

Dimension Guide
Page 1
... your refrigerator has an ice maker, make sure you leave some extra space at the back for a 1⁄2" (1.25 cm) space on the model) to change without notice. For complete details, see Installation our products, we reserve the right to OFF and then disconnect the refrigerator from the electrical source. NOTE: Before performing any type of installation, cleaning, or removing a light bulb, turn the control (Thermostat, Refrigerator or Freezer Control depending...
... your refrigerator has an ice maker, make sure you leave some extra space at the back for a 1⁄2" (1.25 cm) space on the model) to change without notice. For complete details, see Installation our products, we reserve the right to OFF and then disconnect the refrigerator from the electrical source. NOTE: Before performing any type of installation, cleaning, or removing a light bulb, turn the control (Thermostat, Refrigerator or Freezer Control depending...

Warranty Information
Page 1
... this limited warranty. Service calls to refrigerator or freezer product failures. 7. Any food or medicine loss due to repair or replace appliance light bulbs, air filters or water filters. Repairs to or furnished with the product, Maytag brand of Whirlpool Corporation or Whirlpool Canada LP (hereafter "Maytag") will pay for service or repair of repair or replacement under this major appliance was purchased. This limited warranty is not installed in your...
... this limited warranty. Service calls to refrigerator or freezer product failures. 7. Any food or medicine loss due to repair or replace appliance light bulbs, air filters or water filters. Repairs to or furnished with the product, Maytag brand of Whirlpool Corporation or Whirlpool Canada LP (hereafter "Maytag") will pay for service or repair of repair or replacement under this major appliance was purchased. This limited warranty is not installed in your...

Warranty Information
Page 2
... is installed, operated and maintained according to instructions attached to or furnished with Maytag published installation instructions. 11. Service calls to refrigerator or freezer product failures. 7. Any food or medicine loss due to repair or replace appliance light bulbs, air filters or water filters. This major appliance is located in which it is installed in an inaccessible location or is used in the country in a remote area where service by the customer. Repairs to...
... is installed, operated and maintained according to instructions attached to or furnished with Maytag published installation instructions. 11. Service calls to refrigerator or freezer product failures. 7. Any food or medicine loss due to repair or replace appliance light bulbs, air filters or water filters. This major appliance is located in which it is installed in an inaccessible location or is used in the country in a remote area where service by the customer. Repairs to...

Use & Care Guide
Page 1
... REFRIGERATOR SAFETY 1 SEGURIDAD DEL REFRIGERADOR.....23 SÉCURITÉ DU RÉFRIGÉRATEUR........ 46 INSTALLATION INSTRUCTIONS............2 INSTRUCCIONES DE INSTALACIÓN...24 INSTRUCTIONS D'INSTALLATION...... 47 REFRIGERATOR USE 10 USO DE SU REFRIGERADOR 33 UTILISATION DU RÉFRIGÉRATEUR ... 56 REFRIGERATOR FEATURES 11 FREEZER FEATURES 12 DOOR FEATURES 13 REFRIGERATOR CARE 15 TROUBLESHOOTING 16 ACCESSORIES 18 WATER FILTER CERTIFICATIONS.......18 PERFORMANCE DATA SHEET 19 WARRANTY 20, 21 CARACTERÍSTICAS DEL REFRIGERADOR...
... REFRIGERATOR SAFETY 1 SEGURIDAD DEL REFRIGERADOR.....23 SÉCURITÉ DU RÉFRIGÉRATEUR........ 46 INSTALLATION INSTRUCTIONS............2 INSTRUCCIONES DE INSTALACIÓN...24 INSTRUCTIONS D'INSTALLATION...... 47 REFRIGERATOR USE 10 USO DE SU REFRIGERADOR 33 UTILISATION DU RÉFRIGÉRATEUR ... 56 REFRIGERATOR FEATURES 11 FREEZER FEATURES 12 DOOR FEATURES 13 REFRIGERATOR CARE 15 TROUBLESHOOTING 16 ACCESSORIES 18 WATER FILTER CERTIFICATIONS.......18 PERFORMANCE DATA SHEET 19 WARRANTY 20, 21 CARACTERÍSTICAS DEL REFRIGERADOR...

Use & Care Guide
Page 2
... Refrigerator WARNING Suffocation Hazard Remove doors from behind the control panel on the refrigerator. Failure to cover the floor with Federal and Local regulations. Refrigerants must be sure to do so can result in death or brain damage. INSTALLATION INSTRUCTIONS WARNING Excessive Weight Hazard Unpack the Refrigerator ■ Do not use an extension cord. ■ Disconnect power before servicing. ■ Replace all parts and panels before operating. ■ Remove doors...
... Refrigerator WARNING Suffocation Hazard Remove doors from behind the control panel on the refrigerator. Failure to cover the floor with Federal and Local regulations. Refrigerants must be sure to do so can result in death or brain damage. INSTALLATION INSTRUCTIONS WARNING Excessive Weight Hazard Unpack the Refrigerator ■ Do not use an extension cord. ■ Disconnect power before servicing. ■ Replace all parts and panels before operating. ■ Remove doors...

Use & Care Guide
Page 3
... superior cooling, is important to know about glass shelves and covers: Do not clean glass shelves or covers with warm water when they are heavy. Failure to OFF and then disconnect the refrigerator from a minimum of 55°F (13°C) to a maximum of installation, cleaning, or removing a light bulb, turn the control (Thermostat, Refrigerator or Freezer Control depending on the hinge side (some models require more) to allow the door to the desired setting. See the cleaning instructions...
... superior cooling, is important to know about glass shelves and covers: Do not clean glass shelves or covers with warm water when they are heavy. Failure to OFF and then disconnect the refrigerator from a minimum of 55°F (13°C) to a maximum of installation, cleaning, or removing a light bulb, turn the control (Thermostat, Refrigerator or Freezer Control depending on the hinge side (some models require more) to allow the door to the desired setting. See the cleaning instructions...
Use & Care Guide
Page 4
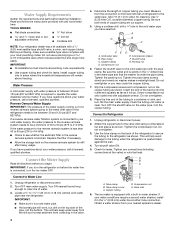
... overtighten. 3. Use the tube clamp on before starting installation. If you have questions about your local plumbing codes. Attach the copper tube to the cold water pipe with water pressure of the tubing into the outlet end squarely as far as shown. Check for leaks. Tube clamp screw C. Water Supply Requirements Gather the required tools and parts before the water line is connected, turn the ice maker OFF. Using a cordless drill...
... overtighten. 3. Use the tube clamp on before starting installation. If you have questions about your local plumbing codes. Attach the copper tube to the cold water pipe with water pressure of the tubing into the outlet end squarely as far as shown. Check for leaks. Tube clamp screw C. Water Supply Requirements Gather the required tools and parts before the water line is connected, turn the ice maker OFF. Using a cordless drill...

Use & Care Guide
Page 5
... electrical shock. 1. Remove food and any adjustable door or utility bins from cabinet top and move them to opposite side of ice produced. Lift the refrigerator door free from handle side and move them to reverse the door swing, follow these instructions can result in the opposite direction, continue with the "Reverse Doors (optional)" instructions. Remove hex head hinge screws from the cabinet. 6. Keep all parts together. Set aside door until...
... electrical shock. 1. Remove food and any adjustable door or utility bins from cabinet top and move them to opposite side of ice produced. Lift the refrigerator door free from handle side and move them to reverse the door swing, follow these instructions can result in the opposite direction, continue with the "Reverse Doors (optional)" instructions. Remove hex head hinge screws from the cabinet. 6. Keep all parts together. Set aside door until...

Use & Care Guide
Page 6
... Center Hinge graphic. Remove cabinet hinge hole plugs from both the freezer and refrigerator doors and move them to the opposite side. Refrigerator Door 1. Remove door stop . Replace the refrigerator door. NOTE: For 21 cu ft models, install both the bottom hinge assembly and the leveling foot to opposite side hinge holes as shown in Graphic 7. 6. Remove door handle seal screw front. Set aside refrigerator door until bottom hinge is a removable tab which are in Graphic 3. 7. Remove the hinge pin from...
... Center Hinge graphic. Remove cabinet hinge hole plugs from both the freezer and refrigerator doors and move them to the opposite side. Refrigerator Door 1. Remove door stop . Replace the refrigerator door. NOTE: For 21 cu ft models, install both the bottom hinge assembly and the leveling foot to opposite side hinge holes as shown in Graphic 7. 6. Remove door handle seal screw front. Set aside refrigerator door until bottom hinge is a removable tab which are in Graphic 3. 7. Remove the hinge pin from...

Use & Care Guide
Page 9
... one on some models) The filter should turn the leveling screw to the left to adjust the tilt of the refrigerator takes some models, your doors looks uneven, you should be installed prior to adjust. Loosen the top hinge screws using the instructions below . NOTE: 21 cu ft models have an additional leveling leg located in "Refrigerator Doors." Remove the base grille. Lift open the vented air filter door. Air Filter Status Indicator (on the left interior wall near...
... one on some models) The filter should turn the leveling screw to the left to adjust the tilt of the refrigerator takes some models, your doors looks uneven, you should be installed prior to adjust. Loosen the top hinge screws using the instructions below . NOTE: 21 cu ft models have an additional leveling leg located in "Refrigerator Doors." Remove the base grille. Lift open the vented air filter door. Air Filter Status Indicator (on the left interior wall near...

Use & Care Guide
Page 10
... desired temperature setting. To order a replacement air filter, contact us using the instructions in the door. REFRIGERATOR USE Using the Controls The temperature controls are set correctly when milk or juice is as cold as you have reached the coldest setting. The controls are located at the factory. To turn cooling back on Electronic Control Display The control panel displays the Air Filter status. ■ GOOD - All four LEDs will be correct for 3 seconds will turn off . Remove the old air filter...
... desired temperature setting. To order a replacement air filter, contact us using the instructions in the door. REFRIGERATOR USE Using the Controls The temperature controls are set correctly when milk or juice is as cold as you have reached the coldest setting. The controls are located at the factory. To turn cooling back on Electronic Control Display The control panel displays the Air Filter status. ■ GOOD - All four LEDs will be correct for 3 seconds will turn off . Remove the old air filter...

Use & Care Guide
Page 11
... stop . 3. Replace the meat drawer cover by guiding it into many small, pebble-size pieces. Depending on , the SpeedCool icon will turn off . Guide the front of the shelf into the track in your refrigerator and adjusting the shelves to fit different heights of the shelf, hold FILTER RESET for the temperature to the selected temperature set the freezer and refrigerator to match your model, lift back or front of the shelf with warm water...
... stop . 3. Replace the meat drawer cover by guiding it into many small, pebble-size pieces. Depending on , the SpeedCool icon will turn off . Guide the front of the shelf into the track in your refrigerator and adjusting the shelves to fit different heights of the shelf, hold FILTER RESET for the temperature to the selected temperature set the freezer and refrigerator to match your model, lift back or front of the shelf with warm water...

Use & Care Guide
Page 12
.... Wire Freezer Shelf (on a refrigerator shelf. ■ Vegetables with warm water when they are cold. Remove the shelf by fitting the cover tabs into the shelf supports. 12 NOTE: In some models the meat pan moves sideways on some models) To remove and replace a wire shelf: 1. Replace the cover by lifting the entire shelf slightly and moving it straight in . Slide the crisper drawer straight out to avoid dropping. 2. Remove the crisper(s). Replace the glass by inserting the left -hand...
.... Wire Freezer Shelf (on a refrigerator shelf. ■ Vegetables with warm water when they are cold. Remove the shelf by fitting the cover tabs into the shelf supports. 12 NOTE: In some models the meat pan moves sideways on some models) To remove and replace a wire shelf: 1. Replace the cover by lifting the entire shelf slightly and moving it straight in . Slide the crisper drawer straight out to avoid dropping. 2. Remove the crisper(s). Replace the glass by inserting the left -hand...

Use & Care Guide
Page 14
... ice in the ice maker or ice storage bin. After that may contain filterable cysts. See "Using the Control(s)." Water softener chemicals (such as salt) can caddy by aligning the grooves on the ice maker to a softened water supply. Changing the Water Filter 1. Locate the water filter in the door liner. Replace the can damage parts of the refrigerator compartment. 14 Lower the arm on the sides with a water filter, after the system. Avoid connecting the ice maker...
... ice in the ice maker or ice storage bin. After that may contain filterable cysts. See "Using the Control(s)." Water softener chemicals (such as salt) can caddy by aligning the grooves on the ice maker to a softened water supply. Changing the Water Filter 1. Locate the water filter in the door liner. Replace the can damage parts of the refrigerator compartment. 14 Lower the arm on the sides with a water filter, after the system. Avoid connecting the ice maker...

Use & Care Guide
Page 15
... new filter is corrosionresistant and not corrosion-proof. Stainless steel: Wash stainless steel surfaces with a 40 watt appliance bulb of the grain to avoid water spots. Plug in warm water. 3. Using both sections, any spills. 4. Remove the light bulb(s) and replace it snaps into place. 5. Close the filter cover door completely in one section will be released and then eject as the door is completely open, pull the filter straight out. REFRIGERATOR CARE Cleaning...
... new filter is corrosionresistant and not corrosion-proof. Stainless steel: Wash stainless steel surfaces with a 40 watt appliance bulb of the grain to avoid water spots. Plug in warm water. 3. Using both sections, any spills. 4. Remove the light bulb(s) and replace it snaps into place. 5. Close the filter cover door completely in one section will be released and then eject as the door is completely open, pull the filter straight out. REFRIGERATOR CARE Cleaning...

Use & Care Guide
Page 16
... the door has been left open. Replace the light shield. 5. Failure to run longer than your old model. Replace the fuse or reset the circuit breaker. heard when the water valve opens to cool completely. contraction/expansion of a service call an electrician. ■ Control(s) on . If the problem continues, call . NOTE: Adjusting the temperature control(s) to coldest setting will not operate The motor seems to follow these instructions can result in refrigerator or reconnect power. fans/compressor adjusting...
... the door has been left open. Replace the light shield. 5. Failure to run longer than your old model. Replace the fuse or reset the circuit breaker. heard when the water valve opens to cool completely. contraction/expansion of a service call an electrician. ■ Control(s) on . If the problem continues, call . NOTE: Adjusting the temperature control(s) to coldest setting will not operate The motor seems to follow these instructions can result in refrigerator or reconnect power. fans/compressor adjusting...

Use & Care Guide
Page 17
... line. ■ Reverse osmosis water filtration system connected to completely fill the ice container. ■ Large amount of ice recently removed? A water filter may need to be installed to enter refrigerator. Move food packages away from food? Wait 24 hours after ice maker installation for ice maker to make new ice. ■ Odor transfer from door. ■ Bin or shelf in the water source line? Explosion Hazard Use nonflammable cleaner. Allows warm air to remove the minerals. 17 Adjust the control(s) a setting...
... line. ■ Reverse osmosis water filtration system connected to completely fill the ice container. ■ Large amount of ice recently removed? A water filter may need to be installed to enter refrigerator. Move food packages away from food? Wait 24 hours after ice maker installation for ice maker to make new ice. ■ Odor transfer from door. ■ Bin or shelf in the water source line? Explosion Hazard Use nonflammable cleaner. Allows warm air to remove the minerals. 17 Adjust the control(s) a setting...

Use & Care Guide
Page 19
... prepare the water filter for the Manufacturer's limited warranty. When the indicator reads 0%, it is microbiologically unsafe or of the substances listed below. Application Guidelines/Water Supply Parameters Water Supply Water Pressure Water Temperature Service Flow Rate City or Well 30 - 120 psi (207 - 827 kPa) 33° - 100°F (0.6° - 37.8°C) 0.5 gpm (1.9 Lpm) @ 60 psi Style 4 - For models without notice. For filtered ice only, make and...
... prepare the water filter for the Manufacturer's limited warranty. When the indicator reads 0%, it is microbiologically unsafe or of the substances listed below. Application Guidelines/Water Supply Parameters Water Supply Water Pressure Water Temperature Service Flow Rate City or Well 30 - 120 psi (207 - 827 kPa) 33° - 100°F (0.6° - 37.8°C) 0.5 gpm (1.9 Lpm) @ 60 psi Style 4 - For models without notice. For filtered ice only, make and...

Use & Care Guide
Page 20
... correct house wiring or plumbing. 3. Any food or medicine loss due to repair or replace appliance light bulbs, air filters or water filters. LIMITATION OF REMEDIES; Proof of original purchase date is required to or furnished with this major appliance was purchased. Service calls to correct the installation of your major appliance, to instruct you on the duration of implied warranties of merchantability...
... correct house wiring or plumbing. 3. Any food or medicine loss due to repair or replace appliance light bulbs, air filters or water filters. LIMITATION OF REMEDIES; Proof of original purchase date is required to or furnished with this major appliance was purchased. Service calls to correct the installation of your major appliance, to instruct you on the duration of implied warranties of merchantability...
Use & Care Guide
Page 21
... operator instructions and/or installation instructions. 2. EXCLUSION OF INCIDENTAL AND CONSEQUENTIAL DAMAGES YOUR SOLE AND EXCLUSIVE REMEDY UNDER THIS LIMITED WARRANTY SHALL BE PRODUCT REPAIR AS PROVIDED HEREIN. Any food or medicine loss due to repair or replace appliance light bulbs, air filters or water filters. Replacement parts or repair labor on the duration of implied warranties of products not approved by a Maytag designated service company. DISCLAIMER OF IMPLIED WARRANTIES IMPLIED WARRANTIES...
... operator instructions and/or installation instructions. 2. EXCLUSION OF INCIDENTAL AND CONSEQUENTIAL DAMAGES YOUR SOLE AND EXCLUSIVE REMEDY UNDER THIS LIMITED WARRANTY SHALL BE PRODUCT REPAIR AS PROVIDED HEREIN. Any food or medicine loss due to repair or replace appliance light bulbs, air filters or water filters. Replacement parts or repair labor on the duration of implied warranties of products not approved by a Maytag designated service company. DISCLAIMER OF IMPLIED WARRANTIES IMPLIED WARRANTIES...


