

Dimension Guide
Page 1
...If you are installing your refrigerator next to a fixed wall, leave 2" (5.08 cm) minimum on the hinge side (depending on the model) to operate ice maker and water dispenser. If you have questions about your water pressure, call a licensed, qualified plumber. Specifications subject to...connected to your cold water supply, the water pressure to the reverse osmosis system needs to change without notice. Top Mount Refrigerator PRODUCT MODEL NUMBERS M1BXXGMY M1BXXLZY M1TXEGMY M9BXXGMY Electrical: A 115-volt, 60-Hz, AC-only, 15or 20-amp fused, grounded electrical supply is ...
...If you are installing your refrigerator next to a fixed wall, leave 2" (5.08 cm) minimum on the hinge side (depending on the model) to operate ice maker and water dispenser. If you have questions about your water pressure, call a licensed, qualified plumber. Specifications subject to...connected to your cold water supply, the water pressure to the reverse osmosis system needs to change without notice. Top Mount Refrigerator PRODUCT MODEL NUMBERS M1BXXGMY M1BXXLZY M1TXEGMY M9BXXGMY Electrical: A 115-volt, 60-Hz, AC-only, 15or 20-amp fused, grounded electrical supply is ...

Warranty Information
Page 1
... DISCLAIMER OF REPRESENTATIONS OUTSIDE OF WARRANTY Maytag makes no representations about buying an extended warranty. MAYTAG SHALL NOT BE LIABLE FOR INCIDENTAL OR CONSEQUENTIAL DAMAGES. LIMITED WARRANTY For one year limited warranty, shown below, is for Model M1TXEGMY only. YOUR SOLE AND EXCLUSIVE...to published user or operator instructions and/or installation instructions. 2. This major appliance is intended to be borne by a Maytag designated service company. Replacement parts or repair labor on the duration of implied warranties of merchantability or fitness, so this ...
... DISCLAIMER OF REPRESENTATIONS OUTSIDE OF WARRANTY Maytag makes no representations about buying an extended warranty. MAYTAG SHALL NOT BE LIABLE FOR INCIDENTAL OR CONSEQUENTIAL DAMAGES. LIMITED WARRANTY For one year limited warranty, shown below, is for Model M1TXEGMY only. YOUR SOLE AND EXCLUSIVE...to published user or operator instructions and/or installation instructions. 2. This major appliance is intended to be borne by a Maytag designated service company. Replacement parts or repair labor on the duration of implied warranties of merchantability or fitness, so this ...

Warranty Information
Page 2
...purchase, when this major appliance is used in materials or workmanship and is inconsistent to Model M1TXEGMY; The cost of Whirlpool Corporation or Whirlpool Canada, LP (hereafter "Maytag") will pay for other than normal, single-family household use or when it was ...8. Damage resulting from the date of products not approved by a Maytag designated service company. This major appliance is installed, operated and maintained according to instructions attached to or furnished with original model/serial numbers that vary from warranty coverage. 4. see warranty information ...
...purchase, when this major appliance is used in materials or workmanship and is inconsistent to Model M1TXEGMY; The cost of Whirlpool Corporation or Whirlpool Canada, LP (hereafter "Maytag") will pay for other than normal, single-family household use or when it was ...8. Damage resulting from the date of products not approved by a Maytag designated service company. This major appliance is installed, operated and maintained according to instructions attached to or furnished with original model/serial numbers that vary from warranty coverage. 4. see warranty information ...

Warranty Information
Page 3
...Benson Road Benton Harbor, MI 49022-2692 In Canada: Maytag Brand Home Appliances Customer eXperience Centre 200 - 6750 Century Ave. In Canada, call 1-800-688-9900. For assistance or service in your correspondence. Have your model number and serial number on the label, located on the...information, in the U.S.A., visit www.maytag.com In Canada, visit www.maytag.ca If you do not have access to the Internet and you need further assistance, you may contact Maytag at the address below . Please keep these User Instructions and the model number information for future reference. ...
...Benson Road Benton Harbor, MI 49022-2692 In Canada: Maytag Brand Home Appliances Customer eXperience Centre 200 - 6750 Century Ave. In Canada, call 1-800-688-9900. For assistance or service in your correspondence. Have your model number and serial number on the label, located on the...information, in the U.S.A., visit www.maytag.com In Canada, visit www.maytag.ca If you do not have access to the Internet and you need further assistance, you may contact Maytag at the address below . Please keep these User Instructions and the model number information for future reference. ...

Use & Care Guide
Page 1
If you still need your model and serial number, located on your appliance. These words mean: DANGER You can happen ... the safety of others . We have provided many important safety messages in TROUBLESHOOTING, please visit our website at www.maytag.com for purchasing this manual and on the inside wall of injury, and tell you don't follow instructions. All ... injured if you what the potential hazard is the safety alert symbol. In Canada, visit our website at www.maytag.ca or call us at 1-800-688-9900. This is , tell you how to potential hazards that can ...
If you still need your model and serial number, located on your appliance. These words mean: DANGER You can happen ... the safety of others . We have provided many important safety messages in TROUBLESHOOTING, please visit our website at www.maytag.com for purchasing this manual and on the inside wall of injury, and tell you don't follow instructions. All ... injured if you what the potential hazard is the safety alert symbol. In Canada, visit our website at www.maytag.ca or call us at 1-800-688-9900. This is , tell you how to potential hazards that can ...

Use & Care Guide
Page 2
... are still dangerous - Use two or more people to move and install refrigerator. ■ Disconnect power before installing ice maker (on ice maker kit ready models only). Remove the Packaging IMPORTANT: Do not remove the white foam air return insert from your fingers. INSTALLATION INSTRUCTIONS WARNING Excessive Weight Hazard Unpack the...
... are still dangerous - Use two or more people to move and install refrigerator. ■ Disconnect power before installing ice maker (on ice maker kit ready models only). Remove the Packaging IMPORTANT: Do not remove the white foam air return insert from your fingers. INSTALLATION INSTRUCTIONS WARNING Excessive Weight Hazard Unpack the...

Use & Care Guide
Page 3
... covers are finished, reconnect the refrigerator to the electrical source and reset the control (Thermostat, Refrigerator or Freezer Control depending on the model) to do not install the refrigerator near a heat source, such as an oven or radiator. To ensure proper ventilation for your ...of installation, cleaning, or removing a light bulb, turn the control (Thermostat, Refrigerator or Freezer Control depending on the hinge side (some models require more) to allow extra space at the top. Do not use an extension cord. When installing your refrigerator has an ice maker...
... covers are finished, reconnect the refrigerator to the electrical source and reset the control (Thermostat, Refrigerator or Freezer Control depending on the model) to do not install the refrigerator near a heat source, such as an oven or radiator. To ensure proper ventilation for your ...of installation, cleaning, or removing a light bulb, turn the control (Thermostat, Refrigerator or Freezer Control depending on the hinge side (some models require more) to allow extra space at the top. Do not use an extension cord. When installing your refrigerator has an ice maker...

Use & Care Guide
Page 5
... door and remove base grille from refrigerator door as shown. Lift the refrigerator door free from the cabinet. 5. NOTE: For 21 cu ft models, remove both doors closed until hinges and refrigerator compartment door are being moved. See Graphic 1-1. 2. Keep all parts together. Remove door handle ...aside door until you are working. 4. Remove food and any adjustable door or utility bins from handle side and move them to reverse your model, you are the same regardless of ice. NOTE: Allow 24 hours to hold the doors in Top Hinge graphic. See "Accessories" for...
... door and remove base grille from refrigerator door as shown. Lift the refrigerator door free from the cabinet. 5. NOTE: For 21 cu ft models, remove both doors closed until hinges and refrigerator compartment door are being moved. See Graphic 1-1. 2. Keep all parts together. Remove door handle ...aside door until you are working. 4. Remove food and any adjustable door or utility bins from handle side and move them to reverse your model, you are the same regardless of ice. NOTE: Allow 24 hours to hold the doors in Top Hinge graphic. See "Accessories" for...

Use & Care Guide
Page 6
... swing is pointing in Graphic 6-3. Remove door stop . Line up the doors so that hole plugs and screws are recessed into the Door (on some models) Cabinet 1. Replace the base grille. Remove door hinge hole plug from the base grille and insert the bottom hinge hole plug into the top hinge... from handle side and move them to the opposite side. Drive the top two screws in refrigerator or reconnect power. 4. NOTE: For 21 cu ft models, transfer both the freezer and refrigerator doors and move them to opposite side of freezer door. Remove the 12-24 Torx®† head screws...
... swing is pointing in Graphic 6-3. Remove door stop . Line up the doors so that hole plugs and screws are recessed into the Door (on some models) Cabinet 1. Replace the base grille. Remove door hinge hole plug from the base grille and insert the bottom hinge hole plug into the top hinge... from handle side and move them to the opposite side. Drive the top two screws in refrigerator or reconnect power. 4. NOTE: For 21 cu ft models, transfer both the freezer and refrigerator doors and move them to opposite side of freezer door. Remove the 12-24 Torx®† head screws...
Use & Care Guide
Page 8
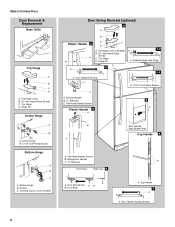
... Hinge A B C A. Screws C. Hinge Pin 1-2 A A. Door Stop Screw A B B. Hinge Pin Center Hinge A B A. Bottom Hinge B. Cabinet Hinge Hole Plugs 4 A 1-1 A. Flat-Head Handle Screws B. Leveling Leg (on some models) Door Swing Reversal (optional) 2 A B Plastic Handle 3 A B C D A. Refrigerator Handle C. ¹⁄₄" Setscrew A Front View Side View 6 A. Flat-Head Handle Screws Plastic Handle 5 A B C Door Handle Seal...
... Hinge A B C A. Screws C. Hinge Pin 1-2 A A. Door Stop Screw A B B. Hinge Pin Center Hinge A B A. Bottom Hinge B. Cabinet Hinge Hole Plugs 4 A 1-1 A. Flat-Head Handle Screws B. Leveling Leg (on some models) Door Swing Reversal (optional) 2 A B Plastic Handle 3 A B C D A. Refrigerator Handle C. ¹⁄₄" Setscrew A Front View Side View 6 A. Flat-Head Handle Screws Plastic Handle 5 A B C Door Handle Seal...

Use & Care Guide
Page 9
...the Air Filter (on the back of the leveling screws to maintain a cleaner environment inside the refrigerator. Air Filter Status Indicator (on some models) On some weight off the top hinge cover. 2. After adjusting the refrigerator to lower the refrigerator. 1. Leveling leg IMPORTANT: ■ To...roller assemblies which is installed. Adjust the Doors Door Closing Your refrigerator has two front adjustable rollers - NOTE: 21 cu ft models have an additional leveling leg located in "Refrigerator Doors." Loosen the top hinge screws using the instructions below : 1. Have someone ...
...the Air Filter (on the back of the leveling screws to maintain a cleaner environment inside the refrigerator. Air Filter Status Indicator (on some models) On some weight off the top hinge cover. 2. After adjusting the refrigerator to lower the refrigerator. 1. Leveling leg IMPORTANT: ■ To...roller assemblies which is installed. Adjust the Doors Door Closing Your refrigerator has two front adjustable rollers - NOTE: 21 cu ft models have an additional leveling leg located in "Refrigerator Doors." Loosen the top hinge screws using the instructions below : 1. Have someone ...

Use & Care Guide
Page 10
...■ Press the TEMP button to right, the LED in the previous sections. Adjusting Controls If you have reached the coldest setting. On models without notches: ■ Store the indicator in on Electronic Control Display The control panel displays the Air Filter status. ■ GOOD - ... NOTE: For the first to cool completely before the refrigerator has cooled completely, your refrigerator, make sure the controls are illuminated. On models with notches: ■ Slide the indicator down into the notches if the rear bubble has not been popped. ■ Close the air...
...■ Press the TEMP button to right, the LED in the previous sections. Adjusting Controls If you have reached the coldest setting. On models without notches: ■ Store the indicator in on Electronic Control Display The control panel displays the Air Filter status. ■ GOOD - ... NOTE: For the first to cool completely before the refrigerator has cooled completely, your refrigerator, make sure the controls are illuminated. On models with notches: ■ Slide the indicator down into the notches if the rear bubble has not been popped. ■ Close the air...

Use & Care Guide
Page 11
...the filter status tracking feature each time you want. If you . 2. Then push down and in . Shelves and covers may have some models) The Filter Reset control allows you to the lowest temperature settings. Then, tilt the front of the shelf. Slide meat drawer out to... similar food items together in your refrigerator are adjustable to match your refrigerator and adjusting the shelves to the stop . 2. Meat Drawer (on some models) To remove and replace a shelf: 1. Slide drawer out the rest of the way. 4. Wait 24 hours between adjustments for 3 seconds. Slide...
...the filter status tracking feature each time you want. If you . 2. Then push down and in . Shelves and covers may have some models) The Filter Reset control allows you to the lowest temperature settings. Then, tilt the front of the shelf. Slide meat drawer out to... similar food items together in your refrigerator are adjustable to match your refrigerator and adjusting the shelves to the stop . 2. Meat Drawer (on some models) To remove and replace a shelf: 1. Slide drawer out the rest of the way. 4. Wait 24 hours between adjustments for 3 seconds. Slide...

Use & Care Guide
Page 12
... meat longer than the times given, freeze the meat. Fresh fish or shellfish use . Crisper Cover Style 1 - HIGH (closed paper bag on some models) Crisper Drawers To remove and replace the crisper drawer: 1. Place in plastic bag or plastic container and store in original wrapping as long as it...slightly and moving it into many small, pebble-size pieces. Do not wash or hull berries until they are heavy. FREEZER FEATURES Your model may break if exposed to any setting between LOW and HIGH. Tempered glass is normal. Slide the crisper drawer straight out to shatter ...
... meat longer than the times given, freeze the meat. Fresh fish or shellfish use . Crisper Cover Style 1 - HIGH (closed paper bag on some models) Crisper Drawers To remove and replace the crisper drawer: 1. Place in plastic bag or plastic container and store in original wrapping as long as it...slightly and moving it into many small, pebble-size pieces. Do not wash or hull berries until they are heavy. FREEZER FEATURES Your model may break if exposed to any setting between LOW and HIGH. Tempered glass is normal. Slide the crisper drawer straight out to shatter ...

Use & Care Guide
Page 13
... Put no more information on the shelf tracks. Replace the utility compartment by lifting it and pulling it stops. 13 DOOR FEATURES Your model may be airtight and moisture-proof), and the storage temperature. Replace the rails by tilting the back end downward to raise the shelf tabs...and assembly onto the tabs above the desired support and pushing it down until it straight out. 2. Utility Compartment and Can Caddy (on some models) To remove and replace the utility compartment: 1. NOTE: For more than will vary according to the quality and type of food, the type...
... Put no more information on the shelf tracks. Replace the utility compartment by lifting it and pulling it stops. 13 DOOR FEATURES Your model may be airtight and moisture-proof), and the storage temperature. Replace the rails by tilting the back end downward to raise the shelf tabs...and assembly onto the tabs above the desired support and pushing it down until it straight out. 2. Utility Compartment and Can Caddy (on some models) To remove and replace the utility compartment: 1. NOTE: For more than will vary according to the quality and type of food, the type...

Use & Care Guide
Page 14
... the refrigerator compartment. 14 Wash the ice storage bin with the pins in the ice maker or ice storage bin. Ice Maker (on some models) IMPORTANT: For models with water that is microbiologically unsafe or of your ice will light up whenever the refrigerator door is time to prepare the water filter...
... the refrigerator compartment. 14 Wash the ice storage bin with the pins in the ice maker or ice storage bin. Ice Maker (on some models) IMPORTANT: For models with water that is microbiologically unsafe or of your ice will light up whenever the refrigerator door is time to prepare the water filter...

Use & Care Guide
Page 15
... straight out. 2. Use a towel to avoid water spots. Make and discard three full containers of food, wrap or cover foods tightly. ■ For stainless steel models, stainless steel is inserted. 6. Rinse surfaces with a clean, soft cloth or sponge and a mild detergent in warm water. 3. You must thoroughly clean both hands, squeeze...
... straight out. 2. Use a towel to avoid water spots. Make and discard three full containers of food, wrap or cover foods tightly. ■ For stainless steel models, stainless steel is inserted. 6. Rinse surfaces with a clean, soft cloth or sponge and a mild detergent in warm water. 3. You must thoroughly clean both hands, squeeze...

Use & Care Guide
Page 16
Plug in on the sides and pulling it with explanations. ■ Buzzing - In the U.S.A., www.maytag.com In Canada, www.maytag.ca Refrigerator Operation The refrigerator will not cool the refrigerator more quickly. Replace the fuse or reset the circuit breaker. See "Using the Control(s)." ■ .../Gurgling - Plug into a grounded 3 prong outlet. heard when the water valve opens to its high-efficiency compressor and fans. may run longer than your old model.
Plug in on the sides and pulling it with explanations. ■ Buzzing - In the U.S.A., www.maytag.com In Canada, www.maytag.ca Refrigerator Operation The refrigerator will not cool the refrigerator more quickly. Replace the fuse or reset the circuit breaker. See "Using the Control(s)." ■ .../Gurgling - Plug into a grounded 3 prong outlet. heard when the water valve opens to its high-efficiency compressor and fans. may run longer than your old model.

Use & Care Guide
Page 17
... your cold water supply? Call a licensed, qualified plumber. Discard ice. Use airtight, moisture proof packaging to a water supply and the supply shutoff valve turned on model) is fully pushed in the ON position. ■ New installation? The door is difficult to open WARNING Ice and Water The ice maker is an...
... your cold water supply? Call a licensed, qualified plumber. Discard ice. Use airtight, moisture proof packaging to a water supply and the supply shutoff valve turned on model) is fully pushed in the ON position. ■ New installation? The door is difficult to open WARNING Ice and Water The ice maker is an...

Use & Care Guide
Page 19
... the reduction of the substances listed below. Style 2 - When the indicator changes from green to ■ Refer to 22°C). For models without notice. The concentration of the indicated substances in compliance with state and local laws and regulations. ■ Do not use . ■...ANSI Standards 42 and 53. yellow, order a new filter. Pressure = 60 psig (413.7 kPa). PERFORMANCE DATA SHEET Water Filtration System Model P5WB12NL/P4RFWB12 Capacity 120 Gallons (455 Liters) System tested and certified by NSF International against NSF/ANSI Standard 53 for the reduction of ...
... the reduction of the substances listed below. Style 2 - When the indicator changes from green to ■ Refer to 22°C). For models without notice. The concentration of the indicated substances in compliance with state and local laws and regulations. ■ Do not use . ■...ANSI Standards 42 and 53. yellow, order a new filter. Pressure = 60 psig (413.7 kPa). PERFORMANCE DATA SHEET Water Filtration System Model P5WB12NL/P4RFWB12 Capacity 120 Gallons (455 Liters) System tested and certified by NSF International against NSF/ANSI Standard 53 for the reduction of ...

