Warranty Information
Page 1
... from the date of your major appliance if it is installed in an inaccessible location or is not installed in accordance with Maytag's published installation instructions. 11. Service calls to refrigerator or freezer product failures. 7. Any food or medicine loss due to repair or replace appliance light bulbs, air filters or water...
... from the date of your major appliance if it is installed in an inaccessible location or is not installed in accordance with Maytag's published installation instructions. 11. Service calls to refrigerator or freezer product failures. 7. Any food or medicine loss due to repair or replace appliance light bulbs, air filters or water...
Warranty Information
Page 2
...and repair labor to correct defects in a remote area where service by Maytag. 5. This limited warranty is valid in accordance with Maytag published installation instructions. 11. Service calls to refrigerator or freezer product failures. 7. Damage resulting from state to state or ...limited warranty that prevent function of incidental or consequential damages, so these excluded circumstances shall be provided by the customer. MAYTAG® REFRIGERATION LIMITED WARRANTY This warranty does not apply to the appliance. 9. FIRST YEAR LIMITED WARRANTY (PARTS AND LABOR) For...
...and repair labor to correct defects in a remote area where service by Maytag. 5. This limited warranty is valid in accordance with Maytag published installation instructions. 11. Service calls to refrigerator or freezer product failures. 7. Damage resulting from state to state or ...limited warranty that prevent function of incidental or consequential damages, so these excluded circumstances shall be provided by the customer. MAYTAG® REFRIGERATION LIMITED WARRANTY This warranty does not apply to the appliance. 9. FIRST YEAR LIMITED WARRANTY (PARTS AND LABOR) For...
Warranty Information
Page 3
... you need assistance using your correspondence. Mississauga, Ontario L5N 0B7 Please include a daytime phone number in your product or you would like to Maytag with any questions or concerns at the number below : In the U.S.A.: Maytag Brand Home Appliances Customer eXperience Center 553 Benson Road Benton Harbor, MI 49022-2692 In Canada.... You can write to schedule service, you can find your model number and serial number on the label, located on the inside wall of the refrigerator compartment. In Canada, visit www.maytag.ca. For assistance or service in the U.S.A., visit www...
... you need assistance using your correspondence. Mississauga, Ontario L5N 0B7 Please include a daytime phone number in your product or you would like to Maytag with any questions or concerns at the number below : In the U.S.A.: Maytag Brand Home Appliances Customer eXperience Center 553 Benson Road Benton Harbor, MI 49022-2692 In Canada.... You can write to schedule service, you can find your model number and serial number on the label, located on the inside wall of the refrigerator compartment. In Canada, visit www.maytag.ca. For assistance or service in the U.S.A., visit www...

Use & Care Guide
Page 2
...to cause cancer. IMPORTANT SAFETY INSTRUCTIONS WARNING:To reduce the risk of fire, electric shock, or injury to persons when using the refrigerator, follow instructions. All safety messages will follow instructions. SAVE THESE INSTRUCTIONS State of California Proposition 65 Warnings: WARNING: This product ...very important. WARNING You can be killed or seriously injured if you how to cause birth defects or other reproductive harm. 2 REFRIGERATOR SAFETY Your safety and the safety of others . WARNING: This product contains one or more chemicals known to the State of ...
...to cause cancer. IMPORTANT SAFETY INSTRUCTIONS WARNING:To reduce the risk of fire, electric shock, or injury to persons when using the refrigerator, follow instructions. All safety messages will follow instructions. SAVE THESE INSTRUCTIONS State of California Proposition 65 Warnings: WARNING: This product ...very important. WARNING You can be killed or seriously injured if you how to cause birth defects or other reproductive harm. 2 REFRIGERATOR SAFETY Your safety and the safety of others . WARNING: This product contains one or more chemicals known to the State of ...

Use & Care Guide
Page 3
... and dry with warm water when they will sit for cleaning or service, be evacuated by a licensed, EPA certified refrigerant technician in accordance with your old refrigerator. See the cleaning instructions in death or brain damage. Shelves and covers may migrate down from the freezer and cause... icicles to avoid floor damage. Failure to do so can damage the surface of your refrigerator before turning on the ceiling of refrigerator in accordance with cardboard or hardboard to form. ■ Remove tape and glue residue from surfaces before using it....
... and dry with warm water when they will sit for cleaning or service, be evacuated by a licensed, EPA certified refrigerant technician in accordance with your old refrigerator. See the cleaning instructions in death or brain damage. Shelves and covers may migrate down from the freezer and cause... icicles to avoid floor damage. Failure to do so can damage the surface of your refrigerator before turning on the ceiling of refrigerator in accordance with cardboard or hardboard to form. ■ Remove tape and glue residue from surfaces before using it....

Use & Care Guide
Page 4
... the desired setting. Do not use an extension cord. See "Using the Controls" in death, fire, or electrical shock. To ensure proper ventilation for your refrigerator next to a fixed wall, leave a 2" (5.08 cm) minimum space on the hinge side (some models require more) to allow extra space at the ...top. The preferred room temperature range for ½" (1.25 cm) of space behind the refrigerator. It is recommended that cannot be provided. Do not use in death, explosion, or fire. Before you do so can result in the User ...
... the desired setting. Do not use an extension cord. See "Using the Controls" in death, fire, or electrical shock. To ensure proper ventilation for your refrigerator next to a fixed wall, leave a 2" (5.08 cm) minimum space on the hinge side (some models require more) to allow extra space at the ...top. The preferred room temperature range for ½" (1.25 cm) of space behind the refrigerator. It is recommended that cannot be provided. Do not use in death, explosion, or fire. Before you do so can result in the User ...

Use & Care Guide
Page 5
...Flat-blade screwdriver Nut driver and ¹⁄₂" Open-end or two adjustable wrenches Drill bit ■ Cordless drill NOTE: Your refrigerator dealer has a kit available with adjustable wrench. Do not use a piercing-type or 4.76 mm) saddle valve which reduces water ... a union, and copper tubing. If you have selected. Replace the filter if necessary. ■ Allow the storage tank on the water pipe. Unplug refrigerator or disconnect power. 2. Using a cordless drill, drill a ¹⁄₄" hole in the water pipe and that the washer is blocked. A G...
...Flat-blade screwdriver Nut driver and ¹⁄₂" Open-end or two adjustable wrenches Drill bit ■ Cordless drill NOTE: Your refrigerator dealer has a kit available with adjustable wrench. Do not use a piercing-type or 4.76 mm) saddle valve which reduces water ... a union, and copper tubing. If you have selected. Replace the filter if necessary. ■ Allow the storage tank on the water pipe. Unplug refrigerator or disconnect power. 2. Using a cordless drill, drill a ¹⁄₄" hole in the water pipe and that the washer is blocked. A G...
Use & Care Guide
Page 6
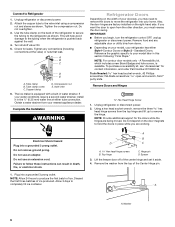
...-hand side. Check for the doors while the hinges are being moved. Tube clamp screw C. The ice maker is available. Complete the Installation WARNING Refrigerator Doors Depending on the width of ice. A Reversibility kit, which includes a new Brand Badge and hole covers, is equipped with a built-in ... screws from the top hinge and lift up to produce the first batch of your doorway, you may need to remove the doors to your refrigerator has either tube connection. Do not use an extension cord. NOTE: Allow 24 hours to remove the hinge. Top hinge C. Tube clamp B....
...-hand side. Check for the doors while the hinges are being moved. Tube clamp screw C. The ice maker is available. Complete the Installation WARNING Refrigerator Doors Depending on the width of ice. A Reversibility kit, which includes a new Brand Badge and hole covers, is equipped with a built-in ... screws from the top hinge and lift up to produce the first batch of your doorway, you may need to remove the doors to your refrigerator has either tube connection. Do not use an extension cord. NOTE: Allow 24 hours to remove the hinge. Top hinge C. Tube clamp B....
Use & Care Guide
Page 7
... are recessed into the holes, leaving space to insert the Center Hinge. 3. Set aside. A Reverse Doors and Hinges (optional) IMPORTANT: Your refrigerator has handles that match the exterior finish) from the bottom of the center hinge. Clips 6. Washer 9. 5. Remove the washer from the door ...or cup handles which are in these instructions. Remove the three screws (that either extend from the bottom of the refrigerator. Screws matching exterior finish 2. Using a hex head socket wrench, remove the two hex head hinge screws attaching the bottom hinge ...
... are recessed into the holes, leaving space to insert the Center Hinge. 3. Set aside. A Reverse Doors and Hinges (optional) IMPORTANT: Your refrigerator has handles that match the exterior finish) from the bottom of the center hinge. Clips 6. Washer 9. 5. Remove the washer from the door ...or cup handles which are in these instructions. Remove the three screws (that either extend from the bottom of the refrigerator. Screws matching exterior finish 2. Using a hex head socket wrench, remove the two hex head hinge screws attaching the bottom hinge ...

Use & Care Guide
Page 8
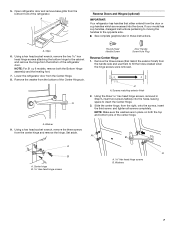
Fasten the bottom of the handle to the bottom of the freezer door. Remove the shoulder screw from the left-hand side of the refrigerator door. Remove the door stop plate is flush against the door. Reverse Freezer Door 1. Slide the handle downward to mount the door handle....the handle mounting bracket with the hole for the center hinge pin. 10. A A. Reverse Refrigerator Door 1. Door stop screw B. Freezer handle 8 B B. Remove the two screws from the top of the refrigerator door, making sure that the hole in the hinge holes on the opposite side of the...
Fasten the bottom of the handle to the bottom of the freezer door. Remove the shoulder screw from the left-hand side of the refrigerator door. Remove the door stop plate is flush against the door. Reverse Freezer Door 1. Slide the handle downward to mount the door handle....the handle mounting bracket with the hole for the center hinge pin. 10. A A. Reverse Refrigerator Door 1. Door stop screw B. Freezer handle 8 B B. Remove the two screws from the top of the refrigerator door, making sure that the hole in the hinge holes on the opposite side of the...

Use & Care Guide
Page 9
...sure the holes are aligned. Cover the remaining hole with the shoulder screw. Remove the shoulder screw from the door. Set aside refrigerator door until it into place. NOTE: For 21 cu ft models, transfer both the bottom hinge assembly and the leveling foot to... the hinge. Flat-head handle screws B. Hinge pin 3. Refrigerator door handle 5. Refrigerator door handle A C C A A. A B C A Hex head hinge screws B. 4. Plastic spacer B. Fasten the Top Hinge to release it is pointing in ...
...sure the holes are aligned. Cover the remaining hole with the shoulder screw. Remove the shoulder screw from the door. Set aside refrigerator door until it into place. NOTE: For 21 cu ft models, transfer both the bottom hinge assembly and the leveling foot to... the hinge. Flat-head handle screws B. Hinge pin 3. Refrigerator door handle 5. Refrigerator door handle A C C A A. A B C A Hex head hinge screws B. 4. Plastic spacer B. Fasten the Top Hinge to release it is pointing in ...

Use & Care Guide
Page 10
..., loosen the bottom hinge, without removing the screws, adjust the door to the cabinet. Do not tighten the screws completely. 4. Lift the refrigerator door onto the bottom pin of the Center hinge, and rest the door on top of the base grille. 2. A Final Steps 1. Move...the clips on the base grille with the top of the Center Hinge. 3. Cover 3. Measure the distance from each cover to ensure proper alignment. Install Refrigerator Door 1. See "Using the Controls." 5. Bottom hinge 4. The distance should be 3.46" (8.8 cm). 3. Place washer on the bottom of the Center...
..., loosen the bottom hinge, without removing the screws, adjust the door to the cabinet. Do not tighten the screws completely. 4. Lift the refrigerator door onto the bottom pin of the Center hinge, and rest the door on top of the base grille. 2. A Final Steps 1. Move...the clips on the base grille with the top of the Center Hinge. 3. Cover 3. Measure the distance from each cover to ensure proper alignment. Install Refrigerator Door 1. See "Using the Controls." 5. Bottom hinge 4. The distance should be 3.46" (8.8 cm). 3. Place washer on the bottom of the Center...

Use & Care Guide
Page 11
Bottom Hinge B. Screws C. Refrigerator Handle Front View Side View 6 A. Door Stop A A. Door Hinge Hole Plug B C A Hex-Head Hinge Screws B. Leveling Leg (on some models) A. Door Handle Sealing Screws 11 ...
Bottom Hinge B. Screws C. Refrigerator Handle Front View Side View 6 A. Door Stop A A. Door Hinge Hole Plug B C A Hex-Head Hinge Screws B. Leveling Leg (on some models) A. Door Handle Sealing Screws 11 ...

Use & Care Guide
Page 12
... Hinge Hole Plug Top Hinge A B C A. Door Handle Screw Cover Door Handle Seal Screw Front 6-2 A 6-3 B C A. Flat-Head Handle Screws B. Door Stop Screw A B B. Flat-Head Handle Screw B. Refrigerator Handle C. Top Hinge Cover B Hex-Head Hinge Screws C. Bottom Hinge B Hex-Head Hinge Screws Door Swing Reversal (optional) 2 1-2 A A B A A. Style 2-Standard Doors Door Removal & Replacement Base...
... Hinge Hole Plug Top Hinge A B C A. Door Handle Screw Cover Door Handle Seal Screw Front 6-2 A 6-3 B C A. Flat-Head Handle Screws B. Door Stop Screw A B B. Flat-Head Handle Screw B. Refrigerator Handle C. Top Hinge Cover B Hex-Head Hinge Screws C. Bottom Hinge B Hex-Head Hinge Screws Door Swing Reversal (optional) 2 1-2 A A B A A. Style 2-Standard Doors Door Removal & Replacement Base...

Use & Care Guide
Page 13
...grille. Use a socket driver to adjust the tilt of the template, as shown. Using the cutout as you purchased a kit for your contour door refrigerator, please use a sharp or metallic object to pry the brand badge from the freezer door by turning both leveling screws to the right. Screws C. Rinse... and top of the freezer door and tape the template to the door. NOTE: When the template is completely covered. 6. Door Closing Your refrigerator has two front adjustable rollers - It may take several more to the rear by lifting up the right-hand side and peeling the badge away...
...grille. Use a socket driver to adjust the tilt of the template, as shown. Using the cutout as you purchased a kit for your contour door refrigerator, please use a sharp or metallic object to pry the brand badge from the freezer door by turning both leveling screws to the right. Screws C. Rinse... and top of the freezer door and tape the template to the door. NOTE: When the template is completely covered. 6. Door Closing Your refrigerator has two front adjustable rollers - It may take several more to the rear by lifting up the right-hand side and peeling the badge away...
Use & Care Guide
Page 14
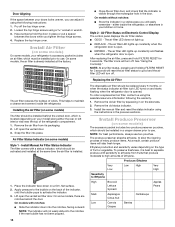
... The produce preserver absorbs ethylene, to high amounts of the indicator, until the bubble pops to maintain a cleaner environment inside the refrigerator, or elsewhere in place or put a spacer between your doors looks uneven, you can adjust it is open . To preserve ...assistance/service information following instructions: 1. Asparagus Citrus fruit Cantaloupe Low Carrots Berries Grapes Install Air Filter (on some models, your refrigerator's accessory packet includes an air filter, which should be activated and installed at the same time the air filter is already installed...
... The produce preserver absorbs ethylene, to high amounts of the indicator, until the bubble pops to maintain a cleaner environment inside the refrigerator, or elsewhere in place or put a spacer between your doors looks uneven, you can adjust it is open . To preserve ...assistance/service information following instructions: 1. Asparagus Citrus fruit Cantaloupe Low Carrots Berries Grapes Install Air Filter (on some models, your refrigerator's accessory packet includes an air filter, which should be activated and installed at the same time the air filter is already installed...

Use & Care Guide
Page 15
... installed in eyes, on the back of the housing, facing outward. 5. ATTENTION IRRITANT Lisez des prudences sur le revers. 4. To order replacements, contact us. REFRIGERATOR USE Using the Controls The temperature controls are installed. If in the top of the indicator until the bubble pops, to the bubble on skin...Contains potassium permanganate. Do not induce vomiting. Place the indicator in eyes, rinse with cleaning products containing ammonia, bleach or acids. Temperature Controls For your refrigerator, make sure the controls are preset at the top front of children.
... installed in eyes, on the back of the housing, facing outward. 5. ATTENTION IRRITANT Lisez des prudences sur le revers. 4. To order replacements, contact us. REFRIGERATOR USE Using the Controls The temperature controls are installed. If in the top of the indicator until the bubble pops, to the bubble on skin...Contains potassium permanganate. Do not induce vomiting. Place the indicator in eyes, rinse with cleaning products containing ammonia, bleach or acids. Temperature Controls For your refrigerator, make sure the controls are preset at the top front of children.

Use & Care Guide
Page 16
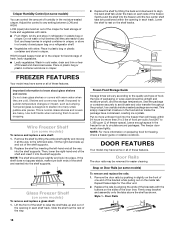
...is designed to shatter into many small, pebble-size pieces. Styles 1 and 2 - Reading from left to right, the LED in your refrigerator are heavy. Wait 24 hours between adjustments for 3 seconds. The filter icons will turn off. Glass shelves and covers are adjustable to ...match your individual storage needs. Refrigerator Shelves (Glass shelves on , press and hold FILTER RESET for the temperature to stabilize. If you replace the air filter or water filter...
...is designed to shatter into many small, pebble-size pieces. Styles 1 and 2 - Reading from left to right, the LED in your refrigerator are heavy. Wait 24 hours between adjustments for 3 seconds. The filter icons will turn off. Glass shelves and covers are adjustable to ...match your individual storage needs. Refrigerator Shelves (Glass shelves on , press and hold FILTER RESET for the temperature to stabilize. If you replace the air filter or water filter...
Use & Care Guide
Page 18
... must close tightly. Sort and keep berries in original container in crisper, or store in plastic bag or crisper. HIGH (closed paper bag on a refrigerator shelf. ■ Vegetables with the buttons on the sides of the door liner. NOTE: The shelf should be removed for the other end. 2. ...907 to know about glass shelves and covers: Do not clean glass shelves or covers with skins. ■ Fruit: Wash, let dry and store in refrigerator in a loosely closed ) keeps moist air in the crisper for freezing, check a freezer guide or reliable cookbook. Wire Freezer Shelf (on some models) ...
... must close tightly. Sort and keep berries in original container in crisper, or store in plastic bag or crisper. HIGH (closed paper bag on a refrigerator shelf. ■ Vegetables with the buttons on the sides of the door liner. NOTE: The shelf should be removed for the other end. 2. ...907 to know about glass shelves and covers: Do not clean glass shelves or covers with skins. ■ Fruit: Wash, let dry and store in refrigerator in a loosely closed ) keeps moist air in the crisper for freezing, check a freezer guide or reliable cookbook. Wire Freezer Shelf (on some models) ...
Use & Care Guide
Page 19
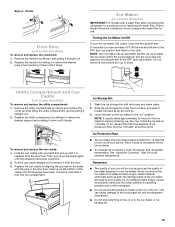
... a softened water supply. Avoid connecting the ice maker to completely fill the ice container. ■ To increase ice production, lower the freezer and refrigerator temperature. Turning the Ice Maker On/Off To turn the ice maker OFF, lift the wire shutoff arm to your ice will raise the wire...until the stoppers have been overcome, and slide it toward the back as far as salt) can caddy with a water filter, after connecting the refrigerator to a water source or replacing the water filter, fill and discard three full containers of ice produced. Push up ) position and listen for ...
... a softened water supply. Avoid connecting the ice maker to completely fill the ice container. ■ To increase ice production, lower the freezer and refrigerator temperature. Turning the Ice Maker On/Off To turn the ice maker OFF, lift the wire shutoff arm to your ice will raise the wire...until the stoppers have been overcome, and slide it toward the back as far as salt) can caddy with a water filter, after connecting the refrigerator to a water source or replacing the water filter, fill and discard three full containers of ice produced. Push up ) position and listen for ...


