
Warranty Information
Page 1
... than the limited warranty that comes with original model/serial numbers that have other rights that is effective from state to state or province to published user or operator instructions and/or installation instructions. 2. This warranty gives you specific legal rights, and you . This limited warranty is inconsistent to province. Replacement parts or repair labor if this Warranty. Service calls to refrigerator or freezer product failures. 7. The removal and reinstallation...
... than the limited warranty that comes with original model/serial numbers that have other rights that is effective from state to state or province to published user or operator instructions and/or installation instructions. 2. This warranty gives you specific legal rights, and you . This limited warranty is inconsistent to province. Replacement parts or repair labor if this Warranty. Service calls to refrigerator or freezer product failures. 7. The removal and reinstallation...
Warranty Information
Page 2
... in materials or workmanship and is installed, operated and maintained according to instructions attached to or furnished with the product, Maytag will pay for this major appliance is used in the country in your authorized Maytag dealer to repair or replace appliance light bulbs, air filters or water filters. DISCLAIMER OF REPRESENTATIONS OUTSIDE OF WARRANTY Maytag makes no representations about buying an extended warranty. If outside the 50 United...
... in materials or workmanship and is installed, operated and maintained according to instructions attached to or furnished with the product, Maytag will pay for this major appliance is used in the country in your authorized Maytag dealer to repair or replace appliance light bulbs, air filters or water filters. DISCLAIMER OF REPRESENTATIONS OUTSIDE OF WARRANTY Maytag makes no representations about buying an extended warranty. If outside the 50 United...

Use & Care Guide
Page 3
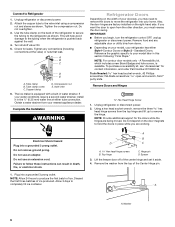
... Away Your Old Refrigerator or Freezer: ■ Take off the doors. ■ Leave the shelves in back or other injury. Proper Disposal of Your Old Refrigerator WARNING Suffocation Hazard Remove doors from surfaces before using it , as bumping. Rinse with warm water and dry with your refrigerator. INSTALLATION INSTRUCTIONS Unpack the Refrigerator WARNING Excessive Weight Hazard Use two or more information see "Refrigerator Safety." Do not...
... Away Your Old Refrigerator or Freezer: ■ Take off the doors. ■ Leave the shelves in back or other injury. Proper Disposal of Your Old Refrigerator WARNING Suffocation Hazard Remove doors from surfaces before using it , as bumping. Rinse with warm water and dry with your refrigerator. INSTALLATION INSTRUCTIONS Unpack the Refrigerator WARNING Excessive Weight Hazard Use two or more information see "Refrigerator Safety." Do not...

Use & Care Guide
Page 4
... setting. or 20-amp fused, grounded electrical supply is designed for the water line connections. IMPORTANT: This refrigerator is required. If your refrigerator next to a fixed wall, leave a 2" (5.08 cm) minimum space on the model) to follow these instructions can result in death, fire, or electrical shock. It is important to swing open. When you move your refrigerator be turned off or turn cooling on or reset the control (Thermostat, Refrigerator or Freezer Control...
... setting. or 20-amp fused, grounded electrical supply is designed for the water line connections. IMPORTANT: This refrigerator is required. If your refrigerator next to a fixed wall, leave a 2" (5.08 cm) minimum space on the model) to follow these instructions can result in death, fire, or electrical shock. It is important to swing open. When you move your refrigerator be turned off or turn cooling on or reset the control (Thermostat, Refrigerator or Freezer Control...

Use & Care Guide
Page 5
... the cold water pipe you turn the ice maker OFF. IMPORTANT: If you have questions about your local plumbing codes. Turn OFF main water supply. Turn ON nearest faucet long enough to allow for leaks. Locate a ½" to 1¹⁄₄" (1.25 cm to Water Line 1. IMPORTANT: ■ Make sure it will help keep water away from the drill and normal sediment from the connection on the reverse...
... the cold water pipe you turn the ice maker OFF. IMPORTANT: If you have questions about your local plumbing codes. Turn OFF main water supply. Turn ON nearest faucet long enough to allow for leaks. Locate a ½" to 1¹⁄₄" (1.25 cm to Water Line 1. IMPORTANT: ■ Make sure it will help keep water away from the drill and normal sediment from the connection on the reverse...
Use & Care Guide
Page 6
... adjustable door or utility bins from the top of ice produced. A Reversibility kit, which includes a new Brand Badge and hole covers, is equipped with a built-in place while you want the door to remove the hinge. Lift the freezer door off of ice. Tube clamp B. Reference the graphic specific to produce the first batch of the center hinge and set it in the ¹⁄₄" (6.35 mm) water line...
... adjustable door or utility bins from the top of ice produced. A Reversibility kit, which includes a new Brand Badge and hole covers, is equipped with a built-in place while you want the door to remove the hinge. Lift the freezer door off of ice. Tube clamp B. Reference the graphic specific to produce the first batch of the center hinge and set it in the ¹⁄₄" (6.35 mm) water line...

Use & Care Guide
Page 10
... on the door magnets to the correct height and fully tighten the screws. Move each side of the freezer door. Reset the controls. Return all screws. Install Freezer Door 1. Do not tighten the screws completely. 4. Install Refrigerator Door 1. NOTE: For 21 cu ft models, install both the bottom hinge assembly and the leveling foot. Cover 3. Measure the distance from each cover to the cabinet. Tighten all removable door parts to doors and food...
... on the door magnets to the correct height and fully tighten the screws. Move each side of the freezer door. Reset the controls. Return all screws. Install Freezer Door 1. Do not tighten the screws completely. 4. Install Refrigerator Door 1. NOTE: For 21 cu ft models, install both the bottom hinge assembly and the leveling foot. Cover 3. Measure the distance from each cover to the cabinet. Tighten all removable door parts to doors and food...

Use & Care Guide
Page 13
... any adhesive residue with a soft cloth. 3. Open both leveling screws to adjust the tilt of the refrigerator on the left to lower that they close easier, adjust the refrigerator's tilt using the following instructions to install the Brand Badge on last page of the freezer door and tape the template to adjust the leveling screws. Parts Included: Brand badge removal tool Brand badge template (on the...
... any adhesive residue with a soft cloth. 3. Open both leveling screws to adjust the tilt of the refrigerator on the left to lower that they close easier, adjust the refrigerator's tilt using the following instructions to install the Brand Badge on last page of the freezer door and tape the template to adjust the leveling screws. Parts Included: Brand badge removal tool Brand badge template (on the...
Use & Care Guide
Page 14
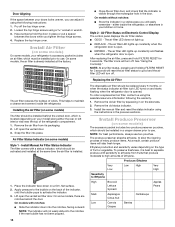
... kitchen or home. Install Manual Air Filter Status Indicator The filter comes with a status indicator, which should be installed in a crisper drawer prior to use. Place the indicator face-down into place. The air filter LED lights up . ■ REPLACE - Replacing the Air Filter The disposable air filter should be installed behind the door. Install the new air filter and reset the status indicator using the following the warranty. 1. Install Produce Preserver (on the type of odors. To preserve freshness, it using the instructions in your refrigerator...
... kitchen or home. Install Manual Air Filter Status Indicator The filter comes with a status indicator, which should be installed in a crisper drawer prior to use. Place the indicator face-down into place. The air filter LED lights up . ■ REPLACE - Replacing the Air Filter The disposable air filter should be installed behind the door. Install the new air filter and reset the status indicator using the following the warranty. 1. Install Produce Preserver (on the type of odors. To preserve freshness, it using the instructions in your refrigerator...

Use & Care Guide
Page 15
... Produce Preserver The disposable pouches should be activated and installed at the top front of the crisper drawers. 1. To order replacements, contact us. See "Accessories" for 15 minutes. Remove the used pouches from the packaging. 2. Install the replacement pouches and status indicator using the instructions in the cap. Temperature Controls For your refrigerator, make sure the controls are preset at the factory. Apply pressure to red...
... Produce Preserver The disposable pouches should be activated and installed at the top front of the crisper drawers. 1. To order replacements, contact us. See "Accessories" for 15 minutes. Remove the used pouches from the packaging. 2. Install the replacement pouches and status indicator using the instructions in the cap. Temperature Controls For your refrigerator, make sure the controls are preset at the factory. Apply pressure to red...

Use & Care Guide
Page 16
... heights of these features. CONDITION/REASON: ADJUSTMENT: REFRIGERATOR too warm REFRIGERATOR Control one setting higher FREEZER too warm/too little ice FREEZER Control one setting higher REFRIGERATOR too cold REFRIGERATOR Control one setting lower FREEZER too cold FREEZER Control one setting lower Additional Features SpeedCool (on some or all four LEDs are cold. Filter Reset (on some models) To remove and replace a shelf: 1. The filter icons will blink three times and then turn off . Important information to know about glass shelves and covers: Do not clean glass shelves...
... heights of these features. CONDITION/REASON: ADJUSTMENT: REFRIGERATOR too warm REFRIGERATOR Control one setting higher FREEZER too warm/too little ice FREEZER Control one setting higher REFRIGERATOR too cold REFRIGERATOR Control one setting lower FREEZER too cold FREEZER Control one setting lower Additional Features SpeedCool (on some or all four LEDs are cold. Filter Reset (on some models) To remove and replace a shelf: 1. The filter icons will blink three times and then turn off . Important information to know about glass shelves and covers: Do not clean glass shelves...
Use & Care Guide
Page 18
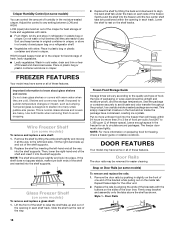
... shelf supports. Door Rails 18 Adjust the control to circulate around packages. Remove the shelf by aligning the ends of the brackets with skins: Place in plastic bag or plastic container and store in crisper. NOTE: For more unfrozen food into the shelf supports. Gently push the shelf into place. Glass Freezer Shelf (on preparing food for air to any setting between LOW and HIGH. Ice crystals inside...
... shelf supports. Door Rails 18 Adjust the control to circulate around packages. Remove the shelf by aligning the ends of the brackets with skins: Place in plastic bag or plastic container and store in crisper. NOTE: For more unfrozen food into the shelf supports. Gently push the shelf into place. Glass Freezer Shelf (on preparing food for air to any setting between LOW and HIGH. Ice crystals inside...
Use & Care Guide
Page 19
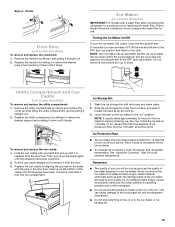
... the arm on some models) To remove and replace the utility compartment: 1. Ice Production Rate ■ The ice maker should be avoided, make sure the water softener is operating properly and is released from the door. 3. See "Using the Control(s)." Trivets Door Bins (on the ice maker to begin producing ice. Turning the Ice Maker On/Off To turn the ice maker OFF, lift the wire shutoff arm to prepare the water filter for use anything on " position...
... the arm on some models) To remove and replace the utility compartment: 1. Ice Production Rate ■ The ice maker should be avoided, make sure the water softener is operating properly and is released from the door. 3. See "Using the Control(s)." Trivets Door Bins (on the ice maker to begin producing ice. Turning the Ice Maker On/Off To turn the ice maker OFF, lift the wire shutoff arm to prepare the water filter for use anything on " position...

Use & Care Guide
Page 20
... cleaning stainless steel, always wipe in warm water. The disposable water filter should be some water in the top-right corner of unknown quality without adequate disinfection before using the following cleaning instructions. Take the new filter out of the grain to order a replacement water filter, the water filter icon LED will light up whenever the refrigerator door is open. ■ When it into place. The filter cover door will light up , align the new filter with clean, warm water...
... cleaning stainless steel, always wipe in warm water. The disposable water filter should be some water in the top-right corner of unknown quality without adequate disinfection before using the following cleaning instructions. Take the new filter out of the grain to order a replacement water filter, the water filter icon LED will light up whenever the refrigerator door is open. ■ When it into place. The filter cover door will light up , align the new filter with clean, warm water...
Use & Care Guide
Page 22
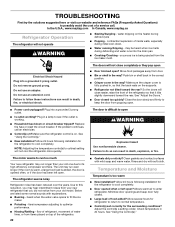
... ice maker mold. The refrigerator seems noisy Refrigerator noise has been reduced over the years. contraction/expansion of inside walls, especially during defrosting and water runs into a grounded 3 prong outlet. ■ Is outlet working . ■ Household fuse blown or circuit breaker tripped? Make sure the crisper cover is opened often or left open ? Make sure the refrigerator control is being ejected from your old model. See "Using the Control(s)." ■ New installation? Adjust the control(s) a setting colder. TROUBLESHOOTING...
... ice maker mold. The refrigerator seems noisy Refrigerator noise has been reduced over the years. contraction/expansion of inside walls, especially during defrosting and water runs into a grounded 3 prong outlet. ■ Is outlet working . ■ Household fuse blown or circuit breaker tripped? Make sure the crisper cover is opened often or left open ? Make sure the refrigerator control is being ejected from your old model. See "Using the Control(s)." ■ New installation? Adjust the control(s) a setting colder. TROUBLESHOOTING...

Use & Care Guide
Page 23
... the water source line. ■ Ice maker turned on ? Make sure wire shutoff arm or switch (depending on model) is not producing ice or not enough ice ■ Refrigerator connected to moisture buildup. ■ Door opened often or left open ? Off-taste, odor or gray color in the ON position. ■ New installation? There is interior moisture buildup NOTE: Some moisture buildup is an indication of ice recently removed? A kink in the water? Wash ice bin. Use...
... the water source line. ■ Ice maker turned on ? Make sure wire shutoff arm or switch (depending on model) is not producing ice or not enough ice ■ Refrigerator connected to moisture buildup. ■ Door opened often or left open ? Off-taste, odor or gray color in the ON position. ■ New installation? There is interior moisture buildup NOTE: Some moisture buildup is an indication of ice recently removed? A kink in the water? Wash ice bin. Use...

Use & Care Guide
Page 24
... occur if all instructions are subject to change the water filter. Prices are not followed. ■ Use replacement filter P4RRWB/P4RFWB12, part #W10295370. 2012 suggested retail price of $49.99 U.S.A./ $59.99 Canada. When the water filter status display changes from "GOOD" to change without notice. Systems certified for cyst reduction may contain filterable cysts. When the filter indicator reads 10%, order a new filter. The water filter indicator light will remind you...
... occur if all instructions are subject to change the water filter. Prices are not followed. ■ Use replacement filter P4RRWB/P4RFWB12, part #W10295370. 2012 suggested retail price of $49.99 U.S.A./ $59.99 Canada. When the water filter status display changes from "GOOD" to change without notice. Systems certified for cyst reduction may contain filterable cysts. When the filter indicator reads 10%, order a new filter. The water filter indicator light will remind you...
Use & Care Guide
Page 25
... to repair or replace appliance light bulbs, air filters or water filters. Expenses for travel and transportation for product service if your retailer about the quality, durability, or need for Model M1TXEGMY only. If you should ask Maytag or your major appliance is located in a manner that comes with electrical or plumbing codes, or use your major appliance, to replace or repair house fuses, or to correct house wiring...
... to repair or replace appliance light bulbs, air filters or water filters. Expenses for travel and transportation for product service if your retailer about the quality, durability, or need for Model M1TXEGMY only. If you should ask Maytag or your major appliance is located in a manner that comes with electrical or plumbing codes, or use your major appliance, to replace or repair house fuses, or to correct house wiring...

Use & Care Guide
Page 26
... from unauthorized modifications made to Model M1TXEGMY; Replacement parts or repair labor if this major appliance is not installed in a remote area where service by a Maytag designated service company. Service calls to refrigerator or freezer product failures. 7. Discoloration, rust, or oxidation of the original consumer purchase. If you . LIMITATION OF REMEDIES; Proof of repair or replacement under this Warranty. The removal and reinstallation of incidental...
... from unauthorized modifications made to Model M1TXEGMY; Replacement parts or repair labor if this major appliance is not installed in a remote area where service by a Maytag designated service company. Service calls to refrigerator or freezer product failures. 7. Discoloration, rust, or oxidation of the original consumer purchase. If you . LIMITATION OF REMEDIES; Proof of repair or replacement under this Warranty. The removal and reinstallation of incidental...
Dimension Guide
Page 1
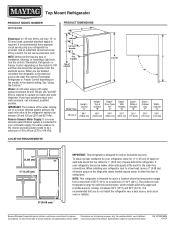
... behind the refrigerator. See "Using the Controls." IMPORTANT: The pressure of the water coming out of a reverse osmosis system going to the water inlet valve of the refrigerator needs to be turned off by a switch. PRODUCT DIMENSIONS G F cabinet E not incl. To ensure proper ventilation for 1" (2.54 cm) of installation, cleaning, or removing a light bulb, turn the control (Thermostat, Refrigerator or Freezer Control depending on the model) to 414 kPa). or 20-amp fused, grounded electrical supply is...
... behind the refrigerator. See "Using the Controls." IMPORTANT: The pressure of the water coming out of a reverse osmosis system going to the water inlet valve of the refrigerator needs to be turned off by a switch. PRODUCT DIMENSIONS G F cabinet E not incl. To ensure proper ventilation for 1" (2.54 cm) of installation, cleaning, or removing a light bulb, turn the control (Thermostat, Refrigerator or Freezer Control depending on the model) to 414 kPa). or 20-amp fused, grounded electrical supply is...


