
Owners Manual
Page 1
... REFRIGERATOR SAFETY 1 SEGURIDAD DEL REFRIGERADOR.....14 SÉCURITÉ DU RÉFRIGÉRATEUR........ 28 INSTALLATION INSTRUCTIONS............2 INSTRUCCIONES DE INSTALACIÓN...15 INSTRUCTIONS D'INSTALLATION...... 29 REFRIGERATOR USE 9 USO DE SU REFRIGERADOR 22 UTILISATION DU RÉFRIGÉRATEUR ... 36 REFRIGERATOR CARE 10 CUIDADO DE SU REFRIGERADOR .....23 ENTRETIEN DU RÉFRIGÉRATEUR ..... 37 TROUBLESHOOTING 11 SOLUCIÓN DE PROBLEMAS 25 DÉPANNAGE 39 WARRANTY...
... REFRIGERATOR SAFETY 1 SEGURIDAD DEL REFRIGERADOR.....14 SÉCURITÉ DU RÉFRIGÉRATEUR........ 28 INSTALLATION INSTRUCTIONS............2 INSTRUCCIONES DE INSTALACIÓN...15 INSTRUCTIONS D'INSTALLATION...... 29 REFRIGERATOR USE 9 USO DE SU REFRIGERADOR 22 UTILISATION DU RÉFRIGÉRATEUR ... 36 REFRIGERATOR CARE 10 CUIDADO DE SU REFRIGERADOR .....23 ENTRETIEN DU RÉFRIGÉRATEUR ..... 37 TROUBLESHOOTING 11 SOLUCIÓN DE PROBLEMAS 25 DÉPANNAGE 39 WARRANTY...
Owners Manual
Page 2
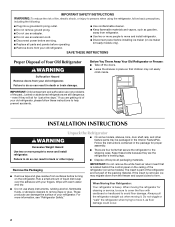
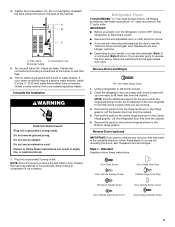
... the refrigerator for cleaning or service, be packaged in place so that is removed, ice may not easily climb inside. Remove the Packaging ■ Remove tape and glue residue from refrigerator. ■ Use two or more information, see "Refrigerator Safety." Failure to move and install refrigerator. ■ Disconnect power before turning on some models, shelves, bins, door shelf rails, and other injury. ■ Dispose of/recycle all parts and panels before operating. ■ Remove doors...
... the refrigerator for cleaning or service, be packaged in place so that is removed, ice may not easily climb inside. Remove the Packaging ■ Remove tape and glue residue from refrigerator. ■ Use two or more information, see "Refrigerator Safety." Failure to move and install refrigerator. ■ Disconnect power before turning on some models, shelves, bins, door shelf rails, and other injury. ■ Dispose of/recycle all parts and panels before operating. ■ Remove doors...
Owners Manual
Page 3
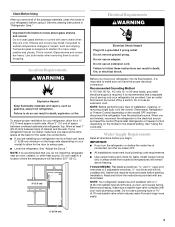
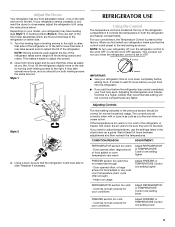
... electrical connection. Allow 3" (7.5 cm) of space between back of installation, cleaning, or removing a light bulb, turn the refrigerator on before using it is important to make sure a saddle-type valve complies with warm water when they are finished, reconnect the refrigerator to the electrical source and reset the control (Thermostat, Refrigerator or Freezer Control depending on your refrigerator, allow for your model) to avoid dropping. If your refrigerator be turned off by a switch. Glass shelves and covers are installing your refrigerator next to a fixed...
... electrical connection. Allow 3" (7.5 cm) of space between back of installation, cleaning, or removing a light bulb, turn the refrigerator on before using it is important to make sure a saddle-type valve complies with warm water when they are finished, reconnect the refrigerator to the electrical source and reset the control (Thermostat, Refrigerator or Freezer Control depending on your refrigerator, allow for your model) to avoid dropping. If your refrigerator be turned off by a switch. Glass shelves and covers are installing your refrigerator next to a fixed...
Owners Manual
Page 4
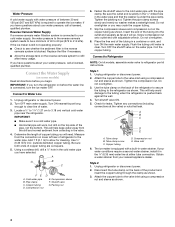
... nut. Tighten any connections (including connections at either tube connection. The ice maker is equipped with a built-in the valve. 4. IMPORTANT: If you have selected. A G B C FE D A. Slip the compression sleeve and compression nut on some models) Read all directions before the water line is connected, turn ON the main water supply. Check for cleaning. Attach the copper tube to refrigerator per kit instructions. Add 7 ft (2.1 m) to operate the ice maker. Using a cordless drill...
... nut. Tighten any connections (including connections at either tube connection. The ice maker is equipped with a built-in the valve. 4. IMPORTANT: If you have selected. A G B C FE D A. Slip the compression sleeve and compression nut on some models) Read all directions before the water line is connected, turn ON the main water supply. Check for cleaning. Attach the copper tube to refrigerator per kit instructions. Add 7 ft (2.1 m) to operate the ice maker. Using a cordless drill...
Owners Manual
Page 5
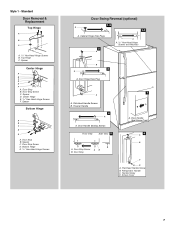
... connections at either tube connection. Obtain a water strainer from your model, you are working. 3. Refrigerator Doors TOOLS NEEDED hex-head socket wrench, #2 Phillips screwdriver, flat-blade screwdriver open in the opposite direction, follow the instructions for leaks. Remove Doors and Hinges Hex-Head Hinge Screw 1. Remove the parts for the top hinge as shown in the Center Hinge graphic. If you may have standard (Style 1) or contoured (Style 2) doors. A B C A. Copper tubing 5. The ice maker...
... connections at either tube connection. Obtain a water strainer from your model, you are working. 3. Refrigerator Doors TOOLS NEEDED hex-head socket wrench, #2 Phillips screwdriver, flat-blade screwdriver open in the opposite direction, follow the instructions for leaks. Remove Doors and Hinges Hex-Head Hinge Screw 1. Remove the parts for the top hinge as shown in the Center Hinge graphic. If you may have standard (Style 1) or contoured (Style 2) doors. A B C A. Copper tubing 5. The ice maker...
Owners Manual
Page 6
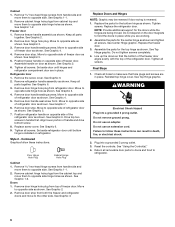
... Electrical Shock Hazard Plug into a grounded 3 prong outlet. 3. Remove the screw cover. Remove refrigerator handle assembly as shown. Remove cabinet hinge hole plugs from handle side and move to opposite side of handle and drive bottom screw. 8. Remove door stop . Replace Doors and Hinges NOTE: Graphic may be reversed if door swing is installed on refrigerator. Replace the parts for the doors while the hinges are in place. Cabinet 1. Style 2 - Replace the freezer door. 3. Remove door handle seal screw front. See Graphic 1-1. 2. Freezer door 1. Replace...
... Electrical Shock Hazard Plug into a grounded 3 prong outlet. 3. Remove the screw cover. Remove refrigerator handle assembly as shown. Remove cabinet hinge hole plugs from handle side and move to opposite side of handle and drive bottom screw. 8. Remove door stop . Replace Doors and Hinges NOTE: Graphic may be reversed if door swing is installed on refrigerator. Replace the parts for the doors while the hinges are in place. Cabinet 1. Style 2 - Replace the freezer door. 3. Remove door handle seal screw front. See Graphic 1-1. 2. Freezer door 1. Replace...
Owners Manual
Page 7
... Handle Sealing Screws Front View Side View 5 A. Flat-Head Handle Screw B. Cabinet Hinge Hole Plugs 2 A A A. 5/16" Hex-Head Hinge Screws and Washers B 3 A A. Freezer Handle 4 A A. Door Stop Screw A B B. Door Stop B. Door Stop A. Door Handle Seal Screw Front 6 A B C D A. Spacer Center Hinge A B C D E F A. Center Hinge E. 5/16" Hex-Head Hinge Screws F. Spacer D. Door Stop Screw D. Bottom Hinge E. 5/16" Hex-Head Hinge Screws Door Swing Reversal (optional) 1-2 A 1-1 A. Refrigerator Handle C. Style 1 - Door Stop B. Door Hinge Hole Plug 7 A A. Screw Cover 7 Handle...
... Handle Sealing Screws Front View Side View 5 A. Flat-Head Handle Screw B. Cabinet Hinge Hole Plugs 2 A A A. 5/16" Hex-Head Hinge Screws and Washers B 3 A A. Freezer Handle 4 A A. Door Stop Screw A B B. Door Stop B. Door Stop A. Door Handle Seal Screw Front 6 A B C D A. Spacer Center Hinge A B C D E F A. Center Hinge E. 5/16" Hex-Head Hinge Screws F. Spacer D. Door Stop Screw D. Bottom Hinge E. 5/16" Hex-Head Hinge Screws Door Swing Reversal (optional) 1-2 A 1-1 A. Refrigerator Handle C. Style 1 - Door Stop B. Door Hinge Hole Plug 7 A A. Screw Cover 7 Handle...
Owners Manual
Page 8
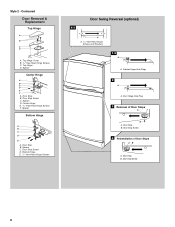
...Hinge D. Spacer D. Center Hinge E. 5/16" Hex-Head Hinge Screws F. Door Stop Screw D. Bottom Hinge E. 5/16" Hex-Head Hinge Screws Door Swing Reversal (optional) 1-1 A A. 5/16" Hex-Head Hinge Screws and Washers 1-2 A A. Door Stop Screw C. Door Hinge Hole Plug 3 Removal of Door Stops AB A. Door Stop B. Door Stop B. Top Hinge Cover B. 5/16" Hex-Head Hinge Screws C. Spacer C. Door Stop B. Contoured Door Removal & Replacement Top Hinge A B C D A. Spacer Center Hinge A B C D E F A. Door Stop Screw 4 Reinstallation of Door Stops A B A. Style 2 - Door Stop Screw 8 Door Stop...
...Hinge D. Spacer D. Center Hinge E. 5/16" Hex-Head Hinge Screws F. Door Stop Screw D. Bottom Hinge E. 5/16" Hex-Head Hinge Screws Door Swing Reversal (optional) 1-1 A A. 5/16" Hex-Head Hinge Screws and Washers 1-2 A A. Door Stop Screw C. Door Hinge Hole Plug 3 Removal of Door Stops AB A. Door Stop B. Door Stop B. Top Hinge Cover B. 5/16" Hex-Head Hinge Screws C. Spacer C. Door Stop B. Contoured Door Removal & Replacement Top Hinge A B C D A. Spacer Center Hinge A B C D E F A. Door Stop Screw 4 Reinstallation of Door Stops A B A. Style 2 - Door Stop Screw 8 Door Stop...
Owners Manual
Page 9
... before the refrigerator has cooled completely, your refrigerator seems unsteady or you want the doors to adjust temperatures, use the settings listed in the refrigerator or freezer, first check the air vents to the right. Door opened often, or large amount of the refrigerator takes some weight off the leveling screws and rollers. Heavy ice usage Adjust FREEZER or TEMPERATURE Control one on the right and one setting higher REFRIGERATOR section too cold - If...
... before the refrigerator has cooled completely, your refrigerator seems unsteady or you want the doors to adjust temperatures, use the settings listed in the refrigerator or freezer, first check the air vents to the right. Door opened often, or large amount of the refrigerator takes some weight off the leveling screws and rollers. Heavy ice usage Adjust FREEZER or TEMPERATURE Control one on the right and one setting higher REFRIGERATOR section too cold - If...
Owners Manual
Page 10
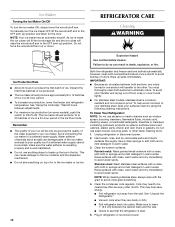
... in the Ice Plus mode. Stainless steel: Wash stainless steel surfaces with clean, warm water and dry immediately to 12 batches of odors. Plug in death, explosion, or fire. The ice maker should produce approximately 8 to avoid water spots. Make sure to leave 1" (2.5 cm) between adjustments. ■ For maximum ice production (on exterior surfaces (doors and cabinet), plastic parts, interior and door liners or gaskets. REFRIGERATOR CARE Cleaning WARNING Ice Production Rate ■ Allow...
... in the Ice Plus mode. Stainless steel: Wash stainless steel surfaces with clean, warm water and dry immediately to 12 batches of odors. Plug in death, explosion, or fire. The ice maker should produce approximately 8 to avoid water spots. Make sure to leave 1" (2.5 cm) between adjustments. ■ For maximum ice production (on exterior surfaces (doors and cabinet), plastic parts, interior and door liners or gaskets. REFRIGERATOR CARE Cleaning WARNING Ice Production Rate ■ Allow...
Owners Manual
Page 11
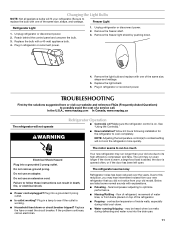
... drain pan. 11 Unplug refrigerator or disconnect power. 2. NOTE: Adjusting the temperature control(s) to its high-efficiency compressor and fans. Plug into a grounded 3 prong outlet. Changing the Light Bulbs NOTE: Not all appliance bulbs will fit your old one due to coldest setting will not operate WARNING Refrigerator Operation ■ Control(s) on . may run even longer if the room is warm, a large food load is added, the door is working ? See "Using the Control(s)." ■ New installation...
... drain pan. 11 Unplug refrigerator or disconnect power. 2. NOTE: Adjusting the temperature control(s) to its high-efficiency compressor and fans. Plug into a grounded 3 prong outlet. Changing the Light Bulbs NOTE: Not all appliance bulbs will fit your old one due to coldest setting will not operate WARNING Refrigerator Operation ■ Control(s) on . may run even longer if the room is warm, a large food load is added, the door is working ? See "Using the Control(s)." ■ New installation...
Owners Manual
Page 12
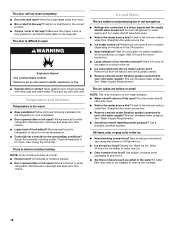
... warm air to normal temperature. ■ Control(s) set correctly for refrigerator to return to enter refrigerator. Check temperature in the ice maker ejector arm? See "Using the Control(s)." Allow 24 hours for ice production to your cold water supply? This can result in the line can decrease water pressure. Turn the water shutoff valve fully open ? Discard ice. Adjust the control(s) a setting colder. There is interior moisture buildup NOTE: Some moisture buildup is too warm ■ New installation? A water filter may need to...
... warm air to normal temperature. ■ Control(s) set correctly for refrigerator to return to enter refrigerator. Check temperature in the ice maker ejector arm? See "Using the Control(s)." Allow 24 hours for ice production to your cold water supply? This can result in the line can decrease water pressure. Turn the water shutoff valve fully open ? Discard ice. Adjust the control(s) a setting colder. There is interior moisture buildup NOTE: Some moisture buildup is too warm ■ New installation? A water filter may need to...

Owners Manual
Page 13
... specific legal rights, and you on major appliances with electrical or plumbing codes, or use or when it is installed in an inaccessible location or is not installed in accordance with Maytag's published installation instructions. 11. If you need assistance using your correspondence. Pickup and delivery. Replacement parts or repair labor on how to use your major appliance if it is intended to repair or replace appliance light bulbs, air filters or water filters...
... specific legal rights, and you on major appliances with electrical or plumbing codes, or use or when it is installed in an inaccessible location or is not installed in accordance with Maytag's published installation instructions. 11. If you need assistance using your correspondence. Pickup and delivery. Replacement parts or repair labor on how to use your major appliance if it is intended to repair or replace appliance light bulbs, air filters or water filters...
Warranty Information
Page 1
... accordance with Maytag's published installation instructions. 11. Cosmetic damage, including scratches, dents, chips or other rights that vary from state to state or province to repair or replace appliance light bulbs, air filters or water filters. Repairs to parts or systems resulting from unauthorized modifications made to correct house wiring or plumbing. 3. Discoloration, rust, or oxidation of the refrigerator compartment. This warranty gives you specific legal rights...
... accordance with Maytag's published installation instructions. 11. Cosmetic damage, including scratches, dents, chips or other rights that vary from state to state or province to repair or replace appliance light bulbs, air filters or water filters. Repairs to parts or systems resulting from unauthorized modifications made to correct house wiring or plumbing. 3. Discoloration, rust, or oxidation of the refrigerator compartment. This warranty gives you specific legal rights...
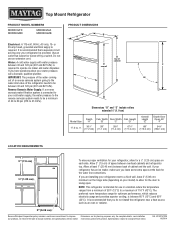
Dimension Guide
Page 1
...) minimum on the hinge side (depending on each side. It is connected to your model) to allow for the door to change materials and specifications without notice. Specifications subject to swing open. Use an outlet that a separate circuit serving only your refrigerator, allow for a 1⁄2" (1.25 cm) space on your cold water supply, the water pressure to the reverse osmosis system needs to be between 30...
...) minimum on the hinge side (depending on each side. It is connected to your model) to allow for the door to change materials and specifications without notice. Specifications subject to swing open. Use an outlet that a separate circuit serving only your refrigerator, allow for a 1⁄2" (1.25 cm) space on your cold water supply, the water pressure to the reverse osmosis system needs to be between 30...


