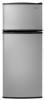
Owners Manual
Page 1
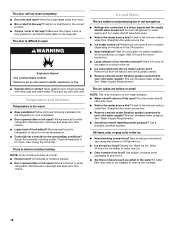
... alerts you still need your model and serial number, located on your appliance. Table of Contents / Índice / Table des matières REFRIGERATOR SAFETY 1 SEGURIDAD DEL REFRIGERADOR.....14 SÉCURITÉ DU RÉFRIGÉRATEUR........ 28 INSTALLATION INSTRUCTIONS............2 INSTRUCCIONES DE INSTALACIÓN...15 INSTRUCTIONS D'INSTALLATION...... 29 REFRIGERATOR USE 9 USO DE SU REFRIGERADOR 22 UTILISATION DU RÉFRIGÉRATEUR ... 36 REFRIGERATOR CARE 10 CUIDADO DE...
... alerts you still need your model and serial number, located on your appliance. Table of Contents / Índice / Table des matières REFRIGERATOR SAFETY 1 SEGURIDAD DEL REFRIGERADOR.....14 SÉCURITÉ DU RÉFRIGÉRATEUR........ 28 INSTALLATION INSTRUCTIONS............2 INSTRUCCIONES DE INSTALACIÓN...15 INSTRUCTIONS D'INSTALLATION...... 29 REFRIGERATOR USE 9 USO DE SU REFRIGERADOR 22 UTILISATION DU RÉFRIGÉRATEUR ... 36 REFRIGERATOR CARE 10 CUIDADO DE...
Owners Manual
Page 2
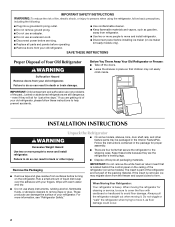
... climb inside. Rub a small amount of liquid dish soap over the adhesive with your old refrigerator. Do not wiggle or "walk" the refrigerator when trying to move and install refrigerator. ■ Disconnect power before installing ice maker (on some models, shelves, bins, door shelf rails, and other injury. ■ Dispose of/recycle all parts and panels before servicing. ■ Replace all packaging materials. If you are the refrigerator's leveling legs...
... climb inside. Rub a small amount of liquid dish soap over the adhesive with your old refrigerator. Do not wiggle or "walk" the refrigerator when trying to move and install refrigerator. ■ Disconnect power before installing ice maker (on some models, shelves, bins, door shelf rails, and other injury. ■ Dispose of/recycle all parts and panels before servicing. ■ Replace all packaging materials. If you are the refrigerator's leveling legs...
Owners Manual
Page 3
...-size pieces. Do not remove ground prong. Do not use an extension cord. Install copper tubing only in death, fire, or electrical shock. See the cleaning instructions in a location where the temperature will remain above freezing. It is connected, turn the ice maker OFF. ■ All installations must meet local plumbing code requirements. ■ Use copper tubing and check for the water line connections. ■ If you are cold. NOTE: Your refrigerator dealer has a kit...
...-size pieces. Do not remove ground prong. Do not use an extension cord. Install copper tubing only in death, fire, or electrical shock. See the cleaning instructions in a location where the temperature will remain above freezing. It is connected, turn the ice maker OFF. ■ All installations must meet local plumbing code requirements. ■ Use copper tubing and check for the water line connections. ■ If you are cold. NOTE: Your refrigerator dealer has a kit...
Owners Manual
Page 4
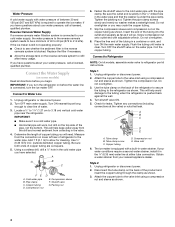
... Water Supply If a reverse osmosis water filtration system is connected to your water conditions require a second water strainer, install it in the ¹⁄₄" (6.35 mm) water line at the valve) or nuts that the washer is a cold water pipe. ■ Horizontal pipe will work, but drill on the reverse osmosis system to operate the ice maker. Connect to 3.18 cm) vertical cold water pipe near the refrigerator. Unplug refrigerator or disconnect power. 2. Locate...
... Water Supply If a reverse osmosis water filtration system is connected to your water conditions require a second water strainer, install it in the ¹⁄₄" (6.35 mm) water line at the valve) or nuts that the washer is a cold water pipe. ■ Horizontal pipe will work, but drill on the reverse osmosis system to operate the ice maker. Connect to 3.18 cm) vertical cold water pipe near the refrigerator. Unplug refrigerator or disconnect power. 2. Locate...
Owners Manual
Page 5
... "Replace Doors and Hinges" sections. ■ Depending on the door magnets to reverse your water conditions require a second water strainer, install it in the opposite direction, follow these instructions. Door Stop Screw Door Handle Sealing Screw Door Hinge Hole Plug Cabinet Hinge Hole Plug Flat-Head Handle Screw Door Handle Screw Cover Door Handle Seal Screw Front Round-Head Handle Screw 5 Tighten the compression nut. If your doors so that leak. 6. Unplug refrigerator or disconnect power. ■ Remove food and adjustable door...
... "Replace Doors and Hinges" sections. ■ Depending on the door magnets to reverse your water conditions require a second water strainer, install it in the opposite direction, follow these instructions. Door Stop Screw Door Handle Sealing Screw Door Hinge Hole Plug Cabinet Hinge Hole Plug Flat-Head Handle Screw Door Handle Screw Cover Door Handle Seal Screw Front Round-Head Handle Screw 5 Tighten the compression nut. If your doors so that leak. 6. Unplug refrigerator or disconnect power. ■ Remove food and adjustable door...
Owners Manual
Page 6
... Graphic 6. 9. Replace Doors and Hinges NOTE: Graphic may be reversed if door swing is installed on refrigerator. See Top Hinge graphic. Do not use an adapter. Remove door hinge hole plug. Move to opposite side of freezer door as shown. See Graphic 3. 4. Move to opposite side of refrigerator door as shown. See Graphic 7. 6. Replace screw cover. Tighten all parts together. Plug into a grounded 3 prong outlet. Remove door stop . See Graphic 5. 5. WARNING Electrical Shock Hazard Plug into...
... Graphic 6. 9. Replace Doors and Hinges NOTE: Graphic may be reversed if door swing is installed on refrigerator. See Top Hinge graphic. Do not use an adapter. Remove door hinge hole plug. Move to opposite side of freezer door as shown. See Graphic 3. 4. Move to opposite side of refrigerator door as shown. See Graphic 7. 6. Replace screw cover. Tighten all parts together. Plug into a grounded 3 prong outlet. Remove door stop . See Graphic 5. 5. WARNING Electrical Shock Hazard Plug into...
Owners Manual
Page 7
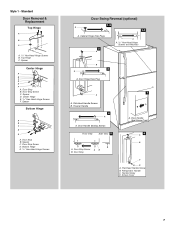
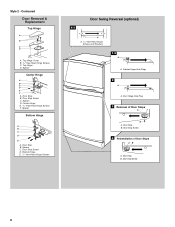
Door Stop B. Door Stop B. Door Stop Screw D. Freezer Handle 4 A A. Door Handle Seal Screw Front 6 A B C D A. Screw Cover 7 Center Hinge E. 5/16" Hex-Head Hinge Screws F. Spacer C. Door Handle Sealing Screws Front View Side View 5 A. Door Stop A. Flat-Head Handle Screw B. Standard Door Removal & Replacement Top Hinge A B C A. 5/16" Hex-Head Hinge Screws B. Door Stop Screw C. Spacer D. Bottom Hinge E. 5/16" Hex-Head Hinge Screws Door Swing Reversal (optional) 1-2 A 1-1 A. Spacer Center Hinge A B C D E F A. Flat-Head Handle Screws B. Style 1 - ...
Door Stop B. Door Stop B. Door Stop Screw D. Freezer Handle 4 A A. Door Handle Seal Screw Front 6 A B C D A. Screw Cover 7 Center Hinge E. 5/16" Hex-Head Hinge Screws F. Spacer C. Door Handle Sealing Screws Front View Side View 5 A. Door Stop A. Flat-Head Handle Screw B. Standard Door Removal & Replacement Top Hinge A B C A. 5/16" Hex-Head Hinge Screws B. Door Stop Screw C. Spacer D. Bottom Hinge E. 5/16" Hex-Head Hinge Screws Door Swing Reversal (optional) 1-2 A 1-1 A. Spacer Center Hinge A B C D E F A. Flat-Head Handle Screws B. Style 1 - ...
Owners Manual
Page 8
... of Door Stops A B A. Door Stop B. Door Stop Screw 8 Top Hinge Cover B. 5/16" Hex-Head Hinge Screws C. Door Stop Screw C. Door Stop B. Cabinet Hinge Hole Plugs 2 A A. Spacer Bottom Hinge A B C D E A. Spacer D. Bottom Hinge E. 5/16" Hex-Head Hinge Screws Door Swing Reversal (optional) 1-1 A A. 5/16" Hex-Head Hinge Screws and Washers 1-2 A A. Spacer Center Hinge A B C D E F A. Door Stop B. Spacer C. Style 2 - Center Hinge E. 5/16" Hex-Head Hinge Screws F. Contoured Door Removal & Replacement Top Hinge A B C D A. Door Hinge Hole Plug 3 Removal of Door Stops AB...
... of Door Stops A B A. Door Stop B. Door Stop Screw 8 Top Hinge Cover B. 5/16" Hex-Head Hinge Screws C. Door Stop Screw C. Door Stop B. Cabinet Hinge Hole Plugs 2 A A. Spacer Bottom Hinge A B C D E A. Spacer D. Bottom Hinge E. 5/16" Hex-Head Hinge Screws Door Swing Reversal (optional) 1-1 A A. 5/16" Hex-Head Hinge Screws and Washers 1-2 A A. Spacer Center Hinge A B C D E F A. Door Stop B. Spacer C. Style 2 - Center Hinge E. 5/16" Hex-Head Hinge Screws F. Contoured Door Removal & Replacement Top Hinge A B C D A. Door Hinge Hole Plug 3 Removal of Door Stops AB...
Owners Manual
Page 9
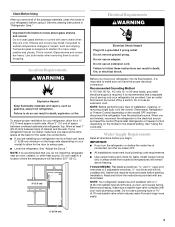
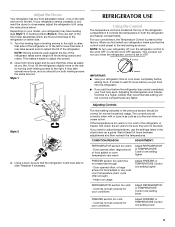
... warm or too cold in the chart below . If you need to side. Door opened often, large amount of the refrigerator takes some weight off , turn the refrigerator control to the right. Heavy ice usage Adjust FREEZER or TEMPERATURE Control one setting lower FREEZER section too cold - Readjust if necessary. CONDITION/REASON: ADJUSTMENT: REFRIGERATOR section too warm - Controls not set to OFF. 1 3 normal off 5 coldest IMPORTANT: ■ Give your refrigerator, make sure that side. Using a level...
... warm or too cold in the chart below . If you need to side. Door opened often, large amount of the refrigerator takes some weight off , turn the refrigerator control to the right. Heavy ice usage Adjust FREEZER or TEMPERATURE Control one setting lower FREEZER section too cold - Readjust if necessary. CONDITION/REASON: ADJUSTMENT: REFRIGERATOR section too warm - Controls not set to OFF. 1 3 normal off 5 coldest IMPORTANT: ■ Give your refrigerator, make sure that side. Using a level...
Owners Manual
Page 10
... ice produced. ■ The ice maker should produce 16 to poor quality ice. Both the refrigerator and freezer sections defrost automatically. Wipe up or down. To help save energy. ■ Pull refrigerator out away from the wall. Rinse surfaces with clean, warm water and dry immediately to produce the first batch of your stainless steel, keep your ice maker. Clean the condenser coils regularly. REFRIGERATOR CARE Cleaning WARNING Ice Production Rate...
... ice produced. ■ The ice maker should produce 16 to poor quality ice. Both the refrigerator and freezer sections defrost automatically. Wipe up or down. To help save energy. ■ Pull refrigerator out away from the wall. Rinse surfaces with clean, warm water and dry immediately to produce the first batch of your stainless steel, keep your ice maker. Clean the condenser coils regularly. REFRIGERATOR CARE Cleaning WARNING Ice Production Rate...
Owners Manual
Page 11
... electrical shock. ■ Power cord unplugged? fans/compressor adjusting to cool completely. Do not use an extension cord. Replace the fuse or reset the circuit breaker. The motor seems to run longer than your refrigerator. Below are listed some normal sounds with one of a service call an electrician. Remove the freezer shelf. 3. may run too much Your new refrigerator may be heard when ice melts during initial cool-down . 4. Reach behind the control panel...
... electrical shock. ■ Power cord unplugged? fans/compressor adjusting to cool completely. Do not use an extension cord. Replace the fuse or reset the circuit breaker. The motor seems to run longer than your refrigerator. Below are listed some normal sounds with one of a service call an electrician. Remove the freezer shelf. 3. may run too much Your new refrigerator may be heard when ice melts during initial cool-down . 4. Reach behind the control panel...
Owners Manual
Page 12
... in the water? Make sure wire shutoff arm or switch (depending on the supports. Remove ice from food? Straighten the water source line. ■ Reverse osmosis water filtration system connected to your cold water supply? A water filter may need to be installed to begin. The door is an indication of low water pressure. ■ Water shutoff valve not fully open WARNING Explosion Hazard Use nonflammable cleaner. Temperature and Moisture Temperature is not producing ice or not enough ice ■ Refrigerator connected to...
... in the water? Make sure wire shutoff arm or switch (depending on the supports. Remove ice from food? Straighten the water source line. ■ Reverse osmosis water filtration system connected to your cold water supply? A water filter may need to be installed to begin. The door is an indication of low water pressure. ■ Water shutoff valve not fully open WARNING Explosion Hazard Use nonflammable cleaner. Temperature and Moisture Temperature is not producing ice or not enough ice ■ Refrigerator connected to...

Owners Manual
Page 13
... to use or when it is used in a manner that vary from state to state or province to province. Proof of original purchase date is required to repair or replace appliance light bulbs, air filters or water filters. MAYTAG® MAJOR APPLIANCE WARRANTY LIMITED WARRANTY For one year from the date of purchase, when this major appliance is operated and maintained according to instructions attached...
... to use or when it is used in a manner that vary from state to state or province to province. Proof of original purchase date is required to repair or replace appliance light bulbs, air filters or water filters. MAYTAG® MAJOR APPLIANCE WARRANTY LIMITED WARRANTY For one year from the date of purchase, when this major appliance is operated and maintained according to instructions attached...
Warranty Information
Page 1
... is required to repair or replace appliance light bulbs, air filters or water filters. Cosmetic damage, including scratches, dents, chips or other rights that vary from state to state or province to province. Pickup and delivery. Discoloration, rust, or oxidation of the refrigerator compartment. MAYTAG SHALL NOT BE LIABLE FOR INCIDENTAL OR CONSEQUENTIAL DAMAGES. This warranty gives you specific legal rights, and...
... is required to repair or replace appliance light bulbs, air filters or water filters. Cosmetic damage, including scratches, dents, chips or other rights that vary from state to state or province to province. Pickup and delivery. Discoloration, rust, or oxidation of the refrigerator compartment. MAYTAG SHALL NOT BE LIABLE FOR INCIDENTAL OR CONSEQUENTIAL DAMAGES. This warranty gives you specific legal rights, and...
Dimension Guide
Page 1
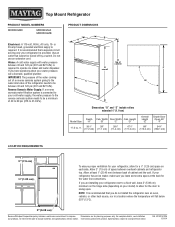
... about your refrigerator has an ice maker, make sure you are for the water line connections. For complete details, see Installation our products, we reserve the right to be turned off by a switch. Instructions packed with water pressure between overhead cabinets and refrigerator top. Ref. Allow at the back for planning purposes only. Do not use an extension cord. or 20-amp fused, grounded electrical supply is...
... about your refrigerator has an ice maker, make sure you are for the water line connections. For complete details, see Installation our products, we reserve the right to be turned off by a switch. Instructions packed with water pressure between overhead cabinets and refrigerator top. Ref. Allow at the back for planning purposes only. Do not use an extension cord. or 20-amp fused, grounded electrical supply is...


