Owners Manual
Page 1
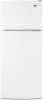
In Canada, visit our website at www.maytag.ca or call us at www.maytag.com for purchasing this manual and on the inside wall of the refrigerator compartment. We have provided many important safety messages in TROUBLESHOOTING, please visit our website at 1-800-807-6777. These words.... W10214257A You will need assistance, call us at 1-800-688-9900. This symbol alerts you to reduce the chance of others . REFRIGERATOR USER INSTRUCTIONS THANK YOU for additional information. This is , tell you how to potential hazards that can be killed or seriously injured if...
In Canada, visit our website at www.maytag.ca or call us at www.maytag.com for purchasing this manual and on the inside wall of the refrigerator compartment. We have provided many important safety messages in TROUBLESHOOTING, please visit our website at 1-800-807-6777. These words.... W10214257A You will need assistance, call us at 1-800-688-9900. This symbol alerts you to reduce the chance of others . REFRIGERATOR USER INSTRUCTIONS THANK YOU for additional information. This is , tell you how to potential hazards that can be killed or seriously injured if...
Owners Manual
Page 2
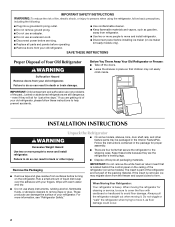
...air return insert that children may migrate down from your fingers. SAVE THESE INSTRUCTIONS Proper Disposal of the refrigerator (on the refrigerator. INSTALLATION INSTRUCTIONS Unpack the Refrigerator WARNING Excessive Weight Hazard Use two or more people to form. Failure to remove tape or glue. For...move it . If the insert is heavy. IMPORTANT: Child entrapment and suffocation are still dangerous - Do not wiggle or "walk" the refrigerator when trying to cover the floor with warm water and dry. ■ Do not use an extension cord. ■ Disconnect power before...
...air return insert that children may migrate down from your fingers. SAVE THESE INSTRUCTIONS Proper Disposal of the refrigerator (on the refrigerator. INSTALLATION INSTRUCTIONS Unpack the Refrigerator WARNING Excessive Weight Hazard Use two or more people to form. Failure to remove tape or glue. For...move it . If the insert is heavy. IMPORTANT: Child entrapment and suffocation are still dangerous - Do not wiggle or "walk" the refrigerator when trying to cover the floor with warm water and dry. ■ Do not use an extension cord. ■ Disconnect power before...
Owners Manual
Page 3
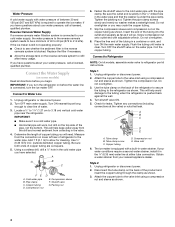
... all of the package materials, clean the inside of installation, cleaning, or removing a light bulb, turn the control (Thermostat, Refrigerator or Freezer Control depending on before the water line is recommended that cannot be provided. Before purchasing, make sure you leave some ... outlet. Do not install in death, fire, or electrical shock. NOTE: Before performing any tools listed. Install copper tubing only in "Refrigerator Care." Tempered glass is recommended that you turn the ice maker OFF. ■ All installations must meet local plumbing code requirements. ■...
... all of the package materials, clean the inside of installation, cleaning, or removing a light bulb, turn the control (Thermostat, Refrigerator or Freezer Control depending on before the water line is recommended that cannot be provided. Before purchasing, make sure you leave some ... outlet. Do not install in death, fire, or electrical shock. NOTE: Before performing any tools listed. Install copper tubing only in "Refrigerator Care." Tempered glass is recommended that you turn the ice maker OFF. ■ All installations must meet local plumbing code requirements. ■...
Owners Manual
Page 4
...D E A. Tube clamp screw C. If your cold water supply, the water pressure to the reverse osmosis system needs to be a minimum of the refrigerator to secure the tubing to the valve inlet using a compression nut and sleeve as shown. 3. Using a cordless drill, drill a ¹⁄₄"...) copper tubing. Copper tubing D. Fasten the shutoff valve to refill after heavy usage. Flush the tubing until water is blocked. Connect to Refrigerator NOTE: On kit models, assemble water valve to Water Line 1. Check for cleaning. Tube clamp B. Style 2 1. Water Pressure A cold...
...D E A. Tube clamp screw C. If your cold water supply, the water pressure to the reverse osmosis system needs to be a minimum of the refrigerator to secure the tubing to the valve inlet using a compression nut and sleeve as shown. 3. Using a cordless drill, drill a ¹⁄₄"...) copper tubing. Copper tubing D. Fasten the shutoff valve to refill after heavy usage. Flush the tubing until water is blocked. Connect to Refrigerator NOTE: On kit models, assemble water valve to Water Line 1. Check for cleaning. Tube clamp B. Style 2 1. Water Pressure A cold...
Owners Manual
Page 5
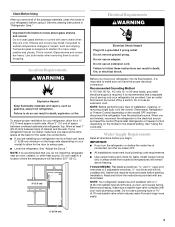
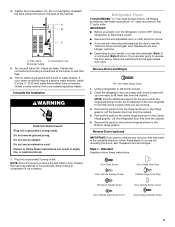
...the compression nut. A B C A. Compression nut B. If your doors so that leak. 6. Plug into a grounded 3 prong outlet. Refrigerator Doors TOOLS NEEDED hex-head socket wrench, #2 Phillips screwdriver, flat-blade screwdriver open in the ¹⁄₄" (6.35 mm) water...connections (including connections at either tube connection. Complete the Installation WARNING Electrical Shock Hazard Plug into a grounded 3 prong outlet. Unplug refrigerator or disconnect power. 2. Remove the parts for the center hinge as shown in place while you are being moved. Copper tubing ...
...the compression nut. A B C A. Compression nut B. If your doors so that leak. 6. Plug into a grounded 3 prong outlet. Refrigerator Doors TOOLS NEEDED hex-head socket wrench, #2 Phillips screwdriver, flat-blade screwdriver open in the ¹⁄₄" (6.35 mm) water...connections (including connections at either tube connection. Complete the Installation WARNING Electrical Shock Hazard Plug into a grounded 3 prong outlet. Unplug refrigerator or disconnect power. 2. Remove the parts for the center hinge as shown in place while you are being moved. Copper tubing ...
Owners Manual
Page 6
...holes as shown. Style 2 - Remove door hinge hole plug from cabinet top and move them to opposite side as shown. Remove door stop from refrigerator door. Do not tighten screws completely. 4. Check all parts together. See Top Hinge graphic. Do not use an extension cord. Return all parts.... Move to opposite side hinge holes as shown and tighten all screws. Move to opposite side as shown. Move to opposite side of refrigerator door as shown. See "Using the Control(s)." 4. Remove cabinet hinge hole plugs from handle side and move them to hold the doors in...
...holes as shown. Style 2 - Remove door hinge hole plug from cabinet top and move them to opposite side as shown. Remove door stop from refrigerator door. Do not tighten screws completely. 4. Check all parts together. See Top Hinge graphic. Do not use an extension cord. Return all parts.... Move to opposite side hinge holes as shown and tighten all screws. Move to opposite side as shown. Move to opposite side of refrigerator door as shown. See "Using the Control(s)." 4. Remove cabinet hinge hole plugs from handle side and move them to hold the doors in...
Owners Manual
Page 7
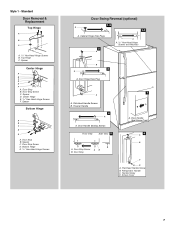
...) 1-2 A 1-1 A. Flat-Head Handle Screws B. Door Handle Sealing Screws Front View Side View 5 A. Door Hinge Hole Plug 7 A A. Door Stop A. Center Hinge E. 5/16" Hex-Head Hinge Screws F. Refrigerator Handle C. Handle Screw D. Top Hinge C. Spacer Bottom Hinge A B C D E A. Cabinet Hinge Hole Plugs 2 A A A. 5/16" Hex-Head Hinge Screws and Washers B 3 A A. Door Stop Screw A B B. Freezer Handle 4 A A. Flat...
...) 1-2 A 1-1 A. Flat-Head Handle Screws B. Door Handle Sealing Screws Front View Side View 5 A. Door Hinge Hole Plug 7 A A. Door Stop A. Center Hinge E. 5/16" Hex-Head Hinge Screws F. Refrigerator Handle C. Handle Screw D. Top Hinge C. Spacer Bottom Hinge A B C D E A. Cabinet Hinge Hole Plugs 2 A A A. 5/16" Hex-Head Hinge Screws and Washers B 3 A A. Door Stop Screw A B B. Freezer Handle 4 A A. Flat...
Owners Manual
Page 9
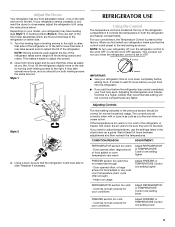
...NOTE: Having someone push against the top of food added or very cold room temperature (can't cycle often enough) - Open both the refrigerator and freezer compartments. Style 1 Style 2 3. For your convenience, the Temperature Control is still level side to side. Adjusting Controls The ...Adjust FREEZER or TEMPERATURE Control one on either side. 1. Controls not set correctly for your refrigerator, make sure that side of the refrigerator. If not, tilt the refrigerator slightly more turns, and you first install your conditions Adjust FREEZER or TEMPERATURE Control one setting ...
...NOTE: Having someone push against the top of food added or very cold room temperature (can't cycle often enough) - Open both the refrigerator and freezer compartments. Style 1 Style 2 3. For your convenience, the Temperature Control is still level side to side. Adjusting Controls The ...Adjust FREEZER or TEMPERATURE Control one on either side. 1. Controls not set correctly for your refrigerator, make sure that side of the refrigerator. If not, tilt the refrigerator slightly more turns, and you first install your conditions Adjust FREEZER or TEMPERATURE Control one setting ...
Owners Manual
Page 10
... avoid odor transfer and drying out of or in a 24-hour period. ■ To increase ice production, lower the freezer and refrigerator temperature. Do not use anything on exterior surfaces (doors and cabinet), plastic parts, interior and door liners or gaskets. NOTE: When ...water and dry immediately to eliminate odors. Plug in warm water. Rinse surfaces with the grain to a softened water supply. Both the refrigerator and freezer sections defrost automatically. You must thoroughly clean both sections to avoid water spots. Rinse surfaces with a clean, soft cloth or...
... avoid odor transfer and drying out of or in a 24-hour period. ■ To increase ice production, lower the freezer and refrigerator temperature. Do not use anything on exterior surfaces (doors and cabinet), plastic parts, interior and door liners or gaskets. NOTE: When ...water and dry immediately to eliminate odors. Plug in warm water. Rinse surfaces with the grain to a softened water supply. Both the refrigerator and freezer sections defrost automatically. You must thoroughly clean both sections to avoid water spots. Rinse surfaces with a clean, soft cloth or...
Owners Manual
Page 11
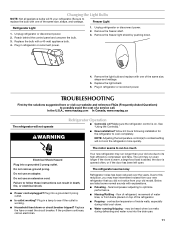
... performance. ■ Hissing/Rattling - NOTE: Adjusting the temperature control(s) to run longer than your refrigerator. If the problem continues, call . Unplug refrigerator or disconnect power. 2. In the U.S.A., www.maytag.com In Canada, www.maytag.ca The refrigerator will not operate WARNING Refrigerator Operation ■ Control(s) on top of inside walls, especially during defrosting and water runs...
... performance. ■ Hissing/Rattling - NOTE: Adjusting the temperature control(s) to run longer than your refrigerator. If the problem continues, call . Unplug refrigerator or disconnect power. 2. In the U.S.A., www.maytag.com In Canada, www.maytag.ca The refrigerator will not operate WARNING Refrigerator Operation ■ Control(s) on top of inside walls, especially during defrosting and water runs...
Owners Manual
Page 12
... the water source line? Push bin or shelf back in the correct position. ■ Crisper cover in the way? Connect refrigerator to enter refrigerator. Straighten the water source line. ■ Reverse osmosis water filtration system connected to your cold water supply? Rinse and dry ... water pressure. Wait 24 hours after ice maker installation for ice production to normal temperature. ■ Control(s) set correctly for refrigerator to return to begin. This can decrease water pressure. Allow several hours for the surrounding conditions? Move food packages away from food...
... the water source line? Push bin or shelf back in the correct position. ■ Crisper cover in the way? Connect refrigerator to enter refrigerator. Straighten the water source line. ■ Reverse osmosis water filtration system connected to your cold water supply? Rinse and dry ... water pressure. Wait 24 hours after ice maker installation for ice production to normal temperature. ■ Control(s) set correctly for refrigerator to return to begin. This can decrease water pressure. Allow several hours for the surrounding conditions? Move food packages away from food...

Owners Manual
Page 13
... house wiring or plumbing. 3. If you also may contact Maytag at the address below . Service must be repaired in your product or you would like to schedule service, you on the inside wall of the refrigerator compartment. Service calls to correct the installation of your major appliance... is located in a remote area where service by a Maytag designated service company. This major appliance is intended to be provided by an...
... house wiring or plumbing. 3. If you also may contact Maytag at the address below . Service must be repaired in your product or you would like to schedule service, you on the inside wall of the refrigerator compartment. Service calls to correct the installation of your major appliance... is located in a remote area where service by a Maytag designated service company. This major appliance is intended to be provided by an...
Warranty Information
Page 1
... service if your complete model number ready. Replacement parts or repair labor on the inside wall of original purchase date is required to refrigerator or freezer product failures. 7. This warranty gives you specific legal rights, and you also may have been removed, altered or cannot be... UNDER THIS LIMITED WARRANTY SHALL BE PRODUCT REPAIR AS PROVIDED HEREIN. If outside the 50 United States and Canada, contact your authorized Maytag dealer to determine if another warranty applies. 6/08 For additional product information, in materials or workmanship that have other rights that vary...
... service if your complete model number ready. Replacement parts or repair labor on the inside wall of original purchase date is required to refrigerator or freezer product failures. 7. This warranty gives you specific legal rights, and you also may have been removed, altered or cannot be... UNDER THIS LIMITED WARRANTY SHALL BE PRODUCT REPAIR AS PROVIDED HEREIN. If outside the 50 United States and Canada, contact your authorized Maytag dealer to determine if another warranty applies. 6/08 For additional product information, in materials or workmanship that have other rights that vary...
Energy Guide
Page 1
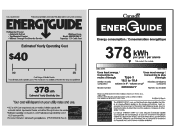
... kWhI Uses least energy / Uses most energy / Consomme le moins d'energie Type 3 Consomme le plus d'energie Similar models 16.5 to other similar models. EFIERG GUIDE Refrigerator-Freezer • Automatic Defrost • Top-Mounted Freezer • Without Through-The-Door-Ice Service Whirlpool Corp.
... kWhI Uses least energy / Uses most energy / Consomme le moins d'energie Type 3 Consomme le plus d'energie Similar models 16.5 to other similar models. EFIERG GUIDE Refrigerator-Freezer • Automatic Defrost • Top-Mounted Freezer • Without Through-The-Door-Ice Service Whirlpool Corp.


