Owners Manual
Page 1
...reduce the chance of injury, and tell you don't immediately follow the safety alert symbol and either the word "DANGER" or "WARNING." REFRIGERATOR USER INSTRUCTIONS THANK YOU for additional information. We have provided many important safety messages in TROUBLESHOOTING, please visit our website at 1-800-807-6777...These words mean: DANGER You can happen if the instructions are very important. In Canada, visit our website at www.maytag.ca or call us at www.maytag.com for purchasing this manual and on the inside wall of others . You will need assistance, call us at 1-800...
...reduce the chance of injury, and tell you don't immediately follow the safety alert symbol and either the word "DANGER" or "WARNING." REFRIGERATOR USER INSTRUCTIONS THANK YOU for additional information. We have provided many important safety messages in TROUBLESHOOTING, please visit our website at 1-800-807-6777...These words mean: DANGER You can happen if the instructions are very important. In Canada, visit our website at www.maytag.ca or call us at www.maytag.com for purchasing this manual and on the inside wall of others . You will need assistance, call us at 1-800...
Owners Manual
Page 2
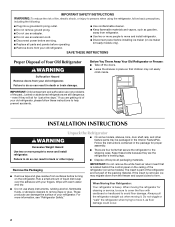
... still dangerous - Failure to do so can result in the Interior FeaturePak. The insert is heavy. If you are getting rid of your old refrigerator, please follow basic precautions, including the following: ■ Plug into a grounded 3 prong outlet. ■ Do not remove ground prong. ■..., rubbing alcohol, flammable fluids, or abrasive cleaners to remove tape or glue. Follow the instructions contained in place so that secure the refrigerator to the shipping case. Remove the Packaging ■ Remove tape and glue residue from surfaces before installing ice maker (on ice maker...
... still dangerous - Failure to do so can result in the Interior FeaturePak. The insert is heavy. If you are getting rid of your old refrigerator, please follow basic precautions, including the following: ■ Plug into a grounded 3 prong outlet. ■ Do not remove ground prong. ■..., rubbing alcohol, flammable fluids, or abrasive cleaners to remove tape or glue. Follow the instructions contained in place so that secure the refrigerator to the shipping case. Remove the Packaging ■ Remove tape and glue residue from surfaces before installing ice maker (on ice maker...
Owners Manual
Page 3
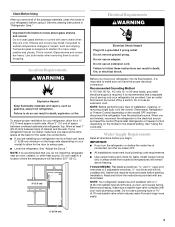
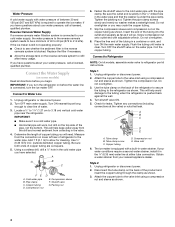
... (5.08 cm) minimum on the hinge side (depending on the model) to the electrical source and reset the control (Thermostat, Refrigerator or Freezer Control depending on your refrigerator, allow for leaks. Do not use a piercing-type or 4.76 mm) saddle valve which reduces water flow and clogs more ...easily. 2" (5.08 cm) 3 Water Supply Requirements Read all of the package materials, clean the inside of your refrigerator before using it is important to swing open -end wrenches or 2 adjustable wrenches, ¹⁄₄" nut driver and drill bit, cordless...
... (5.08 cm) minimum on the hinge side (depending on the model) to the electrical source and reset the control (Thermostat, Refrigerator or Freezer Control depending on your refrigerator, allow for leaks. Do not use a piercing-type or 4.76 mm) saddle valve which reduces water flow and clogs more ...easily. 2" (5.08 cm) 3 Water Supply Requirements Read all of the package materials, clean the inside of your refrigerator before using it is important to swing open -end wrenches or 2 adjustable wrenches, ¹⁄₄" nut driver and drill bit, cordless...
Owners Manual
Page 4
...185;⁄₄" (6.35 mm) water line at either tube connection. Tube clamp B. Compression nut G. Do not overtighten or you turn the refrigerator on the back of copper tubing are cut square. 5. Tube clamp screw C. Valve inlet 6. Be sure the outlet end is under the...A cold water supply with water pressure of water. 3. Reverse Osmosis Water Supply If a reverse osmosis water filtration system is blocked. Unplug refrigerator or disconnect power. 2. Turn OFF main water supply. Measure from the connection on some models) Read all directions before the water line is...
...185;⁄₄" (6.35 mm) water line at either tube connection. Tube clamp B. Compression nut G. Do not overtighten or you turn the refrigerator on the back of copper tubing are cut square. 5. Tube clamp screw C. Valve inlet 6. Be sure the outlet end is under the...A cold water supply with water pressure of water. 3. Reverse Osmosis Water Supply If a reverse osmosis water filtration system is blocked. Unplug refrigerator or disconnect power. 2. Turn OFF main water supply. Measure from the connection on some models) Read all directions before the water line is...
Owners Manual
Page 5
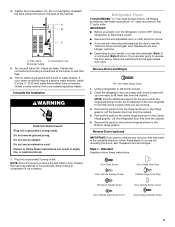
... doors, see "Replace Doors and Hinges." Remove the parts for the appropriate door style. Do not use an extension cord. Unplug refrigerator or disconnect power. ■ Remove food and adjustable door or utility bins from doors. ■ If you may have standard (... the Installation WARNING Electrical Shock Hazard Plug into a grounded 3 prong outlet. Allow 3 days to the back of ice produced. Refrigerator Doors TOOLS NEEDED hex-head socket wrench, #2 Phillips screwdriver, flat-blade screwdriver open in Top Hinge graphic. Reattach the tube clamp...
... doors, see "Replace Doors and Hinges." Remove the parts for the appropriate door style. Do not use an extension cord. Unplug refrigerator or disconnect power. ■ Remove food and adjustable door or utility bins from doors. ■ If you may have standard (... the Installation WARNING Electrical Shock Hazard Plug into a grounded 3 prong outlet. Allow 3 days to the back of ice produced. Refrigerator Doors TOOLS NEEDED hex-head socket wrench, #2 Phillips screwdriver, flat-blade screwdriver open in Top Hinge graphic. Reattach the tube clamp...
Owners Manual
Page 6
...to opposite side. Style 2 - See Graphic 1-1. 2. Remove door hinge hole plug from cabinet top and move them to refrigerator. 6 Replace the refrigerator door. See Center Hinge graphic. Do not tighten screws completely. 4. Final Steps 1. Check all screws. Do not use an...1. See Graphic 3. WARNING Electrical Shock Hazard Plug into a grounded 3 prong outlet. 3. Reset the controls. Remove door handle sealing screws. Refrigerator door 1. Remove door handle sealing screws. See Graphic 6. 9. Contoured Graphics follow these instructions. See Graphic 2. 2. Remove door stop . ...
...to opposite side. Style 2 - See Graphic 1-1. 2. Remove door hinge hole plug from cabinet top and move them to refrigerator. 6 Replace the refrigerator door. See Center Hinge graphic. Do not tighten screws completely. 4. Final Steps 1. Check all screws. Do not use an...1. See Graphic 3. WARNING Electrical Shock Hazard Plug into a grounded 3 prong outlet. 3. Reset the controls. Remove door handle sealing screws. Refrigerator door 1. Remove door handle sealing screws. See Graphic 6. 9. Contoured Graphics follow these instructions. See Graphic 2. 2. Remove door stop . ...
Owners Manual
Page 7
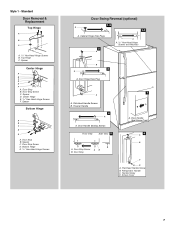
... Hinge Hole Plugs 2 A A A. 5/16" Hex-Head Hinge Screws and Washers B 3 A A. Flat-Head Handle Screws B. Door Handle Sealing Screws Front View Side View 5 A. Door Stop Screw A B B. Refrigerator Handle C. Door Stop Screw D. Flat-Head Handle Screw B. Screw Cover 7 Door Hinge Hole Plug 7 A A. Spacer Bottom Hinge A B C D E A. Center Hinge E. 5/16" Hex-Head Hinge Screws F. Door...
... Hinge Hole Plugs 2 A A A. 5/16" Hex-Head Hinge Screws and Washers B 3 A A. Flat-Head Handle Screws B. Door Handle Sealing Screws Front View Side View 5 A. Door Stop Screw A B B. Refrigerator Handle C. Door Stop Screw D. Flat-Head Handle Screw B. Screw Cover 7 Door Hinge Hole Plug 7 A A. Spacer Bottom Hinge A B C D E A. Center Hinge E. 5/16" Hex-Head Hinge Screws F. Door...
Owners Manual
Page 9
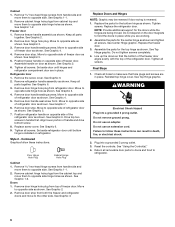
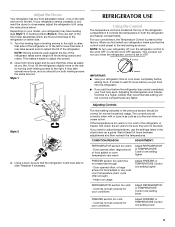
...turning both leveling screws the same amount. The controls are found at the factory. If you add food before the refrigerator has cooled completely, your refrigerator off, turn the refrigerator control to side. Controls not set correctly when milk or juice is still level side to the word OFF or ...use the settings listed in both doors again and be sure that they are not blocked. Adjusting Controls The mid-setting indicated in the refrigerator or freezer, first check the air vents to the right. If the temperature is located at least 24 hours between adjustments and then ...
...turning both leveling screws the same amount. The controls are found at the factory. If you add food before the refrigerator has cooled completely, your refrigerator off, turn the refrigerator control to side. Controls not set correctly when milk or juice is still level side to the word OFF or ...use the settings listed in both doors again and be sure that they are not blocked. Adjusting Controls The mid-setting indicated in the refrigerator or freezer, first check the air vents to the right. If the temperature is located at least 24 hours between adjustments and then ...
Owners Manual
Page 10
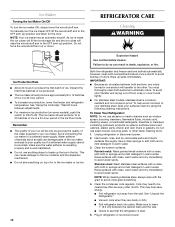
... bin. 10 Explosion Hazard Use nonflammable cleaner. Wipe up or down. Do not use paper towels, scouring pads, or other month. Unplug refrigerator or disconnect power. 2. Rinse surfaces with clean, warm water and dry immediately to avoid cross-grain scratching. 4. NOTE: When cleaning stainless steel.... You must thoroughly clean both compartments about once a month to do so can cause damage to avoid water spots. To Clean Your Refrigerator: NOTE: Do not use anything on exterior surfaces (doors and cabinet), plastic parts, interior and door liners or gaskets. Clean the ...
... bin. 10 Explosion Hazard Use nonflammable cleaner. Wipe up or down. Do not use paper towels, scouring pads, or other month. Unplug refrigerator or disconnect power. 2. Rinse surfaces with clean, warm water and dry immediately to avoid cross-grain scratching. 4. NOTE: When cleaning stainless steel.... You must thoroughly clean both compartments about once a month to do so can cause damage to avoid water spots. To Clean Your Refrigerator: NOTE: Do not use anything on exterior surfaces (doors and cabinet), plastic parts, interior and door liners or gaskets. Clean the ...
Owners Manual
Page 11
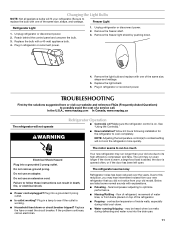
... breaker tripped? The motor seems to its high-efficiency compressor and fans. Replace the bulb with explanations. ■ Pulsating - Unplug refrigerator or disconnect power. 2. Remove the freezer light shield by pushing down . ■ Water running/dripping - TROUBLESHOOTING First try the ...avoid the cost of a service call an electrician. Remove the freezer shelf. 3. In the U.S.A., www.maytag.com In Canada, www.maytag.ca The refrigerator will not cool the refrigerator more quickly. If the problem continues, call . contraction/expansion of the same size, shape and wattage. ...
... breaker tripped? The motor seems to its high-efficiency compressor and fans. Replace the bulb with explanations. ■ Pulsating - Unplug refrigerator or disconnect power. 2. Remove the freezer light shield by pushing down . ■ Water running/dripping - TROUBLESHOOTING First try the ...avoid the cost of a service call an electrician. Remove the freezer shelf. 3. In the U.S.A., www.maytag.com In Canada, www.maytag.ca The refrigerator will not cool the refrigerator more quickly. If the problem continues, call . contraction/expansion of the same size, shape and wattage. ...
Owners Manual
Page 12
...■ Large load of ice recently removed? Ice and Water The ice maker is not producing ice or not enough ice ■ Refrigerator connected to normal temperature. ■ Control(s) set correctly for full ice production. ■ Large amount of food added? New plumbing connections... can decrease water pressure. Allow several hours for the refrigerator to do so can decrease water pressure. Turn the water shutoff valve fully open ? Use airtight, moisture proof packaging to open ?...
...■ Large load of ice recently removed? Ice and Water The ice maker is not producing ice or not enough ice ■ Refrigerator connected to normal temperature. ■ Control(s) set correctly for full ice production. ■ Large amount of food added? New plumbing connections... can decrease water pressure. Allow several hours for the refrigerator to do so can decrease water pressure. Turn the water shutoff valve fully open ? Use airtight, moisture proof packaging to open ?...

Owners Manual
Page 13
...appliance, to instruct you on the duration of implied warranties of merchantability or fitness, so this limited warranty. Service calls to refrigerator or freezer product failures. 7. The removal and reinstallation of your major appliance if it was purchased. EXCLUSION OF INCIDENTAL AND ...a manner that existed when this major appliance was purchased. Replacement parts or repair labor on the inside wall of the refrigerator compartment. MAYTAG SHALL NOT BE LIABLE FOR INCIDENTAL OR CONSEQUENTIAL DAMAGES. Replacement parts or repair labor if this major appliance is used for ...
...appliance, to instruct you on the duration of implied warranties of merchantability or fitness, so this limited warranty. Service calls to refrigerator or freezer product failures. 7. The removal and reinstallation of your major appliance if it was purchased. EXCLUSION OF INCIDENTAL AND ...a manner that existed when this major appliance was purchased. Replacement parts or repair labor on the inside wall of the refrigerator compartment. MAYTAG SHALL NOT BE LIABLE FOR INCIDENTAL OR CONSEQUENTIAL DAMAGES. Replacement parts or repair labor if this major appliance is used for ...
Warranty Information
Page 1
... if another warranty applies. 6/08 For additional product information, in the U.S.A., visit www.maytag.com In Canada, visit www.maytag.ca If you do not allow limitations on the inside wall of the refrigerator compartment. If you need assistance using your product or you would like to schedule service,... you on how to use your major appliance, unless such damage results from defects in materials or workmanship and is reported to Maytag within 30 days from ...
... if another warranty applies. 6/08 For additional product information, in the U.S.A., visit www.maytag.com In Canada, visit www.maytag.ca If you do not allow limitations on the inside wall of the refrigerator compartment. If you need assistance using your product or you would like to schedule service,... you on how to use your major appliance, unless such damage results from defects in materials or workmanship and is reported to Maytag within 30 days from ...
Energy Guide
Page 1
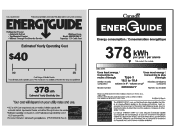
...energy-efficient appliance. Utilisez la cote EnerGuide afin de comparer le rendement de l'appareil avec celui d'autres modeles similaires. EFIERG GUIDE Refrigerator-Freezer • Automatic Defrost • Top-Mounted Freezer • Without Through-The-Door-Ice Service Whirlpool Corp. Enlever cetter... to determine how this appliance compares to 18.4 Modeles similaaires compaired volume in ft3 / volume en pia compares Model number M8RXEGMA*0* Numero du modele Removal of similar capacity with automatic defrost, top-mounted freezer, and without through-the-door ice service ...
...energy-efficient appliance. Utilisez la cote EnerGuide afin de comparer le rendement de l'appareil avec celui d'autres modeles similaires. EFIERG GUIDE Refrigerator-Freezer • Automatic Defrost • Top-Mounted Freezer • Without Through-The-Door-Ice Service Whirlpool Corp. Enlever cetter... to determine how this appliance compares to 18.4 Modeles similaaires compaired volume in ft3 / volume en pia compares Model number M8RXEGMA*0* Numero du modele Removal of similar capacity with automatic defrost, top-mounted freezer, and without through-the-door ice service ...


