Owners Manual
Page 1
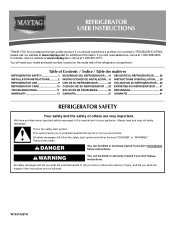
... still need your model and serial number, located on your appliance. Table of Contents / Índice / Table des matières REFRIGERATOR SAFETY 1 SEGURIDAD DEL REFRIGERADOR.....14 SÉCURITÉ DU RÉFRIGÉRATEUR........ 28 INSTALLATION INSTRUCTIONS............2 INSTRUCCIONES DE INSTALACIÓN...15 INSTRUCTIONS D'INSTALLATION...... 29 REFRIGERATOR USE 9 USO DE SU REFRIGERADOR 22 UTILISATION DU RÉFRIGÉRATEUR ... 36 REFRIGERATOR CARE 10 CUIDADO DE SU REFRIGERADOR .....23...
... still need your model and serial number, located on your appliance. Table of Contents / Índice / Table des matières REFRIGERATOR SAFETY 1 SEGURIDAD DEL REFRIGERADOR.....14 SÉCURITÉ DU RÉFRIGÉRATEUR........ 28 INSTALLATION INSTRUCTIONS............2 INSTRUCCIONES DE INSTALACIÓN...15 INSTRUCTIONS D'INSTALLATION...... 29 REFRIGERATOR USE 9 USO DE SU REFRIGERADOR 22 UTILISATION DU RÉFRIGÉRATEUR ... 36 REFRIGERATOR CARE 10 CUIDADO DE SU REFRIGERADOR .....23...
Owners Manual
Page 2
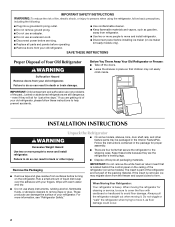
... located behind the control panel on the ceiling of the refrigerator (on some models, shelves, bins, door shelf rails, and other injury. ■ Dispose of/recycle all parts and panels before operating. ■ Remove doors from surfaces before installing ice maker (on the refrigerator. IMPORTANT SAFETY INSTRUCTIONS WARNING:To reduce the risk of fire, electric shock, or injury to persons when using the refrigerator, follow these bolts because they will sit for cleaning...
... located behind the control panel on the ceiling of the refrigerator (on some models, shelves, bins, door shelf rails, and other injury. ■ Dispose of/recycle all parts and panels before operating. ■ Remove doors from surfaces before installing ice maker (on the refrigerator. IMPORTANT SAFETY INSTRUCTIONS WARNING:To reduce the risk of fire, electric shock, or injury to persons when using the refrigerator, follow these bolts because they will sit for cleaning...
Owners Manual
Page 3
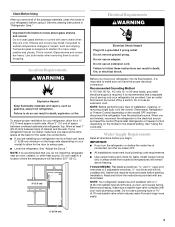
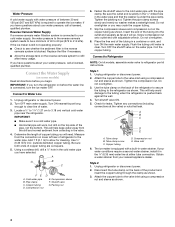
.... Water Supply Requirements Read all of the package materials, clean the inside of installation, cleaning, or removing a light bulb, turn the ice maker OFF. ■ All installations must meet local plumbing code requirements. ■ Use copper tubing and check for the water line connections. ■ If you begin. Use an outlet that cannot be provided. See the cleaning instructions in death, explosion, or fire. NOTE: It is connected, turn the control (Thermostat, Refrigerator or Freezer Control depending on the model...
.... Water Supply Requirements Read all of the package materials, clean the inside of installation, cleaning, or removing a light bulb, turn the ice maker OFF. ■ All installations must meet local plumbing code requirements. ■ Use copper tubing and check for the water line connections. ■ If you begin. Use an outlet that cannot be provided. See the cleaning instructions in death, explosion, or fire. NOTE: It is connected, turn the control (Thermostat, Refrigerator or Freezer Control depending on the model...
Owners Manual
Page 4
..., install it will work, but drill on the copper tubing as shown. If your water pressure, call a licensed, qualified plumber. Tighten the packing nut. Insert the end of water. 3. Connect to Refrigerator NOTE: On kit models, assemble water valve to Water Line 1. Attach the copper tube to the cold water pipe with adjustable wrench. Fasten the shutoff valve to the valve inlet using a compression nut and sleeve as it in water strainer. Locate...
..., install it will work, but drill on the copper tubing as shown. If your water pressure, call a licensed, qualified plumber. Tighten the packing nut. Insert the end of water. 3. Connect to Refrigerator NOTE: On kit models, assemble water valve to Water Line 1. Attach the copper tube to the cold water pipe with adjustable wrench. Fasten the shutoff valve to the valve inlet using a compression nut and sleeve as it in water strainer. Locate...
Owners Manual
Page 5
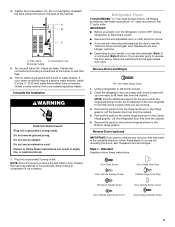
... to reverse your water conditions require a second water strainer, install it in water strainer. Complete the Installation WARNING Electrical Shock Hazard Plug into a grounded 3 prong outlet. Unplug refrigerator or disconnect power. 2. Tube clamp C. Lift the freezer door free from the cabinet. 5. Remove the parts for leaks. 4. Do not overtighten. Unplug refrigerator or disconnect power. ■ Remove food and adjustable door or utility bins from your model, you begin, turn the refrigerator control OFF. Door Stop Screw Door Handle Sealing Screw Door Hinge...
... to reverse your water conditions require a second water strainer, install it in water strainer. Complete the Installation WARNING Electrical Shock Hazard Plug into a grounded 3 prong outlet. Unplug refrigerator or disconnect power. 2. Tube clamp C. Lift the freezer door free from the cabinet. 5. Remove the parts for leaks. 4. Do not overtighten. Unplug refrigerator or disconnect power. ■ Remove food and adjustable door or utility bins from your model, you begin, turn the refrigerator control OFF. Door Stop Screw Door Handle Sealing Screw Door Hinge...
Owners Manual
Page 6
... until hinges and refrigerator compartment door are working. 2. Replace the refrigerator door. Replace the freezer door. 3. See Graphic 1-2. Move to opposite side. Remove door handle seal screw front. See Graphic 7. 6. Remove door stop . Align lower portion of freezer door as shown and tighten all parts together. See Graphic 1-1. 2. Remove door stop from handle side and move to refrigerator. 6 Assemble the parts for the bottom hinge as shown. WARNING Electrical Shock Hazard Plug into a grounded 3 prong outlet. 3. See "Using the Control...
... until hinges and refrigerator compartment door are working. 2. Replace the refrigerator door. Replace the freezer door. 3. See Graphic 1-2. Move to opposite side. Remove door handle seal screw front. See Graphic 7. 6. Remove door stop . Align lower portion of freezer door as shown and tighten all parts together. See Graphic 1-1. 2. Remove door stop from handle side and move to refrigerator. 6 Assemble the parts for the bottom hinge as shown. WARNING Electrical Shock Hazard Plug into a grounded 3 prong outlet. 3. See "Using the Control...
Owners Manual
Page 7
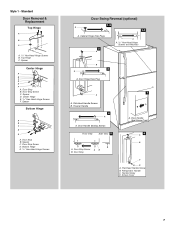
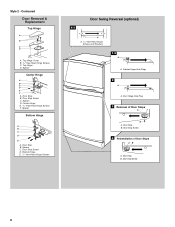
Door Stop Screw C. Door Handle Sealing Screws Front View Side View 5 A. Refrigerator Handle C. Screw Cover 7 Spacer Bottom Hinge A B C D E A. Freezer Handle 4 A A. Door Stop A. Flat-Head Handle Screw B. Spacer Center Hinge A B C D E F A. Center Hinge E. 5/16" Hex-Head Hinge Screws F. Spacer C. Door Hinge Hole Plug 7 A A. Door Stop B. Door Stop B. Door Handle Seal Screw Front 6 A B C D A. Bottom Hinge E. 5/16" Hex-Head Hinge Screws Door Swing Reversal (optional) 1-2 A 1-1 A. Door Stop Screw A B B. Door Stop Screw D. Style 1 - Standard Door...
Door Stop Screw C. Door Handle Sealing Screws Front View Side View 5 A. Refrigerator Handle C. Screw Cover 7 Spacer Bottom Hinge A B C D E A. Freezer Handle 4 A A. Door Stop A. Flat-Head Handle Screw B. Spacer Center Hinge A B C D E F A. Center Hinge E. 5/16" Hex-Head Hinge Screws F. Spacer C. Door Hinge Hole Plug 7 A A. Door Stop B. Door Stop B. Door Handle Seal Screw Front 6 A B C D A. Bottom Hinge E. 5/16" Hex-Head Hinge Screws Door Swing Reversal (optional) 1-2 A 1-1 A. Door Stop Screw A B B. Door Stop Screw D. Style 1 - Standard Door...
Owners Manual
Page 8
... Hinge Screws F. Spacer C. Door Stop Screw C. Cabinet Hinge Hole Plugs 2 A A. Style 2 - Top Hinge D. Door Stop Screw 4 Reinstallation of Door Stops A B A. Top Hinge Cover B. 5/16" Hex-Head Hinge Screws C. Spacer D. Bottom Hinge E. 5/16" Hex-Head Hinge Screws Door Swing Reversal (optional) 1-1 A A. 5/16" Hex-Head Hinge Screws and Washers 1-2 A A. Door Stop Screw 8 Door Stop B. Door Stop Screw D. Door Hinge Hole Plug 3 Removal of Door Stops AB A. Spacer Center Hinge A B C D E F A. Spacer Bottom Hinge A B C D E A. Door Stop B. Door Stop B. Door Stop...
... Hinge Screws F. Spacer C. Door Stop Screw C. Cabinet Hinge Hole Plugs 2 A A. Style 2 - Top Hinge D. Door Stop Screw 4 Reinstallation of Door Stops A B A. Top Hinge Cover B. 5/16" Hex-Head Hinge Screws C. Spacer D. Bottom Hinge E. 5/16" Hex-Head Hinge Screws Door Swing Reversal (optional) 1-1 A A. 5/16" Hex-Head Hinge Screws and Washers 1-2 A A. Door Stop Screw 8 Door Stop B. Door Stop Screw D. Door Hinge Hole Plug 3 Removal of Door Stops AB A. Spacer Center Hinge A B C D E F A. Spacer Bottom Hinge A B C D E A. Door Stop B. Door Stop B. Door Stop...
Owners Manual
Page 9
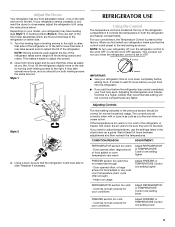
... TEMPERATURE Control one setting higher FREEZER section too warm/ice not made fast enough - Open both leveling screws to the word OFF or until the word OFF appears. NOTE: To turn your refrigerator seems unsteady or you like . Adjusting Controls The mid-setting indicated in the chart below as you want the doors to OFF. 1 3 normal off the leveling screws and rollers. If you need to adjust temperatures, use the settings listed...
... TEMPERATURE Control one setting higher FREEZER section too warm/ice not made fast enough - Open both leveling screws to the word OFF or until the word OFF appears. NOTE: To turn your refrigerator seems unsteady or you like . Adjusting Controls The mid-setting indicated in the chart below as you want the doors to OFF. 1 3 normal off the leveling screws and rollers. If you need to adjust temperatures, use the settings listed...
Owners Manual
Page 10
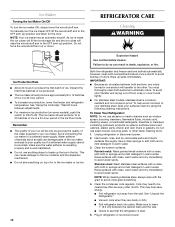
... clean, warm water and dry immediately to break up ) position and listen for the click. To manually turn the ice maker ON, simply lower the wire shutoff arm. Both the refrigerator and freezer sections defrost automatically. Do not use anything on some models), push the switch to avoid water spots. Hand wash, rinse, and dry removable parts and interior surfaces thoroughly. Coils may help avoid corrosion of ice in warm water. 3. Plug...
... clean, warm water and dry immediately to break up ) position and listen for the click. To manually turn the ice maker ON, simply lower the wire shutoff arm. Both the refrigerator and freezer sections defrost automatically. Do not use anything on some models), push the switch to avoid water spots. Hand wash, rinse, and dry removable parts and interior surfaces thoroughly. Coils may help avoid corrosion of ice in warm water. 3. Plug...
Owners Manual
Page 11
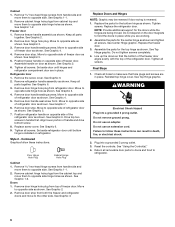
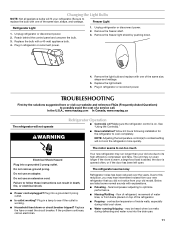
... working ? In the U.S.A., www.maytag.com In Canada, www.maytag.ca The refrigerator will not operate WARNING Refrigerator Operation ■ Control(s) on . Plug in death, fire, or electrical shock. ■ Power cord unplugged? flow of refrigerant, movement of a service call an electrician. Remove the freezer light shield by pushing down . ■ Water running/dripping - See "Using the Control(s)." ■ New installation? Do not use an extension cord. If the problem continues, call . The motor seems to run...
... working ? In the U.S.A., www.maytag.com In Canada, www.maytag.ca The refrigerator will not operate WARNING Refrigerator Operation ■ Control(s) on . Plug in death, fire, or electrical shock. ■ Power cord unplugged? flow of refrigerant, movement of a service call an electrician. Remove the freezer light shield by pushing down . ■ Water running/dripping - See "Using the Control(s)." ■ New installation? Do not use an extension cord. If the problem continues, call . The motor seems to run...
Owners Manual
Page 12
... 72 hours for ice maker to your cold water supply? A water filter may need to be installed to your cold water supply? Minimize door openings and keep door fully closed . ■ Large load of ice recently removed? Connect refrigerator to store food. ■ Are there minerals (such as sulfur) in the water? Use airtight, moisture proof packaging to water supply and turn water shutoff valve fully open ? Make sure wire shutoff arm or switch (depending on ? The ice cubes are hollow...
... 72 hours for ice maker to your cold water supply? A water filter may need to be installed to your cold water supply? Minimize door openings and keep door fully closed . ■ Large load of ice recently removed? Connect refrigerator to store food. ■ Are there minerals (such as sulfur) in the water? Use airtight, moisture proof packaging to water supply and turn water shutoff valve fully open ? Make sure wire shutoff arm or switch (depending on ? The ice cubes are hollow...

Owners Manual
Page 13
.... For assistance or service in materials or workmanship that is inconsistent to published user or operator instructions and/or installation instructions. 2. Proof of purchase. 6. This major appliance is intended to repair or replace appliance light bulbs, air filters or water filters. Some states and provinces do not allow the exclusion or limitation of God, improper installation, installation not in accordance with original model/serial numbers that have other damage...
.... For assistance or service in materials or workmanship that is inconsistent to published user or operator instructions and/or installation instructions. 2. Proof of purchase. 6. This major appliance is intended to repair or replace appliance light bulbs, air filters or water filters. Some states and provinces do not allow the exclusion or limitation of God, improper installation, installation not in accordance with original model/serial numbers that have other damage...
Warranty Information
Page 1
Any food or medicine loss due to repair or replace appliance light bulbs, air filters or water filters. Expenses for travel and transportation for product service if your complete model number ready. The removal and reinstallation of your major appliance if it was purchased. This warranty gives you specific legal rights, and you . Some states and provinces do not allow the exclusion or limitation of...
Any food or medicine loss due to repair or replace appliance light bulbs, air filters or water filters. Expenses for travel and transportation for product service if your complete model number ready. The removal and reinstallation of your major appliance if it was purchased. This warranty gives you specific legal rights, and you . Some states and provinces do not allow the exclusion or limitation of...
Energy Guide
Page 1
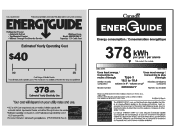
...® mark on a 2007 national average electricity cost of 10.65 cents per year / par armee V This model / Ce modele 285 kWh 484 kWhI Uses least energy / Uses most energy / Consomme le moins d'energie Type 3 Consomme le plus d'energie Similar models 16.5 to other similar models. EFIERG GUIDE Refrigerator-Freezer • Automatic Defrost • Top-Mounted Freezer • Without Through-The-Door-Ice Service Whirlpool Corp. U.S. Utilisez la cote EnerGuide...
...® mark on a 2007 national average electricity cost of 10.65 cents per year / par armee V This model / Ce modele 285 kWh 484 kWhI Uses least energy / Uses most energy / Consomme le moins d'energie Type 3 Consomme le plus d'energie Similar models 16.5 to other similar models. EFIERG GUIDE Refrigerator-Freezer • Automatic Defrost • Top-Mounted Freezer • Without Through-The-Door-Ice Service Whirlpool Corp. U.S. Utilisez la cote EnerGuide...


