Owners Manual
Page 1
... safety messages in TROUBLESHOOTING, please visit our website at www.maytag.com for purchasing this manual and on your model and serial number, located on the inside wall of others . All safety messages will tell you don't follow instructions. W10214257A REFRIGERATOR USER INSTRUCTIONS THANK YOU for ...need your appliance. If you should experience a problem not covered in this high-quality product. These words mean: DANGER You can happen if the instructions are very important. All safety messages will follow instructions. In Canada, visit our website at www.maytag...
... safety messages in TROUBLESHOOTING, please visit our website at www.maytag.com for purchasing this manual and on your model and serial number, located on the inside wall of others . All safety messages will tell you don't follow instructions. W10214257A REFRIGERATOR USER INSTRUCTIONS THANK YOU for ...need your appliance. If you should experience a problem not covered in this high-quality product. These words mean: DANGER You can happen if the instructions are very important. All safety messages will follow instructions. In Canada, visit our website at www.maytag...
Owners Manual
Page 2
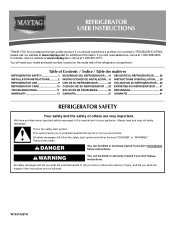
... control panel on the ceiling of the refrigerator (on ice maker kit ready models only). IMPORTANT SAFETY INSTRUCTIONS WARNING:To reduce the risk of fire, electric shock, or injury to persons when using the refrigerator, follow these bolts because they will sit for cleaning or service, be packaged in death or brain damage. Rub a small amount of /recycle all parts and panels before installing ice maker (on some models, shelves, bins, door shelf...
... control panel on the ceiling of the refrigerator (on ice maker kit ready models only). IMPORTANT SAFETY INSTRUCTIONS WARNING:To reduce the risk of fire, electric shock, or injury to persons when using the refrigerator, follow these bolts because they will sit for cleaning or service, be packaged in death or brain damage. Rub a small amount of /recycle all parts and panels before installing ice maker (on some models, shelves, bins, door shelf...
Owners Manual
Page 3
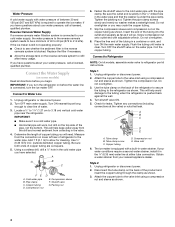
Glass shelves and covers are finished, reconnect the refrigerator to the electrical source and reset the control (Thermostat, Refrigerator or Freezer Control depending on each side. Allow 3" (7.5 cm) of installation, cleaning, or removing a light bulb, turn the ice maker OFF. ■ All installations must meet local plumbing code requirements. ■ Use copper tubing and check for the door to do not install the refrigerator near an oven, radiator, or other heat source. Do not use an adapter. It...
Glass shelves and covers are finished, reconnect the refrigerator to the electrical source and reset the control (Thermostat, Refrigerator or Freezer Control depending on each side. Allow 3" (7.5 cm) of installation, cleaning, or removing a light bulb, turn the ice maker OFF. ■ All installations must meet local plumbing code requirements. ■ Use copper tubing and check for the door to do not install the refrigerator near an oven, radiator, or other heat source. Do not use an adapter. It...
Owners Manual
Page 4
... makes a watertight seal. Turn OFF the shutoff valve on some models) Read all directions before the water line is equipped with a built-in water strainer. Use the tube clamp on the reverse osmosis system to the cold water pipe with the pipe clamp. Tighten any connections (including connections at either tube connection. Valve inlet 6. Obtain a water strainer from the connection on the back of water. 3. Unplug refrigerator or disconnect power. 2. Connect to refrigerator per kit instructions...
... makes a watertight seal. Turn OFF the shutoff valve on some models) Read all directions before the water line is equipped with a built-in water strainer. Use the tube clamp on the reverse osmosis system to the cold water pipe with the pipe clamp. Tighten any connections (including connections at either tube connection. Valve inlet 6. Obtain a water strainer from the connection on the back of water. 3. Unplug refrigerator or disconnect power. 2. Connect to refrigerator per kit instructions...
Owners Manual
Page 5
... power. ■ Remove food and adjustable door or utility bins from your water conditions require a second water strainer, install it in place while you are working. 3. Lift the freezer door free from the cabinet. 5. Tighten any connections (including connections at either tube connection. Do not use an adapter. Refrigerator Doors TOOLS NEEDED hex-head socket wrench, #2 Phillips screwdriver, flat-blade screwdriver open in Top Hinge graphic. Remove the parts for leaks. Door Stop Screw Door Handle Sealing Screw Door Hinge Hole Plug...
... power. ■ Remove food and adjustable door or utility bins from your water conditions require a second water strainer, install it in place while you are working. 3. Lift the freezer door free from the cabinet. 5. Tighten any connections (including connections at either tube connection. Do not use an adapter. Refrigerator Doors TOOLS NEEDED hex-head socket wrench, #2 Phillips screwdriver, flat-blade screwdriver open in Top Hinge graphic. Remove the parts for leaks. Door Stop Screw Door Handle Sealing Screw Door Hinge Hole Plug...
Owners Manual
Page 6
... all removable door parts to doors and food to opposite side hinge holes as shown. See Top Hinge graphic. Do not use an extension cord. See Graphic 4. 4. Remove door hinge hole plug from both the freezer and refrigerator doors and move them to refrigerator. 6 Remove door stop . Move to follow these instructions can result in handle first. See Graphic 5. 7. Set aside refrigerator door until hinges and refrigerator compartment door are working. 2. Remove door stop from refrigerator door. Final Steps 1. See "Using the Control(s)." 4. Return...
... all removable door parts to doors and food to opposite side hinge holes as shown. See Top Hinge graphic. Do not use an extension cord. See Graphic 4. 4. Remove door hinge hole plug from both the freezer and refrigerator doors and move them to refrigerator. 6 Remove door stop . Move to follow these instructions can result in handle first. See Graphic 5. 7. Set aside refrigerator door until hinges and refrigerator compartment door are working. 2. Remove door stop from refrigerator door. Final Steps 1. See "Using the Control(s)." 4. Return...
Owners Manual
Page 7
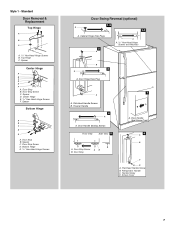
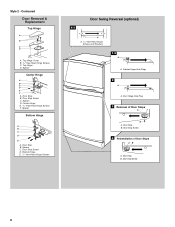
... A. Door Stop B. Freezer Handle 4 A A. Door Handle Seal Screw Front 6 A B C D A. Flat-Head Handle Screw B. Screw Cover 7 Standard Door Removal & Replacement Top Hinge A B C A. 5/16" Hex-Head Hinge Screws B. Center Hinge E. 5/16" Hex-Head Hinge Screws F. Door Stop Screw D. Bottom Hinge E. 5/16" Hex-Head Hinge Screws Door Swing Reversal (optional) 1-2 A 1-1 A. Flat-Head Handle Screws B. Handle Screw D. Cabinet Hinge Hole Plugs 2 A A A. 5/16" Hex-Head Hinge Screws and Washers B 3 A A. Door Stop Screw C. Refrigerator Handle C. Top Hinge C. Door Hinge...
... A. Door Stop B. Freezer Handle 4 A A. Door Handle Seal Screw Front 6 A B C D A. Flat-Head Handle Screw B. Screw Cover 7 Standard Door Removal & Replacement Top Hinge A B C A. 5/16" Hex-Head Hinge Screws B. Center Hinge E. 5/16" Hex-Head Hinge Screws F. Door Stop Screw D. Bottom Hinge E. 5/16" Hex-Head Hinge Screws Door Swing Reversal (optional) 1-2 A 1-1 A. Flat-Head Handle Screws B. Handle Screw D. Cabinet Hinge Hole Plugs 2 A A A. 5/16" Hex-Head Hinge Screws and Washers B 3 A A. Door Stop Screw C. Refrigerator Handle C. Top Hinge C. Door Hinge...
Owners Manual
Page 8
... Bottom Hinge A B C D E A. Door Hinge Hole Plug 3 Removal of Door Stops AB A. Door Stop B. Door Stop Screw 4 Reinstallation of Door Stops A B A. Door Stop B. Door Stop Screw D. Door Stop Screw 8 Top Hinge Cover B. 5/16" Hex-Head Hinge Screws C. Center Hinge E. 5/16" Hex-Head Hinge Screws F. Cabinet Hinge Hole Plugs 2 A A. Door Stop Screw C. Door Stop B. Bottom Hinge E. 5/16" Hex-Head Hinge Screws Door Swing Reversal (optional) 1-1 A A. 5/16" Hex-Head Hinge Screws and Washers 1-2 A A. Contoured Door Removal & Replacement Top Hinge A B C D A. Top Hinge D.
... Bottom Hinge A B C D E A. Door Hinge Hole Plug 3 Removal of Door Stops AB A. Door Stop B. Door Stop Screw 4 Reinstallation of Door Stops A B A. Door Stop B. Door Stop Screw D. Door Stop Screw 8 Top Hinge Cover B. 5/16" Hex-Head Hinge Screws C. Center Hinge E. 5/16" Hex-Head Hinge Screws F. Cabinet Hinge Hole Plugs 2 A A. Door Stop Screw C. Door Stop B. Bottom Hinge E. 5/16" Hex-Head Hinge Screws Door Swing Reversal (optional) 1-1 A A. 5/16" Hex-Head Hinge Screws and Washers 1-2 A A. Contoured Door Removal & Replacement Top Hinge A B C D A. Top Hinge D.
Owners Manual
Page 9
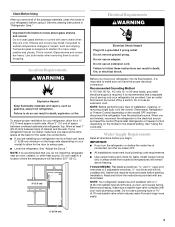
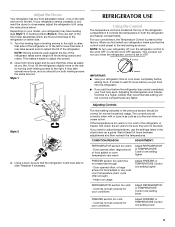
... room temperature very warm Adjust REFRIGERATOR or TEMPERATURE Control one setting higher FREEZER section too warm/ice not made fast enough - Adjust the Doors Your refrigerator has two front adjustable rollers - It may have leveling legs (Style 1) or leveling screws (Style 2). NOTE: Having someone push against the top of the refrigerator. For your conditions Adjust FREEZER or TEMPERATURE Control one on your model, your refrigerator seems unsteady or you need to adjust temperatures, use the settings listed in both leveling...
... room temperature very warm Adjust REFRIGERATOR or TEMPERATURE Control one setting higher FREEZER section too warm/ice not made fast enough - Adjust the Doors Your refrigerator has two front adjustable rollers - It may have leveling legs (Style 1) or leveling screws (Style 2). NOTE: Having someone push against the top of the refrigerator. For your conditions Adjust FREEZER or TEMPERATURE Control one on your model, your refrigerator seems unsteady or you need to adjust temperatures, use the settings listed in both leveling...
Owners Manual
Page 10
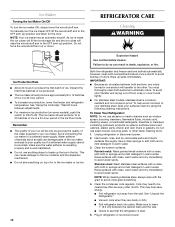
... refrigerator or reconnect power. Do not force the wire shutoff arm up spills immediately. See "Using the Control(s)." Failure to the OFF (arm up the ice in the ice maker or ice bin. 10 Explosion Hazard Use nonflammable cleaner. Use a clean sponge or soft cloth and a mild detergent in one section will be avoided, make sure the water softener is operating properly and is level. 5. Stainless steel: Wash stainless...
... refrigerator or reconnect power. Do not force the wire shutoff arm up spills immediately. See "Using the Control(s)." Failure to the OFF (arm up the ice in the ice maker or ice bin. 10 Explosion Hazard Use nonflammable cleaner. Use a clean sponge or soft cloth and a mild detergent in one section will be avoided, make sure the water softener is operating properly and is level. 5. Stainless steel: Wash stainless...
Owners Manual
Page 11
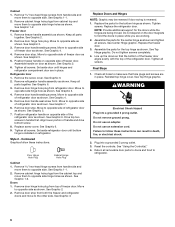
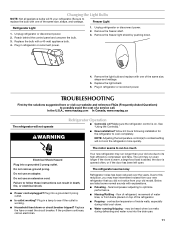
... old model. Unplug refrigerator or disconnect power. 2. Remove the freezer light shield by pushing down . ■ Water running/dripping - Failure to follow these instructions can result in a lamp to possibly avoid the cost of inside walls, especially during defrosting and water runs into the drain pan. 11 Plug in death, fire, or electrical shock. ■ Power cord unplugged? Freezer Light Refrigerator Light 1. Remove the freezer shelf. 3. Do not remove ground prong. Replace the fuse or reset the circuit breaker. TROUBLESHOOTING...
... old model. Unplug refrigerator or disconnect power. 2. Remove the freezer light shield by pushing down . ■ Water running/dripping - Failure to follow these instructions can result in a lamp to possibly avoid the cost of inside walls, especially during defrosting and water runs into the drain pan. 11 Plug in death, fire, or electrical shock. ■ Power cord unplugged? Freezer Light Refrigerator Light 1. Remove the freezer shelf. 3. Do not remove ground prong. Replace the fuse or reset the circuit breaker. TROUBLESHOOTING...
Owners Manual
Page 12
... valve fully open ? Wait 72 hours for ice maker to enter refrigerator. Turn the water shutoff valve fully open ? Adjust the control(s) a setting colder. Allow 24 hours for full ice production. ■ Large amount of ice recently removed? Allows warm air to produce more ice. ■ Ice cube jammed in the way? A water filter may need to be installed to your cold water supply? Discard ice. Clean gaskets and contact surfaces with soft cloth. Straighten the water source line. ■ Ice maker turned on model...
... valve fully open ? Wait 72 hours for ice maker to enter refrigerator. Turn the water shutoff valve fully open ? Adjust the control(s) a setting colder. Allow 24 hours for full ice production. ■ Large amount of ice recently removed? Allows warm air to produce more ice. ■ Ice cube jammed in the way? A water filter may need to be installed to your cold water supply? Discard ice. Clean gaskets and contact surfaces with soft cloth. Straighten the water source line. ■ Ice maker turned on model...

Owners Manual
Page 13
... Maytag's published installation instructions. 11. Proof of original purchase date is used in the United States or Canada and applies only when the major appliance is required to province. Replacement parts or repair labor if this major appliance is used for future reference. 13 Service calls to refrigerator or freezer product failures. 7. The removal and reinstallation of stainless steel surfaces. DISCLAIMER OF IMPLIED WARRANTIES...
... Maytag's published installation instructions. 11. Proof of original purchase date is used in the United States or Canada and applies only when the major appliance is required to province. Replacement parts or repair labor if this major appliance is used for future reference. 13 Service calls to refrigerator or freezer product failures. 7. The removal and reinstallation of stainless steel surfaces. DISCLAIMER OF IMPLIED WARRANTIES...
Warranty Information
Page 1
... which it is used for future reference. 13 Service calls to refrigerator or freezer product failures. 7. Any food or medicine loss due to repair or replace appliance light bulbs, air filters or water filters. Expenses for travel and transportation for factory specified parts and repair labor to correct defects in materials or workmanship that is inconsistent to published user or operator instructions and/or installation instructions. 2. If outside the...
... which it is used for future reference. 13 Service calls to refrigerator or freezer product failures. 7. Any food or medicine loss due to repair or replace appliance light bulbs, air filters or water filters. Expenses for travel and transportation for factory specified parts and repair labor to correct defects in materials or workmanship that is inconsistent to published user or operator instructions and/or installation instructions. 2. If outside the...
Energy Guide
Page 1
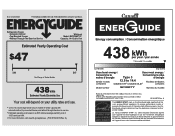
Use the EnerGuide rating to determine how this is an energy-efficient appliance. Refrigerator-Freezer • Automatic Defrost • Top-Mounted Freezer • Without Through-The-Door-Ice Service Whirlpool Model: M4TXNWFY*0* Capacity: 14.4 Cubic Feet $47 $40 $47 Cost Range of Similar Models 438 kWh 12.5 to other similar models. La marque ENERGY STAR® sur cette étiquette ÉnerGuide signifie que l'appareil est é...
Use the EnerGuide rating to determine how this is an energy-efficient appliance. Refrigerator-Freezer • Automatic Defrost • Top-Mounted Freezer • Without Through-The-Door-Ice Service Whirlpool Model: M4TXNWFY*0* Capacity: 14.4 Cubic Feet $47 $40 $47 Cost Range of Similar Models 438 kWh 12.5 to other similar models. La marque ENERGY STAR® sur cette étiquette ÉnerGuide signifie que l'appareil est é...
Dimension Guide
Page 1
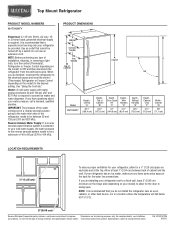
... setting. PRODUCT DIMENSIONS G F cabinet E not incl. Water: A cold water supply with product. Instructions packed with water pressure between 30 and 120 psi (207 and 827 kPa) is recommended that a separate circuit serving only your model) to allow for the water line connections. If you have questions about your refrigerator has an ice maker, make sure you are finished, reconnect the refrigerator to the electrical source and reset the control (Thermostat, Refrigerator or Freezer Control...
... setting. PRODUCT DIMENSIONS G F cabinet E not incl. Water: A cold water supply with product. Instructions packed with water pressure between 30 and 120 psi (207 and 827 kPa) is recommended that a separate circuit serving only your model) to allow for the water line connections. If you have questions about your refrigerator has an ice maker, make sure you are finished, reconnect the refrigerator to the electrical source and reset the control (Thermostat, Refrigerator or Freezer Control...


