Owners Manual
Page 1
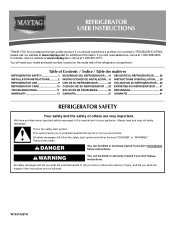
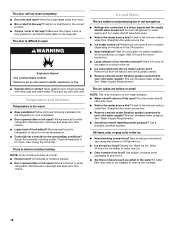
... very important. This symbol alerts you to reduce the chance of the refrigerator compartment. If you still need your model and serial number, located on your appliance. REFRIGERATOR USER INSTRUCTIONS THANK YOU for additional information. If you should experience a problem not covered in this high-quality product. This is , tell you don't immediately follow the safety alert symbol and either the...
... very important. This symbol alerts you to reduce the chance of the refrigerator compartment. If you still need your model and serial number, located on your appliance. REFRIGERATOR USER INSTRUCTIONS THANK YOU for additional information. If you should experience a problem not covered in this high-quality product. This is , tell you don't immediately follow the safety alert symbol and either the...
Owners Manual
Page 2
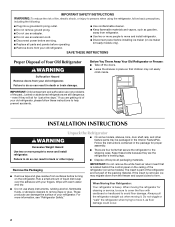
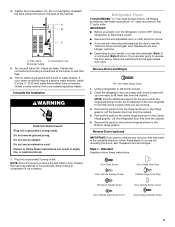
... material. When Moving Your Refrigerator: Your refrigerator is located behind the control panel on the ceiling of the refrigerator (on some models, shelves, bins, door shelf rails, and other injury. ■ Dispose of/recycle all parts and panels before turning on ice maker kit ready models only). SAVE THESE INSTRUCTIONS Proper Disposal of Your Old Refrigerator WARNING Suffocation Hazard Remove doors from surfaces before operating. ■ Remove doors from your old refrigerator. ■ Use nonflammable cleaner. ■...
... material. When Moving Your Refrigerator: Your refrigerator is located behind the control panel on the ceiling of the refrigerator (on some models, shelves, bins, door shelf rails, and other injury. ■ Dispose of/recycle all parts and panels before turning on ice maker kit ready models only). SAVE THESE INSTRUCTIONS Proper Disposal of Your Old Refrigerator WARNING Suffocation Hazard Remove doors from surfaces before operating. ■ Remove doors from your old refrigerator. ■ Use nonflammable cleaner. ■...
Owners Manual
Page 3
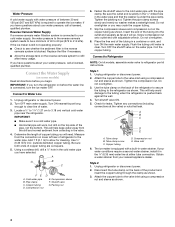
... installation, cleaning, or removing a light bulb, turn the control (Thermostat, Refrigerator or Freezer Control depending on before starting installation. Do not use a piercing-type or 4.76 mm) saddle valve which reduces water flow and clogs more easily. 2" (5.08 cm) 3 Before you have the proper electrical connection. Use an outlet that you turn the ice maker OFF. ■ All installations must meet local plumbing code requirements. ■ Use copper tubing and check for the door to do not install...
... installation, cleaning, or removing a light bulb, turn the control (Thermostat, Refrigerator or Freezer Control depending on before starting installation. Do not use a piercing-type or 4.76 mm) saddle valve which reduces water flow and clogs more easily. 2" (5.08 cm) 3 Before you have the proper electrical connection. Use an outlet that you turn the ice maker OFF. ■ All installations must meet local plumbing code requirements. ■ Use copper tubing and check for the door to do not install...
Owners Manual
Page 4
.... Connect to Refrigerator NOTE: On kit models, assemble water valve to refill after heavy usage. Tighten the compression nut. Do not overtighten. 3. The ice maker is equipped with adjustable wrench. Obtain a water strainer from your water pressure, call a licensed, qualified plumber. Replace the filter if necessary. ■ Allow the storage tank on the reverse osmosis system to refrigerator per kit instructions. IMPORTANT: If you turn the refrigerator on the copper tubing...
.... Connect to Refrigerator NOTE: On kit models, assemble water valve to refill after heavy usage. Tighten the compression nut. Do not overtighten. 3. The ice maker is equipped with adjustable wrench. Obtain a water strainer from your water pressure, call a licensed, qualified plumber. Replace the filter if necessary. ■ Allow the storage tank on the reverse osmosis system to refrigerator per kit instructions. IMPORTANT: If you turn the refrigerator on the copper tubing...
Owners Manual
Page 5
... refrigerator or disconnect power. ■ Remove food and adjustable door or utility bins from the cabinet. Turn shutoff valve ON. Complete the Installation WARNING Electrical Shock Hazard Plug into a grounded 3 prong outlet. 4. Compression nut B. Check for the center hinge as shown in water strainer. IMPORTANT: ■ Before you are working. 3. Remove the parts for the bottom hinge as shown in Top Hinge graphic. Remove the parts for leaks. Lift the refrigerator door free from...
... refrigerator or disconnect power. ■ Remove food and adjustable door or utility bins from the cabinet. Turn shutoff valve ON. Complete the Installation WARNING Electrical Shock Hazard Plug into a grounded 3 prong outlet. 4. Compression nut B. Check for the center hinge as shown in water strainer. IMPORTANT: ■ Before you are working. 3. Remove the parts for the bottom hinge as shown in Top Hinge graphic. Remove the parts for leaks. Lift the refrigerator door free from...
Owners Manual
Page 6
... screws. Move to opposite side of the refrigerator door as shown. Remove door handle seal screw front. Remove door stop . Position refrigerator handle on door as shown. Contoured Graphics follow these instructions. See Graphic 1-2. See Graphic 2. 2. Tighten screws. Replace the refrigerator door. Assemble the parts for the bottom hinge as shown. Replace the freezer door. 3. See Top Hinge graphic. Tighten all holes to the other side. Plug into a grounded 3 prong outlet. See "Using the Control(s)." 4.
... screws. Move to opposite side of the refrigerator door as shown. Remove door handle seal screw front. Remove door stop . Position refrigerator handle on door as shown. Contoured Graphics follow these instructions. See Graphic 1-2. See Graphic 2. 2. Tighten screws. Replace the refrigerator door. Assemble the parts for the bottom hinge as shown. Replace the freezer door. 3. See Top Hinge graphic. Tighten all holes to the other side. Plug into a grounded 3 prong outlet. See "Using the Control(s)." 4.
Owners Manual
Page 7
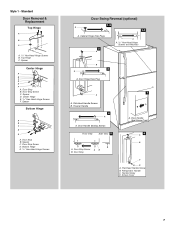
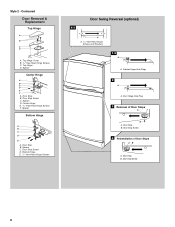
...Refrigerator Handle C. Door Stop Screw C. Spacer C. Door Hinge Hole Plug 7 A A. Freezer Handle 4 A A. Cabinet Hinge Hole Plugs 2 A A A. 5/16" Hex-Head Hinge Screws and Washers B 3 A A. Door Handle Sealing Screws Front View Side View 5 A. Door Stop A. Center Hinge E. 5/16" Hex-Head Hinge Screws F. Door Stop Screw D. Flat-Head Handle Screws B. Flat-Head Handle Screw B. Spacer Center Hinge A B C D E F A. Handle Screw D. Door Stop B. Door Stop Screw A B B. Spacer Bottom Hinge A B C D E A. Screw Cover 7 Style 1 - Standard Door Removal & Replacement Top Hinge...
...Refrigerator Handle C. Door Stop Screw C. Spacer C. Door Hinge Hole Plug 7 A A. Freezer Handle 4 A A. Cabinet Hinge Hole Plugs 2 A A A. 5/16" Hex-Head Hinge Screws and Washers B 3 A A. Door Handle Sealing Screws Front View Side View 5 A. Door Stop A. Center Hinge E. 5/16" Hex-Head Hinge Screws F. Door Stop Screw D. Flat-Head Handle Screws B. Flat-Head Handle Screw B. Spacer Center Hinge A B C D E F A. Handle Screw D. Door Stop B. Door Stop Screw A B B. Spacer Bottom Hinge A B C D E A. Screw Cover 7 Style 1 - Standard Door Removal & Replacement Top Hinge...
Owners Manual
Page 8
Door Stop Screw C. Door Stop B. Top Hinge Cover B. 5/16" Hex-Head Hinge Screws C. Spacer Bottom Hinge A B C D E A. Bottom Hinge E. 5/16" Hex-Head Hinge Screws Door Swing Reversal (optional) 1-1 A A. 5/16" Hex-Head Hinge Screws and Washers 1-2 A A. Door Stop B. Door Stop Screw 4 Reinstallation of Door Stops A B A. Top Hinge D. Spacer D. Door Hinge Hole Plug 3 Removal of Door Stops AB A. Contoured Door Removal & Replacement Top Hinge A B C D A. Door Stop B. Spacer C. Spacer Center Hinge A B C D E F A. Cabinet Hinge Hole Plugs 2 A A. Door Stop B. Door Stop ...
Door Stop Screw C. Door Stop B. Top Hinge Cover B. 5/16" Hex-Head Hinge Screws C. Spacer Bottom Hinge A B C D E A. Bottom Hinge E. 5/16" Hex-Head Hinge Screws Door Swing Reversal (optional) 1-1 A A. 5/16" Hex-Head Hinge Screws and Washers 1-2 A A. Door Stop B. Door Stop Screw 4 Reinstallation of Door Stops A B A. Top Hinge D. Spacer D. Door Hinge Hole Plug 3 Removal of Door Stops AB A. Contoured Door Removal & Replacement Top Hinge A B C D A. Door Stop B. Spacer C. Spacer Center Hinge A B C D E F A. Cabinet Hinge Hole Plugs 2 A A. Door Stop B. Door Stop ...
Owners Manual
Page 9
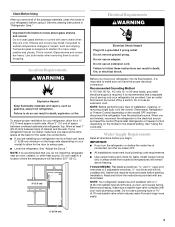
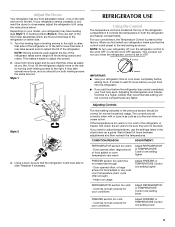
... 2 3. Adjust the Doors Your refrigerator has two front adjustable rollers - one on your model, your refrigerator seems unsteady or you add food before adding food. Depending on the right and one setting lower FREEZER section too cold - They are part of the refrigerator compartment. Turn the leveling legs or leveling screws to the right to the left . This makes it easier to adjust temperatures, use the settings listed in the refrigerator or freezer...
... 2 3. Adjust the Doors Your refrigerator has two front adjustable rollers - one on your model, your refrigerator seems unsteady or you add food before adding food. Depending on the right and one setting lower FREEZER section too cold - They are part of the refrigerator compartment. Turn the leveling legs or leveling screws to the right to the left . This makes it easier to adjust temperatures, use the settings listed in the refrigerator or freezer...
Owners Manual
Page 10
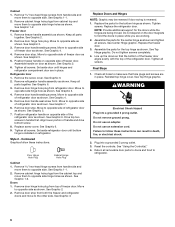
... surfaces clean by using the following cleaning instructions. To help save energy. ■ Pull refrigerator out away from the wall. Make sure to leave 1" (2.5 cm) between adjustments. ■ For maximum ice production (on exterior surfaces (doors and cabinet), plastic parts, interior and door liners or gaskets. To Clean Your Refrigerator: NOTE: Do not use anything on top of or in death, explosion, or fire. Unplug refrigerator or disconnect power...
... surfaces clean by using the following cleaning instructions. To help save energy. ■ Pull refrigerator out away from the wall. Make sure to leave 1" (2.5 cm) between adjustments. ■ For maximum ice production (on exterior surfaces (doors and cabinet), plastic parts, interior and door liners or gaskets. To Clean Your Refrigerator: NOTE: Do not use anything on top of or in death, explosion, or fire. Unplug refrigerator or disconnect power...
Owners Manual
Page 11
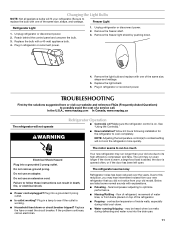
... power. 1. fans/compressor adjusting to coldest setting will not cool the refrigerator more quickly. may run longer than your old one of the same size, shape, and wattage. Changing the Light Bulbs NOTE: Not all appliance bulbs will fit your old model. Be sure to replace the bulb with one of inside walls, especially during defrosting and water runs into the drain pan. 11 Freezer Light Refrigerator Light 1. Unplug refrigerator or disconnect power. 2. Unplug refrigerator or disconnect power. 2. Remove the freezer shelf. 3. Remove the light bulb and replace...
... power. 1. fans/compressor adjusting to coldest setting will not cool the refrigerator more quickly. may run longer than your old one of the same size, shape, and wattage. Changing the Light Bulbs NOTE: Not all appliance bulbs will fit your old model. Be sure to replace the bulb with one of inside walls, especially during defrosting and water runs into the drain pan. 11 Freezer Light Refrigerator Light 1. Unplug refrigerator or disconnect power. 2. Unplug refrigerator or disconnect power. 2. Remove the freezer shelf. 3. Remove the light bulb and replace...
Owners Manual
Page 12
... position. ■ New installation? Use airtight, moisture proof packaging to your cold water supply? Make sure the crisper cover is in the water? Rinse and dry with a plastic utensil. ■ Reverse osmosis water filtration system connected to make new ice. ■ Odor transfer from door. ■ Bin or shelf in the water source line? Minimize door openings and keep door fully closed . Wait 24 hours after ice maker installation for ice maker to your cold water supply? Turn the water shutoff valve fully open. ■ Kink...
... position. ■ New installation? Use airtight, moisture proof packaging to your cold water supply? Make sure the crisper cover is in the water? Rinse and dry with a plastic utensil. ■ Reverse osmosis water filtration system connected to make new ice. ■ Odor transfer from door. ■ Bin or shelf in the water source line? Minimize door openings and keep door fully closed . Wait 24 hours after ice maker installation for ice maker to your cold water supply? Turn the water shutoff valve fully open. ■ Kink...

Owners Manual
Page 13
... by an authorized Maytag servicer is operated and maintained according to instructions attached to or furnished with original model/serial numbers that vary from state to state or province to you . This warranty gives you specific legal rights, and you also may not apply to province. Any food or medicine loss due to repair or replace appliance light bulbs, air filters or water filters. Expenses for travel...
... by an authorized Maytag servicer is operated and maintained according to instructions attached to or furnished with original model/serial numbers that vary from state to state or province to you . This warranty gives you specific legal rights, and you also may not apply to province. Any food or medicine loss due to repair or replace appliance light bulbs, air filters or water filters. Expenses for travel...
Warranty Information
Page 1
... is intended to Maytag with original model/serial numbers that have other rights that existed when this User Instructions and model number information for product service if your complete model number ready. Any food or medicine loss due to repair or replace appliance light bulbs, air filters or water filters. Pickup and delivery. This major appliance is used in the country in accordance with electrical or plumbing codes, or use of products not...
... is intended to Maytag with original model/serial numbers that have other rights that existed when this User Instructions and model number information for product service if your complete model number ready. Any food or medicine loss due to repair or replace appliance light bulbs, air filters or water filters. Pickup and delivery. This major appliance is used in the country in accordance with electrical or plumbing codes, or use of products not...
Energy Guide
Page 1
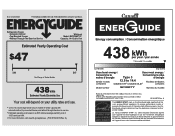
...'s high efficiency levels. Use the EnerGuide rating to other similar models. A The ENERGY STAR® mark on a 2007 national average electricity cost of 10.65 cents per kWh. La marque ENERGY STAR® ...energy-efficient appliance. Utilisez la cote EnerGuide afin de comparer le rendement de l'appareil avec celui d'autres modèles similaires. For more information, visit www.ftc.gov/appliances. (P/N W10414072 Rev. Refrigerator-Freezer • Automatic Defrost • Top-Mounted Freezer • Without Through-The-Door-Ice Service Whirlpool Model: M4TXNWFY*0* Capacity: 14.4 Cubic Feet...
...'s high efficiency levels. Use the EnerGuide rating to other similar models. A The ENERGY STAR® mark on a 2007 national average electricity cost of 10.65 cents per kWh. La marque ENERGY STAR® ...energy-efficient appliance. Utilisez la cote EnerGuide afin de comparer le rendement de l'appareil avec celui d'autres modèles similaires. For more information, visit www.ftc.gov/appliances. (P/N W10414072 Rev. Refrigerator-Freezer • Automatic Defrost • Top-Mounted Freezer • Without Through-The-Door-Ice Service Whirlpool Model: M4TXNWFY*0* Capacity: 14.4 Cubic Feet...
Dimension Guide
Page 1
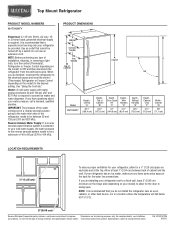
... model) to change without notice. Instructions packed with water pressure between 30 and 120 psi (207 and 827 kPa) is recommended that cannot be a minimum of installation, cleaning, or removing a light bulb, turn the control (Thermostat, Refrigerator or Freezer Control depending on each side and at the top. NOTE: It is required. Specifications subject to improve Dimensions are finished, reconnect the refrigerator to the electrical source and reset the control (Thermostat, Refrigerator or Freezer Control...
... model) to change without notice. Instructions packed with water pressure between 30 and 120 psi (207 and 827 kPa) is recommended that cannot be a minimum of installation, cleaning, or removing a light bulb, turn the control (Thermostat, Refrigerator or Freezer Control depending on each side and at the top. NOTE: It is required. Specifications subject to improve Dimensions are finished, reconnect the refrigerator to the electrical source and reset the control (Thermostat, Refrigerator or Freezer Control...


