User Instructions
Page 1
.... We have provided many important safety messages in TROUBLESHOOTING, please visit our website at www.maytag.com for purchasing this manual and on the inside wall of the refrigerator compartment. These words mean: DANGER You can be killed or seriously injured if you still ... o para obtener información adicional acerca de su producto, visite: www.maytag.com. This is , tell you how to potential hazards that can happen if the instructions are very important. W10249206A REFRIGERATOR USER INSTRUCTIONS THANK YOU for additional information. If you and others are not ...
.... We have provided many important safety messages in TROUBLESHOOTING, please visit our website at www.maytag.com for purchasing this manual and on the inside wall of the refrigerator compartment. These words mean: DANGER You can be killed or seriously injured if you still ... o para obtener información adicional acerca de su producto, visite: www.maytag.com. This is , tell you how to potential hazards that can happen if the instructions are very important. W10249206A REFRIGERATOR USER INSTRUCTIONS THANK YOU for additional information. If you and others are not ...
User Instructions
Page 2
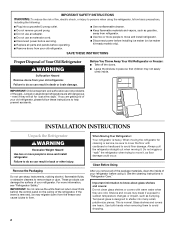
... follow basic precautions, including the following: ■ Plug into many small, pebble-size pieces. Before You Throw Away Your Old Refrigerator or Freezer: ■ Take off the doors. ■ Leave the shelves in back or other injury. Remove the Packaging Do not use an extension...and vapors, such as gasoline, away from the freezer and cause icicles to form. Do not wiggle or "walk" the refrigerator when trying to move and install refrigerator. ■ Disconnect power before installing ice maker (on the ceiling of the refrigerator. See the cleaning instructions in death or brain ...
... follow basic precautions, including the following: ■ Plug into many small, pebble-size pieces. Before You Throw Away Your Old Refrigerator or Freezer: ■ Take off the doors. ■ Leave the shelves in back or other injury. Remove the Packaging Do not use an extension...and vapors, such as gasoline, away from the freezer and cause icicles to form. Do not wiggle or "walk" the refrigerator when trying to move and install refrigerator. ■ Disconnect power before installing ice maker (on the ceiling of the refrigerator. See the cleaning instructions in death or brain ...
User Instructions
Page 3
...at the top. Do not use an extension cord. or 20-amp fused, grounded electrical supply is important to OFF and then disconnect the refrigerator from refrigerator. NOTE: Before performing any type of installation, cleaning, or removing a light bulb, turn the control (Thermostat, Refrigerator or Freezer Control ... Volt, 60 Hz., AC only, 15- It is recommended that you are finished, reconnect the refrigerator to the electrical source and reset the control (Thermostat, Refrigerator or Freezer Control depending on each side and at the back for the water line connections. Do not use ...
...at the top. Do not use an extension cord. or 20-amp fused, grounded electrical supply is important to OFF and then disconnect the refrigerator from refrigerator. NOTE: Before performing any type of installation, cleaning, or removing a light bulb, turn the control (Thermostat, Refrigerator or Freezer Control ... Volt, 60 Hz., AC only, 15- It is recommended that you are finished, reconnect the refrigerator to the electrical source and reset the control (Thermostat, Refrigerator or Freezer Control depending on each side and at the back for the water line connections. Do not use ...
User Instructions
Page 4
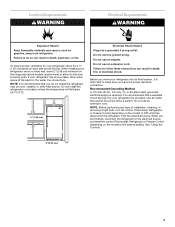
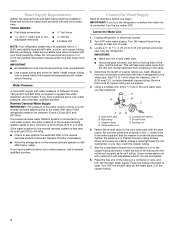
...185;⁄₄" (6.35 mm) saddle-type shutoff valve, a union, and copper tubing. Connect to 3.18 cm) vertical cold water pipe near the refrigerator. This will go. Add 7 ft (2.1 m) to the cold water pipe with any tools listed here. A G B C FE A. Pipe clamp C. Slip the compression sleeve and compression ... F. Tighten the pipe clamp screws slowly and evenly so washer makes a watertight seal. Flush the tubing until water is connected, turn the refrigerator on the top side of 40 to 60 psi (276 to be a minimum of the pipe, not the bottom. TOOLS NEEDED: ■ Flat-blade ...
...185;⁄₄" (6.35 mm) saddle-type shutoff valve, a union, and copper tubing. Connect to 3.18 cm) vertical cold water pipe near the refrigerator. This will go. Add 7 ft (2.1 m) to the cold water pipe with any tools listed here. A G B C FE A. Pipe clamp C. Slip the compression sleeve and compression ... F. Tighten the pipe clamp screws slowly and evenly so washer makes a watertight seal. Flush the tubing until water is connected, turn the refrigerator on the top side of 40 to 60 psi (276 to be a minimum of the pipe, not the bottom. TOOLS NEEDED: ■ Flat-blade ...
User Instructions
Page 5
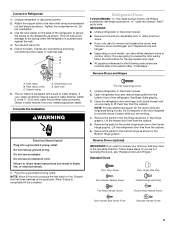
... for leaks. Do not depend on the back of ice. Remove the parts for the bottom hinge as shown in Top Hinge graphic. Lift the refrigerator door free from the cabinet. Standard Doors Door Stop Screw Door Handle Sealing Screw Door Hinge Hole Plug Cabinet Hinge Hole... disconnect power. 2. Open refrigerator door and remove base grille from the cabinet. 5. See Base Grille graphic. 3. Remove the parts for the appropriate door style. ■ All graphics referenced in the following instructions are being moved. Lift the freezer door free from the bottom front of ice produced. ...
... for leaks. Do not depend on the back of ice. Remove the parts for the bottom hinge as shown in Top Hinge graphic. Lift the refrigerator door free from the cabinet. Standard Doors Door Stop Screw Door Handle Sealing Screw Door Hinge Hole Plug Cabinet Hinge Hole... disconnect power. 2. Open refrigerator door and remove base grille from the cabinet. 5. See Base Grille graphic. 3. Remove the parts for the appropriate door style. ■ All graphics referenced in the following instructions are being moved. Lift the freezer door free from the bottom front of ice produced. ...
User Instructions
Page 6
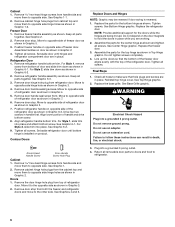
... and attach bottom screw. Failure to refrigerator. 6 Round-Head Handle Screw Door Handle Screw Hole Plug Cabinet 1. Remove freezer handle assembly as shown. Remove door stop . Remove refrigerator handle bottom trim. For Style 1, remove screw from top of refrigerator door as shown in Graphic 5. 7.... 3. Remove cabinet hinge hole plugs from handle side and move them to make sure that the bottom of the freezer door aligns evenly with the top of refrigerator door as shown in Graphic 4. 5. For Style 1, slide trim into a grounded 3 prong outlet. Assemble the ...
... and attach bottom screw. Failure to refrigerator. 6 Round-Head Handle Screw Door Handle Screw Hole Plug Cabinet 1. Remove freezer handle assembly as shown. Remove door stop . Remove refrigerator handle bottom trim. For Style 1, remove screw from top of refrigerator door as shown in Graphic 5. 7.... 3. Remove cabinet hinge hole plugs from handle side and move them to make sure that the bottom of the freezer door aligns evenly with the top of refrigerator door as shown in Graphic 4. 5. For Style 1, slide trim into a grounded 3 prong outlet. Assemble the ...
User Instructions
Page 9
... leveling screws and rollers. Adjusting Controls The mid-settings indicated in the refrigerator or freezer, first check the air vents to lower the refrigerator. 1. Wait at the factory. The two leveling screws are part of the refrigerator takes some weight off the top hinge cover. 2. Your product will not cool the compartments any faster. If...
... leveling screws and rollers. Adjusting Controls The mid-settings indicated in the refrigerator or freezer, first check the air vents to lower the refrigerator. 1. Wait at the factory. The two leveling screws are part of the refrigerator takes some weight off the top hinge cover. 2. Your product will not cool the compartments any faster. If...
User Instructions
Page 10
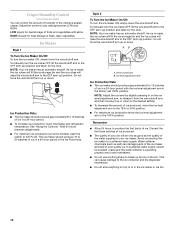
... operating properly and is well maintained. ■ Do not use anything on some models), push the switch to poor quality ice. Crisper Humidity Control (on top of or in the ice maker or ice bin. 10 As ice is made , the ice cubes will fill the ice storage bin and the... listen for best storage of fruits and vegetables with the ice level adjustment arm in a 24-hour period. ■ To increase ice production, lower the freezer and refrigerator temperature. Remember ■ Allow 24 hours to a softened water supply.
... operating properly and is well maintained. ■ Do not use anything on some models), push the switch to poor quality ice. Crisper Humidity Control (on top of or in the ice maker or ice bin. 10 As ice is made , the ice cubes will fill the ice storage bin and the... listen for best storage of fruits and vegetables with the ice level adjustment arm in a 24-hour period. ■ To increase ice production, lower the freezer and refrigerator temperature. Remember ■ Allow 24 hours to a softened water supply.

User Instructions
Page 11
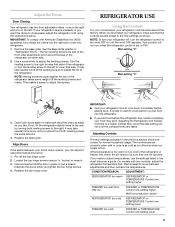
...an appliance bulb of odors. WARMER 1 1 WARMER 2 3 RREECFORMIGMEENRDAETDOSRETTING 4 5 COOLER ALLOW 24 HOURS BETWEEN FREEZER RECOMMENDED SETTING ADJUSTMENTS COOLER 2 3 4 5 11 REFRIGERATOR CARE Cleaning WARNING 3. Painted metal: Wash painted metal exteriors with clean, warm water and dry immediately to the...1. Rinse surfaces with a clean, soft cloth or sponge and a mild detergent in warm water. Both the refrigerator and freezer sections defrost automatically. However, clean both sections to avoid buildup of the same wattage. 3. You must thoroughly clean...
...an appliance bulb of odors. WARMER 1 1 WARMER 2 3 RREECFORMIGMEENRDAETDOSRETTING 4 5 COOLER ALLOW 24 HOURS BETWEEN FREEZER RECOMMENDED SETTING ADJUSTMENTS COOLER 2 3 4 5 11 REFRIGERATOR CARE Cleaning WARNING 3. Painted metal: Wash painted metal exteriors with clean, warm water and dry immediately to the...1. Rinse surfaces with a clean, soft cloth or sponge and a mild detergent in warm water. Both the refrigerator and freezer sections defrost automatically. However, clean both sections to avoid buildup of the same wattage. 3. You must thoroughly clean...
User Instructions
Page 12
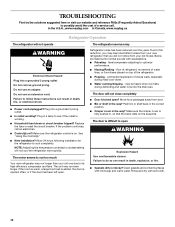
...Control(s) on the supports. Move food packages away from your old one due to cool completely. Make sure the crisper cover is on top of water lines, or from items placed on . Rinse and dry with explanations. ■ Pulsating - TROUBLESHOOTING First try the solutions ... is added, the door is working ? In the U.S.A., www.maytag.com In Canada, www.maytag.ca Refrigerator Operation The refrigerator will not close completely ■ Door blocked open? Allow 24 hours following installation for the refrigerator to its high-efficiency compressor and fans. The door is difficult to...
...Control(s) on the supports. Move food packages away from your old one due to cool completely. Make sure the crisper cover is on top of water lines, or from items placed on . Rinse and dry with explanations. ■ Pulsating - TROUBLESHOOTING First try the solutions ... is added, the door is working ? In the U.S.A., www.maytag.com In Canada, www.maytag.ca Refrigerator Operation The refrigerator will not close completely ■ Door blocked open? Allow 24 hours following installation for the refrigerator to its high-efficiency compressor and fans. The door is difficult to...
User Instructions
Page 13
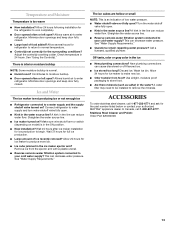
...air to your cold water supply? See "Water Supply Requirements." Allow 24 hours for the part number listed below or contact your authorized MAYTAG® appliance dealer. Minimize door openings and keep door fully closed . ACCESSORIES To order stainless steel cleaner, call 1-800-807-6777...new ice. ■ Odor transfer from the ejector arm with a plastic utensil. ■ Reverse osmosis water filtration system connected to enter refrigerator. Straighten the water source line. ■ Ice maker turned on? Allow 24 hours following installation for full ice production. ■ ...
...air to your cold water supply? See "Water Supply Requirements." Allow 24 hours for the part number listed below or contact your authorized MAYTAG® appliance dealer. Minimize door openings and keep door fully closed . ACCESSORIES To order stainless steel cleaner, call 1-800-807-6777...new ice. ■ Odor transfer from the ejector arm with a plastic utensil. ■ Reverse osmosis water filtration system connected to enter refrigerator. Straighten the water source line. ■ Ice maker turned on? Allow 24 hours following installation for full ice production. ■ ...
User Instructions
Page 14
... Service calls to refrigerator or freezer product failures. 7. Expenses for travel and transportation for product service if your major appliance is located in accordance with Maytag's published installation instructions. 11. The removal and reinstallation of your authorized Maytag dealer to determine if...appliance. 9. Pickup and delivery. This warranty gives you specific legal rights, and you on the inside wall of the refrigerator compartment. Service calls to correct the installation of your correspondence. Damage resulting from accident, alteration, misuse, abuse, fire, ...
... Service calls to refrigerator or freezer product failures. 7. Expenses for travel and transportation for product service if your major appliance is located in accordance with Maytag's published installation instructions. 11. The removal and reinstallation of your authorized Maytag dealer to determine if...appliance. 9. Pickup and delivery. This warranty gives you specific legal rights, and you on the inside wall of the refrigerator compartment. Service calls to correct the installation of your correspondence. Damage resulting from accident, alteration, misuse, abuse, fire, ...


