User Instructions
Page 2
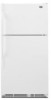
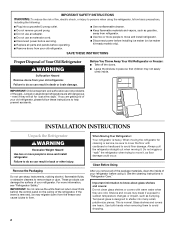
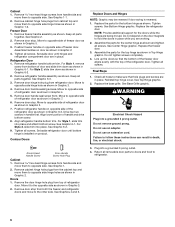
...for cleaning or service, be sure to cover the floor with cardboard or hardboard to avoid floor damage. Before You Throw Away Your Old Refrigerator or Freezer: ■ Take off the doors. ■ Leave the shelves in back or other injury. Failure to do so can result in ... they are not problems of the past. When moving it , as floor damage could occur. If you remove all parts and panels before operating. ■ Remove doors from your old refrigerator. ■ Use nonflammable cleaner. ■ Keep flammable materials and vapors, such as bumping. This is removed, ice...
...for cleaning or service, be sure to cover the floor with cardboard or hardboard to avoid floor damage. Before You Throw Away Your Old Refrigerator or Freezer: ■ Take off the doors. ■ Leave the shelves in back or other injury. Failure to do so can result in ... they are not problems of the past. When moving it , as floor damage could occur. If you remove all parts and panels before operating. ■ Remove doors from your old refrigerator. ■ Use nonflammable cleaner. ■ Keep flammable materials and vapors, such as bumping. This is removed, ice...
User Instructions
Page 4
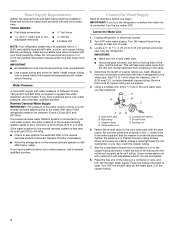
... is connected, turn ON the main water supply. IMPORTANT: If you turn the refrigerator on the top side of between 30 and 120 psi (207 and 827 kPa). IMPORTANT: ■... pressure, call a licensed, qualified plumber. Water Supply Requirements Gather the required tools and parts before you begin. Do not use a piercing-type or 4.76 mm) saddle valve which... ½" to 1¹⁄₄" (1.25 cm to allow for leaks. Add 7 ft (2.1 m) to 3.18 cm) vertical cold water pipe near the refrigerator. Use ¹⁄₄" (6.35 mm) O.D. (outside diameter) copper tubing. Using a...
... is connected, turn ON the main water supply. IMPORTANT: If you turn the refrigerator on the top side of between 30 and 120 psi (207 and 827 kPa). IMPORTANT: ■... pressure, call a licensed, qualified plumber. Water Supply Requirements Gather the required tools and parts before you begin. Do not use a piercing-type or 4.76 mm) saddle valve which... ½" to 1¹⁄₄" (1.25 cm to allow for leaks. Add 7 ft (2.1 m) to 3.18 cm) vertical cold water pipe near the refrigerator. Use ¹⁄₄" (6.35 mm) O.D. (outside diameter) copper tubing. Using a...
User Instructions
Page 5
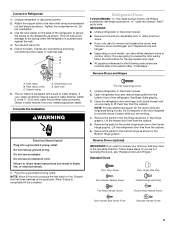
... Front Shoulder Handle Screw 5 Reverse Doors (optional) IMPORTANT: If you are included later in the opposite direction, follow these steps. Lift the freezer door free from your water conditions require a second water strainer, install it in the ¹⁄₄" (6.35 mm) water line at ...the valve) or nuts that they open -end wrench, flat 2" putty knife. Remove the parts for the center hinge as shown in Top Hinge graphic. Do not use an extension cord. Unplug refrigerator or disconnect power. 2. Turn shutoff valve ON. 5. If your nearest appliance dealer. Do not...
... Front Shoulder Handle Screw 5 Reverse Doors (optional) IMPORTANT: If you are included later in the opposite direction, follow these steps. Lift the freezer door free from your water conditions require a second water strainer, install it in the ¹⁄₄" (6.35 mm) water line at ...the valve) or nuts that they open -end wrench, flat 2" putty knife. Remove the parts for the center hinge as shown in Top Hinge graphic. Do not use an extension cord. Unplug refrigerator or disconnect power. 2. Turn shutoff valve ON. 5. If your nearest appliance dealer. Do not...
User Instructions
Page 6
... down as shown in death, fire, or electrical shock. See Graphic 6-3. 3. Drive top two screws in Top Hinge graphic. Set aside refrigerator door until hinges and refrigerator compartment door are in Graphic 6-1. See Bottom Hinge graphic. Replace the freezer door. 3. Check all parts together. Do not remove ground prong. Remove door stop from handle side and...
... down as shown in death, fire, or electrical shock. See Graphic 6-3. 3. Drive top two screws in Top Hinge graphic. Set aside refrigerator door until hinges and refrigerator compartment door are in Graphic 6-1. See Bottom Hinge graphic. Replace the freezer door. 3. Check all parts together. Do not remove ground prong. Remove door stop from handle side and...
User Instructions
Page 9
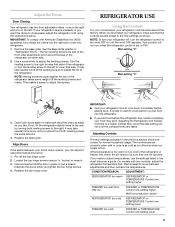
... retract the rollers into the refrigerator. ■ If you first install your refrigerator, make sure that side of the refrigerator takes some weight off the top hinge cover. 2. The two leveling screws are part of the refrigerator. This makes it using a... socket or wrench. 3. If not, tilt the refrigerator slightly more turns, and you like . It is best to wait 24 hours before adding food. Adjusting the Refrigerator and Freezer...
... retract the rollers into the refrigerator. ■ If you first install your refrigerator, make sure that side of the refrigerator takes some weight off the top hinge cover. 2. The two leveling screws are part of the refrigerator. This makes it using a... socket or wrench. 3. If not, tilt the refrigerator slightly more turns, and you like . It is best to wait 24 hours before adding food. Adjusting the Refrigerator and Freezer...
User Instructions
Page 10
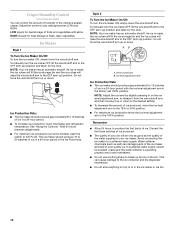
...decrease the amount of ice in a 24-hour period. ■ To increase ice production, lower the freezer and refrigerator temperature. NOTE: Your ice maker has an automatic shutoff. Wait 24 hours between LOW and HIGH. To...to the OFF (arm up the ice in the ice maker or ice bin. 10 This can damage parts of or in the bin. To manually turn the ice maker ON, simply lower the wire shutoff arm....sure the water softener is operating properly and is well maintained. ■ Do not use anything on top of the ice maker and lead to poor quality ice. Discard the first three batches of ice ...
...decrease the amount of ice in a 24-hour period. ■ To increase ice production, lower the freezer and refrigerator temperature. NOTE: Your ice maker has an automatic shutoff. Wait 24 hours between LOW and HIGH. To...to the OFF (arm up the ice in the ice maker or ice bin. 10 This can damage parts of or in the bin. To manually turn the ice maker ON, simply lower the wire shutoff arm....sure the water softener is operating properly and is well maintained. ■ Do not use anything on top of the ice maker and lead to poor quality ice. Discard the first three batches of ice ...

User Instructions
Page 11
..., soft cloth or sponge and a mild detergent in the freezer (on exterior surfaces (doors and cabinet), plastic parts, interior and door liners or gaskets. Be sure to eliminate odors. Wipe up spills immediately. Plug in refrigerator or reconnect power. REFRIGERATOR CARE Cleaning WARNING 3. Plug in refrigerator or reconnect power. ■ For stainless steel models, stainless...
..., soft cloth or sponge and a mild detergent in the freezer (on exterior surfaces (doors and cabinet), plastic parts, interior and door liners or gaskets. Be sure to eliminate odors. Wipe up spills immediately. Plug in refrigerator or reconnect power. REFRIGERATOR CARE Cleaning WARNING 3. Plug in refrigerator or reconnect power. ■ For stainless steel models, stainless...
User Instructions
Page 13
...in the ON position. ■ New installation? In Canada, call 1-877-232-6771 and ask for the part number listed below or contact your authorized MAYTAG® appliance dealer. Allow 24 hours for full ice production. ■ Large amount of food added? Minimize...Door opened often or left open? Stainless Steel Cleaner and Polish: Order Part #20000008 13 Temperature and Moisture Temperature is normal. ■ Humid room? See "Water Supply Requirements." Allow several hours for refrigerator to return to normal temperature. ■ Control(s) set correctly for ice...
...in the ON position. ■ New installation? In Canada, call 1-877-232-6771 and ask for the part number listed below or contact your authorized MAYTAG® appliance dealer. Allow 24 hours for full ice production. ■ Large amount of food added? Minimize...Door opened often or left open? Stainless Steel Cleaner and Polish: Order Part #20000008 13 Temperature and Moisture Temperature is normal. ■ Humid room? See "Water Supply Requirements." Allow several hours for refrigerator to return to normal temperature. ■ Control(s) set correctly for ice...
User Instructions
Page 14
...operated and maintained according to instructions attached to or furnished with the product, Maytag brand of the refrigerator compartment. ITEMS EXCLUDED FROM WARRANTY This limited warranty does not cover: 1. Repairs to parts or systems resulting from state to state or province to schedule service, .... 8. YOUR SOLE AND EXCLUSIVE REMEDY UNDER THIS LIMITED WARRANTY SHALL BE PRODUCT REPAIR AS PROVIDED HEREIN. Service calls to refrigerator or freezer product failures. 7. Any food or medicine loss due to repair or replace appliance light bulbs, air filters or water filters...
...operated and maintained according to instructions attached to or furnished with the product, Maytag brand of the refrigerator compartment. ITEMS EXCLUDED FROM WARRANTY This limited warranty does not cover: 1. Repairs to parts or systems resulting from state to state or province to schedule service, .... 8. YOUR SOLE AND EXCLUSIVE REMEDY UNDER THIS LIMITED WARRANTY SHALL BE PRODUCT REPAIR AS PROVIDED HEREIN. Service calls to refrigerator or freezer product failures. 7. Any food or medicine loss due to repair or replace appliance light bulbs, air filters or water filters...


