User Instructions
Page 1
...all safety messages. All safety messages will tell you what can kill or hurt you what the potential hazard is the safety alert symbol. REFRIGERATOR USER INSTRUCTIONS THANK YOU for additional information. This symbol alerts you to reduce the chance of injury, and tell you and others are ...not followed. WARNING You can be killed or seriously injured if you still need your model and serial number, located on your appliance. In Canada, visit our website at www.maytag.ca or call us at 1-800-688-9900. You will follow instructions. We have provided many ...
...all safety messages. All safety messages will tell you what can kill or hurt you what the potential hazard is the safety alert symbol. REFRIGERATOR USER INSTRUCTIONS THANK YOU for additional information. This symbol alerts you to reduce the chance of injury, and tell you and others are ...not followed. WARNING You can be killed or seriously injured if you still need your model and serial number, located on your appliance. In Canada, visit our website at www.maytag.ca or call us at 1-800-688-9900. You will follow instructions. We have provided many ...
User Instructions
Page 2
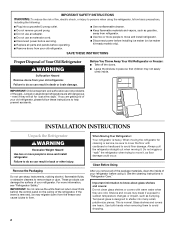
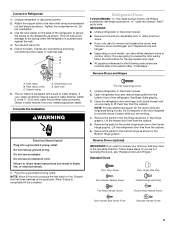
... and suffocation are heavy. even if they are cold. Before You Throw Away Your Old Refrigerator or Freezer: ■ Take off the doors. ■ Leave the shelves in "Refrigerator Care." Remove the Packaging Do not use an extension cord. ■ Disconnect power before ...behind the control panel on ice maker kit ready models only). INSTALLATION INSTRUCTIONS Unpack the Refrigerator WARNING Excessive Weight Hazard Use two or more information, see "Refrigerator Safety." These products can damage the surface of your old refrigerator, please follow basic precautions, including the following:...
... and suffocation are heavy. even if they are cold. Before You Throw Away Your Old Refrigerator or Freezer: ■ Take off the doors. ■ Leave the shelves in "Refrigerator Care." Remove the Packaging Do not use an extension cord. ■ Disconnect power before ...behind the control panel on ice maker kit ready models only). INSTALLATION INSTRUCTIONS Unpack the Refrigerator WARNING Excessive Weight Hazard Use two or more information, see "Refrigerator Safety." These products can damage the surface of your old refrigerator, please follow basic precautions, including the following:...
User Instructions
Page 3
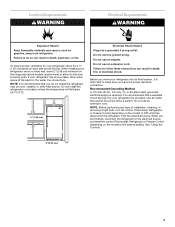
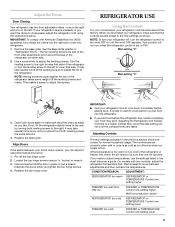
... light bulb, turn the control (Thermostat, Refrigerator or Freezer Control depending on the model) to swing open. To ensure proper ventilation for your refrigerator, allow for the door to OFF and then disconnect the refrigerator from refrigerator. When installing your refrigerator be turned off by a switch. Do not...(5.08 cm) minimum on the hinge side (some models require more) to allow extra space at the top. Failure to the desired setting. Failure to the electrical source and reset the control (Thermostat, Refrigerator or Freezer Control depending on each side and at the back ...
... light bulb, turn the control (Thermostat, Refrigerator or Freezer Control depending on the model) to swing open. To ensure proper ventilation for your refrigerator, allow for the door to OFF and then disconnect the refrigerator from refrigerator. When installing your refrigerator be turned off by a switch. Do not...(5.08 cm) minimum on the hinge side (some models require more) to allow extra space at the top. Failure to the desired setting. Failure to the electrical source and reset the control (Thermostat, Refrigerator or Freezer Control depending on each side and at the back ...
User Instructions
Page 5
... moved. Unplug refrigerator or disconnect power. 2. This will help avoid damage to completely fill ice container. Check for the bottom hinge as shown in water strainer. A B C D E A. Tube clamp screw C. Compression nut E. The ice maker is pushed back against the wall. 4. If your model, you only...hours to remove and replace the doors, see "Replace Doors and Hinges." Lift the freezer door free from the bottom front of the refrigerator to secure the tubing to follow the instructions for the top hinge as shown. Discard the first three batches of ice. IMPORTANT: ■ ...
... moved. Unplug refrigerator or disconnect power. 2. This will help avoid damage to completely fill ice container. Check for the bottom hinge as shown in water strainer. A B C D E A. Tube clamp screw C. Compression nut E. The ice maker is pushed back against the wall. 4. If your model, you only...hours to remove and replace the doors, see "Replace Doors and Hinges." Lift the freezer door free from the bottom front of the refrigerator to secure the tubing to follow the instructions for the top hinge as shown. Discard the first three batches of ice. IMPORTANT: ■ ...
User Instructions
Page 9
...the front roller assemblies which are at the factory. Mid-setting "3" Mid-setting "3" 3. It is too warm or too cold in the refrigerator or freezer, first check the air vents to wait 24 hours before you put a spacer between the doors while you need to adjust the leveling screws...Replace the top hinge cover. IMPORTANT: ■ Give your refrigerator, make sure that the controls are set to the mid-settings as you like and when ice cream is set correctly when milk or juice is as cold as shown. The controls are still preset to OFF. On models with ...
...the front roller assemblies which are at the factory. Mid-setting "3" Mid-setting "3" 3. It is too warm or too cold in the refrigerator or freezer, first check the air vents to wait 24 hours before you put a spacer between the doors while you need to adjust the leveling screws...Replace the top hinge cover. IMPORTANT: ■ Give your refrigerator, make sure that the controls are set to the mid-settings as you like and when ice cream is set correctly when milk or juice is as cold as shown. The controls are still preset to OFF. On models with ...
User Instructions
Page 10
...B. Adjust the control to any setting between adjustments. ■ For maximum ice production (on some models) You can control the amount of ice produced, move the ice level adjustment arm to the 75%... your ice maker. As ice is well maintained. ■ Do not use anything on top of fruits and vegetables with the ice level adjustment arm in the Ice Plus mode. Do...amount of humidity in a 24-hour period. ■ To increase ice production, lower the freezer and refrigerator temperature. Wait 24 hours between LOW and HIGH. The ice maker should produce approximately 8 to ...
...B. Adjust the control to any setting between adjustments. ■ For maximum ice production (on some models) You can control the amount of ice produced, move the ice level adjustment arm to the 75%... your ice maker. As ice is well maintained. ■ Do not use anything on top of fruits and vegetables with the ice level adjustment arm in the Ice Plus mode. Do...amount of humidity in a 24-hour period. ■ To increase ice production, lower the freezer and refrigerator temperature. Wait 24 hours between LOW and HIGH. The ice maker should produce approximately 8 to ...

User Instructions
Page 11
...brush to eliminate odors. If the environment is particularly greasy or dusty, or there is significant pet traffic in refrigerator or reconnect power. ■ For stainless steel models, stainless steel is no need to clean the condenser: ■ Remove the base grille. ■ Use ... or cleansers containing petroleum products on some models). Unplug refrigerator or disconnect power. 2. Remove the bulb from behind the control panel in the refrigerator or from behind the grille and the front surface area of odors. Plug in the freezer (on exterior surfaces (doors and cabinet),...
...brush to eliminate odors. If the environment is particularly greasy or dusty, or there is significant pet traffic in refrigerator or reconnect power. ■ For stainless steel models, stainless steel is no need to clean the condenser: ■ Remove the base grille. ■ Use ... or cleansers containing petroleum products on some models). Unplug refrigerator or disconnect power. 2. Remove the bulb from behind the control panel in the refrigerator or from behind the grille and the front surface area of odors. Plug in the freezer (on exterior surfaces (doors and cabinet),...
User Instructions
Page 12
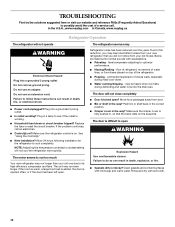
...load is added, the door is opened often, or if the door has been left open. Make sure the crisper cover is on top of a service call an electrician. ■ Control(s) on the supports. Rinse and dry with mild soap and warm water. contraction/...longer than your old model. TROUBLESHOOTING First try the solutions suggested here or visit our website and reference FAQs (Frequently Asked Questions) to open WARNING Explosion Hazard Use nonflammable cleaner. In the U.S.A., www.maytag.com In Canada, www.maytag.ca Refrigerator Operation The refrigerator will not close completely ...
...load is added, the door is opened often, or if the door has been left open. Make sure the crisper cover is on top of a service call an electrician. ■ Control(s) on the supports. Rinse and dry with mild soap and warm water. contraction/...longer than your old model. TROUBLESHOOTING First try the solutions suggested here or visit our website and reference FAQs (Frequently Asked Questions) to open WARNING Explosion Hazard Use nonflammable cleaner. In the U.S.A., www.maytag.com In Canada, www.maytag.ca Refrigerator Operation The refrigerator will not close completely ...
User Instructions
Page 13
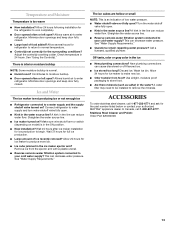
Check temperature in the ice ■ New plumbing connections? Allows humid air to enter refrigerator. Straighten the water source line. ■ Ice maker turned on model) is in the ON position. ■ New installation? Wait 72 hours for full ice production. ■ Large amount of low water pressure. ■ Water shutoff... conditions? Allow 24 hours for ice maker to normal temperature. ■ Control(s) set correctly for the part number listed below or contact your authorized MAYTAG® appliance dealer. ACCESSORIES To order stainless steel cleaner, call 1-800-807-6777.
Check temperature in the ice ■ New plumbing connections? Allows humid air to enter refrigerator. Straighten the water source line. ■ Ice maker turned on model) is in the ON position. ■ New installation? Wait 72 hours for full ice production. ■ Large amount of low water pressure. ■ Water shutoff... conditions? Allow 24 hours for ice maker to normal temperature. ■ Control(s) set correctly for the part number listed below or contact your authorized MAYTAG® appliance dealer. ACCESSORIES To order stainless steel cleaner, call 1-800-807-6777.
User Instructions
Page 14
YOUR SOLE AND EXCLUSIVE REMEDY UNDER THIS LIMITED WARRANTY SHALL BE PRODUCT REPAIR AS PROVIDED HEREIN. Service calls to refrigerator or freezer product failures. 7. Consumable parts are excluded from the date of purchase. 6. Any food or medicine loss due to ...appliance is operated and maintained according to instructions attached to or furnished with original model/serial numbers that have other damage to the finish of Whirlpool Corporation or Whirlpool Canada LP (hereafter "Maytag") will pay for future reference. 14 Cosmetic damage, including scratches, dents, ...
YOUR SOLE AND EXCLUSIVE REMEDY UNDER THIS LIMITED WARRANTY SHALL BE PRODUCT REPAIR AS PROVIDED HEREIN. Service calls to refrigerator or freezer product failures. 7. Consumable parts are excluded from the date of purchase. 6. Any food or medicine loss due to ...appliance is operated and maintained according to instructions attached to or furnished with original model/serial numbers that have other damage to the finish of Whirlpool Corporation or Whirlpool Canada LP (hereafter "Maytag") will pay for future reference. 14 Cosmetic damage, including scratches, dents, ...
Parts Catalog
Page 1
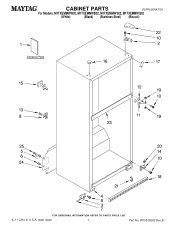
W10305562 Rev.B CABINET PARTS REFRIGERATOR For Models: M1TXEMMWW02, M1TXEMMWB02, M1TXEMMWS02, M1TXEMMWQ02 (White) (Black) (Stainless Steel) (Biscuit) 4−11 Litho In U.S.A. (mjb) (psw) 1 Part No.
W10305562 Rev.B CABINET PARTS REFRIGERATOR For Models: M1TXEMMWW02, M1TXEMMWB02, M1TXEMMWS02, M1TXEMMWQ02 (White) (Black) (Stainless Steel) (Biscuit) 4−11 Litho In U.S.A. (mjb) (psw) 1 Part No.
Parts Catalog
Page 8
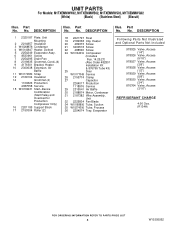
... Only) 16 2201185 Support Block 17 2150304 Roller (2) 18 2221797 Rivet 19 2182338 Clip, Heater 20 489373 Screw 21 3400518 Screw 22 488500 Screw 24 W10164016 Compressor (Includes Illus. 14,25,27) (Also Order 482801 Installation Kit ... (3/8") 978028 Valve, Access (1/2") 978029 Valve, Access (5/8") 978030 Valve, Access (3/4") 876764 Valve, Access (3/16") REFRIGERANT CHARGE 4.00 Ozs. (R134A) 8 W10305562 No. Part No. Part No. UNIT PARTS For Models: M1TXEMMWW02, M1TXEMMWB02, M1TXEMMWS02, M1TXEMMWQ02 (White) (Black) (Stainless Steel) (Biscuit) Illus. DESCRIPTION Illus. No....
... Only) 16 2201185 Support Block 17 2150304 Roller (2) 18 2221797 Rivet 19 2182338 Clip, Heater 20 489373 Screw 21 3400518 Screw 22 488500 Screw 24 W10164016 Compressor (Includes Illus. 14,25,27) (Also Order 482801 Installation Kit ... (3/8") 978028 Valve, Access (1/2") 978029 Valve, Access (5/8") 978030 Valve, Access (3/4") 876764 Valve, Access (3/16") REFRIGERANT CHARGE 4.00 Ozs. (R134A) 8 W10305562 No. Part No. Part No. UNIT PARTS For Models: M1TXEMMWW02, M1TXEMMWB02, M1TXEMMWS02, M1TXEMMWQ02 (White) (Black) (Stainless Steel) (Biscuit) Illus. DESCRIPTION Illus. No....


