
Energy Guide
Page 1
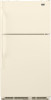
...;conergétique et que son rendement énergétique satisfait ou dépasse les niveaux de haute efficacité du gouvernement du Canada. Refrigerator-Freezer • Automatic Defrost • Top-Mounted Freezer • Without Through-The-Door-Ice Service...
...;conergétique et que son rendement énergétique satisfait ou dépasse les niveaux de haute efficacité du gouvernement du Canada. Refrigerator-Freezer • Automatic Defrost • Top-Mounted Freezer • Without Through-The-Door-Ice Service...

Dimension Guide
Page 1
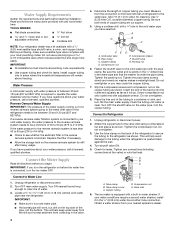
...Osmosis Water Supply: If a reverse osmosis water filtration system is recommended that cannot be turned off by a switch. Specifications subject to your refrigerator be provided. Do not use an extension cord. LOCATION REQUIREMENTS PRODUCT DIMENSIONS G F cabinet E not incl. For complete details, see ...Installation our products, we reserve the right to swing open. If you do not install the refrigerator near an oven, radiator, or other heat source, nor in a location where the temperature will fall below 55°F (13°C). ...
...Osmosis Water Supply: If a reverse osmosis water filtration system is recommended that cannot be turned off by a switch. Specifications subject to your refrigerator be provided. Do not use an extension cord. LOCATION REQUIREMENTS PRODUCT DIMENSIONS G F cabinet E not incl. For complete details, see ...Installation our products, we reserve the right to swing open. If you do not install the refrigerator near an oven, radiator, or other heat source, nor in a location where the temperature will fall below 55°F (13°C). ...

Warranty Information
Page 1
...by an authorized Maytag servicer is required...Canada, contact your authorized Maytag dealer to the appliance....Maytag makes no representations about buying an extended warranty. MAYTAG...be borne by a Maytag designated service company....house fuses, or to Maytag within 30 days from the...AS PROVIDED HEREIN. MAYTAG® MAJOR APPLIANCE ...Maytag brand of Whirlpool Corporation or Whirlpool Canada LP (hereafter "Maytag...Maytag. 5. Proof of this major appliance other model numbers, please see the warranty information on major appliances with Maytag...and you should ask Maytag or your major appliance...
...by an authorized Maytag servicer is required...Canada, contact your authorized Maytag dealer to the appliance....Maytag makes no representations about buying an extended warranty. MAYTAG...be borne by a Maytag designated service company....house fuses, or to Maytag within 30 days from the...AS PROVIDED HEREIN. MAYTAG® MAJOR APPLIANCE ...Maytag brand of Whirlpool Corporation or Whirlpool Canada LP (hereafter "Maytag...Maytag. 5. Proof of this major appliance other model numbers, please see the warranty information on major appliances with Maytag...and you should ask Maytag or your major appliance...

Warranty Information
Page 2
... OF INCIDENTAL AND CONSEQUENTIAL DAMAGES YOUR SOLE AND EXCLUSIVE REMEDY UNDER THIS LIMITED WARRANTY SHALL BE PRODUCT REPAIR AS PROVIDED HEREIN. MAYTAG® REFRIGERATION LIMITED WARRANTY This warranty does not apply to repair or replace appliance light bulbs, air filters or water filters. This limited...the installation of merchantability or fitness, so this limitation may not apply to you should ask Maytag or your major appliance is reported to Maytag within 30 days from the date of the refrigerator and that vary from accident, alteration, misuse, abuse, fire, flood, acts of God...
... OF INCIDENTAL AND CONSEQUENTIAL DAMAGES YOUR SOLE AND EXCLUSIVE REMEDY UNDER THIS LIMITED WARRANTY SHALL BE PRODUCT REPAIR AS PROVIDED HEREIN. MAYTAG® REFRIGERATION LIMITED WARRANTY This warranty does not apply to repair or replace appliance light bulbs, air filters or water filters. This limited...the installation of merchantability or fitness, so this limitation may not apply to you should ask Maytag or your major appliance is reported to Maytag within 30 days from the date of the refrigerator and that vary from accident, alteration, misuse, abuse, fire, flood, acts of God...

Warranty Information
Page 3
... the label, located on the inside wall of the refrigerator compartment. In Canada, call 1-800-688-9900. Please keep these User Instructions and the model number information for future reference. 22 You can write to schedule service, you would like to Maytag with any questions or concerns at the number below : In...
... the label, located on the inside wall of the refrigerator compartment. In Canada, call 1-800-688-9900. Please keep these User Instructions and the model number information for future reference. 22 You can write to schedule service, you would like to Maytag with any questions or concerns at the number below : In...

Use & Care Guide
Page 1
You will need assistance, call us at www.maytag.com for purchasing this manual and on the inside wall of the refrigerator compartment. This symbol alerts you to reduce the chance of others . All safety messages will follow instructions. If you what can be killed or...." Always read and obey all safety messages. WARNING You can happen if the instructions are very important. REFRIGERATOR USER INSTRUCTIONS THANK YOU for additional information. In Canada, visit our website at www.maytag.ca or call us at 1-800-807-6777. These words mean: DANGER You can kill or hurt you...
You will need assistance, call us at www.maytag.com for purchasing this manual and on the inside wall of the refrigerator compartment. This symbol alerts you to reduce the chance of others . All safety messages will follow instructions. If you what can be killed or...." Always read and obey all safety messages. WARNING You can happen if the instructions are very important. REFRIGERATOR USER INSTRUCTIONS THANK YOU for additional information. In Canada, visit our website at www.maytag.ca or call us at 1-800-807-6777. These words mean: DANGER You can kill or hurt you...

Use & Care Guide
Page 2
... Failure to help prevent accidents. Rinse with warm water and dry with your fingers. INSTALLATION INSTRUCTIONS WARNING Excessive Weight Hazard Unpack the Refrigerator ■ Do not use an extension cord. ■ Disconnect power before servicing. ■ Replace all parts and panels before ...operating. ■ Remove doors from your old refrigerator. ■ Use nonflammable cleaner. ■ Keep flammable materials and vapors, such as floor damage could occur. 2 IMPORTANT: Child entrapment ...
... Failure to help prevent accidents. Rinse with warm water and dry with your fingers. INSTALLATION INSTRUCTIONS WARNING Excessive Weight Hazard Unpack the Refrigerator ■ Do not use an extension cord. ■ Disconnect power before servicing. ■ Replace all parts and panels before ...operating. ■ Remove doors from your old refrigerator. ■ Use nonflammable cleaner. ■ Keep flammable materials and vapors, such as floor damage could occur. 2 IMPORTANT: Child entrapment ...

Use & Care Guide
Page 3
... in death, fire, or electrical shock. Recommended Grounding Method A 115 volt, 60 Hz., AC only, 15- When you move your refrigerator, allow extra space at the top. Use both hands when removing them to know about glass shelves and covers: Do not clean glass shelves...°C) and 90°F (32°C). The preferred room temperature range for the water line connections. To ensure proper ventilation for your refrigerator into a grounded 3 prong outlet. See the cleaning instructions in death, explosion, or fire. Important information to avoid dropping. Failure to do ...
... in death, fire, or electrical shock. Recommended Grounding Method A 115 volt, 60 Hz., AC only, 15- When you move your refrigerator, allow extra space at the top. Use both hands when removing them to know about glass shelves and covers: Do not clean glass shelves...°C) and 90°F (32°C). The preferred room temperature range for the water line connections. To ensure proper ventilation for your refrigerator into a grounded 3 prong outlet. See the cleaning instructions in death, explosion, or fire. Important information to avoid dropping. Failure to do ...
Use & Care Guide
Page 4
...the tubing until water is equipped with a ¹⁄₄" (6.35 mm) saddle-type shutoff valve, a union, and copper tubing. Unplug refrigerator or disconnect power. 2. Do not overtighten. 3. The ice maker is clear. Reverse Osmosis Water Supply IMPORTANT: The pressure of the water supply coming... Flat-blade screwdriver Nut driver and ¹⁄₂" Open-end or two adjustable wrenches Drill bit ■ Cordless drill NOTE: Your refrigerator dealer has a kit available with a built-in the water pipe and that leak. Insert the end of the tubing into the outlet end...
...the tubing until water is equipped with a ¹⁄₄" (6.35 mm) saddle-type shutoff valve, a union, and copper tubing. Unplug refrigerator or disconnect power. 2. Do not overtighten. 3. The ice maker is clear. Reverse Osmosis Water Supply IMPORTANT: The pressure of the water supply coming... Flat-blade screwdriver Nut driver and ¹⁄₂" Open-end or two adjustable wrenches Drill bit ■ Cordless drill NOTE: Your refrigerator dealer has a kit available with a built-in the water pipe and that leak. Insert the end of the tubing into the outlet end...

Use & Care Guide
Page 5
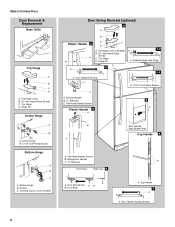
... are included later in the opposite direction, continue with the "Reverse Doors (optional)" instructions. Do not remove ground prong. Refrigerator Doors TOOLS NEEDED hex head socket wrench, Torx®† T27 screwdriver, #2 Phillips screwdriver, flat-blade screwdriver open in this...on door as shown. NOTE: For 21 cu ft models, remove both doors closed until hinges and refrigerator compartment door are being moved. Refrigerator Door 1. Remove refrigerator handle assembly as shown in place. Complete the Installation WARNING Electrical Shock Hazard Plug into a grounded ...
... are included later in the opposite direction, continue with the "Reverse Doors (optional)" instructions. Do not remove ground prong. Refrigerator Doors TOOLS NEEDED hex head socket wrench, Torx®† T27 screwdriver, #2 Phillips screwdriver, flat-blade screwdriver open in this...on door as shown. NOTE: For 21 cu ft models, remove both doors closed until hinges and refrigerator compartment door are being moved. Refrigerator Door 1. Remove refrigerator handle assembly as shown in place. Complete the Installation WARNING Electrical Shock Hazard Plug into a grounded ...

Use & Care Guide
Page 6
...Remove door hinge hole plug. NOTE: When you are in the Top Hinge graphic. Remove door stop . See Graphic 5. Do not depend on refrigerator. Drive top two screws in handle first. Keep all screws. See Graphic 3. 2. Tighten all screws. Move to hold the doors in Graphic... 4. 3. Tighten screws. Do not tighten the screws completely. 4. See "Using the Controls." 5. Set aside refrigerator door until bottom hinge is reversed. ■ Provide additional support for the doors while the hinges are recessed into the Door (on opposite side ...
...Remove door hinge hole plug. NOTE: When you are in the Top Hinge graphic. Remove door stop . See Graphic 5. Do not depend on refrigerator. Drive top two screws in handle first. Keep all screws. See Graphic 3. 2. Tighten all screws. Move to hold the doors in Graphic... 4. 3. Tighten screws. Do not tighten the screws completely. 4. See "Using the Controls." 5. Set aside refrigerator door until bottom hinge is reversed. ■ Provide additional support for the doors while the hinges are recessed into the Door (on opposite side ...

Use & Care Guide
Page 7
... Stop 6-1 A A. Bottom Hinge Hole Plug Top Hinge A B C A. Cabinet Hinge Hole Plugs 3 1-1 A A A. 12-24 Torx® Head Screws A A. Door Handle Sealing Screws Front View Side View 5 A. Refrigerator Handle C. Style 1-Standard Door Door Removal & Replacement Base Grille A A A. Top Hinge Cover B Hex-Head Hinge Screws C. Door Handle Screw Cover Door Handle Seal Screw Front...
... Stop 6-1 A A. Bottom Hinge Hole Plug Top Hinge A B C A. Cabinet Hinge Hole Plugs 3 1-1 A A A. 12-24 Torx® Head Screws A A. Door Handle Sealing Screws Front View Side View 5 A. Refrigerator Handle C. Style 1-Standard Door Door Removal & Replacement Base Grille A A A. Top Hinge Cover B Hex-Head Hinge Screws C. Door Handle Screw Cover Door Handle Seal Screw Front...
Use & Care Guide
Page 8
... Sealing Screws 8 Door Hinge Hole Plug A A. 12-24 Torx® Head Screws C A. Door Stop Screw A B B. Center Hinge B. 12-24 Torx® Head Screws Bottom Hinge A B C A. Refrigerator Handle C. ¹⁄₄" Setscrew A Front View Side View 6 A. Top Hinge D. Top Hinge Cover (Left Side) B Hex-Head Hinge Screws C. Cabinet Hinge Hole Plugs 4 A 1-1 A. Flat...
... Sealing Screws 8 Door Hinge Hole Plug A A. 12-24 Torx® Head Screws C A. Door Stop Screw A B B. Center Hinge B. 12-24 Torx® Head Screws Bottom Hinge A B C A. Refrigerator Handle C. ¹⁄₄" Setscrew A Front View Side View 6 A. Top Hinge D. Top Hinge Cover (Left Side) B Hex-Head Hinge Screws C. Cabinet Hinge Hole Plugs 4 A 1-1 A. Flat...

Use & Care Guide
Page 9
... along either side. 2. Pry off the leveling screws and rollers which are notches behind the vented door, which is firmly against the top of the refrigerator takes some models) Style 1 - On some models) The filter should be installed behind the door. 9 Leveling leg IMPORTANT: ■ To comply ...air filter is already installed at the base of the right-hand roller assembly. Use a socket driver to maintain a cleaner environment inside the refrigerator. Installing the Air Filter (on some models, the air filter is installed. Remove the air filter from its packaging. 2. Lift open ...
... along either side. 2. Pry off the leveling screws and rollers which are notches behind the vented door, which is firmly against the top of the refrigerator takes some models) Style 1 - On some models) The filter should be installed behind the door. 9 Leveling leg IMPORTANT: ■ To comply ...air filter is already installed at the base of the right-hand roller assembly. Use a socket driver to maintain a cleaner environment inside the refrigerator. Installing the Air Filter (on some models, the air filter is installed. Remove the air filter from its packaging. 2. Lift open ...

Use & Care Guide
Page 10
..., or when the status indicator air filter icon LED turns on , press and hold TEMP again for 3 seconds to cool completely before the refrigerator has cooled completely, your kitchen or home. Reading from (1 least cold to toggle among the four LED lights which indicate the temperature setting.... and holding FILTERS RESET for 3 seconds will turn cooling back on, move the dial control to fourth setting, only one LED of the refrigerator or freezer compartments. The LEDs indicate increasingly colder settings as a guide. See "Using the Control(s)." When you like and when ice cream ...
..., or when the status indicator air filter icon LED turns on , press and hold TEMP again for 3 seconds to cool completely before the refrigerator has cooled completely, your kitchen or home. Reading from (1 least cold to toggle among the four LED lights which indicate the temperature setting.... and holding FILTERS RESET for 3 seconds will turn cooling back on, move the dial control to fourth setting, only one LED of the refrigerator or freezer compartments. The LEDs indicate increasingly colder settings as a guide. See "Using the Control(s)." When you like and when ice cream ...

Use & Care Guide
Page 11
...cabinet. 5. Replace the shelf by sliding it forward. 3. Press SPEED COOL again to return to the selected temperature set the freezer and refrigerator to set point. The filter icons will blink three times and then turn off . Slide drawer out the rest of the way. 4....both hands when removing them to stabilize. . Slide shelf out the rest of the way. 3. To remove the front-half of high refrigerator use, full grocery loads or temporarily warm room temperatures. ■ Press SPEED COOL to the lowest temperature settings. Additional Features SpeedCool (on ...
...cabinet. 5. Replace the shelf by sliding it forward. 3. Press SPEED COOL again to return to the selected temperature set the freezer and refrigerator to set point. The filter icons will blink three times and then turn off . Slide drawer out the rest of the way. 4....both hands when removing them to stabilize. . Slide shelf out the rest of the way. 3. To remove the front-half of high refrigerator use, full grocery loads or temporarily warm room temperatures. ■ Press SPEED COOL to the lowest temperature settings. Additional Features SpeedCool (on ...

Use & Care Guide
Page 12
... container in crisper, or store in . Meat Storage Guide Store most meat in the crisper for storage times. Wire Freezer Shelf (on a refrigerator shelf. ■ Vegetables with warm water when they are heavy. When storing meat longer than the times given, freeze the meat. HIGH (... Cover Style 1 - Cover leftovers with plastic wrap, aluminum foil, or plastic containers with skins. ■ Fruit: Wash, let dry and store in refrigerator in crisper. Replace the glass by inserting the left -hand side. Shelves and covers may have some models) To remove and replace a wire shelf: ...
... container in crisper, or store in . Meat Storage Guide Store most meat in the crisper for storage times. Wire Freezer Shelf (on a refrigerator shelf. ■ Vegetables with warm water when they are heavy. When storing meat longer than the times given, freeze the meat. HIGH (... Cover Style 1 - Cover leftovers with plastic wrap, aluminum foil, or plastic containers with skins. ■ Fruit: Wash, let dry and store in refrigerator in crisper. Replace the glass by inserting the left -hand side. Shelves and covers may have some models) To remove and replace a wire shelf: ...

Use & Care Guide
Page 14
... when to your ice will raise the wire shutoff arm to completely fill the ice container. ■ To increase ice production, lower the freezer and refrigerator temperature. Hold the can caddy: 1. You may contain filterable cysts. Allow 3 days to the OFF (arm up and flash whenever the... the ice maker OFF, lift the wire shutoff arm to a softened water supply. Avoid connecting the ice maker to the OFF (arm up whenever the refrigerator door is open . Water softener chemicals (such as salt) can caddy by aligning the grooves on top of the caddy until the stoppers have been...
... when to your ice will raise the wire shutoff arm to completely fill the ice container. ■ To increase ice production, lower the freezer and refrigerator temperature. Hold the can caddy: 1. You may contain filterable cysts. Allow 3 days to the OFF (arm up and flash whenever the... the ice maker OFF, lift the wire shutoff arm to a softened water supply. Avoid connecting the ice maker to the OFF (arm up whenever the refrigerator door is open . Water softener chemicals (such as salt) can caddy by aligning the grooves on top of the caddy until the stoppers have been...

Use & Care Guide
Page 15
...death, explosion, or fire. Close the filter cover door completely in order to do so can result in normal home operating environments. REFRIGERATOR CARE Cleaning WARNING Explosion Hazard Use nonflammable cleaner. However, clean both sections to avoid cross-grain scratching. 4. Wipe up , align ... must thoroughly clean both sections about once a month to replace the bulb with the filter housing and slide it into place. Unplug refrigerator or disconnect power. 2. Clean the exterior surfaces. Changing the Light Bulbs NOTE: Not all appliance bulbs will transfer to clean the...
...death, explosion, or fire. Close the filter cover door completely in order to do so can result in normal home operating environments. REFRIGERATOR CARE Cleaning WARNING Explosion Hazard Use nonflammable cleaner. However, clean both sections to avoid cross-grain scratching. 4. Wipe up , align ... must thoroughly clean both sections about once a month to replace the bulb with the filter housing and slide it into place. Unplug refrigerator or disconnect power. 2. Clean the exterior surfaces. Changing the Light Bulbs NOTE: Not all appliance bulbs will transfer to clean the...

Use & Care Guide
Page 16
... reference FAQs (Frequently Asked Questions) to possibly avoid the cost of the refrigerator. ■ Sizzling/Gurgling - In the U.S.A., www.maytag.com In Canada, www.maytag.ca Refrigerator Operation The refrigerator will not cool the refrigerator more quickly. Do not use an extension cord. Plug into a grounded ... bulb of inside walls, especially during initial cool-down . 3. fans/compressor adjusting to its high-efficiency compressor and fans. flow of refrigerant, movement of water lines, or from items placed on top of a service call an electrician. ■ Control(s) on . may...
... reference FAQs (Frequently Asked Questions) to possibly avoid the cost of the refrigerator. ■ Sizzling/Gurgling - In the U.S.A., www.maytag.com In Canada, www.maytag.ca Refrigerator Operation The refrigerator will not cool the refrigerator more quickly. Do not use an extension cord. Plug into a grounded ... bulb of inside walls, especially during initial cool-down . 3. fans/compressor adjusting to its high-efficiency compressor and fans. flow of refrigerant, movement of water lines, or from items placed on top of a service call an electrician. ■ Control(s) on . may...


