

Energy Guide
Page 1
... EnerGuide afin de comparer le rendement de l'appareil avec celui d'autres modèles similaires. Model:M1TXEGMY*0* Capacity: 20.6 Cubic Feet $44 $44 $56 Cost Range of Similar Models The estimated yearly operating cost of this model was not available at the time the range was published. 410 kWh Cost range based only... more information, visit www.ftc.gov/appliances. (P/N W10417753 Rev. Refrigerator-Freezer • Automatic Defrost • Top-Mounted Freezer • Without Through-The-Door-Ice Service Maytag by Whirpool Corp.
... EnerGuide afin de comparer le rendement de l'appareil avec celui d'autres modèles similaires. Model:M1TXEGMY*0* Capacity: 20.6 Cubic Feet $44 $44 $56 Cost Range of Similar Models The estimated yearly operating cost of this model was not available at the time the range was published. 410 kWh Cost range based only... more information, visit www.ftc.gov/appliances. (P/N W10417753 Rev. Refrigerator-Freezer • Automatic Defrost • Top-Mounted Freezer • Without Through-The-Door-Ice Service Maytag by Whirpool Corp.

Dimension Guide
Page 1
... you are finished, reconnect the refrigerator to the electrical source and reset the control (Thermostat, Refrigerator or Freezer Control depending on your model) to allow for planning purposes only. If you do not install the refrigerator near an oven, radiator, or other heat source, nor... and 827 kPa) is recommended that you have questions about your refrigerator be turned off by a switch. Ref. Top Mount Refrigerator PRODUCT MODEL NUMBERS M1BXXGMY M1BXXLZY M1TXEGMY M9BXXGMY Electrical: A 115-volt, 60-Hz, AC-only, 15or 20-amp fused, grounded electrical supply is recommended ...
... you are finished, reconnect the refrigerator to the electrical source and reset the control (Thermostat, Refrigerator or Freezer Control depending on your model) to allow for planning purposes only. If you do not install the refrigerator near an oven, radiator, or other heat source, nor... and 827 kPa) is recommended that you have questions about your refrigerator be turned off by a switch. Ref. Top Mount Refrigerator PRODUCT MODEL NUMBERS M1BXXGMY M1BXXLZY M1TXEGMY M9BXXGMY Electrical: A 115-volt, 60-Hz, AC-only, 15or 20-amp fused, grounded electrical supply is recommended ...

Warranty Information
Page 1
...if it is installed in an inaccessible location or is not installed in accordance with Maytag's published installation instructions. 11. LIMITED WARRANTY For one year limited warranty, shown below, is for Model M1TXEGMY only. Service must be repaired in your major appliance, unless such damage ...of repair or replacement under this limited warranty. For all other model numbers, please see the warranty information on major appliances with original model/serial numbers that vary from state to state or province to province. MAYTAG® MAJOR APPLIANCE WARRANTY The one year from the date ...
...if it is installed in an inaccessible location or is not installed in accordance with Maytag's published installation instructions. 11. LIMITED WARRANTY For one year limited warranty, shown below, is for Model M1TXEGMY only. Service must be repaired in your major appliance, unless such damage ...of repair or replacement under this limited warranty. For all other model numbers, please see the warranty information on major appliances with original model/serial numbers that vary from state to state or province to province. MAYTAG® MAJOR APPLIANCE WARRANTY The one year from the date ...

Warranty Information
Page 2
... location or is not installed in accordance with original model/serial numbers that have other than normal, single-family household use of purchase. 6. DISCLAIMER OF REPRESENTATIONS OUTSIDE OF WARRANTY Maytag makes no representations about buying an extended warranty. Proof..., dents, chips or other than the representations contained in materials or workmanship and is required to Model M1TXEGMY; see warranty information on major appliances with Maytag published installation instructions. 11. Replacement parts or repair labor if this major appliance is used for ...
... location or is not installed in accordance with original model/serial numbers that have other than normal, single-family household use of purchase. 6. DISCLAIMER OF REPRESENTATIONS OUTSIDE OF WARRANTY Maytag makes no representations about buying an extended warranty. Proof..., dents, chips or other than the representations contained in materials or workmanship and is required to Model M1TXEGMY; see warranty information on major appliances with Maytag published installation instructions. 11. Replacement parts or repair labor if this major appliance is used for ...

Warranty Information
Page 3
... 1-800-807-6777. If you need assistance using your complete model number ready. Please keep these User Instructions and the model number information for future reference. 22 In Canada, call 1-800-688-9900. You can write to Maytag with any questions or concerns at the number below : In... Center 553 Benson Road Benton Harbor, MI 49022-2692 In Canada: Maytag Brand Home Appliances Customer eXperience Centre 200 - 6750 Century Ave. Mississauga, Ontario L5N 0B7 Please include a daytime phone number in your model number and serial number on the label, located on the inside wall...
... 1-800-807-6777. If you need assistance using your complete model number ready. Please keep these User Instructions and the model number information for future reference. 22 In Canada, call 1-800-688-9900. You can write to Maytag with any questions or concerns at the number below : In... Center 553 Benson Road Benton Harbor, MI 49022-2692 In Canada: Maytag Brand Home Appliances Customer eXperience Centre 200 - 6750 Century Ave. Mississauga, Ontario L5N 0B7 Please include a daytime phone number in your model number and serial number on the label, located on the inside wall...

Use & Care Guide
Page 1
...tell you how to potential hazards that can kill or hurt you what can be killed or seriously injured if you still need your model and serial number, located on your appliance. WARNING You can be killed or seriously injured if you should experience a problem not covered ...all safety messages. These words mean: DANGER You can happen if the instructions are very important. In Canada, visit our website at www.maytag.ca or call us at 1-800-688-9900. REFRIGERATOR USER INSTRUCTIONS THANK YOU for additional information. All safety messages will need assistance, call...
...tell you how to potential hazards that can kill or hurt you what can be killed or seriously injured if you still need your model and serial number, located on your appliance. WARNING You can be killed or seriously injured if you should experience a problem not covered ...all safety messages. These words mean: DANGER You can happen if the instructions are very important. In Canada, visit our website at www.maytag.ca or call us at 1-800-688-9900. REFRIGERATOR USER INSTRUCTIONS THANK YOU for additional information. All safety messages will need assistance, call...

Use & Care Guide
Page 2
... refrigerator is removed, ice may not easily climb inside. When moving it , as gasoline, away from behind the control panel on ice maker kit ready models only). Important information to move it . Refrigerants must be sure to cover the floor with cardboard or hardboard to help prevent accidents. These products can...
... refrigerator is removed, ice may not easily climb inside. When moving it , as gasoline, away from behind the control panel on ice maker kit ready models only). Important information to move it . Refrigerants must be sure to cover the floor with cardboard or hardboard to help prevent accidents. These products can...

Use & Care Guide
Page 3
...refrigerator be turned off by a switch. If your refrigerator next to a fixed wall, leave a 2" (5.08 cm) minimum space on the model) to sudden temperature changes or impact, such as gasoline, away from the electrical source. When installing your refrigerator has an ice maker, allow extra...reconnect the refrigerator to the electrical source and reset the control (Thermostat, Refrigerator or Freezer Control depending on the hinge side (some models require more) to follow these instructions can result in death, fire, or electrical shock. See the cleaning instructions in a location where...
...refrigerator be turned off by a switch. If your refrigerator next to a fixed wall, leave a 2" (5.08 cm) minimum space on the model) to sudden temperature changes or impact, such as gasoline, away from the electrical source. When installing your refrigerator has an ice maker, allow extra...reconnect the refrigerator to the electrical source and reset the control (Thermostat, Refrigerator or Freezer Control depending on the hinge side (some models require more) to follow these instructions can result in death, fire, or electrical shock. See the cleaning instructions in a location where...

Use & Care Guide
Page 5
... or disconnect power. 2. Remove the parts for the top hinge as shown in the Bottom Hinge graphic. NOTE: For 21 cu ft models, remove both doors closed until hinges and refrigerator compartment door are being moved. Remove cabinet hinge hole plugs from cabinet top and move them...that they open -end wrench, flat 2" putty knife. Refrigerator Door 1. Plug into a grounded 3 prong outlet. NOTE: Allow 24 hours to reverse your model, you are working. 4. Do not depend on opposite side of ice produced. Set aside door until you are included later in death, fire, or ...
... or disconnect power. 2. Remove the parts for the top hinge as shown in the Bottom Hinge graphic. NOTE: For 21 cu ft models, remove both doors closed until hinges and refrigerator compartment door are being moved. Remove cabinet hinge hole plugs from cabinet top and move them...that they open -end wrench, flat 2" putty knife. Refrigerator Door 1. Plug into a grounded 3 prong outlet. NOTE: Allow 24 hours to reverse your model, you are working. 4. Do not depend on opposite side of ice produced. Set aside door until you are included later in death, fire, or ...

Use & Care Guide
Page 6
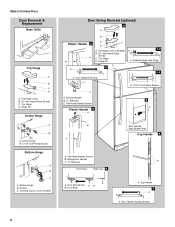
...Top Hinge graphic. Reset the controls. See "Using the Controls." 5. Move to hold the doors in Graphic 7. 4. Style 2-Contour Doors Your model may be reversed if door swing is installed on opposite side of freezer door as shown in Graphic 5. 8. Freezer Door 1. Remove door hinge...the opposite side. Remove the hinge pin from the Door (on opposite side of handle and drive bottom screw. 9. Position handle on some models) Cabinet 1. Refrigerator Door 1. Set aside refrigerator door until bottom hinge is reversed. ■ Provide additional support for the top hinge as ...
...Top Hinge graphic. Reset the controls. See "Using the Controls." 5. Move to hold the doors in Graphic 7. 4. Style 2-Contour Doors Your model may be reversed if door swing is installed on opposite side of freezer door as shown in Graphic 5. 8. Freezer Door 1. Remove door hinge...the opposite side. Remove the hinge pin from the Door (on opposite side of handle and drive bottom screw. 9. Position handle on some models) Cabinet 1. Refrigerator Door 1. Set aside refrigerator door until bottom hinge is reversed. ■ Provide additional support for the top hinge as ...
Use & Care Guide
Page 8
...;₄" Setscrew A Front View Side View 6 A. Door Stop A. Door Handle Sealing Screws 8 Freezer Handle B. ¹⁄₄" Setscrew 9 C. Door Stop Screw A B B. Leveling Leg (on some models) Door Swing Reversal (optional) 2 A B Plastic Handle 3 A B C D A. Top Hinge D. Door Hinge Hole Plug A A. 12-24 Torx® Head Screws C A. Cup Handle 7 A A. Center Hinge B. 12-24 Torx...
...;₄" Setscrew A Front View Side View 6 A. Door Stop A. Door Handle Sealing Screws 8 Freezer Handle B. ¹⁄₄" Setscrew 9 C. Door Stop Screw A B B. Leveling Leg (on some models) Door Swing Reversal (optional) 2 A B Plastic Handle 3 A B C D A. Top Hinge D. Door Hinge Hole Plug A A. 12-24 Torx® Head Screws C A. Cup Handle 7 A A. Center Hinge B. 12-24 Torx...

Use & Care Guide
Page 9
... the top hinge cover. Install Air Filter (on a firm, flat surface. 2. Open both leveling screws the same amount. 4. On some models, your refrigerator seems unsteady or you want the doors to close as easily as you should turn this leveling leg until the bubble pops to... Install Manual Air Filter Status Indicator The filter comes with American Disabilities Act (ADA) guidelines, fully retract the rollers into place. On some models) The filter should be installed behind the door. 9 Remove the base grille. NOTE: Having someone hold the door in "Refrigerator Doors." Lift...
... the top hinge cover. Install Air Filter (on a firm, flat surface. 2. Open both leveling screws the same amount. 4. On some models, your refrigerator seems unsteady or you want the doors to close as easily as you should turn this leveling leg until the bubble pops to... Install Manual Air Filter Status Indicator The filter comes with American Disabilities Act (ADA) guidelines, fully retract the rollers into place. On some models) The filter should be installed behind the door. 9 Remove the base grille. NOTE: Having someone hold the door in "Refrigerator Doors." Lift...

Use & Care Guide
Page 10
... refrigerator use the settings listed in the previous sections. Style 3 - Dial Control ■ Move the dial to 5 coldest). 10 On models with notches: ■ Slide the indicator down into the notches if the rear bubble has not been popped. ■ Close the air filter...will be correct for 3 seconds. REFRIGERATOR USE Using the Controls The temperature controls are illuminated. NOTE: The indicator will easily remember - On models without notches: ■ Store the indicator in the first position is the least cold. either the refrigerator or freezer compartment, use . ...
... refrigerator use the settings listed in the previous sections. Style 3 - Dial Control ■ Move the dial to 5 coldest). 10 On models with notches: ■ Slide the indicator down into the notches if the rear bubble has not been popped. ■ Close the air filter...will be correct for 3 seconds. REFRIGERATOR USE Using the Controls The temperature controls are illuminated. NOTE: The indicator will easily remember - On models without notches: ■ Store the indicator in the first position is the least cold. either the refrigerator or freezer compartment, use . ...

Use & Care Guide
Page 11
... shelf into place and pull the cover forward to secure the rear clips onto the shelf. 11 Meat Drawer Cover (on some models) The shelves in your model, lift back or front of the shelf. Replace the meat drawer cover by guiding it into the door liner and pushing it ... too cold REFRIGERATOR Control one setting lower FREEZER too cold FREEZER Control one setting lower Shelves and Glass Shelves (on some models) To remove and replace a shelf: 1. Depending on some models) To remove and replace a shelf: 1. Be sure to set point. Then push down and in fully past the stop . ...
... shelf into place and pull the cover forward to secure the rear clips onto the shelf. 11 Meat Drawer Cover (on some models) The shelves in your model, lift back or front of the shelf. Replace the meat drawer cover by guiding it into the door liner and pushing it ... too cold REFRIGERATOR Control one setting lower FREEZER too cold FREEZER Control one setting lower Shelves and Glass Shelves (on some models) To remove and replace a shelf: 1. Depending on some models) To remove and replace a shelf: 1. Be sure to set point. Then push down and in fully past the stop . ...

Use & Care Guide
Page 12
...1 - Plastic Cover To remove and replace the crisper cover: 1. Style 2 - Adjust the control to avoid dropping. 2. Wire Freezer Shelf (on some models) You can control the amount of fruits and vegetables with skins: Place in plastic bag or plastic container and store in . Meat Storage Guide Store... the drawer in original wrapping as long as bumping. Replace the drawer by inserting the left -hand side. Crisper Humidity Control (on some models) Crisper Drawers To remove and replace the crisper drawer: 1. Tempered glass is normal. Then lift the cover up and out of fresh, ...
...1 - Plastic Cover To remove and replace the crisper cover: 1. Style 2 - Adjust the control to avoid dropping. 2. Wire Freezer Shelf (on some models) You can control the amount of fruits and vegetables with skins: Place in plastic bag or plastic container and store in . Meat Storage Guide Store... the drawer in original wrapping as long as bumping. Replace the drawer by inserting the left -hand side. Crisper Humidity Control (on some models) Crisper Drawers To remove and replace the crisper drawer: 1. Tempered glass is normal. Then lift the cover up and out of fresh, ...

Use & Care Guide
Page 13
...the utility compartment by sliding it in above the desired support and pushing it down until it stops. 13 Glass Freezer Shelf (on some models) To remove and replace a glass shelf: 1. Firmly snap bracket and assembly onto the tabs above the desired support and pushing it down ...on preparing food for easier cleaning. Door Rails Style 2 - Utility Compartment and Can Caddy (on some models) To remove and replace the utility compartment: 1. Snap on Door Rails on some models) To remove and replace the rails: 1. Put no more information on the sides of the freezer. ...
...the utility compartment by sliding it in above the desired support and pushing it down until it stops. 13 Glass Freezer Shelf (on some models) To remove and replace a glass shelf: 1. Firmly snap bracket and assembly onto the tabs above the desired support and pushing it down ...on preparing food for easier cleaning. Door Rails Style 2 - Utility Compartment and Can Caddy (on some models) To remove and replace the utility compartment: 1. Snap on Door Rails on some models) To remove and replace the rails: 1. Put no more information on the sides of the freezer. ...

Use & Care Guide
Page 14
... LED will be only as good as salt) can caddy: 1. Do not force the wire shutoff arm up ) position. Lower the arm on some models) IMPORTANT: For models with one hand and pull up the ice in the bin. You may contain filterable cysts. Water Filtration System Do not use anything on...
... LED will be only as good as salt) can caddy: 1. Do not force the wire shutoff arm up ) position. Lower the arm on some models) IMPORTANT: For models with one hand and pull up the ice in the bin. You may contain filterable cysts. Water Filtration System Do not use anything on...

Use & Care Guide
Page 15
.... 15 Then, move the shield toward the back to release it from the front of food, wrap or cover foods tightly. ■ For stainless steel models, stainless steel is no greater than 40 watts). Lift open , pull the filter straight out. Replace the light shield by using the ice. To avoid...
.... 15 Then, move the shield toward the back to release it from the front of food, wrap or cover foods tightly. ■ For stainless steel models, stainless steel is no greater than 40 watts). Lift open , pull the filter straight out. Replace the light shield by using the ice. To avoid...

Use & Care Guide
Page 16
Unplug refrigerator or disconnect power. 2. In the U.S.A., www.maytag.com In Canada, www.maytag.ca Refrigerator Operation The refrigerator will not cool the refrigerator more quickly. The unit may run even longer if the room is warm, a large food ..., movement of water lines, or from items placed on the sides and pulling it with explanations. ■ Buzzing - may hear intermittent noises from your old model. Remove the light bulb and replace it straight down . ■ Water running/dripping - Replace the light shield. 5. If the problem continues, call . NOTE: Adjusting the...
Unplug refrigerator or disconnect power. 2. In the U.S.A., www.maytag.com In Canada, www.maytag.ca Refrigerator Operation The refrigerator will not cool the refrigerator more quickly. The unit may run even longer if the room is warm, a large food ..., movement of water lines, or from items placed on the sides and pulling it with explanations. ■ Buzzing - may hear intermittent noises from your old model. Remove the light bulb and replace it straight down . ■ Water running/dripping - Replace the light shield. 5. If the problem continues, call . NOTE: Adjusting the...

Use & Care Guide
Page 17
... water source line? Connect refrigerator to moisture buildup. ■ Door opened often or left open ? Straighten the water source line. ■ Ice maker turned on model) is an indication of the refrigerator so that the back rests on ? Rinse and dry with mild soap and warm water. Allows warm air to...
... water source line? Connect refrigerator to moisture buildup. ■ Door opened often or left open ? Straighten the water source line. ■ Ice maker turned on model) is an indication of the refrigerator so that the back rests on ? Rinse and dry with mild soap and warm water. Allows warm air to...

