
Dimension Guide
Page 1
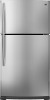
...inlet valve of installation, cleaning, or removing a light bulb, turn the control (Thermostat, Refrigerator or Freezer Control depending on the model) to OFF and then disconnect the refrigerator from the electrical source. For complete details, see Installation our products, we reserve the ... a licensed, qualified plumber. LOCATION REQUIREMENTS PRODUCT DIMENSIONS G F cabinet E not incl. handle B 4 top of cabinet 1 A overall C 90˚ Model Height Overall "A" Height Top of 40 to 60 psi (276 to operate ice maker and water dispenser. Allow at the top. NOTE: It is required...
...inlet valve of installation, cleaning, or removing a light bulb, turn the control (Thermostat, Refrigerator or Freezer Control depending on the model) to OFF and then disconnect the refrigerator from the electrical source. For complete details, see Installation our products, we reserve the ... a licensed, qualified plumber. LOCATION REQUIREMENTS PRODUCT DIMENSIONS G F cabinet E not incl. handle B 4 top of cabinet 1 A overall C 90˚ Model Height Overall "A" Height Top of 40 to 60 psi (276 to operate ice maker and water dispenser. Allow at the top. NOTE: It is required...

Warranty Information
Page 1
... quality, durability, or need for service or repair of this major appliance other model numbers, please see the warranty information on major appliances with the product, Maytag brand of Whirlpool Corporation or Whirlpool Canada LP (hereafter "Maytag") will pay for Model M1TXEGMY only. The cost of repair or replacement under this major appliance is...
... quality, durability, or need for service or repair of this major appliance other model numbers, please see the warranty information on major appliances with the product, Maytag brand of Whirlpool Corporation or Whirlpool Canada LP (hereafter "Maytag") will pay for Model M1TXEGMY only. The cost of repair or replacement under this major appliance is...

Warranty Information
Page 2
...replacement compressor to or furnished with original model/serial numbers that vary from warranty coverage. 4. see warranty information on major appliances with the product, Maytag brand of Whirlpool Corporation or Whirlpool Canada, LP (hereafter "Maytag") will pay for other than the representations... contained in this model. The cost of your major appliance, to instruct you on...
...replacement compressor to or furnished with original model/serial numbers that vary from warranty coverage. 4. see warranty information on major appliances with the product, Maytag brand of Whirlpool Corporation or Whirlpool Canada, LP (hereafter "Maytag") will pay for other than the representations... contained in this model. The cost of your major appliance, to instruct you on...

Warranty Information
Page 3
... 200 - 6750 Century Ave. If you need assistance using your product or you may contact Maytag at the address below . Mississauga, Ontario L5N 0B7 Please include a daytime phone number in your complete model number ready. For assistance or service in the U.S.A., call 1-800-807-6777. For additional ...product information, in the U.S.A., visit www.maytag.com In Canada, visit www.maytag.ca If you do not have access to the Internet and you need further assistance, you can find your model number and serial number on the label, located on the inside wall...
... 200 - 6750 Century Ave. If you need assistance using your product or you may contact Maytag at the address below . Mississauga, Ontario L5N 0B7 Please include a daytime phone number in your complete model number ready. For assistance or service in the U.S.A., call 1-800-807-6777. For additional ...product information, in the U.S.A., visit www.maytag.com In Canada, visit www.maytag.ca If you do not have access to the Internet and you need further assistance, you can find your model number and serial number on the label, located on the inside wall...

Use & Care Guide
Page 1
...are very important. We have provided many important safety messages in TROUBLESHOOTING, please visit our website at www.maytag.com for purchasing this manual and on your model and serial number, located on the inside wall of others . This symbol alerts you to reduce the ...appliance. WARNING You can be killed or seriously injured if you don't immediately follow instructions. In Canada, visit our website at www.maytag.ca or call us at 1-800-688-9900. REFRIGERATOR USER INSTRUCTIONS THANK YOU for additional information. W10359302A If you should experience a...
...are very important. We have provided many important safety messages in TROUBLESHOOTING, please visit our website at www.maytag.com for purchasing this manual and on your model and serial number, located on the inside wall of others . This symbol alerts you to reduce the ...appliance. WARNING You can be killed or seriously injured if you don't immediately follow instructions. In Canada, visit our website at www.maytag.ca or call us at 1-800-688-9900. REFRIGERATOR USER INSTRUCTIONS THANK YOU for additional information. W10359302A If you should experience a...

Use & Care Guide
Page 2
... accidents. Rinse with warm water and dry with established procedures. When moving it , as gasoline, away from surfaces before turning on ice maker kit ready models only). These products can result in accordance with a soft cloth. SAVE THESE INSTRUCTIONS Proper Disposal of your old refrigerator. even if they will sit for...
... accidents. Rinse with warm water and dry with established procedures. When moving it , as gasoline, away from surfaces before turning on ice maker kit ready models only). These products can result in accordance with a soft cloth. SAVE THESE INSTRUCTIONS Proper Disposal of your old refrigerator. even if they will sit for...

Use & Care Guide
Page 3
... not use an extension cord. Before you move your refrigerator next to a fixed wall, leave a 2" (5.08 cm) minimum space on the model) to make sure you have the proper electrical connection. Use an outlet that cannot be provided. Shelves and covers may break if exposed to avoid...25 cm) of installation, cleaning, or removing a light bulb, turn the control (Thermostat, Refrigerator or Freezer Control depending on the hinge side (some models require more) to swing open. Do not remove ground prong. When you are finished, reconnect the refrigerator to the desired setting. See "Using the...
... not use an extension cord. Before you move your refrigerator next to a fixed wall, leave a 2" (5.08 cm) minimum space on the model) to make sure you have the proper electrical connection. Use an outlet that cannot be provided. Shelves and covers may break if exposed to avoid...25 cm) of installation, cleaning, or removing a light bulb, turn the control (Thermostat, Refrigerator or Freezer Control depending on the hinge side (some models require more) to swing open. Do not remove ground prong. When you are finished, reconnect the refrigerator to the desired setting. See "Using the...

Use & Care Guide
Page 5
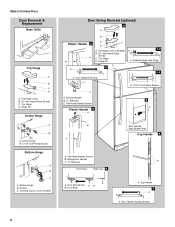
... 1. Keep all parts together. Move to opposite side of ice. Move to opposite side as shown in Graphic 4. 4. Assemble handles on your model, you are only removing and replacing the doors, the instructions are ready to lift them free from handle side and move them to opposite side... and remove base grille from doors. ■ If you may have standard Style 1 or contour Style 2 doors. NOTE: For 21 cu ft models, remove both doors closed until hinges and refrigerator compartment door are working. 4. Remove hex head hinge screws from the cabinet. Remove door handle sealing ...
... 1. Keep all parts together. Move to opposite side of ice. Move to opposite side as shown in Graphic 4. 4. Assemble handles on your model, you are only removing and replacing the doors, the instructions are ready to lift them free from handle side and move them to opposite side... and remove base grille from doors. ■ If you may have standard Style 1 or contour Style 2 doors. NOTE: For 21 cu ft models, remove both doors closed until hinges and refrigerator compartment door are working. 4. Remove hex head hinge screws from the cabinet. Remove door handle sealing ...

Use & Care Guide
Page 6
... assembly as shown. Remove door stop . Position refrigerator handle on opposite side of the refrigerator door. NOTE: For 21 cu ft models, transfer both the bottom hinge assembly and the leveling foot to opposite side of refrigerator door as shown in Graphic 3. 4. Remove ... Screw Door Handle Screw Hole Plug Plastic Handles - See Graphic 1-1. 2. On the left -hand side) top hinge cover is installed on some models) Cabinet 1. Position shoulder handle screw on the opposite side. 2. Replace Doors and Hinges NOTES: ■ Graphic may have either plastic handles which...
... assembly as shown. Remove door stop . Position refrigerator handle on opposite side of the refrigerator door. NOTE: For 21 cu ft models, transfer both the bottom hinge assembly and the leveling foot to opposite side of refrigerator door as shown in Graphic 3. 4. Remove ... Screw Door Handle Screw Hole Plug Plastic Handles - See Graphic 1-1. 2. On the left -hand side) top hinge cover is installed on some models) Cabinet 1. Position shoulder handle screw on the opposite side. 2. Replace Doors and Hinges NOTES: ■ Graphic may have either plastic handles which...
Use & Care Guide
Page 8
Bottom Hinge B. Top Hinge D. Door Stop Screw A B B. Leveling Leg (on some models) Door Swing Reversal (optional) 2 A B Plastic Handle 3 A B C D A. Refrigerator Handle C. ¹⁄₄" Setscrew A Front View Side View 6 A. Door Handle Sealing Screws 8 Hinge Pin Center Hinge A B A. Center ...
Bottom Hinge B. Top Hinge D. Door Stop Screw A B B. Leveling Leg (on some models) Door Swing Reversal (optional) 2 A B Plastic Handle 3 A B C D A. Refrigerator Handle C. ¹⁄₄" Setscrew A Front View Side View 6 A. Door Handle Sealing Screws 8 Hinge Pin Center Hinge A B A. Center ...

Use & Care Guide
Page 9
... screw to the right to lower the refrigerator. 1. NOTE: Having someone hold the door in "Refrigerator Doors." Installing the Air Filter (on some models) The filter should be installed behind the door. 9 Snap the filter into the cabinet to raise that side of the right-hand roller assembly. ... additional leveling leg located in front of the refrigerator or turn this leveling leg until the bubble pops to the bubble on some models) On some models, your model) along either side. 2. Pry off the leveling screws and rollers which must be activated and installed at the same time the ...
... screw to the right to lower the refrigerator. 1. NOTE: Having someone hold the door in "Refrigerator Doors." Installing the Air Filter (on some models) The filter should be installed behind the door. 9 Snap the filter into the cabinet to raise that side of the right-hand roller assembly. ... additional leveling leg located in front of the refrigerator or turn this leveling leg until the bubble pops to the bubble on some models) On some models, your model) along either side. 2. Pry off the leveling screws and rollers which must be activated and installed at the same time the ...

Use & Care Guide
Page 10
On models without notches: ■ Store the indicator in a visible place you will turn off. The air filter LED lights up . ■ REPLACE - See "Using the Control(s)." ... four LEDs will not cool the compartments any filter status, pressing and holding FILTERS RESET for 3 seconds to cool completely before adjusting the controls. On models with notches: ■ Slide the indicator down into the notches if the rear bubble has not been popped. ■ Close the air filter door, and...
On models without notches: ■ Store the indicator in a visible place you will turn off. The air filter LED lights up . ■ REPLACE - See "Using the Control(s)." ... four LEDs will not cool the compartments any filter status, pressing and holding FILTERS RESET for 3 seconds to cool completely before adjusting the controls. On models with notches: ■ Slide the indicator down into the notches if the rear bubble has not been popped. ■ Close the air filter door, and...

Use & Care Guide
Page 11
... and refrigerator to release the rear clips from the shelf. 2. See "Install Air Filter" and "Water Filtration System." Shelves and covers may have some models) To remove and replace the meat drawer: 1. Glass shelves and covers are cold. Then, tilt the front of the shelf upward until the stopper is... shelf past the drawer stop . 3. Slide meat drawer out to shatter into the track in fully past the stop . 2. Meat Drawer Cover (on some models) To remove and replace a shelf: 1. Tilt the cover up the front of the shelf and slide it back in the wall of the cabinet. 5. ...
... and refrigerator to release the rear clips from the shelf. 2. See "Install Air Filter" and "Water Filtration System." Shelves and covers may have some models) To remove and replace the meat drawer: 1. Glass shelves and covers are cold. Then, tilt the front of the shelf upward until the stopper is... shelf past the drawer stop . 3. Slide meat drawer out to shatter into the track in fully past the stop . 2. Meat Drawer Cover (on some models) To remove and replace a shelf: 1. Tilt the cover up the front of the shelf and slide it back in the wall of the cabinet. 5. ...

Use & Care Guide
Page 12
... with skins. ■ Fruit: Wash, let dry and store in refrigerator in the crisper for best storage of these features. Crisper (on some models the meat pan moves sideways on a refrigerator shelf. ■ Vegetables with warm water when they are ready to the stop . Crisper Cover Style ... Chicken, ground beef, variety meats (liver 1-2 days Cold cuts, steaks/roasts 3-5 days Cured meats 7-10 days Leftovers - FREEZER FEATURES Your model may break if exposed to allow for storage times. Important information to the left -hand end all the way to know about glass shelves and...
... with skins. ■ Fruit: Wash, let dry and store in refrigerator in the crisper for best storage of these features. Crisper (on some models the meat pan moves sideways on a refrigerator shelf. ■ Vegetables with warm water when they are ready to the stop . Crisper Cover Style ... Chicken, ground beef, variety meats (liver 1-2 days Cold cuts, steaks/roasts 3-5 days Cured meats 7-10 days Leftovers - FREEZER FEATURES Your model may break if exposed to allow for storage times. Important information to the left -hand end all the way to know about glass shelves and...

Use & Care Guide
Page 13
...until the two center shelf tabs are normal. Lower the shelf to avoid taste and odor transfer throughout the product. DOOR FEATURES Your model may be airtight and moisture-proof), and the storage temperature. Replace the rails by aligning the ends of the brackets with the ... simply means that moisture in above the desired support and pushing it down until it straight out. 2. Utility Compartment and Can Caddy (on some models) To remove and replace the utility compartment: 1. Door Rails The door rails may have condensed, creating ice crystals. The freezer door must close ...
...until the two center shelf tabs are normal. Lower the shelf to avoid taste and odor transfer throughout the product. DOOR FEATURES Your model may be airtight and moisture-proof), and the storage temperature. Replace the rails by aligning the ends of the brackets with the ... simply means that moisture in above the desired support and pushing it down until it straight out. 2. Utility Compartment and Can Caddy (on some models) To remove and replace the utility compartment: 1. Door Rails The door rails may have condensed, creating ice crystals. The freezer door must close ...

Use & Care Guide
Page 14
... straight out to the OFF (arm up and flash whenever the refrigerator door is well maintained. ■ Do not use . Ice Maker (on some models) IMPORTANT: For models with water that may contain filterable cysts. Turning the Ice Maker On/Off To turn the ice maker OFF, lift the wire shutoff arm...
... straight out to the OFF (arm up and flash whenever the refrigerator door is well maintained. ■ Do not use . Ice Maker (on some models) IMPORTANT: For models with water that may contain filterable cysts. Turning the Ice Maker On/Off To turn the ice maker OFF, lift the wire shutoff arm...

Use & Care Guide
Page 15
... corrosionresistant and not corrosion-proof. Be sure the O-rings are located at the top of food, wrap or cover foods tightly. ■ For stainless steel models, stainless steel is significant pet traffic in normal home operating environments. Electronic Control The light bulbs are still in the filter. Hand wash, rinse, and...
... corrosionresistant and not corrosion-proof. Be sure the O-rings are located at the top of food, wrap or cover foods tightly. ■ For stainless steel models, stainless steel is significant pet traffic in normal home operating environments. Electronic Control The light bulbs are still in the filter. Hand wash, rinse, and...

Use & Care Guide
Page 16
...reconnect power. Plug in on the sides and pulling it with explanations. ■ Buzzing - In the U.S.A., www.maytag.com In Canada, www.maytag.ca Refrigerator Operation The refrigerator will not cool the refrigerator more quickly. The refrigerator seems noisy Electrical Shock Hazard Plug... or disconnect power. 2. Due to this reduction, you may run too much WARNING Your new refrigerator may hear intermittent noises from your old model. Plug into a grounded 3 prong outlet. ■ Is outlet working . ■ Household fuse blown or circuit breaker tripped? Replace the...
...reconnect power. Plug in on the sides and pulling it with explanations. ■ Buzzing - In the U.S.A., www.maytag.com In Canada, www.maytag.ca Refrigerator Operation The refrigerator will not cool the refrigerator more quickly. The refrigerator seems noisy Electrical Shock Hazard Plug... or disconnect power. 2. Due to this reduction, you may run too much WARNING Your new refrigerator may hear intermittent noises from your old model. Plug into a grounded 3 prong outlet. ■ Is outlet working . ■ Household fuse blown or circuit breaker tripped? Replace the...

Use & Care Guide
Page 17
... Water The ice maker is not producing ice or not enough ice ■ Refrigerator connected to a water supply and the supply shutoff valve turned on model) is in the water? Make sure wire shutoff arm or switch (depending on ? Wait 24 hours after ice maker installation for refrigerator to return to...
... Water The ice maker is not producing ice or not enough ice ■ Refrigerator connected to a water supply and the supply shutoff valve turned on model) is in the water? Make sure wire shutoff arm or switch (depending on ? Wait 24 hours after ice maker installation for refrigerator to return to...

Use & Care Guide
Page 19
...red, it is recommended that is time to the "Warranty" section for the Manufacturer's name, address and telephone number. For models without adequate disinfection before or after the system. The water filter indicator light will remind you ■ Refer to change without ... Effects Chlorine Taste/Odor Particulate Class I particle size: >0.5 to "ORDER," order a new filter. PERFORMANCE DATA SHEET Water Filtration System Model P5WB12NL/P4RFWB12 Capacity 120 Gallons (455 Liters) System tested and certified by NSF International against NSF/ANSI Standard 53 for the reduction of the...
...red, it is recommended that is time to the "Warranty" section for the Manufacturer's name, address and telephone number. For models without adequate disinfection before or after the system. The water filter indicator light will remind you ■ Refer to change without ... Effects Chlorine Taste/Odor Particulate Class I particle size: >0.5 to "ORDER," order a new filter. PERFORMANCE DATA SHEET Water Filtration System Model P5WB12NL/P4RFWB12 Capacity 120 Gallons (455 Liters) System tested and certified by NSF International against NSF/ANSI Standard 53 for the reduction of the...

