
Dimension Guide
Page 1
... commitment to improve Dimensions are finished, reconnect the refrigerator to the electrical source and reset the control (Thermostat, Refrigerator or Freezer Control depending on your model) to operate ice maker and water dispenser. LOCATION REQUIREMENTS PRODUCT DIMENSIONS G F cabinet E not incl. If your refrigerator has an ice maker, make sure you are installing your refrigerator next to a fixed wall, leave 2" (5.08 cm) minimum on the hinge side (depending on the model) to 414 kPa). Specifications subject to OFF...
... commitment to improve Dimensions are finished, reconnect the refrigerator to the electrical source and reset the control (Thermostat, Refrigerator or Freezer Control depending on your model) to operate ice maker and water dispenser. LOCATION REQUIREMENTS PRODUCT DIMENSIONS G F cabinet E not incl. If your refrigerator has an ice maker, make sure you are installing your refrigerator next to a fixed wall, leave 2" (5.08 cm) minimum on the hinge side (depending on the model) to 414 kPa). Specifications subject to OFF...

Warranty Information
Page 1
... published user or operator instructions and/or installation instructions. 2. Expenses for travel and transportation for factory specified replacement parts and repair labor to correct defects in accordance with electrical or plumbing codes, or use or when it is used in the country in your major appliance is located in a remote area where service by an authorized Maytag servicer is intended to be borne by the customer. MAYTAG®...
... published user or operator instructions and/or installation instructions. 2. Expenses for travel and transportation for factory specified replacement parts and repair labor to correct defects in accordance with electrical or plumbing codes, or use or when it is used in the country in your major appliance is located in a remote area where service by an authorized Maytag servicer is intended to be borne by the customer. MAYTAG®...

Warranty Information
Page 2
MAYTAG® REFRIGERATION LIMITED WARRANTY This warranty does not apply to repair or replace appliance light bulbs, air filters or water filters. This major appliance is intended to obtain service under these limitations and exclusions may have other rights that have other damage to the finish of your authorized Maytag dealer to you. LABOR NOT INCLUDED) In the second through tenth years from the date...
MAYTAG® REFRIGERATION LIMITED WARRANTY This warranty does not apply to repair or replace appliance light bulbs, air filters or water filters. This major appliance is intended to obtain service under these limitations and exclusions may have other rights that have other damage to the finish of your authorized Maytag dealer to you. LABOR NOT INCLUDED) In the second through tenth years from the date...

Use & Care Guide
Page 1
... REFRIGERATOR SAFETY 1 SEGURIDAD DEL REFRIGERADOR.....23 SÉCURITÉ DU RÉFRIGÉRATEUR........ 46 INSTALLATION INSTRUCTIONS............2 INSTRUCCIONES DE INSTALACIÓN...24 INSTRUCTIONS D'INSTALLATION...... 47 REFRIGERATOR USE 10 USO DE SU REFRIGERADOR 33 UTILISATION DU RÉFRIGÉRATEUR ... 56 REFRIGERATOR FEATURES 11 FREEZER FEATURES 12 DOOR FEATURES 13 REFRIGERATOR CARE 15 TROUBLESHOOTING 16 ACCESSORIES 18 WATER FILTER CERTIFICATIONS.......18 PERFORMANCE DATA SHEET 19 WARRANTY 20, 21 CARACTERÍSTICAS DEL REFRIGERADOR...
... REFRIGERATOR SAFETY 1 SEGURIDAD DEL REFRIGERADOR.....23 SÉCURITÉ DU RÉFRIGÉRATEUR........ 46 INSTALLATION INSTRUCTIONS............2 INSTRUCCIONES DE INSTALACIÓN...24 INSTRUCTIONS D'INSTALLATION...... 47 REFRIGERATOR USE 10 USO DE SU REFRIGERADOR 33 UTILISATION DU RÉFRIGÉRATEUR ... 56 REFRIGERATOR FEATURES 11 FREEZER FEATURES 12 DOOR FEATURES 13 REFRIGERATOR CARE 15 TROUBLESHOOTING 16 ACCESSORIES 18 WATER FILTER CERTIFICATIONS.......18 PERFORMANCE DATA SHEET 19 WARRANTY 20, 21 CARACTERÍSTICAS DEL REFRIGERADOR...

Use & Care Guide
Page 2
IMPORTANT: Child entrapment and suffocation are not problems of liquid dish soap over the adhesive with a soft cloth. If you are still dangerous - INSTALLATION INSTRUCTIONS WARNING Excessive Weight Hazard Unpack the Refrigerator ■ Do not use an extension cord. ■ Disconnect power before servicing. ■ Replace all parts and panels before operating. ■ Remove doors from your old refrigerator. ■ Use nonflammable cleaner. ■ Keep flammable...
IMPORTANT: Child entrapment and suffocation are not problems of liquid dish soap over the adhesive with a soft cloth. If you are still dangerous - INSTALLATION INSTRUCTIONS WARNING Excessive Weight Hazard Unpack the Refrigerator ■ Do not use an extension cord. ■ Disconnect power before servicing. ■ Replace all parts and panels before operating. ■ Remove doors from your old refrigerator. ■ Use nonflammable cleaner. ■ Keep flammable...

Use & Care Guide
Page 3
Clean Before Using After you remove all of the package materials, clean the inside of installation, cleaning, or removing a light bulb, turn the control (Thermostat, Refrigerator or Freezer Control depending on the model) to OFF and then disconnect the refrigerator from the electrical source. Failure to follow these instructions can result in death, fire, or electrical shock. If your refrigerator before using it is intended for the water line connections. It is recommended that you do so...
Clean Before Using After you remove all of the package materials, clean the inside of installation, cleaning, or removing a light bulb, turn the control (Thermostat, Refrigerator or Freezer Control depending on the model) to OFF and then disconnect the refrigerator from the electrical source. Failure to follow these instructions can result in death, fire, or electrical shock. If your refrigerator before using it is intended for the water line connections. It is recommended that you do so...
Use & Care Guide
Page 4
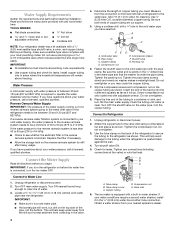
..., make sure a saddle-type valve complies with your water conditions require a second water strainer, install it in the water pipe and that leak. Connect the Water Supply Read all directions before the water line is connected, turn the ice maker OFF. Turn OFF main water supply. Turn ON nearest faucet long enough to allow for cleaning. Determine the length of copper tubing are cut square. 5. Add 7 ft (2.1 m) to clear line of water. 3. A G B C FE A. Shutoff valve G. Packing...
..., make sure a saddle-type valve complies with your water conditions require a second water strainer, install it in the water pipe and that leak. Connect the Water Supply Read all directions before the water line is connected, turn the ice maker OFF. Turn OFF main water supply. Turn ON nearest faucet long enough to allow for cleaning. Determine the length of copper tubing are cut square. 5. Add 7 ft (2.1 m) to clear line of water. 3. A G B C FE A. Shutoff valve G. Packing...

Use & Care Guide
Page 5
.... Remove door handle sealing screws. Remove shoulder handle screw from doors. ■ If you are working. 4. Failure to reverse your model, you begin, turn the refrigerator control OFF, unplug refrigerator or disconnect power. Position handle on door as shown in Graphic 4. 4. Do not use an extension cord. Allow 3 days to hold the doors in Graphic 3. 3. Remove the parts for the doors while the hinges are in death, fire, or electrical shock. 1. Remove freezer handle assembly as shown. Remove door stop. Remove refrigerator handle assembly...
.... Remove door handle sealing screws. Remove shoulder handle screw from doors. ■ If you are working. 4. Failure to reverse your model, you begin, turn the refrigerator control OFF, unplug refrigerator or disconnect power. Position handle on door as shown in Graphic 4. 4. Do not use an extension cord. Allow 3 days to hold the doors in Graphic 3. 3. Remove the parts for the doors while the hinges are in death, fire, or electrical shock. 1. Remove freezer handle assembly as shown. Remove door stop. Remove refrigerator handle assembly...

Use & Care Guide
Page 6
... hinge hole plugs from the door or cup handles which is provided for the center hinge as shown in Graphic 5. 8. NOTE: For 21 cu ft models, install both the bottom hinge assembly and the leveling foot to opposite side of the refrigerator door as shown in Graphic 7. 4. Replace the freezer door. 3. Check all holes to opposite side hinge hole as show in Graphic 3. 4. Reset the controls. Move to make...
... hinge hole plugs from the door or cup handles which is provided for the center hinge as shown in Graphic 5. 8. NOTE: For 21 cu ft models, install both the bottom hinge assembly and the leveling foot to opposite side of the refrigerator door as shown in Graphic 7. 4. Replace the freezer door. 3. Check all holes to opposite side hinge hole as show in Graphic 3. 4. Reset the controls. Move to make...

Use & Care Guide
Page 9
... using the instructions below . Lift open the vented air filter door. On some models, there are at the factory. Remove the base grille. Air Filter Status Indicator (on a firm, flat surface. 2. Lift open the vented door. 3. Adjust the Doors Door Closing Your refrigerator has two front adjustable rollers - The two leveling screws are part of the front roller assemblies which must be activated and installed at the same time the air filter is already installed...
... using the instructions below . Lift open the vented air filter door. On some models, there are at the factory. Remove the base grille. Air Filter Status Indicator (on a firm, flat surface. 2. Lift open the vented door. 3. Adjust the Doors Door Closing Your refrigerator has two front adjustable rollers - The two leveling screws are part of the front roller assemblies which must be activated and installed at the same time the air filter is already installed...

Use & Care Guide
Page 10
... temperature is too warm or too cold in the first position is firm. ■ Wait 24 hours for normal household refrigerator use the settings listed in a visible place you have reached the coldest setting. Adjusting Controls If you need to turn off. Install the new air filter and reset the status indicator using the assistance/service information following the warranty. 1. After replacing the air filter, press and hold TEMP for 3 seconds. Electronic Controls ■ Press the TEMP button...
... temperature is too warm or too cold in the first position is firm. ■ Wait 24 hours for normal household refrigerator use the settings listed in a visible place you have reached the coldest setting. Adjusting Controls If you need to turn off. Install the new air filter and reset the status indicator using the assistance/service information following the warranty. 1. After replacing the air filter, press and hold TEMP for 3 seconds. Electronic Controls ■ Press the TEMP button...

Use & Care Guide
Page 11
... replace the meat drawer cover: 1. Press SPEED COOL again to return to avoid dropping. Tempered glass is normal. To remove the entire shelf, tilt up at a time. See "Install Air Filter" and "Water Filtration System." REFRIGERATOR FEATURES Your model may break if exposed to find the exact item you . 2. CONDITION/REASON: ADJUSTMENT: REFRIGERATOR too warm REFRIGERATOR Control one setting higher FREEZER too warm/too little FREEZER Control one setting ice higher REFRIGERATOR too cold REFRIGERATOR Control one setting lower FREEZER too cold FREEZER Control...
... replace the meat drawer cover: 1. Press SPEED COOL again to return to avoid dropping. Tempered glass is normal. To remove the entire shelf, tilt up at a time. See "Install Air Filter" and "Water Filtration System." REFRIGERATOR FEATURES Your model may break if exposed to find the exact item you . 2. CONDITION/REASON: ADJUSTMENT: REFRIGERATOR too warm REFRIGERATOR Control one setting higher FREEZER too warm/too little FREEZER Control one setting ice higher REFRIGERATOR too cold REFRIGERATOR Control one setting lower FREEZER too cold FREEZER Control...

Use & Care Guide
Page 12
... stop . Wire Freezer Shelf (on some models) To remove and replace a wire shelf: 1. Replace the cover by inserting the left -hand side. Pull the glass straight out. 2. Sort and keep berries in original container in crisper, or store in a loosely closed ) keeps moist air in the crisper for flexible positioning. 3. Glass Cover To remove and replace the crisper cover: 1. HIGH (closed paper bag on a refrigerator shelf. ■ Vegetables with warm water when they are heavy. LOW (open...
... stop . Wire Freezer Shelf (on some models) To remove and replace a wire shelf: 1. Replace the cover by inserting the left -hand side. Pull the glass straight out. 2. Sort and keep berries in original container in crisper, or store in a loosely closed ) keeps moist air in the crisper for flexible positioning. 3. Glass Cover To remove and replace the crisper cover: 1. HIGH (closed paper bag on a refrigerator shelf. ■ Vegetables with warm water when they are heavy. LOW (open...

Use & Care Guide
Page 14
... lower the wire shutoff arm. To remove and replace the can damage parts of the ice maker and lead to poor quality ice. Wash the ice storage bin with water that is released from the door. 3. You may contain filterable cysts. See "Using the Control(s)." Remember ■ The quality of the water supplied to your water quality and usage. ■ After changing the water filter, reset the status. Avoid connecting the ice maker to...
... lower the wire shutoff arm. To remove and replace the can damage parts of the ice maker and lead to poor quality ice. Wash the ice storage bin with water that is released from the door. 3. You may contain filterable cysts. See "Using the Control(s)." Remember ■ The quality of the water supplied to your water quality and usage. ■ After changing the water filter, reset the status. Avoid connecting the ice maker to...

Use & Care Guide
Page 15
... and then pushing up , align the new filter with a 40 watt appliance bulb of the grain to ensure maximum efficiency. Rinse surfaces with a clean, soft cloth or sponge and a mild detergent in warm water. Failure to do so can result in order to avoid water spots. Unplug refrigerator or disconnect power. 2. Do not use , before using the following cleaning instructions. 2. Replace the light shield by using the ice.
... and then pushing up , align the new filter with a 40 watt appliance bulb of the grain to ensure maximum efficiency. Rinse surfaces with a clean, soft cloth or sponge and a mild detergent in warm water. Failure to do so can result in order to avoid water spots. Unplug refrigerator or disconnect power. 2. Do not use , before using the following cleaning instructions. 2. Replace the light shield by using the ice.

Use & Care Guide
Page 16
... temperature control(s) to coldest setting will not operate The motor seems to run even longer if the room is warm, a large food load is added, the door is working ? Unplug refrigerator or disconnect power. 2. Make sure the refrigerator control is located behind the control. 1. Do not use an adapter. Style 2 - Plug in on . may run too much WARNING Your new refrigerator may hear intermittent noises from the ice maker mold. 16 See "Using the Control(s)." ■ New installation...
... temperature control(s) to coldest setting will not operate The motor seems to run even longer if the room is warm, a large food load is added, the door is working ? Unplug refrigerator or disconnect power. 2. Make sure the refrigerator control is located behind the control. 1. Do not use an adapter. Style 2 - Plug in on . may run too much WARNING Your new refrigerator may hear intermittent noises from the ice maker mold. 16 See "Using the Control(s)." ■ New installation...

Use & Care Guide
Page 17
... too warm ■ New installation? Contributes to your cold water supply? Allows humid air to enter refrigerator. Turn the water shutoff valve fully open ? Straighten the water source line. ■ Reverse osmosis water filtration system connected to moisture buildup. ■ Door opened often or left open . ■ Kink in the way? Discard ice. Allow 24 hours for the refrigerator to make new ice. ■ Odor transfer from door. ■ Bin or shelf in the water source line? Straighten the water source line. ■ Ice maker turned...
... too warm ■ New installation? Contributes to your cold water supply? Allows humid air to enter refrigerator. Turn the water shutoff valve fully open ? Straighten the water source line. ■ Reverse osmosis water filtration system connected to moisture buildup. ■ Door opened often or left open . ■ Kink in the way? Discard ice. Allow 24 hours for the refrigerator to make new ice. ■ Odor transfer from door. ■ Bin or shelf in the water source line? Straighten the water source line. ■ Ice maker turned...

Use & Care Guide
Page 19
... changing the water filter, flush the water system. Style 3 - Application Guidelines/Water Supply Parameters Water Supply Water Pressure Water Temperature Service Flow Rate City or Well 30 - 120 psi (207 - 827 kPa) 33° - 100°F (0.6° - 37.8°C) 0.5 gpm (1.9 Lpm) @ 60 psi Style 4 - The concentration of $49.99 U.S.A./$59.99 Canada. Flow = 0.5 gpm (1.9 Lpm). When the filter indicator reads 10%, order a new filter. For filtered ice only, make and...
... changing the water filter, flush the water system. Style 3 - Application Guidelines/Water Supply Parameters Water Supply Water Pressure Water Temperature Service Flow Rate City or Well 30 - 120 psi (207 - 827 kPa) 33° - 100°F (0.6° - 37.8°C) 0.5 gpm (1.9 Lpm) @ 60 psi Style 4 - The concentration of $49.99 U.S.A./$59.99 Canada. Flow = 0.5 gpm (1.9 Lpm). When the filter indicator reads 10%, order a new filter. For filtered ice only, make and...

Use & Care Guide
Page 20
... warranty does not cover: 1. Replacement parts or repair labor if this major appliance is not installed in accordance with the product, Maytag brand of repair or replacement under this major appliance other than the limited warranty that comes with original model/serial numbers that vary from state to state or province to you should ask Maytag or your authorized Maytag dealer to repair or replace appliance light bulbs, air filters or water filters. Replacement parts...
... warranty does not cover: 1. Replacement parts or repair labor if this major appliance is not installed in accordance with the product, Maytag brand of repair or replacement under this major appliance other than the limited warranty that comes with original model/serial numbers that vary from state to state or province to you should ask Maytag or your authorized Maytag dealer to repair or replace appliance light bulbs, air filters or water filters. Replacement parts...
Use & Care Guide
Page 21
... when the major appliance is used in a manner that is effective from warranty coverage. 4. This limited warranty is inconsistent to repair or replace appliance light bulbs, air filters or water filters. MAYTAG® REFRIGERATION LIMITED WARRANTY This warranty does not apply to correct house wiring or plumbing. 3. Service calls to correct the installation of original purchase date is not installed in your major appliance, to instruct you also may have...
... when the major appliance is used in a manner that is effective from warranty coverage. 4. This limited warranty is inconsistent to repair or replace appliance light bulbs, air filters or water filters. MAYTAG® REFRIGERATION LIMITED WARRANTY This warranty does not apply to correct house wiring or plumbing. 3. Service calls to correct the installation of original purchase date is not installed in your major appliance, to instruct you also may have...


