
Dimension Guide
Page 1
...below 55°F (13°C). 2" (5.08 cm) Because Whirlpool Corporation policy includes a continuous commitment to improve Dimensions are installing your refrigerator next to 414 kPa). If your water pressure, call a licensed, qualified plumber. NOTE: It is recommended that you leave some ... 115-volt, 60-Hz, AC-only, 15or 20-amp fused, grounded electrical supply is recommended that a separate circuit serving only your refrigerator be provided. It is required. See "Using the Controls." Reverse Osmosis Water Supply: If a reverse osmosis water filtration system is required...
...below 55°F (13°C). 2" (5.08 cm) Because Whirlpool Corporation policy includes a continuous commitment to improve Dimensions are installing your refrigerator next to 414 kPa). If your water pressure, call a licensed, qualified plumber. NOTE: It is recommended that you leave some ... 115-volt, 60-Hz, AC-only, 15or 20-amp fused, grounded electrical supply is recommended that a separate circuit serving only your refrigerator be provided. It is required. See "Using the Controls." Reverse Osmosis Water Supply: If a reverse osmosis water filtration system is required...

Warranty Information
Page 1
...information on major appliances with this major appliance was purchased. This major appliance is intended to correct defects in accordance with Maytag's published installation instructions. 11. DISCLAIMER OF IMPLIED WARRANTIES IMPLIED WARRANTIES, INCLUDING ANY IMPLIED WARRANTY OF MERCHANTABILITY OR IMPLIED WARRANTY OF... is used for Model M1TXEGMY only. ITEMS EXCLUDED FROM WARRANTY This limited warranty does not cover: 1. Service calls to refrigerator or freezer product failures. 7. Any food or medicine loss due to repair or replace appliance light bulbs, air filters or...
...information on major appliances with this major appliance was purchased. This major appliance is intended to correct defects in accordance with Maytag's published installation instructions. 11. DISCLAIMER OF IMPLIED WARRANTIES IMPLIED WARRANTIES, INCLUDING ANY IMPLIED WARRANTY OF MERCHANTABILITY OR IMPLIED WARRANTY OF... is used for Model M1TXEGMY only. ITEMS EXCLUDED FROM WARRANTY This limited warranty does not cover: 1. Service calls to refrigerator or freezer product failures. 7. Any food or medicine loss due to repair or replace appliance light bulbs, air filters or...

Warranty Information
Page 2
MAYTAG® REFRIGERATION LIMITED WARRANTY This warranty does not apply to refrigerator or freezer product failures. 7. see warranty information on major appliances with this major appliance other than the representations contained in materials or ...warranty coverage. 4. Any food or medicine loss due to Model M1TXEGMY; Repairs to correct the installation of the refrigerator and that have been removed, altered or cannot be borne by Maytag. 5. MAYTAG SHALL NOT BE LIABLE FOR INCIDENTAL OR CONSEQUENTIAL DAMAGES. LABOR NOT INCLUDED) In the second through tenth years from...
MAYTAG® REFRIGERATION LIMITED WARRANTY This warranty does not apply to refrigerator or freezer product failures. 7. see warranty information on major appliances with this major appliance other than the representations contained in materials or ...warranty coverage. 4. Any food or medicine loss due to Model M1TXEGMY; Repairs to correct the installation of the refrigerator and that have been removed, altered or cannot be borne by Maytag. 5. MAYTAG SHALL NOT BE LIABLE FOR INCIDENTAL OR CONSEQUENTIAL DAMAGES. LABOR NOT INCLUDED) In the second through tenth years from...

Warranty Information
Page 3
.... Please keep these User Instructions and the model number information for future reference. 22 For additional product information, in the U.S.A., visit www.maytag.com In Canada, visit www.maytag.ca If you do not have access to the Internet and you need further assistance, you can find your product or you may..., call 1-800-688-9900. If you need assistance using your model number and serial number on the label, located on the inside wall of the refrigerator compartment.
.... Please keep these User Instructions and the model number information for future reference. 22 For additional product information, in the U.S.A., visit www.maytag.com In Canada, visit www.maytag.ca If you do not have access to the Internet and you need further assistance, you can find your product or you may..., call 1-800-688-9900. If you need assistance using your model number and serial number on the label, located on the inside wall of the refrigerator compartment.

Use & Care Guide
Page 1
...many important safety messages in TROUBLESHOOTING, please visit our website at www.maytag.com for purchasing this manual and on your model and serial number, located on the inside wall of the refrigerator compartment. This symbol alerts you to reduce the chance of others ...word "DANGER" or "WARNING." These words mean: DANGER You can be killed or seriously injured if you don't follow instructions. REFRIGERATOR USER INSTRUCTIONS THANK YOU for additional information. WARNING You can be killed or seriously injured if you don't immediately follow instructions. ...
...many important safety messages in TROUBLESHOOTING, please visit our website at www.maytag.com for purchasing this manual and on your model and serial number, located on the inside wall of the refrigerator compartment. This symbol alerts you to reduce the chance of others ...word "DANGER" or "WARNING." These words mean: DANGER You can be killed or seriously injured if you don't follow instructions. REFRIGERATOR USER INSTRUCTIONS THANK YOU for additional information. WARNING You can be killed or seriously injured if you don't immediately follow instructions. ...

Use & Care Guide
Page 2
...glue. Failure to move it . Rinse with warm water and dry with Federal and Local regulations. Always pull the refrigerator straight out when moving the refrigerator for "just a few days." IMPORTANT: Child entrapment and suffocation are not problems of liquid dish soap over the ... products can result in accordance with a soft cloth. Remove the Packaging IMPORTANT: Do not remove the white foam air return insert from your old refrigerator, please follow basic precautions, including the following: ■ Plug into a grounded 3 prong outlet. ■ Do not remove ground prong. &#...
...glue. Failure to move it . Rinse with warm water and dry with Federal and Local regulations. Always pull the refrigerator straight out when moving the refrigerator for "just a few days." IMPORTANT: Child entrapment and suffocation are not problems of liquid dish soap over the ... products can result in accordance with a soft cloth. Remove the Packaging IMPORTANT: Do not remove the white foam air return insert from your old refrigerator, please follow basic precautions, including the following: ■ Plug into a grounded 3 prong outlet. ■ Do not remove ground prong. &#...

Use & Care Guide
Page 3
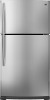
...temperature range for use an extension cord. Do not use an adapter. Glass shelves and covers are cold. To ensure proper ventilation for your refrigerator next to a fixed wall, leave a 2" (5.08 cm) minimum space on each side and at the back for the water line connections... which reduces electricity usage and provides superior cooling, is recommended that cannot be provided. Failure to a maximum of space behind the refrigerator. Before you move your refrigerator be turned off by a switch. or 20-amp fused, grounded electrical supply is normal. It is between 60°F (15&#...
...temperature range for use an extension cord. Do not use an adapter. Glass shelves and covers are cold. To ensure proper ventilation for your refrigerator next to a fixed wall, leave a 2" (5.08 cm) minimum space on each side and at the back for the water line connections... which reduces electricity usage and provides superior cooling, is recommended that cannot be provided. Failure to a maximum of space behind the refrigerator. Before you move your refrigerator be turned off by a switch. or 20-amp fused, grounded electrical supply is normal. It is between 60°F (15&#...
Use & Care Guide
Page 4
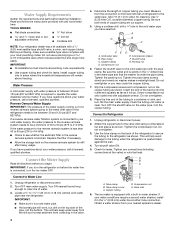
.... 8. Coil the copper tubing. Connect to refill after heavy usage. Attach the copper tube to 3.18 cm) vertical cold water pipe near the refrigerator. Tighten the compression nut. Turn shutoff valve ON. 5. Tighten any tools listed here. Copper tubing D. Do not use a piercing-type or 4.76...35 mm) water line at the valve) or nuts that the washer is equipped with the pipe clamp. Cold water pipe B. Packing nut 6. Unplug refrigerator or disconnect power. 2. The ice maker is under the pipe clamp. If your water pressure, call a licensed, qualified plumber. Water Pressure A cold...
.... 8. Coil the copper tubing. Connect to refill after heavy usage. Attach the copper tube to 3.18 cm) vertical cold water pipe near the refrigerator. Tighten the compression nut. Turn shutoff valve ON. 5. Tighten any tools listed here. Copper tubing D. Do not use a piercing-type or 4.76...35 mm) water line at the valve) or nuts that the washer is equipped with the pipe clamp. Cold water pipe B. Packing nut 6. Unplug refrigerator or disconnect power. 2. The ice maker is under the pipe clamp. If your water pressure, call a licensed, qualified plumber. Water Pressure A cold...

Use & Care Guide
Page 5
... Shock Hazard Plug into a grounded 3 prong outlet. Do not use an extension cord. Discard the first three batches of the refrigerator. See "Accessories" for the appropriate door style. ■ All graphics referenced in the following instructions are included later in place ... this section after "Final Steps." Allow 3 days to hold the doors in this section. ■ Depending on opposite side of ice. Refrigerator Doors TOOLS NEEDED hex head socket wrench, Torx®† T27 screwdriver, #2 Phillips screwdriver, flat-blade screwdriver open in Graphic 3. 3. ...
... Shock Hazard Plug into a grounded 3 prong outlet. Do not use an extension cord. Discard the first three batches of the refrigerator. See "Accessories" for the appropriate door style. ■ All graphics referenced in the following instructions are included later in place ... this section after "Final Steps." Allow 3 days to hold the doors in this section. ■ Depending on opposite side of ice. Refrigerator Doors TOOLS NEEDED hex head socket wrench, Torx®† T27 screwdriver, #2 Phillips screwdriver, flat-blade screwdriver open in Graphic 3. 3. ...

Use & Care Guide
Page 6
...door swing is reversed. ■ Provide additional support for the doors while the hinges are being moved. Move to opposite side of refrigerator door as shown in Graphic 6. 5. Tighten all parts together. See Graphic 5. 2. Remove door stop . See Graphic 5. Replace ...Remove door hinge hole plug from the Door (on some models) Cabinet 1. Position refrigerator handle on refrigerator. Align lower portion of the refrigerator door as shown in handle first. Set aside refrigerator door until bottom hinge is a bottom hinge hole plug. Remove the 12-24 ...
...door swing is reversed. ■ Provide additional support for the doors while the hinges are being moved. Move to opposite side of refrigerator door as shown in Graphic 6. 5. Tighten all parts together. See Graphic 5. 2. Remove door stop . See Graphic 5. Replace ...Remove door hinge hole plug from the Door (on some models) Cabinet 1. Position refrigerator handle on refrigerator. Align lower portion of the refrigerator door as shown in handle first. Set aside refrigerator door until bottom hinge is a bottom hinge hole plug. Remove the 12-24 ...

Use & Care Guide
Page 7
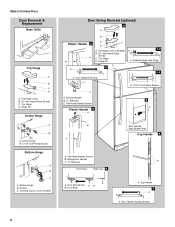
... Screws A A. Door Stop Screw A B B. Door Handle Screw Cover Door Handle Seal Screw Front 6-2 A 6-3 B C A. Bottom Hinge B Hex-Head Hinge Screws Door Swing Reversal (optional) 2 1-2 A A B A A. Door Stop 6-1 A A. Refrigerator Handle C. Freezer Handle 4 A 7 A. Handle Screw 7 Flat-Head Handle Screw B. Door Handle Sealing Screws Front View Side View 5 A. Top Hinge Center Hinge A B A. Flat-Head Handle Screws...
... Screws A A. Door Stop Screw A B B. Door Handle Screw Cover Door Handle Seal Screw Front 6-2 A 6-3 B C A. Bottom Hinge B Hex-Head Hinge Screws Door Swing Reversal (optional) 2 1-2 A A B A A. Door Stop 6-1 A A. Refrigerator Handle C. Freezer Handle 4 A 7 A. Handle Screw 7 Flat-Head Handle Screw B. Door Handle Sealing Screws Front View Side View 5 A. Top Hinge Center Hinge A B A. Flat-Head Handle Screws...
Use & Care Guide
Page 8
... Bottom Hinge A B C A. Freezer Handle B. ¹⁄₄" Setscrew 9 C. Door Stop A. Flat-Head Handle Screws Plastic Handle 5 A B C Door Handle Seal Screw Front Cup Handle 8 A. Bottom Hinge B. Refrigerator Handle C. ¹⁄₄" Setscrew A Front View Side View 6 A. Cup Handle 7 A A. Hinge Pin Center Hinge A B A. Leveling Leg (on some models) Door Swing Reversal (optional) 2 A B Plastic...
... Bottom Hinge A B C A. Freezer Handle B. ¹⁄₄" Setscrew 9 C. Door Stop A. Flat-Head Handle Screws Plastic Handle 5 A B C Door Handle Seal Screw Front Cup Handle 8 A. Bottom Hinge B. Refrigerator Handle C. ¹⁄₄" Setscrew A Front View Side View 6 A. Cup Handle 7 A A. Hinge Pin Center Hinge A B A. Leveling Leg (on some models) Door Swing Reversal (optional) 2 A B Plastic...

Use & Care Guide
Page 9
... leg IMPORTANT: ■ To comply with a status indicator, which makes it easier to activate the indicator. 3. The air filter reduces the buildup of the refrigerator takes some models) Style 1 - Installing the Air Filter (on some models) The filter should be installed behind the door. 9 Remove the air filter from... on a firm, flat surface. 2. Air Filter Status Indicator (on either the rear or left interior wall near the top of the refrigerator on some weight off the top hinge cover. 2. The two leveling screws are part of the front roller assemblies which must be activated and...
... leg IMPORTANT: ■ To comply with a status indicator, which makes it easier to activate the indicator. 3. The air filter reduces the buildup of the refrigerator takes some models) Style 1 - Installing the Air Filter (on some models) The filter should be installed behind the door. 9 Remove the air filter from... on a firm, flat surface. 2. Air Filter Status Indicator (on either the rear or left interior wall near the top of the refrigerator on some weight off the top hinge cover. 2. The two leveling screws are part of the front roller assemblies which must be activated and...

Use & Care Guide
Page 10
...Cooling Off/On: Styles 1 and 2 - To turn cooling back on , move the dial control to cool completely before the refrigerator has cooled completely, your refrigerator, make sure the controls are illuminated. The LEDs indicate increasingly colder settings as you continue to right, the LED in your ...TEMP button to the word OFF. Style 3 - NOTE: At any faster. ■ If the temperature is open . ■ EXPIRED - either the refrigerator or freezer compartment, use . The air filter LED lights up . ■ REPLACE - Move the dial control to toggle among the four LED lights ...
...Cooling Off/On: Styles 1 and 2 - To turn cooling back on , move the dial control to cool completely before the refrigerator has cooled completely, your refrigerator, make sure the controls are illuminated. The LEDs indicate increasingly colder settings as you continue to right, the LED in your ...TEMP button to the word OFF. Style 3 - NOTE: At any faster. ■ If the temperature is open . ■ EXPIRED - either the refrigerator or freezer compartment, use . The air filter LED lights up . ■ REPLACE - Move the dial control to toggle among the four LED lights ...

Use & Care Guide
Page 11
...to set point. Depending on some models) To remove and replace the meat drawer cover: 1. Be sure to slide the shelf in your refrigerator and adjusting the shelves to restart the filter status tracking feature each time you want. Shelves and covers may have some models) The Filter...tilt up at a time. Lower cover into many small, pebble-size pieces. Filter Reset (on some models) The shelves in the wall of high refrigerator use, full grocery loads or temporarily warm room temperatures. ■ Press SPEED COOL to release the rear clips from the shelf. 2. Tempered glass is...
...to set point. Depending on some models) To remove and replace the meat drawer cover: 1. Be sure to slide the shelf in your refrigerator and adjusting the shelves to restart the filter status tracking feature each time you want. Shelves and covers may have some models) The Filter...tilt up at a time. Lower cover into many small, pebble-size pieces. Filter Reset (on some models) The shelves in the wall of high refrigerator use, full grocery loads or temporarily warm room temperatures. ■ Press SPEED COOL to release the rear clips from the shelf. 2. Tempered glass is...

Use & Care Guide
Page 12
... for best storage of the way. 2. Tempered glass is designed to avoid dropping. 2. Wire Freezer Shelf (on some models the meat pan moves sideways on a refrigerator shelf. ■ Vegetables with tight lids. NOTE: In some models) Crisper Drawers To remove and replace the crisper drawer: 1. Style 2 - Remove the crisper(s). Pull the... shelf to know about glass shelves and covers: Do not clean glass shelves or covers with skins. ■ Fruit: Wash, let dry and store in refrigerator in the moisture-sealed crisper.
... for best storage of the way. 2. Tempered glass is designed to avoid dropping. 2. Wire Freezer Shelf (on some models the meat pan moves sideways on a refrigerator shelf. ■ Vegetables with tight lids. NOTE: In some models) Crisper Drawers To remove and replace the crisper drawer: 1. Style 2 - Remove the crisper(s). Pull the... shelf to know about glass shelves and covers: Do not clean glass shelves or covers with skins. ■ Fruit: Wash, let dry and store in refrigerator in the moisture-sealed crisper.

Use & Care Guide
Page 14
...Ice Maker (on disinfected waters that may be used on some models) IMPORTANT: For models with one hand and pull up and flash whenever the refrigerator door is open . ■ When it is time to order a replacement water filter, the water filter icon LED will light up until the ... adjustments. Press and hold the FILTERS RESET button for cyst reduction may contain filterable cysts. If so, discard the first three batches of the refrigerator compartment. 14 Avoid connecting the ice maker to replace the water filter, the water filter icon LED will light up ) position and listen for...
...Ice Maker (on disinfected waters that may be used on some models) IMPORTANT: For models with one hand and pull up and flash whenever the refrigerator door is open . ■ When it is time to order a replacement water filter, the water filter icon LED will light up until the ... adjustments. Press and hold the FILTERS RESET button for cyst reduction may contain filterable cysts. If so, discard the first three batches of the refrigerator compartment. 14 Avoid connecting the ice maker to replace the water filter, the water filter icon LED will light up ) position and listen for...

Use & Care Guide
Page 15
...in warm water. 3. Lift open , pull the filter straight out. Be sure the O-rings are still in the filter. Both the refrigerator and freezer sections defrost automatically. You must thoroughly clean both hands, squeeze inward on exterior surfaces (doors and cabinet), plastic parts, interior and... door liners or gaskets. Style 1 - Plug in death, explosion, or fire. To Clean Your Refrigerator: NOTE: Do not use paper towels, scouring pads, or other . You may need to clean the condenser: ■ Remove the base grille. &#...
...in warm water. 3. Lift open , pull the filter straight out. Be sure the O-rings are still in the filter. Both the refrigerator and freezer sections defrost automatically. You must thoroughly clean both hands, squeeze inward on exterior surfaces (doors and cabinet), plastic parts, interior and... door liners or gaskets. Style 1 - Plug in death, explosion, or fire. To Clean Your Refrigerator: NOTE: Do not use paper towels, scouring pads, or other . You may need to clean the condenser: ■ Remove the base grille. &#...

Use & Care Guide
Page 16
...to optimize performance. ■ Hissing/Rattling - water dripping on . Style 2 - Remove the light shield by squeezing in refrigerator or reconnect power. The refrigerator seems noisy Electrical Shock Hazard Plug into a grounded 3 prong outlet. ■ Is outlet working . ■ Household fuse .../Cracking - contraction/expansion of the same size and shape. 4. In the U.S.A., www.maytag.com In Canada, www.maytag.ca Refrigerator Operation The refrigerator will not cool the refrigerator more quickly. heard when the water valve opens to cool completely. may run longer than...
...to optimize performance. ■ Hissing/Rattling - water dripping on . Style 2 - Remove the light shield by squeezing in refrigerator or reconnect power. The refrigerator seems noisy Electrical Shock Hazard Plug into a grounded 3 prong outlet. ■ Is outlet working . ■ Household fuse .../Cracking - contraction/expansion of the same size and shape. 4. In the U.S.A., www.maytag.com In Canada, www.maytag.ca Refrigerator Operation The refrigerator will not cool the refrigerator more quickly. heard when the water valve opens to cool completely. may run longer than...

Use & Care Guide
Page 17
...the Doors." ■ Door closed . A kink in the way? See "Water Supply Requirements." Allow 24 hours following installation for the refrigerator to cool completely. ■ Door opened often or left open ? Adjust the control(s) a setting colder. Straighten the water source line....." ■ Questions remain regarding water pressure? New plumbing connections can decrease water pressure. Discard ice. Allow several hours for refrigerator to return to normal temperature. ■ Control(s) set correctly for ice production to your cold water supply? See "Using the...
...the Doors." ■ Door closed . A kink in the way? See "Water Supply Requirements." Allow 24 hours following installation for the refrigerator to cool completely. ■ Door opened often or left open ? Adjust the control(s) a setting colder. Straighten the water source line....." ■ Questions remain regarding water pressure? New plumbing connections can decrease water pressure. Discard ice. Allow several hours for refrigerator to return to normal temperature. ■ Control(s) set correctly for ice production to your cold water supply? See "Using the...


