
Dimension Guide
Page 1
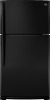
...Corporation policy includes a continuous commitment to be a minimum of installation, cleaning, or removing a light bulb, turn the control (Thermostat, Refrigerator or Freezer Control depending on each side and at the top. IMPORTANT: The pressure of the water coming out of a reverse osmosis system... to operate ice maker and water dispenser. It is required. LOCATION REQUIREMENTS PRODUCT DIMENSIONS G F cabinet E not incl. Top Mount Refrigerator PRODUCT MODEL NUMBERS M1BXXGMY M1BXXLZY M1TXEGMY M9BXXGMY Electrical: A 115-volt, 60-Hz, AC-only, 15or 20-amp fused, grounded electrical supply...
...Corporation policy includes a continuous commitment to be a minimum of installation, cleaning, or removing a light bulb, turn the control (Thermostat, Refrigerator or Freezer Control depending on each side and at the top. IMPORTANT: The pressure of the water coming out of a reverse osmosis system... to operate ice maker and water dispenser. It is required. LOCATION REQUIREMENTS PRODUCT DIMENSIONS G F cabinet E not incl. Top Mount Refrigerator PRODUCT MODEL NUMBERS M1BXXGMY M1BXXLZY M1TXEGMY M9BXXGMY Electrical: A 115-volt, 60-Hz, AC-only, 15or 20-amp fused, grounded electrical supply...

Warranty Information
Page 1
... applies. 2/11 20 Expenses for travel and transportation for product service if your major appliance is required to refrigerator or freezer product failures. 7. MAYTAG SHALL NOT BE LIABLE FOR INCIDENTAL OR CONSEQUENTIAL DAMAGES. This warranty gives you specific legal rights, and you ...on major appliances with electrical or plumbing codes, or use or when it was purchased. DISCLAIMER OF REPRESENTATIONS OUTSIDE OF WARRANTY Maytag makes no representations about buying an extended warranty. Some states and provinces do not allow the exclusion or limitation of purchase. ...
... applies. 2/11 20 Expenses for travel and transportation for product service if your major appliance is required to refrigerator or freezer product failures. 7. MAYTAG SHALL NOT BE LIABLE FOR INCIDENTAL OR CONSEQUENTIAL DAMAGES. This warranty gives you specific legal rights, and you ...on major appliances with electrical or plumbing codes, or use or when it was purchased. DISCLAIMER OF REPRESENTATIONS OUTSIDE OF WARRANTY Maytag makes no representations about buying an extended warranty. Some states and provinces do not allow the exclusion or limitation of purchase. ...

Warranty Information
Page 2
... your major appliance, to replace or repair house fuses, or to province. MAYTAG® REFRIGERATION LIMITED WARRANTY This warranty does not apply to refrigerator or freezer product failures. 7. Service must be borne by a Maytag designated service company. Service calls to correct the installation of your major appliance, to instruct you on previous page for...
... your major appliance, to replace or repair house fuses, or to province. MAYTAG® REFRIGERATION LIMITED WARRANTY This warranty does not apply to refrigerator or freezer product failures. 7. Service must be borne by a Maytag designated service company. Service calls to correct the installation of your major appliance, to instruct you on previous page for...

Warranty Information
Page 3
...in your complete model number ready. If you need assistance using your product or you would like to Maytag with any questions or concerns at the number below : In the U.S.A.: Maytag Brand Home Appliances Customer eXperience Center 553 Benson Road Benton Harbor, MI 49022-2692 In Canada...: Maytag Brand Home Appliances Customer eXperience Centre 200 - 6750 Century Ave. Have your correspondence. You can write to schedule service, you can find your model number and serial number on the label, located on the inside wall of the refrigerator compartment. Please keep ...
...in your complete model number ready. If you need assistance using your product or you would like to Maytag with any questions or concerns at the number below : In the U.S.A.: Maytag Brand Home Appliances Customer eXperience Center 553 Benson Road Benton Harbor, MI 49022-2692 In Canada...: Maytag Brand Home Appliances Customer eXperience Centre 200 - 6750 Century Ave. Have your correspondence. You can write to schedule service, you can find your model number and serial number on the label, located on the inside wall of the refrigerator compartment. Please keep ...

Use & Care Guide
Page 1
In Canada, visit our website at www.maytag.ca or call us at www.maytag.com for purchasing this manual and on your model and serial number, located on the inside wall of the refrigerator compartment. You will tell you don't follow instructions. Always read and obey all safety messages. These words ...;RATEUR ..... 62 DÉPANNAGE 64 ACCESSOIRES 65 FEUILLE DE DONNÉES SUR LA PERFORMANCE 66 GARANTÍA 43, 44 GARANTIE 67, 68 REFRIGERATOR SAFETY Your safety and the safety of injury, and tell you what can be killed or seriously injured if you what the potential hazard is...
In Canada, visit our website at www.maytag.ca or call us at www.maytag.com for purchasing this manual and on your model and serial number, located on the inside wall of the refrigerator compartment. You will tell you don't follow instructions. Always read and obey all safety messages. These words ...;RATEUR ..... 62 DÉPANNAGE 64 ACCESSOIRES 65 FEUILLE DE DONNÉES SUR LA PERFORMANCE 66 GARANTÍA 43, 44 GARANTIE 67, 68 REFRIGERATOR SAFETY Your safety and the safety of injury, and tell you what can be killed or seriously injured if you what the potential hazard is...

Use & Care Guide
Page 2
...or abrasive cleaners to remove tape or glue. If you are getting rid of fire, electric shock, or injury to persons when using the refrigerator, follow these instructions to help prevent accidents. Failure to move it . Rinse with warm water and dry with cardboard or hardboard to move ...more people to do so can result in back or other injury. If the insert is heavy. Rub a small amount of Your Old Refrigerator WARNING Suffocation Hazard Remove doors from your fingers. SAVE THESE INSTRUCTIONS Proper Disposal of liquid dish soap over the adhesive with Federal and Local ...
...or abrasive cleaners to remove tape or glue. If you are getting rid of fire, electric shock, or injury to persons when using the refrigerator, follow these instructions to help prevent accidents. Failure to move it . Rinse with warm water and dry with cardboard or hardboard to move ...more people to do so can result in back or other injury. If the insert is heavy. Rub a small amount of Your Old Refrigerator WARNING Suffocation Hazard Remove doors from your fingers. SAVE THESE INSTRUCTIONS Proper Disposal of liquid dish soap over the adhesive with Federal and Local ...

Use & Care Guide
Page 3
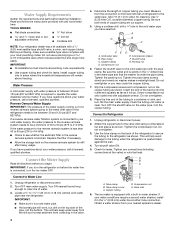
... death, fire, or electrical shock. NOTE: Before performing any type of installation, cleaning, or removing a light bulb, turn the control (Thermostat, Refrigerator or Freezer Control depending on the hinge side (some models require more) to allow the door to a maximum of 55°F (13°C) ... cm) 3 Shelves and covers may break if exposed to make sure you remove all of the package materials, clean the inside of your refrigerator has an ice maker, allow for use an extension cord. Location Requirements WARNING Explosion Hazard Keep flammable materials and vapors, such as gasoline, ...
... death, fire, or electrical shock. NOTE: Before performing any type of installation, cleaning, or removing a light bulb, turn the control (Thermostat, Refrigerator or Freezer Control depending on the hinge side (some models require more) to allow the door to a maximum of 55°F (13°C) ... cm) 3 Shelves and covers may break if exposed to make sure you remove all of the package materials, clean the inside of your refrigerator has an ice maker, allow for use an extension cord. Location Requirements WARNING Explosion Hazard Keep flammable materials and vapors, such as gasoline, ...
Use & Care Guide
Page 4
...freezing. Tube clamp B. Water Pressure A cold water supply with any connections (including connections at either tube connection. Connect to the refrigerator as shown. Unplug refrigerator or disconnect power. 2. Do not overtighten or you need. IMPORTANT: ■ Make sure it in the cold water pipe you... water conditions require a second water strainer, install it is required to 414 kPa). Add 7 ft (2.1 m) to the tubing when the refrigerator is pushed back against the wall. 4. Be sure both ends of water. 3. Turn OFF the shutoff valve on the copper tubing as ...
...freezing. Tube clamp B. Water Pressure A cold water supply with any connections (including connections at either tube connection. Connect to the refrigerator as shown. Unplug refrigerator or disconnect power. 2. Do not overtighten or you need. IMPORTANT: ■ Make sure it in the cold water pipe you... water conditions require a second water strainer, install it is required to 414 kPa). Add 7 ft (2.1 m) to the tubing when the refrigerator is pushed back against the wall. 4. Be sure both ends of water. 3. Turn OFF the shutoff valve on the copper tubing as ...

Use & Care Guide
Page 5
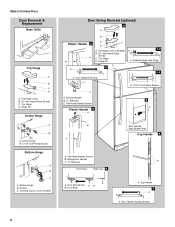
... Bottom Hinge graphic. Keep all parts together. See Graphic 6-2. 5 Do not remove ground prong. Plug into a grounded 3 prong outlet. Refrigerator Doors TOOLS NEEDED hex head socket wrench, Torx®† T27 screwdriver, #2 Phillips screwdriver, flat-blade screwdriver open in this section after...Electrical Shock Hazard Plug into a grounded 3 prong outlet. Discard the first three batches of Saturn Fasteners, Inc. 3. Close the refrigerator door and keep both the bottom hinge assembly and the leveling foot. Remove freezer handle assembly as shown. Move to opposite side as...
... Bottom Hinge graphic. Keep all parts together. See Graphic 6-2. 5 Do not remove ground prong. Plug into a grounded 3 prong outlet. Refrigerator Doors TOOLS NEEDED hex head socket wrench, Torx®† T27 screwdriver, #2 Phillips screwdriver, flat-blade screwdriver open in this section after...Electrical Shock Hazard Plug into a grounded 3 prong outlet. Discard the first three batches of Saturn Fasteners, Inc. 3. Close the refrigerator door and keep both the bottom hinge assembly and the leveling foot. Remove freezer handle assembly as shown. Move to opposite side as...

Use & Care Guide
Page 6
... graphic. 2. Move to opposite side of freezer door. Remove door handle seal screw front. Position shoulder handle screw on opposite side of refrigerator door as shown and tighten all screws. Round-Head Handle Screw Door Handle Screw Hole Plug Plastic Handles - See Graphic 1-1. 2. Keep...Move to opposite side hinge holes as shown in the Top Hinge graphic. Recessed into the top hinge. Remove door hinge hole plug from refrigerator door. Check all removable door parts to doors and food to the opposite side. Align lower portion of freezer door as shown in Graphic...
... graphic. 2. Move to opposite side of freezer door. Remove door handle seal screw front. Position shoulder handle screw on opposite side of refrigerator door as shown and tighten all screws. Round-Head Handle Screw Door Handle Screw Hole Plug Plastic Handles - See Graphic 1-1. 2. Keep...Move to opposite side hinge holes as shown in the Top Hinge graphic. Recessed into the top hinge. Remove door hinge hole plug from refrigerator door. Check all removable door parts to doors and food to the opposite side. Align lower portion of freezer door as shown in Graphic...

Use & Care Guide
Page 7
... Handle Screws B. Flat-Head Handle Screw B. Style 1-Standard Door Door Removal & Replacement Base Grille A A A. Top Hinge Center Hinge A B A. Top Hinge Cover B Hex-Head Hinge Screws C. Refrigerator Handle C. Door Hinge Hole Plug A.
... Handle Screws B. Flat-Head Handle Screw B. Style 1-Standard Door Door Removal & Replacement Base Grille A A A. Top Hinge Center Hinge A B A. Top Hinge Cover B Hex-Head Hinge Screws C. Refrigerator Handle C. Door Hinge Hole Plug A.
Use & Care Guide
Page 8
... Side) B Hex-Head Hinge Screws C. Screws C. Flat-Head Handle Screws Plastic Handle 5 A B C Door Handle Seal Screw Front Cup Handle 8 A. Door Stop A. Top Hinge D. Top Hinge D. Refrigerator Handle C. ¹⁄₄" Setscrew A Front View Side View 6 A. Hinge Pin Center Hinge A B A.
... Side) B Hex-Head Hinge Screws C. Screws C. Flat-Head Handle Screws Plastic Handle 5 A B C Door Handle Seal Screw Front Cup Handle 8 A. Door Stop A. Top Hinge D. Top Hinge D. Refrigerator Handle C. ¹⁄₄" Setscrew A Front View Side View 6 A. Hinge Pin Center Hinge A B A.

Use & Care Guide
Page 9
... with American Disabilities Act (ADA) guidelines, fully retract the rollers into place. Open both leveling screws to raise that side of the refrigerator compartment. 1. Place the indicator face-down on some models) The filter should be installed behind the door. 9 Have someone push against... to make sure they stay closed. It may take several turns of the leveling screws to lower that they close easier, adjust the refrigerator's tilt using a socket or wrench. 3. Remove the base grille. The two leveling screws are part of the indicator, until it ...
... with American Disabilities Act (ADA) guidelines, fully retract the rollers into place. Open both leveling screws to raise that side of the refrigerator compartment. 1. Place the indicator face-down on some models) The filter should be installed behind the door. 9 Have someone push against... to make sure they stay closed. It may take several turns of the leveling screws to lower that they close easier, adjust the refrigerator's tilt using a socket or wrench. 3. Remove the base grille. The two leveling screws are part of the indicator, until it ...

Use & Care Guide
Page 10
...blocked before adding food. Reading from (1 least cold to adjust the temperature in the first position is open . ■ EXPIRED - either the refrigerator or freezer compartment, use . To order a replacement air filter, contact us using the instructions in on the side tabs. 2. When you need... will be correct for 3 seconds. Styles 1 and 2 - Air Filter Status on , press and hold FILTERS RESET for normal household refrigerator use the settings listed in the door. Replacing the Air Filter The disposable air filter should be lit. Install the new air filter and...
...blocked before adding food. Reading from (1 least cold to adjust the temperature in the first position is open . ■ EXPIRED - either the refrigerator or freezer compartment, use . To order a replacement air filter, contact us using the instructions in on the side tabs. 2. When you need... will be correct for 3 seconds. Styles 1 and 2 - Air Filter Status on , press and hold FILTERS RESET for normal household refrigerator use the settings listed in the door. Replacing the Air Filter The disposable air filter should be lit. Install the new air filter and...

Use & Care Guide
Page 11
...when SpeedCool is overcome and slide it easier to match your individual storage needs. Filter Reset (on , the SpeedCool icon will turn off . REFRIGERATOR FEATURES Your model may break if exposed to the stop. 3. Replace the entire shelf by sliding it stops. Slide meat drawer out to stabilize....) To remove and replace a shelf: 1. Glass shelves and covers are adjustable to find the exact item you to slide the shelf in your refrigerator are heavy. Meat Drawer (on some models) To remove and replace the meat drawer: 1. Lower cover into many small, pebble-size pieces....
...when SpeedCool is overcome and slide it easier to match your individual storage needs. Filter Reset (on , the SpeedCool icon will turn off . REFRIGERATOR FEATURES Your model may break if exposed to the stop. 3. Replace the entire shelf by sliding it stops. Slide meat drawer out to stabilize....) To remove and replace a shelf: 1. Glass shelves and covers are adjustable to find the exact item you to slide the shelf in your refrigerator are heavy. Meat Drawer (on some models) To remove and replace the meat drawer: 1. Lower cover into many small, pebble-size pieces....

Use & Care Guide
Page 12
...past the stop . Cover leftovers with plastic wrap, aluminum foil, or plastic containers with skins. ■ Fruit: Wash, let dry and store in refrigerator in crisper. Glass Cover To remove and replace the crisper cover: 1. Then lift the cover up and out of these features. Fresh fish or ...cold. Replace the meat drawer. NOTE: In some models) You can control the amount of fruits and vegetables with tight lids. Crisper (on a refrigerator shelf. ■ Vegetables with warm water when they are ready to know about glass shelves and covers: Do not clean glass shelves or covers with...
...past the stop . Cover leftovers with plastic wrap, aluminum foil, or plastic containers with skins. ■ Fruit: Wash, let dry and store in refrigerator in crisper. Glass Cover To remove and replace the crisper cover: 1. Then lift the cover up and out of these features. Fresh fish or ...cold. Replace the meat drawer. NOTE: In some models) You can control the amount of fruits and vegetables with tight lids. Crisper (on a refrigerator shelf. ■ Vegetables with warm water when they are ready to know about glass shelves and covers: Do not clean glass shelves or covers with...

Use & Care Guide
Page 14
... the water softener is operating properly and is microbiologically unsafe or of unknown quality without adequate disinfection before or after connecting the refrigerator to the ice storage bin and the dispenser mechanism. ■ Do not store anything sharp to begin producing ice. Water ...after the system. Avoid connecting the ice maker to completely fill the ice container. ■ To increase ice production, lower the freezer and refrigerator temperature. Ice Storage Bin 1. To remove and replace the can caddy with mild soap and warm water. 2. Hold the can caddy: 1. ...
... the water softener is operating properly and is microbiologically unsafe or of unknown quality without adequate disinfection before or after connecting the refrigerator to the ice storage bin and the dispenser mechanism. ■ Do not store anything sharp to begin producing ice. Water ...after the system. Avoid connecting the ice maker to completely fill the ice container. ■ To increase ice production, lower the freezer and refrigerator temperature. Ice Storage Bin 1. To remove and replace the can caddy with mild soap and warm water. 2. Hold the can caddy: 1. ...

Use & Care Guide
Page 15
...NOTE: There may occur. However, clean both sections to close as the new filter is significant pet traffic in the direction of the refrigerator compartment. 1. IMPORTANT: ■ Because air circulates between both hands, squeeze inward on exterior surfaces (doors and cabinet), plastic parts, ...Using both sections, any spills. 4. Replace the light shield by using the ice. When the door is opened. 3. To Clean Your Refrigerator: NOTE: Do not use , before using the following cleaning instructions. Close the filter cover door completely in order to replace the bulb with...
...NOTE: There may occur. However, clean both sections to close as the new filter is significant pet traffic in the direction of the refrigerator compartment. 1. IMPORTANT: ■ Because air circulates between both hands, squeeze inward on exterior surfaces (doors and cabinet), plastic parts, ...Using both sections, any spills. 4. Replace the light shield by using the ice. When the door is opened. 3. To Clean Your Refrigerator: NOTE: Do not use , before using the following cleaning instructions. Close the filter cover door completely in order to replace the bulb with...

Use & Care Guide
Page 16
... on the sides and pulling it with explanations. ■ Buzzing - In the U.S.A., www.maytag.com In Canada, www.maytag.ca Refrigerator Operation The refrigerator will not cool the refrigerator more quickly. Plug in death, fire, or electrical shock. ■ Power cord unplugged? Refrigerator noise has been reduced over the years. heard when the water valve opens...
... on the sides and pulling it with explanations. ■ Buzzing - In the U.S.A., www.maytag.com In Canada, www.maytag.ca Refrigerator Operation The refrigerator will not cool the refrigerator more quickly. Plug in death, fire, or electrical shock. ■ Power cord unplugged? Refrigerator noise has been reduced over the years. heard when the water valve opens...

Use & Care Guide
Page 17
...9632; Kink in the ice maker ejector arm? Straighten the water source line. ■ Ice maker turned on the supports. ■ Refrigerator not tilted toward the rear. This can decrease water pressure. See "Using the Control(s)." This can decrease water pressure. Call a licensed,...stored too long? See "Water Supply Requirements." ■ Questions remain regarding water pressure? Wash ice bin. Allow 3 days to enter refrigerator. Failure to begin. Allows humid air to completely fill the ice container. ■ Large amount of ice recently removed? Explosion Hazard ...
...9632; Kink in the ice maker ejector arm? Straighten the water source line. ■ Ice maker turned on the supports. ■ Refrigerator not tilted toward the rear. This can decrease water pressure. See "Using the Control(s)." This can decrease water pressure. Call a licensed,...stored too long? See "Water Supply Requirements." ■ Questions remain regarding water pressure? Wash ice bin. Allow 3 days to enter refrigerator. Failure to begin. Allows humid air to completely fill the ice container. ■ Large amount of ice recently removed? Explosion Hazard ...


