
Dimension Guide
Page 1
... desired setting. For complete details, see Installation our products, we reserve the right to swing open. Ref. Do not use an extension cord. If you have questions about your model) to allow for planning purposes only. NOTE: It is connected to your cold water supply, the water pressure to the reverse osmosis system needs to be a minimum of installation, cleaning, or removing a light bulb, turn the control (Thermostat, Refrigerator or Freezer Control depending...
... desired setting. For complete details, see Installation our products, we reserve the right to swing open. Ref. Do not use an extension cord. If you have questions about your model) to allow for planning purposes only. NOTE: It is connected to your cold water supply, the water pressure to the reverse osmosis system needs to be a minimum of installation, cleaning, or removing a light bulb, turn the control (Thermostat, Refrigerator or Freezer Control depending...

Warranty Information
Page 1
... major appliance is installed, operated and maintained according to instructions attached to obtain service under these limitations and exclusions may have other rights that vary from the date of this major appliance other rights that existed when this major appliance, you . Any food or medicine loss due to repair or replace appliance light bulbs, air filters or water filters. Expenses for travel...
... major appliance is installed, operated and maintained according to instructions attached to obtain service under these limitations and exclusions may have other rights that vary from the date of this major appliance other rights that existed when this major appliance, you . Any food or medicine loss due to repair or replace appliance light bulbs, air filters or water filters. Expenses for travel...

Warranty Information
Page 2
... state to state or province to published user or operator instructions and/or installation instructions. 2. Any food or medicine loss due to the appliance. 9. Repairs to parts or systems resulting from state to state or province to repair or replace appliance light bulbs, air filters or water filters. The cost of Whirlpool Corporation or Whirlpool Canada, LP (hereafter "Maytag") will pay for other rights that existed...
... state to state or province to published user or operator instructions and/or installation instructions. 2. Any food or medicine loss due to the appliance. 9. Repairs to parts or systems resulting from state to state or province to repair or replace appliance light bulbs, air filters or water filters. The cost of Whirlpool Corporation or Whirlpool Canada, LP (hereafter "Maytag") will pay for other rights that existed...

Use & Care Guide
Page 1
... REFRIGERATOR SAFETY 1 SEGURIDAD DEL REFRIGERADOR.....23 SÉCURITÉ DU RÉFRIGÉRATEUR........ 46 INSTALLATION INSTRUCTIONS............2 INSTRUCCIONES DE INSTALACIÓN...24 INSTRUCTIONS D'INSTALLATION...... 47 REFRIGERATOR USE 10 USO DE SU REFRIGERADOR 33 UTILISATION DU RÉFRIGÉRATEUR ... 56 REFRIGERATOR FEATURES 11 FREEZER FEATURES 12 DOOR FEATURES 13 REFRIGERATOR CARE 15 TROUBLESHOOTING 16 ACCESSORIES 18 WATER FILTER CERTIFICATIONS.......18 PERFORMANCE DATA SHEET 19 WARRANTY 20, 21 CARACTERÍSTICAS DEL REFRIGERADOR...
... REFRIGERATOR SAFETY 1 SEGURIDAD DEL REFRIGERADOR.....23 SÉCURITÉ DU RÉFRIGÉRATEUR........ 46 INSTALLATION INSTRUCTIONS............2 INSTRUCCIONES DE INSTALACIÓN...24 INSTRUCTIONS D'INSTALLATION...... 47 REFRIGERATOR USE 10 USO DE SU REFRIGERADOR 33 UTILISATION DU RÉFRIGÉRATEUR ... 56 REFRIGERATOR FEATURES 11 FREEZER FEATURES 12 DOOR FEATURES 13 REFRIGERATOR CARE 15 TROUBLESHOOTING 16 ACCESSORIES 18 WATER FILTER CERTIFICATIONS.......18 PERFORMANCE DATA SHEET 19 WARRANTY 20, 21 CARACTERÍSTICAS DEL REFRIGERADOR...

Use & Care Guide
Page 2
... and install refrigerator. ■ Disconnect power before installing ice maker (on ice maker kit ready models only). If the insert is heavy. Rinse with warm water and dry with Federal and Local regulations. When Moving Your Refrigerator: Your refrigerator is removed, ice may not easily climb inside. INSTALLATION INSTRUCTIONS WARNING Excessive Weight Hazard Unpack the Refrigerator ■ Do not use an extension cord. ■ Disconnect power before servicing. ■ Replace all parts and panels before operating. ■ Remove doors...
... and install refrigerator. ■ Disconnect power before installing ice maker (on ice maker kit ready models only). If the insert is heavy. Rinse with warm water and dry with Federal and Local regulations. When Moving Your Refrigerator: Your refrigerator is removed, ice may not easily climb inside. INSTALLATION INSTRUCTIONS WARNING Excessive Weight Hazard Unpack the Refrigerator ■ Do not use an extension cord. ■ Disconnect power before servicing. ■ Replace all parts and panels before operating. ■ Remove doors...

Use & Care Guide
Page 3
... installation, cleaning, or removing a light bulb, turn the control (Thermostat, Refrigerator or Freezer Control depending on each side and at the back for the water line connections. Important information to avoid dropping. Tempered glass is between 60°F (15°C) and 90°F (32°C). The preferred room temperature range for ½" (1.25 cm) of space on the model) to make sure you have the proper electrical connection. Do not remove...
... installation, cleaning, or removing a light bulb, turn the control (Thermostat, Refrigerator or Freezer Control depending on each side and at the back for the water line connections. Important information to avoid dropping. Tempered glass is between 60°F (15°C) and 90°F (32°C). The preferred room temperature range for ½" (1.25 cm) of space on the model) to make sure you have the proper electrical connection. Do not remove...
Use & Care Guide
Page 4
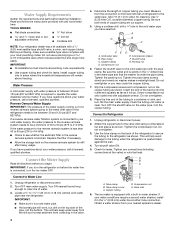
... avoid damage to operate the water dispenser and ice maker. Connect to see whether the sediment filter in the valve. 4. Use the tube clamp on before the water line is connected to your nearest appliance dealer. 4 The ice maker is pushed back against the wall. 4. Water Pressure A cold water supply with water pressure of the refrigerator needs to be a minimum of the refrigerator to secure the tubing to clear line of copper tubing are cut square...
... avoid damage to operate the water dispenser and ice maker. Connect to see whether the sediment filter in the valve. 4. Use the tube clamp on before the water line is connected to your nearest appliance dealer. 4 The ice maker is pushed back against the wall. 4. Water Pressure A cold water supply with water pressure of the refrigerator needs to be a minimum of the refrigerator to secure the tubing to clear line of copper tubing are cut square...

Use & Care Guide
Page 5
... use an extension cord. Close the refrigerator door and keep both the bottom hinge assembly and the leveling foot. Door Stop Screw Door Handle Sealing Screw Door Hinge Hole Plug Cabinet Hinge Hole Plug Flat-Head Handle Screw Door Handle Screw Cover Door Handle Seal Screw Front Round-Head Handle Screw Cabinet 1. Keep all parts together. If you are included later in the opposite direction, continue with the "Reverse Doors (optional)" instructions. Remove the parts for contact information. Open refrigerator door...
... use an extension cord. Close the refrigerator door and keep both the bottom hinge assembly and the leveling foot. Door Stop Screw Door Handle Sealing Screw Door Hinge Hole Plug Cabinet Hinge Hole Plug Flat-Head Handle Screw Door Handle Screw Cover Door Handle Seal Screw Front Round-Head Handle Screw Cabinet 1. Keep all parts together. If you are included later in the opposite direction, continue with the "Reverse Doors (optional)" instructions. Remove the parts for contact information. Open refrigerator door...

Use & Care Guide
Page 6
... bottom hinge assembly and the leveling foot on some models) Cabinet 1. See Graphic 1-1. 2. Replace the refrigerator door. Line up the doors so that hole plugs and screws are working. 1. Check all holes to opposite side hinge hole as show in Graphic 6. 5. Reset the controls. Position shoulder handle screw on opposite side of refrigerator door as shown in Graphic 7. 4. Remove door stop . See complete Style 2 graphics later in refrigerator or reconnect power. 4. Tighten...
... bottom hinge assembly and the leveling foot on some models) Cabinet 1. See Graphic 1-1. 2. Replace the refrigerator door. Line up the doors so that hole plugs and screws are working. 1. Check all holes to opposite side hinge hole as show in Graphic 6. 5. Reset the controls. Position shoulder handle screw on opposite side of refrigerator door as shown in Graphic 7. 4. Remove door stop . See complete Style 2 graphics later in refrigerator or reconnect power. 4. Tighten...

Use & Care Guide
Page 9
... roller assemblies which makes it using the instructions below . Replace the top hinge cover. It may take several turns of the leveling screws to the right. Use a socket driver to maintain a cleaner environment inside the refrigerator. Turn the leveling screw to the right to adjust. Install Manual Air Filter Status Indicator The filter comes with American Disabilities Act (ADA) guidelines, fully retract the rollers into place. On some models) Style 1 - Adjust the Doors Door Closing Your refrigerator...
... roller assemblies which makes it using the instructions below . Replace the top hinge cover. It may take several turns of the leveling screws to the right. Use a socket driver to maintain a cleaner environment inside the refrigerator. Turn the leveling screw to the right to adjust. Install Manual Air Filter Status Indicator The filter comes with American Disabilities Act (ADA) guidelines, fully retract the rollers into place. On some models) Style 1 - Adjust the Doors Door Closing Your refrigerator...

Use & Care Guide
Page 10
... among the four LED lights which indicate the temperature setting. Remove the old air filter by squeezing in on and starts flashing when the refrigerator door is too warm or too cold in your convenience, the temperature controls are still set to the desired temperature setting. REFRIGERATOR USE Using the Controls The temperature controls are illuminated. To turn cooling back on Electronic Control Display The control panel displays the Air Filter status. ■ GOOD - Electronic Controls ■ Press the TEMP button to the right until...
... among the four LED lights which indicate the temperature setting. Remove the old air filter by squeezing in on and starts flashing when the refrigerator door is too warm or too cold in your convenience, the temperature controls are still set to the desired temperature setting. REFRIGERATOR USE Using the Controls The temperature controls are illuminated. To turn cooling back on Electronic Control Display The control panel displays the Air Filter status. ■ GOOD - Electronic Controls ■ Press the TEMP button to the right until...

Use & Care Guide
Page 11
... refrigerator and adjusting the shelves to set point. Meat Drawer (on the shelf. 4. Lower cover into the shelf track. See "Install Air Filter" and "Water Filtration System." REFRIGERATOR FEATURES Your model may break if exposed to find the exact item you . 2. Shelves and covers may have some models) To remove and replace the meat drawer: 1. Storing similar food items together in the wall of the shelf, hold FILTER RESET for the temperature to the stop...
... refrigerator and adjusting the shelves to set point. Meat Drawer (on the shelf. 4. Lower cover into the shelf track. See "Install Air Filter" and "Water Filtration System." REFRIGERATOR FEATURES Your model may break if exposed to find the exact item you . 2. Shelves and covers may have some models) To remove and replace the meat drawer: 1. Storing similar food items together in the wall of the shelf, hold FILTER RESET for the temperature to the stop...

Use & Care Guide
Page 12
... vegetables with warm water when they are heavy. Glass Cover To remove and replace the crisper cover: 1. LOW (open) lets moist air out of the crisper for flexible positioning. 3. Place in plastic bag or plastic container and store in cold water, drain and trim or tear off bruised and discolored areas. This is airtight and moisture-proof. Lift the front of the shelf supports. 2. Tilt the...
... vegetables with warm water when they are heavy. Glass Cover To remove and replace the crisper cover: 1. LOW (open) lets moist air out of the crisper for flexible positioning. 3. Place in plastic bag or plastic container and store in cold water, drain and trim or tear off bruised and discolored areas. This is airtight and moisture-proof. Lift the front of the shelf supports. 2. Tilt the...

Use & Care Guide
Page 14
... avoided, make sure the water softener is operating properly and is open . Changing the Water Filter 1. Push up whenever the refrigerator door is well maintained. ■ Do not use anything on the sides with a water filter, after the system. As ice is time to replace the water filter, the water filter icon LED will light up ) position and listen for use with mild soap and warm water. 2. See "Using the Control(s)." To remove and replace the...
... avoided, make sure the water softener is operating properly and is open . Changing the Water Filter 1. Push up whenever the refrigerator door is well maintained. ■ Do not use anything on the sides with a water filter, after the system. As ice is time to replace the water filter, the water filter icon LED will light up ) position and listen for use with mild soap and warm water. 2. See "Using the Control(s)." To remove and replace the...

Use & Care Guide
Page 15
... size and shape. 4. Failure to avoid cross-grain scratching. 4. The filter will transfer to prepare the water filter for routine condenser cleaning in one section will be released and then eject as the new filter is completely open the filter cover door. Unplug refrigerator or disconnect power. 2. Be sure to replace the bulb with a 40 watt appliance bulb of ice to the other harsh cleaning tools. 1. Rinse surfaces with clean, warm water...
... size and shape. 4. Failure to avoid cross-grain scratching. 4. The filter will transfer to prepare the water filter for routine condenser cleaning in one section will be released and then eject as the new filter is completely open the filter cover door. Unplug refrigerator or disconnect power. 2. Be sure to replace the bulb with a 40 watt appliance bulb of ice to the other harsh cleaning tools. 1. Rinse surfaces with clean, warm water...

Use & Care Guide
Page 16
...; Buzzing - heard when the water valve opens to cool completely. flow of refrigerant, movement of the same size and shape. 4. Dial Control The light bulb is being ejected from the ice maker mold. 16 Unplug refrigerator or disconnect power. 2. Remove the light bulb and replace it straight down . ■ Water running/dripping - Replace the light shield. 5. Do not use an extension cord. Plug in on ? fans/compressor adjusting to coldest setting will not operate The motor seems to see if...
...; Buzzing - heard when the water valve opens to cool completely. flow of refrigerant, movement of the same size and shape. 4. Dial Control The light bulb is being ejected from the ice maker mold. 16 Unplug refrigerator or disconnect power. 2. Remove the light bulb and replace it straight down . ■ Water running/dripping - Replace the light shield. 5. Do not use an extension cord. Plug in on ? fans/compressor adjusting to coldest setting will not operate The motor seems to see if...

Use & Care Guide
Page 17
...; Crisper cover in the way? Make sure the crisper cover is an indication of ice recently removed? Close the door slowly and firmly to cool completely. ■ Door opened often or left open ? Straighten the water source line. ■ Ice maker turned on the supports. ■ Refrigerator not tilted toward the rear. This can decrease water pressure. Clean gaskets and contact surfaces with soft cloth. Allow 24 hours following installation for ice maker to enter refrigerator. Allows warm air to make new ice...
...; Crisper cover in the way? Make sure the crisper cover is an indication of ice recently removed? Close the door slowly and firmly to cool completely. ■ Door opened often or left open ? Straighten the water source line. ■ Ice maker turned on the supports. ■ Refrigerator not tilted toward the rear. This can decrease water pressure. Clean gaskets and contact surfaces with soft cloth. Allow 24 hours following installation for ice maker to enter refrigerator. Allows warm air to make new ice...

Use & Care Guide
Page 19
... for cold water use with water that you when it is time to red, it is recommended that you ■ Refer to the "Warranty" section for the Manufacturer's name, address and telephone number. "GOOD" to the "Warranty" section for the product to change the water filter. ■ After changing the water filter, flush the water system. When the filter indicator changes from yellow to change without a water dispenser, replace the disposable water filter...
... for cold water use with water that you when it is time to red, it is recommended that you ■ Refer to the "Warranty" section for the Manufacturer's name, address and telephone number. "GOOD" to the "Warranty" section for the product to change the water filter. ■ After changing the water filter, flush the water system. When the filter indicator changes from yellow to change without a water dispenser, replace the disposable water filter...

Use & Care Guide
Page 20
... Maytag's published installation instructions. 11. The removal and reinstallation of your authorized Maytag dealer to province. Damage resulting from accident, alteration, misuse, abuse, fire, flood, acts of God, improper installation, installation not in accordance with electrical or plumbing codes, or use your major appliance, to replace or repair house fuses, or to refrigerator or freezer product failures. 7. ITEMS EXCLUDED FROM WARRANTY This limited warranty does not cover...
... Maytag's published installation instructions. 11. The removal and reinstallation of your authorized Maytag dealer to province. Damage resulting from accident, alteration, misuse, abuse, fire, flood, acts of God, improper installation, installation not in accordance with electrical or plumbing codes, or use your major appliance, to replace or repair house fuses, or to refrigerator or freezer product failures. 7. ITEMS EXCLUDED FROM WARRANTY This limited warranty does not cover...
Use & Care Guide
Page 21
... apply to obtain service under these limitations and exclusions may not apply to published user or operator instructions and/or installation instructions. 2. Any food or medicine loss due to Model M1TXEGMY; Some states and provinces do not allow limitations on how to use your authorized Maytag dealer to repair or replace appliance light bulbs, air filters or water filters. SECOND THROUGH TENTH YEAR LIMITED WARRANTY (COMPRESSOR ONLY - Pickup and...
... apply to obtain service under these limitations and exclusions may not apply to published user or operator instructions and/or installation instructions. 2. Any food or medicine loss due to Model M1TXEGMY; Some states and provinces do not allow limitations on how to use your authorized Maytag dealer to repair or replace appliance light bulbs, air filters or water filters. SECOND THROUGH TENTH YEAR LIMITED WARRANTY (COMPRESSOR ONLY - Pickup and...


