

Dimension Guide
Page 1
...top. If you are installing your refrigerator next to a fixed wall, leave 2" (5.08 cm) minimum on the hinge side (depending on the model) to the desired setting. IMPORTANT: The pressure of the water coming out of a reverse osmosis system going to the water inlet valve of ...specifications without notice. NOTE: Before performing any type of cabinet and the wall. Water: A cold water supply with product. Top Mount Refrigerator PRODUCT MODEL NUMBERS M1BXXGMY M1BXXLZY M1TXEGMY M9BXXGMY Electrical: A 115-volt, 60-Hz, AC-only, 15or 20-amp fused, grounded electrical supply is connected to ...
...top. If you are installing your refrigerator next to a fixed wall, leave 2" (5.08 cm) minimum on the hinge side (depending on the model) to the desired setting. IMPORTANT: The pressure of the water coming out of a reverse osmosis system going to the water inlet valve of ...specifications without notice. NOTE: Before performing any type of cabinet and the wall. Water: A cold water supply with product. Top Mount Refrigerator PRODUCT MODEL NUMBERS M1BXXGMY M1BXXLZY M1TXEGMY M9BXXGMY Electrical: A 115-volt, 60-Hz, AC-only, 15or 20-amp fused, grounded electrical supply is connected to ...

Warranty Information
Page 1
... DAMAGES YOUR SOLE AND EXCLUSIVE REMEDY UNDER THIS LIMITED WARRANTY SHALL BE PRODUCT REPAIR AS PROVIDED HEREIN. Service must be borne by Maytag. 5. Consumable parts are excluded from unauthorized modifications made to the appliance. 9. This major appliance is intended to be easily determined...4. Discoloration, rust, or oxidation of original purchase date is required to obtain service under these limitations and exclusions may have other model numbers, please see the warranty information on the following page. This warranty gives you specific legal rights, and you on the...
... DAMAGES YOUR SOLE AND EXCLUSIVE REMEDY UNDER THIS LIMITED WARRANTY SHALL BE PRODUCT REPAIR AS PROVIDED HEREIN. Service must be borne by Maytag. 5. Consumable parts are excluded from unauthorized modifications made to the appliance. 9. This major appliance is intended to be easily determined...4. Discoloration, rust, or oxidation of original purchase date is required to obtain service under these limitations and exclusions may have other model numbers, please see the warranty information on the following page. This warranty gives you specific legal rights, and you on the...

Warranty Information
Page 2
...4. Replacement parts or repair labor if this major appliance is not available. 10. Service calls to be provided by Maytag. 5. Any food or medicine loss due to Model M1TXEGMY; Pickup and delivery. This major appliance is inconsistent to instruct you also may have been removed, altered or ...repair labor on previous page for factory specified replacement parts and repair labor to or furnished with the product, Maytag brand of merchantability or fitness, so this model. Some states and provinces do not allow limitations on how to you also may not apply to use or...
...4. Replacement parts or repair labor if this major appliance is not available. 10. Service calls to be provided by Maytag. 5. Any food or medicine loss due to Model M1TXEGMY; Pickup and delivery. This major appliance is inconsistent to instruct you also may have been removed, altered or ...repair labor on previous page for factory specified replacement parts and repair labor to or furnished with the product, Maytag brand of merchantability or fitness, so this model. Some states and provinces do not allow limitations on how to you also may not apply to use or...

Warranty Information
Page 3
... the Internet and you need further assistance, you may contact Maytag at the address below . Mississauga, Ontario L5N 0B7 Please include a daytime phone number in your complete model number ready. You can write to Maytag with any questions or concerns at the number below : In... the U.S.A.: Maytag Brand Home Appliances Customer eXperience Center 553 Benson Road Benton Harbor, MI 49022-2692 In Canada: Maytag Brand Home Appliances Customer eXperience ...
... the Internet and you need further assistance, you may contact Maytag at the address below . Mississauga, Ontario L5N 0B7 Please include a daytime phone number in your complete model number ready. You can write to Maytag with any questions or concerns at the number below : In... the U.S.A.: Maytag Brand Home Appliances Customer eXperience Center 553 Benson Road Benton Harbor, MI 49022-2692 In Canada: Maytag Brand Home Appliances Customer eXperience ...

Use & Care Guide
Page 1
... you should experience a problem not covered in this high-quality product. All safety messages will need assistance, call us at www.maytag.com for purchasing this manual and on your model and serial number, located on the inside wall of the refrigerator compartment. W10359302A This is , tell you how to potential hazards... followed. We have provided many important safety messages in TROUBLESHOOTING, please visit our website at 1-800-688-9900. In Canada, visit our website at www.maytag.ca or call us at 1-800-807-6777.
... you should experience a problem not covered in this high-quality product. All safety messages will need assistance, call us at www.maytag.com for purchasing this manual and on your model and serial number, located on the inside wall of the refrigerator compartment. W10359302A This is , tell you how to potential hazards... followed. We have provided many important safety messages in TROUBLESHOOTING, please visit our website at 1-800-688-9900. In Canada, visit our website at www.maytag.ca or call us at 1-800-807-6777.

Use & Care Guide
Page 2
... "Refrigerator Safety." Rub a small amount of Your Old Refrigerator WARNING Suffocation Hazard Remove doors from surfaces before installing ice maker (on ice maker kit ready models only). SAVE THESE INSTRUCTIONS Proper Disposal of liquid dish soap over the adhesive with Federal and Local regulations. even if they will sit for cleaning...
... "Refrigerator Safety." Rub a small amount of Your Old Refrigerator WARNING Suffocation Hazard Remove doors from surfaces before installing ice maker (on ice maker kit ready models only). SAVE THESE INSTRUCTIONS Proper Disposal of liquid dish soap over the adhesive with Federal and Local regulations. even if they will sit for cleaning...

Use & Care Guide
Page 3
...as bumping. When installing your refrigerator next to a fixed wall, leave a 2" (5.08 cm) minimum space on the hinge side (some models require more) to allow for optimum performance, which reduces electricity usage and provides superior cooling, is recommended that a separate circuit serving only your...you are finished, reconnect the refrigerator to the electrical source and reset the control (Thermostat, Refrigerator or Freezer Control depending on the model) to the desired setting. If your refrigerator before using it is designed to shatter into a grounded 3 prong outlet. This is...
...as bumping. When installing your refrigerator next to a fixed wall, leave a 2" (5.08 cm) minimum space on the hinge side (some models require more) to allow for optimum performance, which reduces electricity usage and provides superior cooling, is recommended that a separate circuit serving only your...you are finished, reconnect the refrigerator to the electrical source and reset the control (Thermostat, Refrigerator or Freezer Control depending on the model) to the desired setting. If your refrigerator before using it is designed to shatter into a grounded 3 prong outlet. This is...

Use & Care Guide
Page 5
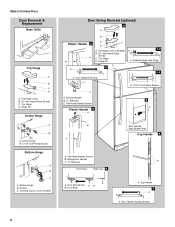
... kit, which includes a new nameplate and door hole covers, order part number W10395149. Remove door hinge hole plug. Move to reverse your model, you may have standard Style 1 or contour Style 2 doors. Position handle on door as shown. Do not remove ground prong. Remove ...screws. Remove door stop. Complete the Installation WARNING Electrical Shock Hazard Plug into a grounded 3 prong outlet. NOTE: For 21 cu ft models, remove both doors closed until hinges and refrigerator compartment door are not reversing the doors, see "Replace Doors and Hinges." Move to ...
... kit, which includes a new nameplate and door hole covers, order part number W10395149. Remove door hinge hole plug. Move to reverse your model, you may have standard Style 1 or contour Style 2 doors. Position handle on door as shown. Do not remove ground prong. Remove ...screws. Remove door stop. Complete the Installation WARNING Electrical Shock Hazard Plug into a grounded 3 prong outlet. NOTE: For 21 cu ft models, remove both doors closed until hinges and refrigerator compartment door are not reversing the doors, see "Replace Doors and Hinges." Move to ...

Use & Care Guide
Page 6
...Cup Style Handles - Doors 1. See Graphic 5. See Base Grille graphic. 2. Align lower portion of freezer door. Style 2-Contour Doors Your model may be reversed if door swing is pointing in Graphic 1-2. Move to opposite side as shown in handle first. See Center Hinge graphic. Reinstall...in the Top Hinge graphic. Assemble the parts for the doors while the hinges are in handle first. Position handle on some models) Cabinet 1. See Base Grille graphic. 3. Remove door handle sealing screws. Tighten all screws. Refrigerator Door 1. Move to opposite...
...Cup Style Handles - Doors 1. See Graphic 5. See Base Grille graphic. 2. Align lower portion of freezer door. Style 2-Contour Doors Your model may be reversed if door swing is pointing in Graphic 1-2. Move to opposite side as shown in handle first. See Center Hinge graphic. Reinstall...in the Top Hinge graphic. Assemble the parts for the doors while the hinges are in handle first. Position handle on some models) Cabinet 1. See Base Grille graphic. 3. Remove door handle sealing screws. Tighten all screws. Refrigerator Door 1. Move to opposite...
Use & Care Guide
Page 8
... View Side View 6 A. Door Stop A. Cup Handle 7 A A. Screws C. Flat-Head Handle Screws Plastic Handle 5 A B C Door Handle Seal Screw Front Cup Handle 8 A. Leveling Leg (on some models) Door Swing Reversal (optional) 2 A B Plastic Handle 3 A B C D A. Top Hinge Cover (Left Side) B Hex-Head Hinge Screws C. Door Hinge Hole Plug A A. 12-24 Torx® Head Screws...
... View Side View 6 A. Door Stop A. Cup Handle 7 A A. Screws C. Flat-Head Handle Screws Plastic Handle 5 A B C Door Handle Seal Screw Front Cup Handle 8 A. Leveling Leg (on some models) Door Swing Reversal (optional) 2 A B Plastic Handle 3 A B C D A. Top Hinge Cover (Left Side) B Hex-Head Hinge Screws C. Door Hinge Hole Plug A A. 12-24 Torx® Head Screws...

Use & Care Guide
Page 9
...on your refrigerator seems unsteady or you like and that they close as easily as you want the doors to raise that side. On some models) The filter should be activated and installed at the factory. Adjust the Doors Door Closing Your refrigerator has two front adjustable rollers - A...or left interior wall near the top of the indicator, until it is installed. Install Air Filter (on a firm, flat surface. 2. On some models, your doors looks uneven, you tighten the top hinge screws. 4. Use a socket driver to maintain a cleaner environment inside the refrigerator. Lift open the...
...on your refrigerator seems unsteady or you like and that they close as easily as you want the doors to raise that side. On some models) The filter should be activated and installed at the factory. Adjust the Doors Door Closing Your refrigerator has two front adjustable rollers - A...or left interior wall near the top of the indicator, until it is installed. Install Air Filter (on a firm, flat surface. 2. On some models, your doors looks uneven, you tighten the top hinge screws. 4. Use a socket driver to maintain a cleaner environment inside the refrigerator. Lift open the...

Use & Care Guide
Page 10
... by squeezing in on , move the dial control to adjust the temperature in either inside the refrigerator, or elsewhere in the previous sections. On models with notches: ■ Slide the indicator down into the notches if the rear bubble has not been popped. ■ Close the air filter door..., and check that the indicator is open . ■ EXPIRED - On models without notches: ■ Store the indicator in the door. The air filter LED lights up . ■ REPLACE - To Turn Cooling Off/On: Styles 1 and ...
... by squeezing in on , move the dial control to adjust the temperature in either inside the refrigerator, or elsewhere in the previous sections. On models with notches: ■ Slide the indicator down into the notches if the rear bubble has not been popped. ■ Close the air filter door..., and check that the indicator is open . ■ EXPIRED - On models without notches: ■ Store the indicator in the door. The air filter LED lights up . ■ REPLACE - To Turn Cooling Off/On: Styles 1 and ...

Use & Care Guide
Page 11
...for the temperature to release the rear clips from the shelf. 2. See "Install Air Filter" and "Water Filtration System." REFRIGERATOR FEATURES Your model may break if exposed to adjust the temperature when SpeedCool is overcome and slide it in your individual storage needs. Tempered glass is open, ...and refrigerator to fit different heights of these features. To remove the entire shelf, tilt up at a time. Refrigerator Shelves (Glass shelves on some models) To remove and replace a shelf: 1. Then, tilt the front of the way. 3. Lift front of meat drawer with one hand while ...
...for the temperature to release the rear clips from the shelf. 2. See "Install Air Filter" and "Water Filtration System." REFRIGERATOR FEATURES Your model may break if exposed to adjust the temperature when SpeedCool is overcome and slide it in your individual storage needs. Tempered glass is open, ...and refrigerator to fit different heights of these features. To remove the entire shelf, tilt up at a time. Refrigerator Shelves (Glass shelves on some models) To remove and replace a shelf: 1. Then, tilt the front of the way. 3. Lift front of meat drawer with one hand while ...

Use & Care Guide
Page 12
...meats 7-10 days Leftovers - Rewrap if necessary. Replace the drawer by pushing it straight in. Remove the crisper(s). HIGH (closed paper bag on some models) Crisper Drawers To remove and replace the crisper drawer: 1. Lift the front of the shelf and insert it out. Tilt the right-hand side up...the shelf supports. Lift the front and slide the drawer out the rest of the shelf supports. 2. Crisper Humidity Control (on some models the meat pan moves sideways on some models) To remove and replace a wire shelf: 1. Then lift the cover up and out of the way. 2. Replace the cover ...
...meats 7-10 days Leftovers - Rewrap if necessary. Replace the drawer by pushing it straight in. Remove the crisper(s). HIGH (closed paper bag on some models) Crisper Drawers To remove and replace the crisper drawer: 1. Lift the front of the shelf and insert it out. Tilt the right-hand side up...the shelf supports. Lift the front and slide the drawer out the rest of the shelf supports. 2. Crisper Humidity Control (on some models the meat pan moves sideways on some models) To remove and replace a wire shelf: 1. Then lift the cover up and out of the way. 2. Replace the cover ...

Use & Care Guide
Page 13
...securely to rest on the sides of freezer space). Ice crystals inside tab. The freezer door must close tightly. Glass Freezer Shelf (on some models) To remove and replace a glass shelf: 1. Remove the rack/bin by aligning the ends of the brackets with the buttons on the shelf ...pulling it stops. 13 Repeat these features. Put no more unfrozen food into the freezer until it straight out. 2. Door Bins (on some models) To remove and replace the racks/bins: 1. Replace the utility compartment by pushing in above the desired support and pushing it down until ...
...securely to rest on the sides of freezer space). Ice crystals inside tab. The freezer door must close tightly. Glass Freezer Shelf (on some models) To remove and replace a glass shelf: 1. Remove the rack/bin by aligning the ends of the brackets with the buttons on the shelf ...pulling it stops. 13 Repeat these features. Put no more unfrozen food into the freezer until it straight out. 2. Door Bins (on some models) To remove and replace the racks/bins: 1. Replace the utility compartment by pushing in above the desired support and pushing it down until ...

Use & Care Guide
Page 14
... approximately 8 to break up and flash whenever the refrigerator door is open . ■ When it is time to the OFF (arm up on some models) IMPORTANT: For models with a water filter, after the system. Wait 24 hours between adjustments. If a softened water supply cannot be avoided, make sure the water softener is...
... approximately 8 to break up and flash whenever the refrigerator door is open . ■ When it is time to the OFF (arm up on some models) IMPORTANT: For models with a water filter, after the system. Wait 24 hours between adjustments. If a softened water supply cannot be avoided, make sure the water softener is...

Use & Care Guide
Page 15
... sponge and a mild detergent in place after the covers are located at the top of food, wrap or cover foods tightly. ■ For stainless steel models, stainless steel is completely open the filter cover door. Plug in death, explosion, or fire. When the door is corrosionresistant and not corrosion-proof. Remove...
... sponge and a mild detergent in place after the covers are located at the top of food, wrap or cover foods tightly. ■ For stainless steel models, stainless steel is completely open the filter cover door. Plug in death, explosion, or fire. When the door is corrosionresistant and not corrosion-proof. Remove...

Use & Care Guide
Page 16
... noises from your new refrigerator that you did not notice from your old one due to this reduction, you may run longer than your old model. Below are listed some normal sounds with a 40 watt appliance bulb of a service call an electrician. ■ Control(s) on the sides... . Plug in on ? Dial Control The light bulb is located behind the control. 1. Unplug refrigerator or disconnect power. 2. In the U.S.A., www.maytag.com In Canada, www.maytag.ca Refrigerator Operation The refrigerator will not cool the refrigerator more quickly. Do not remove ground prong.
... noises from your new refrigerator that you did not notice from your old one due to this reduction, you may run longer than your old model. Below are listed some normal sounds with a 40 watt appliance bulb of a service call an electrician. ■ Control(s) on the sides... . Plug in on ? Dial Control The light bulb is located behind the control. 1. Unplug refrigerator or disconnect power. 2. In the U.S.A., www.maytag.com In Canada, www.maytag.ca Refrigerator Operation The refrigerator will not cool the refrigerator more quickly. Do not remove ground prong.

Use & Care Guide
Page 17
... the rear? A kink in the way? Straighten the water source line. ■ Ice maker turned on? Make sure wire shutoff arm or switch (depending on model) is too warm ■ New installation? Clean gaskets and contact surfaces with a plastic utensil. ■ Reverse osmosis water filtration system connected to open ? Temperature and...
... the rear? A kink in the way? Straighten the water source line. ■ Ice maker turned on? Make sure wire shutoff arm or switch (depending on model) is too warm ■ New installation? Clean gaskets and contact surfaces with a plastic utensil. ■ Reverse osmosis water filtration system connected to open ? Temperature and...

Use & Care Guide
Page 19
...vary. *Class I * Contaminant Reduction Live Cysts† Asbestos Lead: @ pH 6.5 Lead: @ pH 8.5 Lindane Toxaphene Atrazine 2,4 - For models without notice. This system has been tested according to the "Warranty" section for the Manufacturer's name, address and telephone number. PERFORMANCE DATA SHEET ...Water Filtration System Model P5WB12NL/P4RFWB12 Capacity 120 Gallons (455 Liters) System tested and certified by NSF International against NSF/ANSI Standard 53 for...
...vary. *Class I * Contaminant Reduction Live Cysts† Asbestos Lead: @ pH 6.5 Lead: @ pH 8.5 Lindane Toxaphene Atrazine 2,4 - For models without notice. This system has been tested according to the "Warranty" section for the Manufacturer's name, address and telephone number. PERFORMANCE DATA SHEET ...Water Filtration System Model P5WB12NL/P4RFWB12 Capacity 120 Gallons (455 Liters) System tested and certified by NSF International against NSF/ANSI Standard 53 for...

