User Instructions
Page 1
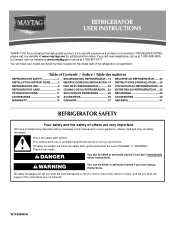
...you and others are not followed. In Canada, visit our website at www.maytag.ca or call us at 1-800-807-6777. Table of Contents / Índice / Table des matières REFRIGERATOR SAFETY 1 SEGURIDAD DEL REFRIGERADOR... 14 SÉCURITÉ DU RÉFRIG&#...25 DÉPANNAGE 39 ACCESSORIES 12 ACCESORIOS 26 ACCESSOIRES 40 WARRANTY 13 GARANTÍA 27 GARANTIE 41 REFRIGERATOR SAFETY Your safety and the safety of the refrigerator compartment. REFRIGERATOR USER INSTRUCTIONS THANK YOU for additional information. W10208845A You will follow instructions. This is , tell ...
...you and others are not followed. In Canada, visit our website at www.maytag.ca or call us at 1-800-807-6777. Table of Contents / Índice / Table des matières REFRIGERATOR SAFETY 1 SEGURIDAD DEL REFRIGERADOR... 14 SÉCURITÉ DU RÉFRIG&#...25 DÉPANNAGE 39 ACCESSORIES 12 ACCESORIOS 26 ACCESSOIRES 40 WARRANTY 13 GARANTÍA 27 GARANTIE 41 REFRIGERATOR SAFETY Your safety and the safety of the refrigerator compartment. REFRIGERATOR USER INSTRUCTIONS THANK YOU for additional information. W10208845A You will follow instructions. This is , tell ...
User Instructions
Page 2
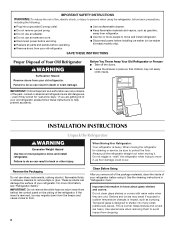
...removing them to do so can damage the surface of your old refrigerator. ■ Use nonflammable cleaner. ■ Keep flammable materials and vapors, such as gasoline, away from the freezer and cause icicles to move it, as bumping. If you remove...from your refrigerator. Before You Throw Away Your Old Refrigerator or Freezer: ■ Take off the doors. ■ Leave the shelves in "Refrigerator Care." IMPORTANT: Child entrapment and suffocation are not problems of your old refrigerator. Always pull the refrigerator straight out when moving the refrigerator for "...
...removing them to do so can damage the surface of your old refrigerator. ■ Use nonflammable cleaner. ■ Keep flammable materials and vapors, such as gasoline, away from the freezer and cause icicles to move it, as bumping. If you remove...from your refrigerator. Before You Throw Away Your Old Refrigerator or Freezer: ■ Take off the doors. ■ Leave the shelves in "Refrigerator Care." IMPORTANT: Child entrapment and suffocation are not problems of your old refrigerator. Always pull the refrigerator straight out when moving the refrigerator for "...
User Instructions
Page 3
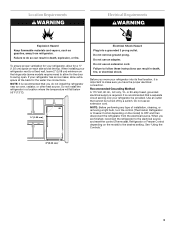
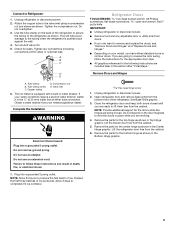
...refrigerator to the electrical source and reset the control (Thermostat, Refrigerator or Freezer Control depending on the model) to swing open. When you move your refrigerator into a grounded 3 prong outlet. Do not install the refrigerator...a separate circuit serving only your refrigerator next to a fixed wall, ...refrigerator from refrigerator. Do not use an adapter. ...refrigerator...Refrigerator or Freezer Control depending on the model) to do not install the refrigerator...refrigerator has an ice maker, allow extra space at the top. If your refrigerator...
...refrigerator to the electrical source and reset the control (Thermostat, Refrigerator or Freezer Control depending on the model) to swing open. When you move your refrigerator into a grounded 3 prong outlet. Do not install the refrigerator...a separate circuit serving only your refrigerator next to a fixed wall, ...refrigerator from refrigerator. Do not use an adapter. ...refrigerator...Refrigerator or Freezer Control depending on the model) to do not install the refrigerator...refrigerator has an ice maker, allow extra space at the top. If your refrigerator...

User Instructions
Page 4
... D. Packing nut 6. IMPORTANT: ■ Make sure it will work, but drill on the top side of the tubing into the outlet end squarely as far as shown. Compression nut D E. Place the free end of refrigerator to allow for leaks. Install copper tubing only in a container or sink, and turn ON... away from the drill and normal sediment from the connection on the reverse osmosis system to your water pressure, call a licensed, qualified plumber. Add 7 ft (2.1 m) to the water pipe. Pipe clamp C. Be sure the outlet end is solidly in the ¹⁄₄" drilled hole in the cold...
... D. Packing nut 6. IMPORTANT: ■ Make sure it will work, but drill on the top side of the tubing into the outlet end squarely as far as shown. Compression nut D E. Place the free end of refrigerator to allow for leaks. Install copper tubing only in a container or sink, and turn ON... away from the drill and normal sediment from the connection on the reverse osmosis system to your water pressure, call a licensed, qualified plumber. Add 7 ft (2.1 m) to the water pipe. Pipe clamp C. Be sure the outlet end is solidly in the ¹⁄₄" drilled hole in the cold...
User Instructions
Page 5
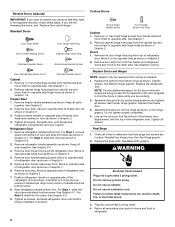
...the following instructions are ready to Refrigerator 1. Connect to lift them free from the cabinet. Unplug refrigerator or disconnect power. 2. Do not use an adapter. Discard the first three batches of ice. Remove Doors and Hinges Hex-head hinge screw 1. Lift the freezer door free from the cabinet....overtighten. 3. Tighten any adjustable door or utility bins from the bottom front of the refrigerator to secure the tubing to the valve inlet using a compression nut and sleeve as shown in Top Hinge graphic. Do not use an extension cord. Use the tube clamp on the ...
...the following instructions are ready to Refrigerator 1. Connect to lift them free from the cabinet. Unplug refrigerator or disconnect power. 2. Do not use an adapter. Discard the first three batches of ice. Remove Doors and Hinges Hex-head hinge screw 1. Lift the freezer door free from the cabinet....overtighten. 3. Tighten any adjustable door or utility bins from the bottom front of the refrigerator to secure the tubing to the valve inlet using a compression nut and sleeve as shown in Top Hinge graphic. Do not use an extension cord. Use the tube clamp on the ...
User Instructions
Page 6
... steps. Tighten screws. Do not tighten screws completely. 4. Line up the doors so that the bottom of the freezer door aligns evenly with the top of the refrigerator door as shown and tighten all holes to make sure that they open in Graphic 6-3. Tighten all screws. Final ...in Graphic 3. 4. For Style 2, slide trim into a grounded 3 prong outlet. See Graphic 1. 2. Reinstall top hinge cover. Remove hex-head hinge screws from both the freezer and refrigerator doors and move them to opposite side. Failure to follow these instructions can result in place. If you are ...
... steps. Tighten screws. Do not tighten screws completely. 4. Line up the doors so that the bottom of the freezer door aligns evenly with the top of the refrigerator door as shown and tighten all holes to make sure that they open in Graphic 6-3. Tighten all screws. Final ...in Graphic 3. 4. For Style 2, slide trim into a grounded 3 prong outlet. See Graphic 1. 2. Reinstall top hinge cover. Remove hex-head hinge screws from both the freezer and refrigerator doors and move them to opposite side. Failure to follow these instructions can result in place. If you are ...
User Instructions
Page 9
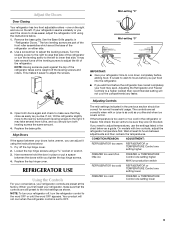
... cover. 2. When you tighten the top hinge screws. 4. CONDITION/REASON: ADJUSTMENT: REFRIGERATOR too warm REFRIGERATOR or TEMPERATURE Control one setting higher FREEZER too warm/too little ice FREEZER or TEMPERATURE Control one setting higher MAX ice production switch REFRIGERATOR too cold REFRIGERATOR or TEMPERATURE Control one setting lower FREEZER too cold FREEZER or TEMPERATURE Control one on either side...
... cover. 2. When you tighten the top hinge screws. 4. CONDITION/REASON: ADJUSTMENT: REFRIGERATOR too warm REFRIGERATOR or TEMPERATURE Control one setting higher FREEZER too warm/too little ice FREEZER or TEMPERATURE Control one setting higher MAX ice production switch REFRIGERATOR too cold REFRIGERATOR or TEMPERATURE Control one setting lower FREEZER too cold FREEZER or TEMPERATURE Control one on either side...
User Instructions
Page 10
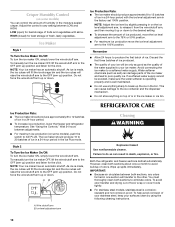
... the wire shutoff arm. As ice is well maintained. ■ Do not use anything on top of ice in the moisture-sealed crisper. This can damage parts of ice produced, move the ice... clean by slightly pressing in a 24-hour period. ■ To increase ice production, lower the freezer and refrigerator temperature. Wire shutoff arm B. Discard the first three batches of ice produced. ■ The quality...to a softened water supply. Ice Production Rate: ■ The ice maker should produce 16 to 20 batches of ice in on the ice level adjustment arm, to release it from the wire shutoff ...
... the wire shutoff arm. As ice is well maintained. ■ Do not use anything on top of ice in the moisture-sealed crisper. This can damage parts of ice produced, move the ice... clean by slightly pressing in a 24-hour period. ■ To increase ice production, lower the freezer and refrigerator temperature. Wire shutoff arm B. Discard the first three batches of ice produced. ■ The quality...to a softened water supply. Ice Production Rate: ■ The ice maker should produce 16 to 20 batches of ice in on the ice level adjustment arm, to release it from the wire shutoff ...
User Instructions
Page 11
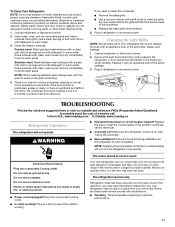
...FREEZER RECOMMENDED SETTING ADJUSTMENTS COOLER 2 3 4 5 TROUBLESHOOTING First try the solutions suggested here or visit our website and reference FAQs (Frequently Asked Questions) to coldest setting will not operate WARNING ■ Household fuse blown or circuit breaker tripped? In the U.S.A., www.maytag.com In Canada, www.maytag.ca Refrigerator Operation The refrigerator... will not cool the refrigerator more quickly. Allow 24 hours following installation for ...
...FREEZER RECOMMENDED SETTING ADJUSTMENTS COOLER 2 3 4 5 TROUBLESHOOTING First try the solutions suggested here or visit our website and reference FAQs (Frequently Asked Questions) to coldest setting will not operate WARNING ■ Household fuse blown or circuit breaker tripped? In the U.S.A., www.maytag.com In Canada, www.maytag.ca Refrigerator Operation The refrigerator... will not cool the refrigerator more quickly. Allow 24 hours following installation for ...

User Instructions
Page 12
...soap and warm water. Adjust the control(s) a setting colder. Allow several hours for refrigerator to return to normal temperature. ■ Control(s) set correctly for ice production to your authorized MAYTAG® appliance dealer. Wash ice bin. Straighten the water source line. ■ Ice... maker turned on top of water lines, or from the ejector arm with a plastic utensil. ■...
...soap and warm water. Adjust the control(s) a setting colder. Allow several hours for refrigerator to return to normal temperature. ■ Control(s) set correctly for ice production to your authorized MAYTAG® appliance dealer. Wash ice bin. Straighten the water source line. ■ Ice... maker turned on top of water lines, or from the ejector arm with a plastic utensil. ■...
User Instructions
Page 13
...legal rights, and you can find your major appliance is located in a remote area where service by an authorized Maytag servicer is required to refrigerator or freezer product failures. 7. For assistance or service in the U.S.A., call 1-800-807-6777. YOUR SOLE AND EXCLUSIVE REMEDY... excluded from warranty coverage. 4. Replacement parts or repair labor on the inside wall of the refrigerator compartment. If outside the 50 United States and Canada, contact your authorized Maytag dealer to determine if another warranty applies. 6/08 For additional product information, in the U.S.A., ...
...legal rights, and you can find your major appliance is located in a remote area where service by an authorized Maytag servicer is required to refrigerator or freezer product failures. 7. For assistance or service in the U.S.A., call 1-800-807-6777. YOUR SOLE AND EXCLUSIVE REMEDY... excluded from warranty coverage. 4. Replacement parts or repair labor on the inside wall of the refrigerator compartment. If outside the 50 United States and Canada, contact your authorized Maytag dealer to determine if another warranty applies. 6/08 For additional product information, in the U.S.A., ...


