User Instructions
Page 1
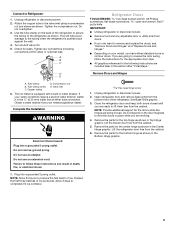
... manual and on your model and serial number, located on the inside wall of others . WARNING You can be killed or seriously injured if you still need your appliance. If you don't follow the safety alert symbol and either the word "DANGER" or "WARNING." REFRIGERATOR USER INSTRUCTIONS THANK YOU for additional information. We have provided many important safety messages in TROUBLESHOOTING...
... manual and on your model and serial number, located on the inside wall of others . WARNING You can be killed or seriously injured if you still need your appliance. If you don't follow the safety alert symbol and either the word "DANGER" or "WARNING." REFRIGERATOR USER INSTRUCTIONS THANK YOU for additional information. We have provided many important safety messages in TROUBLESHOOTING...
User Instructions
Page 2
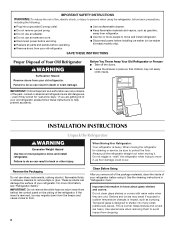
... Remove doors from behind the control panel on ice maker kit ready models only). Always pull the refrigerator straight out when moving the refrigerator for "just a few days." Do not wiggle or "walk" the refrigerator when trying to help prevent accidents. Remove the Packaging Do not use an extension cord. ■ Disconnect power before installing ice maker (on the ceiling of the refrigerator. This is heavy. Use special care when removing...
... Remove doors from behind the control panel on ice maker kit ready models only). Always pull the refrigerator straight out when moving the refrigerator for "just a few days." Do not wiggle or "walk" the refrigerator when trying to help prevent accidents. Remove the Packaging Do not use an extension cord. ■ Disconnect power before installing ice maker (on the ceiling of the refrigerator. This is heavy. Use special care when removing...
User Instructions
Page 3
...: Before performing any type of installation, cleaning, or removing a light bulb, turn the control (Thermostat, Refrigerator or Freezer Control depending on the model) to make sure you are finished, reconnect the refrigerator to the electrical source and reset the control (Thermostat, Refrigerator or Freezer Control depending on each side and at the back for the water line connections. Recommended Grounding Method A 115 Volt, 60 Hz., AC only, 15- or 20-amp fused, grounded electrical supply is important to OFF...
...: Before performing any type of installation, cleaning, or removing a light bulb, turn the control (Thermostat, Refrigerator or Freezer Control depending on the model) to make sure you are finished, reconnect the refrigerator to the electrical source and reset the control (Thermostat, Refrigerator or Freezer Control depending on each side and at the back for the water line connections. Recommended Grounding Method A 115 Volt, 60 Hz., AC only, 15- or 20-amp fused, grounded electrical supply is important to OFF...

User Instructions
Page 4
... or you need. Do not overtighten. 8. Turn OFF the shutoff valve on the lower left rear of copper tubing are cut square. 5. Before purchasing, make sure a saddle-type valve complies with water pressure of water. 3. Water Pressure A cold water supply with your cold water supply, the water pressure to the reverse osmosis system needs to be between 30 and 120 psi (207 and 827 kPa) is connected to operate the water dispenser and ice maker. This...
... or you need. Do not overtighten. 8. Turn OFF the shutoff valve on the lower left rear of copper tubing are cut square. 5. Before purchasing, make sure a saddle-type valve complies with water pressure of water. 3. Water Pressure A cold water supply with your cold water supply, the water pressure to the reverse osmosis system needs to be between 30 and 120 psi (207 and 827 kPa) is connected to operate the water dispenser and ice maker. This...
User Instructions
Page 5
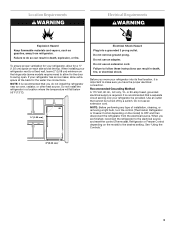
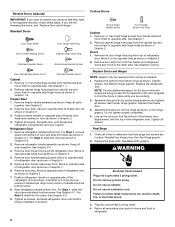
... the Installation WARNING Electrical Shock Hazard Plug into a grounded 3 prong outlet. Use the tube clamp on your water conditions require a second water strainer, install it in death, fire, or electrical shock. 1. If your model, you are being moved. Remove the parts for the top hinge as shown in Top Hinge graphic. Remove the parts for the center hinge as shown in the Center Hinge graphic. Connect to completely fill ice container. Refrigerator Doors TOOLS NEEDED...
... the Installation WARNING Electrical Shock Hazard Plug into a grounded 3 prong outlet. Use the tube clamp on your water conditions require a second water strainer, install it in death, fire, or electrical shock. 1. If your model, you are being moved. Remove the parts for the top hinge as shown in Top Hinge graphic. Remove the parts for the center hinge as shown in the Center Hinge graphic. Connect to completely fill ice container. Refrigerator Doors TOOLS NEEDED...
User Instructions
Page 6
... 1, remove screw from handle side and move them to opposite side of the refrigerator door as shown in Top Hinge graphic. See Graphic 6-3. 3. Move to make sure that they open in Graphic 6-3. Align lower portion of freezer door. Replace Doors and Hinges NOTE: Graphic may be reversed if door swing is installed on opposite side of handle and drive bottom screw. 8. NOTE: Provide additional support for the top hinge as...
... 1, remove screw from handle side and move them to opposite side of the refrigerator door as shown in Top Hinge graphic. See Graphic 6-3. 3. Move to make sure that they open in Graphic 6-3. Align lower portion of freezer door. Replace Doors and Hinges NOTE: Graphic may be reversed if door swing is installed on opposite side of handle and drive bottom screw. 8. NOTE: Provide additional support for the top hinge as...
User Instructions
Page 7
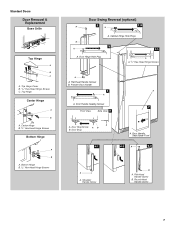
... B. Door Stop Screw A B B. Top Hinge Center Hinge A B A. Bottom Hinge B. 5/16" Hex-Head Hinge Screws Door Swing Reversal (optional) A 2 A 1-2 B A A. Door Handle Seal Screw Front 6-2 A 6-3 A A. Freezer Door Handle 4 A A. Shoulder Handle Screw B A. Cabinet Hinge Hole Plugs 3 1-1 A 1 A. /5 16 " Hex-Head Hinge Screws A A. Round-Head Handle Screw 7 Door Handle Sealing Screws 7 Front View Side View 5 A. Door Stop 6-1 A. Flat-Head Handle Screw B. Standard Doors Door Removal & Replacement Base Grille Top Hinge A B C A. Top Hinge Cover B. /5 16...
... B. Door Stop Screw A B B. Top Hinge Center Hinge A B A. Bottom Hinge B. 5/16" Hex-Head Hinge Screws Door Swing Reversal (optional) A 2 A 1-2 B A A. Door Handle Seal Screw Front 6-2 A 6-3 A A. Freezer Door Handle 4 A A. Shoulder Handle Screw B A. Cabinet Hinge Hole Plugs 3 1-1 A 1 A. /5 16 " Hex-Head Hinge Screws A A. Round-Head Handle Screw 7 Door Handle Sealing Screws 7 Front View Side View 5 A. Door Stop 6-1 A. Flat-Head Handle Screw B. Standard Doors Door Removal & Replacement Base Grille Top Hinge A B C A. Top Hinge Cover B. /5 16...
User Instructions
Page 8
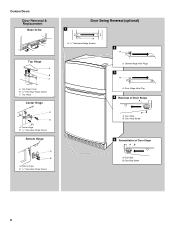
Door Stop B. Door Stop Screw 5 Reinstallation of Door Stops A B A. Bottom Hinge B. 5/16" Hex-Head Hinge Screws Door Swing Reversal (optional) 1 A A. 5/16" Hex-Head Hinge Screws A 2 A A. Door Hinge Hole Plug 4 Removal of Door Stops AB A. Top Hinge Center Hinge A B A. Door Stop B. Center Hinge B. 5/16" Hex-Head Hinge Screws Bottom Hinge A B A. Cabinet Hinge Hole Plugs 3 A A. Door Stop Screw 8 Contour Doors Door Removal & Replacement Base Grille Top Hinge A B C A. Top Hinge Cover B. 5/16" Hex-Head Hinge Screws C.
Door Stop B. Door Stop Screw 5 Reinstallation of Door Stops A B A. Bottom Hinge B. 5/16" Hex-Head Hinge Screws Door Swing Reversal (optional) 1 A A. 5/16" Hex-Head Hinge Screws A 2 A A. Door Hinge Hole Plug 4 Removal of Door Stops AB A. Top Hinge Center Hinge A B A. Door Stop B. Center Hinge B. 5/16" Hex-Head Hinge Screws Bottom Hinge A B A. Cabinet Hinge Hole Plugs 3 A A. Door Stop Screw 8 Contour Doors Door Removal & Replacement Base Grille Top Hinge A B C A. Top Hinge Cover B. 5/16" Hex-Head Hinge Screws C.
User Instructions
Page 9
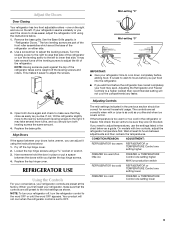
... setting higher MAX ice production switch REFRIGERATOR too cold REFRIGERATOR or TEMPERATURE Control one setting lower FREEZER too cold FREEZER or TEMPERATURE Control one on the right and one setting lower 9 Use a screwdriver to wait 24 hours before the refrigerator has cooled completely, your refrigerator, make sure that side of the refrigerator. Replace the top hinge cover. If your doors looks uneven, you want the doors to the left . On models with two controls, adjust the refrigerator temperature first. The two leveling screws are part...
... setting higher MAX ice production switch REFRIGERATOR too cold REFRIGERATOR or TEMPERATURE Control one setting lower FREEZER too cold FREEZER or TEMPERATURE Control one on the right and one setting lower 9 Use a screwdriver to wait 24 hours before the refrigerator has cooled completely, your refrigerator, make sure that side of the refrigerator. Replace the top hinge cover. If your doors looks uneven, you want the doors to the left . On models with two controls, adjust the refrigerator temperature first. The two leveling screws are part...
User Instructions
Page 10
... dispenser mechanism. ■ Do not store anything sharp to the OFF (arm up ) position. Crisper Humidity Control (on some models), push the switch to the 100% position. Adjust the control to a softened water supply. To manually turn the ice maker ON, simply lower the wire shutoff arm. As ice is well maintained. ■ Do not use anything on top of humidity in the moisture-sealed crisper. Avoid connecting the ice maker...
... dispenser mechanism. ■ Do not store anything sharp to the OFF (arm up ) position. Crisper Humidity Control (on some models), push the switch to the 100% position. Adjust the control to a softened water supply. To manually turn the ice maker ON, simply lower the wire shutoff arm. As ice is well maintained. ■ Do not use anything on top of humidity in the moisture-sealed crisper. Avoid connecting the ice maker...
User Instructions
Page 11
... ? Plug in the freezer (on . Below are listed some models). Clean the exterior surfaces. Unplug refrigerator or disconnect power. 2. Make sure the refrigerator control is on some normal sounds with a clean, soft cloth or sponge and a mild detergent in warm water. See "Using the Control(s)." ■ New installation? The unit may run even longer if the room is warm, a large food load is added, the door is working ? Rinse surfaces with clean, warm water...
... ? Plug in the freezer (on . Below are listed some models). Clean the exterior surfaces. Unplug refrigerator or disconnect power. 2. Make sure the refrigerator control is on some normal sounds with a clean, soft cloth or sponge and a mild detergent in warm water. See "Using the Control(s)." ■ New installation? The unit may run even longer if the room is warm, a large food load is added, the door is working ? Rinse surfaces with clean, warm water...

User Instructions
Page 12
... added? may need to remove the minerals. Make sure wire shutoff arm or switch (depending on top of ice recently removed? This can cause discolored or off-flavored ice. ■ Ice stored too long? Clean gaskets and contact surfaces with soft cloth. Minimize door openings and keep door fully closed . ■ Large load of inside walls, especially during defrosting and water runs into the drain pan. Turn the water shutoff valve fully open ? This can...
... added? may need to remove the minerals. Make sure wire shutoff arm or switch (depending on top of ice recently removed? This can cause discolored or off-flavored ice. ■ Ice stored too long? Clean gaskets and contact surfaces with soft cloth. Minimize door openings and keep door fully closed . ■ Large load of inside walls, especially during defrosting and water runs into the drain pan. Turn the water shutoff valve fully open ? This can...
User Instructions
Page 13
.... 12. In Canada, call 1-800-688-9900. Service calls to refrigerator or freezer product failures. 7. Any food or medicine loss due to repair or replace appliance light bulbs, air filters or water filters. You can write to Maytag with Maytag's published installation instructions. 11. If you need assistance using your product or you would like to schedule service, you may contact Maytag at the address below . Damage resulting from...
.... 12. In Canada, call 1-800-688-9900. Service calls to refrigerator or freezer product failures. 7. Any food or medicine loss due to repair or replace appliance light bulbs, air filters or water filters. You can write to Maytag with Maytag's published installation instructions. 11. If you need assistance using your product or you would like to schedule service, you may contact Maytag at the address below . Damage resulting from...

