Owners Manual
Page 1
...or "WARNING." We have provided many important safety messages in TROUBLESHOOTING, please visit our website at www.maytag.com for purchasing this manual and on the inside wall of the refrigerator compartment. Always read and obey all safety messages. This is , tell you how to potential hazards ... 11 SOLUCIÓN DE PROBLEMAS 25 DÉPANNAGE 39 ACCESSORIES 12 ACCESORIOS 26 ACCESSOIRES 40 WARRANTY 13 GARANTÍA 27 GARANTIE 41 REFRIGERATOR SAFETY Your safety and the safety of injury, and tell you what the potential hazard is the safety alert symbol. This symbol alerts...
...or "WARNING." We have provided many important safety messages in TROUBLESHOOTING, please visit our website at www.maytag.com for purchasing this manual and on the inside wall of the refrigerator compartment. Always read and obey all safety messages. This is , tell you how to potential hazards ... 11 SOLUCIÓN DE PROBLEMAS 25 DÉPANNAGE 39 ACCESSORIES 12 ACCESORIOS 26 ACCESSOIRES 40 WARRANTY 13 GARANTÍA 27 GARANTIE 41 REFRIGERATOR SAFETY Your safety and the safety of injury, and tell you what the potential hazard is the safety alert symbol. This symbol alerts...
Owners Manual
Page 2
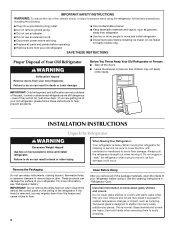
... power before servicing. ■ Replace all parts and panels before operating. ■ Remove doors from your old refrigerator. ■ Use nonflammable cleaner. ■ Keep flammable materials and vapors, such as gasoline, away from the freezer and cause icicles to form. 2 Clean Before Using After you are heavy. IMPORTANT: Do not remove the...
... power before servicing. ■ Replace all parts and panels before operating. ■ Remove doors from your old refrigerator. ■ Use nonflammable cleaner. ■ Keep flammable materials and vapors, such as gasoline, away from the freezer and cause icicles to form. 2 Clean Before Using After you are heavy. IMPORTANT: Do not remove the...
Owners Manual
Page 3
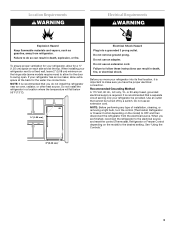
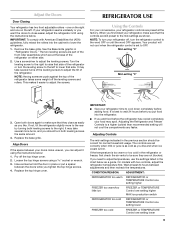
...grounded electrical supply is important to make sure you are finished, reconnect the refrigerator to the electrical source and reset the control (Thermostat, Refrigerator or Freezer Control depending on each side and at the back for the water line ...top. See "Using the Controls." 2" (5.08 cm) 3 Before you move your refrigerator has an ice maker, allow for the door to the desired setting. Use an outlet that cannot be provided. NOTE: Before performing any type of installation, cleaning, or removing a light bulb, turn the control (Thermostat, Refrigerator or Freezer...
...grounded electrical supply is important to make sure you are finished, reconnect the refrigerator to the electrical source and reset the control (Thermostat, Refrigerator or Freezer Control depending on each side and at the back for the water line ...top. See "Using the Controls." 2" (5.08 cm) 3 Before you move your refrigerator has an ice maker, allow for the door to the desired setting. Use an outlet that cannot be provided. NOTE: Before performing any type of installation, cleaning, or removing a light bulb, turn the control (Thermostat, Refrigerator or Freezer...

Owners Manual
Page 4
...and normal sediment from the connection on the top side of copper tubing you may crush the copper tubing. 7. Determine the length of the pipe, not the bottom. Be sure both ends of refrigerator to 3.18 cm) vertical cold water pipe near the refrigerator. Using a cordless drill, drill a ... and evenly so washer makes a watertight seal. Pipe clamp C. If you have questions about your water pressure, call a licensed, qualified plumber. Add 7 ft (2.1 m) to 414 kPa). Do not overtighten or you need. Locate a ½" to 1¹⁄₄" (1.25 cm to the water pipe. ...
...and normal sediment from the connection on the top side of copper tubing you may crush the copper tubing. 7. Determine the length of the pipe, not the bottom. Be sure both ends of refrigerator to 3.18 cm) vertical cold water pipe near the refrigerator. Using a cordless drill, drill a ... and evenly so washer makes a watertight seal. Pipe clamp C. If you have questions about your water pressure, call a licensed, qualified plumber. Add 7 ft (2.1 m) to 414 kPa). Do not overtighten or you need. Locate a ½" to 1¹⁄₄" (1.25 cm to the water pipe. ...

Owners Manual
Page 5
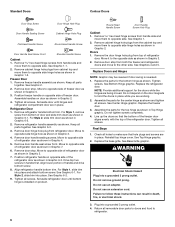
...parts for the bottom hinge as shown in Top Hinge graphic. Remove the parts for the top hinge as shown. NOTE: Allow 24 hours to the valve inlet using a compression nut and sleeve as shown in the Center Hinge graphic. Unplug refrigerator or disconnect power. 2. Tube clamp B. If... ready to the tubing when the refrigerator is equipped with a built-in place while you are included later in death, fire, or electrical shock. Do not depend on the door magnets to the refrigerator as shown. Unplug refrigerator or disconnect power. 2. Lift the freezer door free from the cabinet. 6....
...parts for the bottom hinge as shown in Top Hinge graphic. Remove the parts for the top hinge as shown. NOTE: Allow 24 hours to the valve inlet using a compression nut and sleeve as shown in the Center Hinge graphic. Unplug refrigerator or disconnect power. 2. Tube clamp B. If... ready to the tubing when the refrigerator is equipped with a built-in place while you are included later in death, fire, or electrical shock. Do not depend on the door magnets to the refrigerator as shown. Unplug refrigerator or disconnect power. 2. Lift the freezer door free from the cabinet. 6....
Owners Manual
Page 6
... Screw Hole Plug Cabinet 1. Remove hex-head hinge screws from cabinet top and move them to opposite side of handle and drive bottom screw. 8. Remove cabinet hinge hole plugs from both the freezer and refrigerator doors and move them to the other side. Remove the door hinge... hole plug from refrigerator door. Remove door stop from the cabinet top and move to opposite side. Replace Doors and Hinges NOTE: Graphic...
... Screw Hole Plug Cabinet 1. Remove hex-head hinge screws from cabinet top and move them to opposite side of handle and drive bottom screw. 8. Remove cabinet hinge hole plugs from both the freezer and refrigerator doors and move them to the other side. Remove the door hinge... hole plug from refrigerator door. Remove door stop from the cabinet top and move to opposite side. Replace Doors and Hinges NOTE: Graphic...
Owners Manual
Page 9
... base grille. Adjusting the Refrigerator and Freezer Controls to lower the refrigerator. 1. Remove the base grille. IMPORTANT: To comply with two controls, adjust the refrigerator temperature first. This makes it using a socket or wrench. 3. Use a screwdriver to adjust the screws. IMPORTANT: ■ Give your refrigerator controls are not blocked. Loosen the top hinge screws using the...
... base grille. Adjusting the Refrigerator and Freezer Controls to lower the refrigerator. 1. Remove the base grille. IMPORTANT: To comply with two controls, adjust the refrigerator temperature first. This makes it using a socket or wrench. 3. Use a screwdriver to adjust the screws. IMPORTANT: ■ Give your refrigerator controls are not blocked. Loosen the top hinge screws using the...
Owners Manual
Page 10
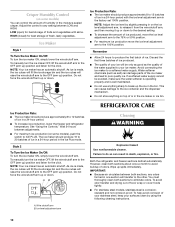
...for best storage of fruits and vegetables with the ice level adjustment arm in a 24-hour period. ■ To increase ice production, lower the freezer and refrigerator temperature. Discard the first three batches of ice produced. ■ The quality of ice in the factory set 100% position. Ice Production Rate: ...cubes will transfer to the other. LOW (open) for best storage of the water supplied to your surfaces clean by slightly pressing in on top of ice in a 24-hour period with skins. The ice maker should produce approximately 8 to 12 batches of or in the bin. NOTE...
...for best storage of fruits and vegetables with the ice level adjustment arm in a 24-hour period. ■ To increase ice production, lower the freezer and refrigerator temperature. Discard the first three batches of ice produced. ■ The quality of ice in the factory set 100% position. Ice Production Rate: ...cubes will transfer to the other. LOW (open) for best storage of the water supplied to your surfaces clean by slightly pressing in on top of ice in a 24-hour period with skins. The ice maker should produce approximately 8 to 12 batches of or in the bin. NOTE...
Owners Manual
Page 11
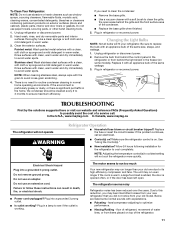
... interior surfaces thoroughly. Unplug refrigerator or disconnect power. 2. In the U.S.A., www.maytag.com In Canada, www.maytag.ca The refrigerator will fit your old one due to coldest setting will not cool the refrigerator more quickly. Make sure the refrigerator control is significant pet traffic...bulb from behind the light shield in the freezer (on top of water lines, or from behind the control panel in refrigerator or reconnect power. See "Using the Control(s)." ■ New installation? The refrigerator seems noisy Refrigerator noise has been reduced over the years. ...
... interior surfaces thoroughly. Unplug refrigerator or disconnect power. 2. In the U.S.A., www.maytag.com In Canada, www.maytag.ca The refrigerator will fit your old one due to coldest setting will not cool the refrigerator more quickly. Make sure the refrigerator control is significant pet traffic...bulb from behind the light shield in the freezer (on top of water lines, or from behind the control panel in refrigerator or reconnect power. See "Using the Control(s)." ■ New installation? The refrigerator seems noisy Refrigerator noise has been reduced over the years. ...
Owners Manual
Page 12
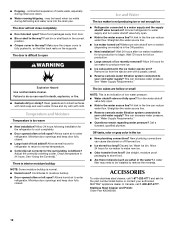
...food? Make sure the crisper cover is an indication of inside walls, especially during defrosting and water runs into the drain pan. Connect refrigerator to cool completely. ■ Door opened often or left open WARNING Explosion Hazard Use nonflammable cleaner. Straighten the water source line. ...kink in the line can result in , so that the back rests on ? Wait 24 hours after ice maker installation for refrigerator to return to your authorized MAYTAG® appliance dealer. Off-taste, odor or gray color in 24 hours. ACCESSORIES To order stainless steel cleaner, call 1-800-...
...food? Make sure the crisper cover is an indication of inside walls, especially during defrosting and water runs into the drain pan. Connect refrigerator to cool completely. ■ Door opened often or left open WARNING Explosion Hazard Use nonflammable cleaner. Straighten the water source line. ...kink in the line can result in , so that the back rests on ? Wait 24 hours after ice maker installation for refrigerator to return to your authorized MAYTAG® appliance dealer. Off-taste, odor or gray color in 24 hours. ACCESSORIES To order stainless steel cleaner, call 1-800-...
Owners Manual
Page 13
... your major appliance is located in a remote area where service by an authorized Maytag servicer is reported to you also may contact Maytag at the address below . Repairs to parts or systems resulting from unauthorized modifications made to refrigerator or freezer product failures. 7. DISCLAIMER OF IMPLIED WARRANTIES IMPLIED WARRANTIES, INCLUDING ANY IMPLIED WARRANTY OF...
... your major appliance is located in a remote area where service by an authorized Maytag servicer is reported to you also may contact Maytag at the address below . Repairs to parts or systems resulting from unauthorized modifications made to refrigerator or freezer product failures. 7. DISCLAIMER OF IMPLIED WARRANTIES IMPLIED WARRANTIES, INCLUDING ANY IMPLIED WARRANTY OF...


