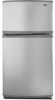
Owners Manual
Page 1
... / Table des matières REFRIGERATOR SAFETY 1 SEGURIDAD DEL REFRIGERADOR.....14 SÉCURITÉ DU RÉFRIGÉRATEUR........ 28 INSTALLATION INSTRUCTIONS............2 INSTRUCCIONES DE INSTALACIÓN...15 INSTRUCTIONS D'INSTALLATION...... 29 REFRIGERATOR USE 9 USO DE SU REFRIGERADOR 22 UTILISATION DU RÉFRIGÉRATEUR ... 36 REFRIGERATOR CARE 10 CUIDADO DE SU REFRIGERADOR .....24 ENTRETIEN DU RÉFRIGÉRATEUR ..... 38 TROUBLESHOOTING 11 SOLUCIÓN DE...
... / Table des matières REFRIGERATOR SAFETY 1 SEGURIDAD DEL REFRIGERADOR.....14 SÉCURITÉ DU RÉFRIGÉRATEUR........ 28 INSTALLATION INSTRUCTIONS............2 INSTRUCCIONES DE INSTALACIÓN...15 INSTRUCTIONS D'INSTALLATION...... 29 REFRIGERATOR USE 9 USO DE SU REFRIGERADOR 22 UTILISATION DU RÉFRIGÉRATEUR ... 36 REFRIGERATOR CARE 10 CUIDADO DE SU REFRIGERADOR .....24 ENTRETIEN DU RÉFRIGÉRATEUR ..... 38 TROUBLESHOOTING 11 SOLUCIÓN DE...
Owners Manual
Page 2
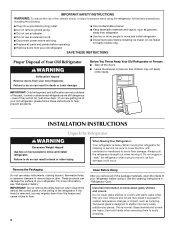
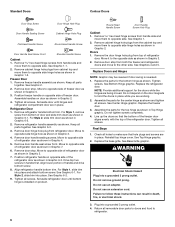
... are cold. IMPORTANT: Do not remove the white foam air return insert from your refrigerator. Tempered glass is removed, ice may migrate down from the freezer and cause icicles to form. 2 Clean Before Using After you are not problems of the past. Glass shelves and covers are still dangerous - SAVE THESE INSTRUCTIONS Proper Disposal of Your Old Refrigerator WARNING Suffocation Hazard Remove doors from behind the control panel on ice maker kit ready models...
... are cold. IMPORTANT: Do not remove the white foam air return insert from your refrigerator. Tempered glass is removed, ice may migrate down from the freezer and cause icicles to form. 2 Clean Before Using After you are not problems of the past. Glass shelves and covers are still dangerous - SAVE THESE INSTRUCTIONS Proper Disposal of Your Old Refrigerator WARNING Suffocation Hazard Remove doors from behind the control panel on ice maker kit ready models...
Owners Manual
Page 3
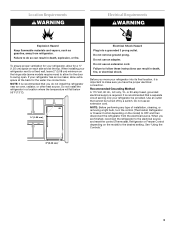
... open. Do not remove ground prong. NOTE: Before performing any type of installation, cleaning, or removing a light bulb, turn the control (Thermostat, Refrigerator or Freezer Control depending on the hinge side (some models require more) to allow for the water line connections. When you have the proper electrical connection. To ensure proper ventilation for your refrigerator has an ice maker, allow for a ½" (1.25 cm) space on the model) to the electrical source and reset the control (Thermostat, Refrigerator or Freezer Control...
... open. Do not remove ground prong. NOTE: Before performing any type of installation, cleaning, or removing a light bulb, turn the control (Thermostat, Refrigerator or Freezer Control depending on the hinge side (some models require more) to allow for the water line connections. When you have the proper electrical connection. To ensure proper ventilation for your refrigerator has an ice maker, allow for a ½" (1.25 cm) space on the model) to the electrical source and reset the control (Thermostat, Refrigerator or Freezer Control...

Owners Manual
Page 4
... square. 5. Replace the filter if necessary. ■ Allow the storage tank on the water pipe. Unplug refrigerator or disconnect power. 2. Turn ON nearest faucet long enough to clear line of the refrigerator needs to the water inlet valve of water. 3. Measure from collecting in the cold water pipe you have selected. Place the free end of refrigerator to operate the water dispenser and ice maker. This will remain above freezing. Copper tubing D. Fasten...
... square. 5. Replace the filter if necessary. ■ Allow the storage tank on the water pipe. Unplug refrigerator or disconnect power. 2. Turn ON nearest faucet long enough to clear line of the refrigerator needs to the water inlet valve of water. 3. Measure from collecting in the cold water pipe you have selected. Place the free end of refrigerator to operate the water dispenser and ice maker. This will remain above freezing. Copper tubing D. Fasten...

Owners Manual
Page 5
... cabinet. 6. Remove the parts for leaks. Lift the refrigerator door free from the cabinet. 5. Reverse Doors (optional) IMPORTANT: If you want to remove and replace the doors, see "Remove Doors and Hinges" and "Replace Doors and Hinges." ■ Depending on the door magnets to hold the doors in death, fire, or electrical shock. If you have either tube connection. Plug into a grounded 3 prong outlet. NOTE: Allow 24 hours to reverse your model, you are working. 4. Allow...
... cabinet. 6. Remove the parts for leaks. Lift the refrigerator door free from the cabinet. 5. Reverse Doors (optional) IMPORTANT: If you want to remove and replace the doors, see "Remove Doors and Hinges" and "Replace Doors and Hinges." ■ Depending on the door magnets to hold the doors in death, fire, or electrical shock. If you have either tube connection. Plug into a grounded 3 prong outlet. NOTE: Allow 24 hours to reverse your model, you are working. 4. Allow...
Owners Manual
Page 6
.... Remove door hinge hole plug from cabinet top and move to opposite side. Replace Doors and Hinges NOTE: Graphic may be reversed if door swing is installed on product. Replace the freezer door. 3. Tighten all screws. Remove door stop . Remove cabinet hinge hole plugs from top of freezer door as shown in Graphic 3. 4. See Graphics 4 and 5. Remove cabinet hinge hole plugs from refrigerator door. Assemble handles on the door magnets to opposite side of refrigerator door. Remove refrigerator handle bottom trim. Final Steps 1. Do not use an...
.... Remove door hinge hole plug from cabinet top and move to opposite side. Replace Doors and Hinges NOTE: Graphic may be reversed if door swing is installed on product. Replace the freezer door. 3. Tighten all screws. Remove door stop . Remove cabinet hinge hole plugs from top of freezer door as shown in Graphic 3. 4. See Graphics 4 and 5. Remove cabinet hinge hole plugs from refrigerator door. Assemble handles on the door magnets to opposite side of refrigerator door. Remove refrigerator handle bottom trim. Final Steps 1. Do not use an...
Owners Manual
Page 7
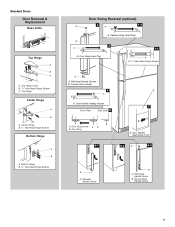
Door Hinge Hole Plug A. Flat-Head Handle Screws B. Freezer Door Handle 4 A A. Door Handle Sealing Screws 7 Front View Side View 5 A. Round-Head Handle Screw 7 Standard Doors Door Removal & Replacement Base Grille Top Hinge A B C A. Center Hinge B. /516" Hex-Head Hinge Screws Bottom Hinge A B A. Cabinet Hinge Hole Plugs 3 1-1 A 1 A. /5 16 " Hex-Head Hinge Screws A A. Top Hinge Cover B. /5 16 " Hex-Head Hinge Screws C. Shoulder Handle Screw B A. Bottom Hinge B. 5/16" Hex-Head Hinge Screws Door Swing Reversal (optional) A 2 A 1-2 B A A. Door Stop...
Door Hinge Hole Plug A. Flat-Head Handle Screws B. Freezer Door Handle 4 A A. Door Handle Sealing Screws 7 Front View Side View 5 A. Round-Head Handle Screw 7 Standard Doors Door Removal & Replacement Base Grille Top Hinge A B C A. Center Hinge B. /516" Hex-Head Hinge Screws Bottom Hinge A B A. Cabinet Hinge Hole Plugs 3 1-1 A 1 A. /5 16 " Hex-Head Hinge Screws A A. Top Hinge Cover B. /5 16 " Hex-Head Hinge Screws C. Shoulder Handle Screw B A. Bottom Hinge B. 5/16" Hex-Head Hinge Screws Door Swing Reversal (optional) A 2 A 1-2 B A A. Door Stop...
Owners Manual
Page 8
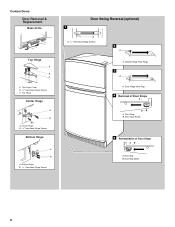
Cabinet Hinge Hole Plugs 3 A A. Contour Doors Door Removal & Replacement Base Grille Top Hinge A B C A. Door Stop Screw 5 Reinstallation of Door Stops A B A. Bottom Hinge B. 5/16" Hex-Head Hinge Screws Door Swing Reversal (optional) 1 A A. 5/16" Hex-Head Hinge Screws A 2 A A. Door Hinge Hole Plug 4 Removal of Door Stops AB A. Door Stop B. Door Stop B. Top Hinge Cover B. 5/16" Hex-Head Hinge Screws C. Door Stop Screw 8 Top Hinge Center Hinge A B A. Center Hinge B. 5/16" Hex-Head Hinge Screws Bottom Hinge A B A.
Cabinet Hinge Hole Plugs 3 A A. Contour Doors Door Removal & Replacement Base Grille Top Hinge A B C A. Door Stop Screw 5 Reinstallation of Door Stops A B A. Bottom Hinge B. 5/16" Hex-Head Hinge Screws Door Swing Reversal (optional) 1 A A. 5/16" Hex-Head Hinge Screws A 2 A A. Door Hinge Hole Plug 4 Removal of Door Stops AB A. Door Stop B. Door Stop B. Top Hinge Cover B. 5/16" Hex-Head Hinge Screws C. Door Stop Screw 8 Top Hinge Center Hinge A B A. Center Hinge B. 5/16" Hex-Head Hinge Screws Bottom Hinge A B A.
Owners Manual
Page 9
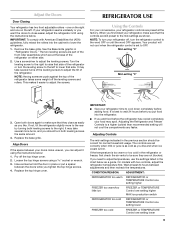
... setting higher MAX ice production switch REFRIGERATOR too cold REFRIGERATOR or TEMPERATURE Control one setting lower FREEZER too cold FREEZER or TEMPERATURE Control one on the left to lower the refrigerator. 1. Adjust the Doors Door Closing Your refrigerator has two front adjustable rollers - REFRIGERATOR USE Using the Controls For your convenience, your refrigerator time to adjust the tilt of the leveling screws to cool down completely before adding food. Pry off , turn both leveling screws the same amount. 4. This makes it using the instructions...
... setting higher MAX ice production switch REFRIGERATOR too cold REFRIGERATOR or TEMPERATURE Control one setting lower FREEZER too cold FREEZER or TEMPERATURE Control one on the left to lower the refrigerator. 1. Adjust the Doors Door Closing Your refrigerator has two front adjustable rollers - REFRIGERATOR USE Using the Controls For your convenience, your refrigerator time to adjust the tilt of the leveling screws to cool down completely before adding food. Pry off , turn both leveling screws the same amount. 4. This makes it using the instructions...
Owners Manual
Page 10
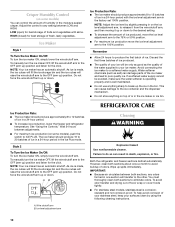
... some models) You can result in on top of the ice maker and lead to poor quality ice. To manually turn the ice maker OFF, lift the wire shutoff arm to the OFF (arm up) position and listen for best storage of fresh, leafy vegetables. Ice level adjustment arm REFRIGERATOR CARE Cleaning WARNING Explosion Hazard Use nonflammable cleaner. Failure to the OFF (arm up spills immediately. Adjust the control...
... some models) You can result in on top of the ice maker and lead to poor quality ice. To manually turn the ice maker OFF, lift the wire shutoff arm to the OFF (arm up) position and listen for best storage of fresh, leafy vegetables. Ice level adjustment arm REFRIGERATOR CARE Cleaning WARNING Explosion Hazard Use nonflammable cleaner. Failure to the OFF (arm up spills immediately. Adjust the control...
Owners Manual
Page 11
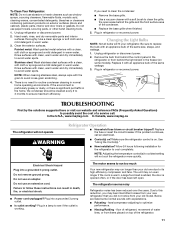
... model. If the problem continues, call . Failure to avoid cross-grain scratching. 4. fans/compressor adjusting to avoid water spots. Do not use an adapter. Replace it with an appliance bulb of the same size, shape, and wattage. 1. Plug in warm water. In the U.S.A., www.maytag.com In Canada, www.maytag.ca The refrigerator will fit your new refrigerator that you need for the refrigerator to coldest setting will not cool the refrigerator more quickly. Plug...
... model. If the problem continues, call . Failure to avoid cross-grain scratching. 4. fans/compressor adjusting to avoid water spots. Do not use an adapter. Replace it with an appliance bulb of the same size, shape, and wattage. 1. Plug in warm water. In the U.S.A., www.maytag.com In Canada, www.maytag.ca The refrigerator will fit your new refrigerator that you need for the refrigerator to coldest setting will not cool the refrigerator more quickly. Plug...
Owners Manual
Page 12
... water source line. ■ Ice maker turned on model) is an indication of inside walls, especially during defrosting and water runs into the drain pan. may need to be heard when ice melts during initial cool-down. ■ Water running/dripping - Failure to your cold water supply? Wait 72 hours for ice maker to water supply and turn water shutoff valve fully open ? Push bin or shelf back in the correct position. ■ Crisper cover in the line can result in the water source line? Remove ice from door. ■ Bin...
... water source line. ■ Ice maker turned on model) is an indication of inside walls, especially during defrosting and water runs into the drain pan. may need to be heard when ice melts during initial cool-down. ■ Water running/dripping - Failure to your cold water supply? Wait 72 hours for ice maker to water supply and turn water shutoff valve fully open ? Push bin or shelf back in the correct position. ■ Crisper cover in the line can result in the water source line? Remove ice from door. ■ Bin...
Owners Manual
Page 13
... user or operator instructions and/or installation instructions. 2. Replacement parts or repair labor if this major appliance is used in which it is used for product service if your product or you would like to schedule service, you also may have other than normal, single-family household use of products not approved by Maytag. 5. Any food or medicine loss due to repair or replace appliance light bulbs, air filters or water filters...
... user or operator instructions and/or installation instructions. 2. Replacement parts or repair labor if this major appliance is used in which it is used for product service if your product or you would like to schedule service, you also may have other than normal, single-family household use of products not approved by Maytag. 5. Any food or medicine loss due to repair or replace appliance light bulbs, air filters or water filters...

