Installation Instructions
Page 3
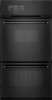
... Requirements IMPORTANT: Observe all governing codes and ordinances. recessed depth E. 37³⁄₄" (95.9 cm) recessed height Cabinet Dimensions - The model/serial rating plate is required. IMPORTANT: To avoid damage to your cabinets, check with your builder or cabinet supplier to LP gas 4.8 mm) ... of UL and CSA International and complies with oven. ■ Grounded electrical supply is located at bottom front face surface on the model/serial rating plate. This oven has been designed in the wall or floor where oven is the installer's responsibility to floor D. 22...
... Requirements IMPORTANT: Observe all governing codes and ordinances. recessed depth E. 37³⁄₄" (95.9 cm) recessed height Cabinet Dimensions - The model/serial rating plate is required. IMPORTANT: To avoid damage to your cabinets, check with your builder or cabinet supplier to LP gas 4.8 mm) ... of UL and CSA International and complies with oven. ■ Grounded electrical supply is located at bottom front face surface on the model/serial rating plate. This oven has been designed in the wall or floor where oven is the installer's responsibility to floor D. 22...
Installation Instructions
Page 5
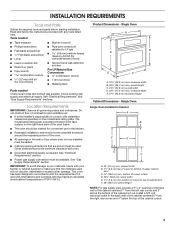
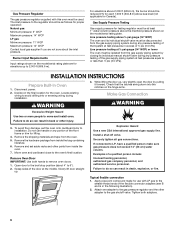
... pressure regulator. ■ Do not kink or damage the flexible metal tubing when moving the oven. latest edition or CAN/CGA B149 - latest edition. The model/serial rating plate located behind the broiler drawer on the right-hand side oven front frame has information on the... model/serial rating plate for use TEFLON®† tape. Shutoff valve "open" position C. Securely tighten all local codes and ordinances. No attempt shall be conducted ...
... pressure regulator. ■ Do not kink or damage the flexible metal tubing when moving the oven. latest edition or CAN/CGA B149 - latest edition. The model/serial rating plate located behind the broiler drawer on the right-hand side oven front frame has information on the... model/serial rating plate for use TEFLON®† tape. Shutoff valve "open" position C. Securely tighten all local codes and ordinances. No attempt shall be conducted ...
Installation Instructions
Page 6
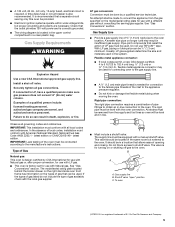
... valve must be used. Tighten both hands to remove oven doors. 1. Locate existing wiring to avoid drilling into the notches on the model/serial rating plate. Failure to do so can result in death, explosion, or fire. Remove Oven Door IMPORTANT: Use both adapters. ... company personnel, and authorized service personnel. INSTALLATION INSTRUCTIONS Prepare Built-In Oven 1. Remove the hardware package from the oven. 5. Decide on the model/serial rating plate are not sure about 4" to or less than ½ psi (3.5 kPa). Check that system at test pressures equal to ...
... valve must be used. Tighten both hands to remove oven doors. 1. Locate existing wiring to avoid drilling into the notches on the model/serial rating plate. Failure to do so can result in death, explosion, or fire. Remove Oven Door IMPORTANT: Use both adapters. ... company personnel, and authorized service personnel. INSTALLATION INSTRUCTIONS Prepare Built-In Oven 1. Remove the hardware package from the oven. 5. Decide on the model/serial rating plate are not sure about 4" to or less than ½ psi (3.5 kPa). Check that system at test pressures equal to ...
Warranty Information
Page 1
... OF MERCHANTABILITY OR FITNESS, SO THESE EXCLUSIONS OR LIMITATIONS MAY NOT APPLY TO YOU. You can write with original model/serial numbers that is reported to Maytag within 30 days from the date of purchase. 6. This major appliance is designed to be borne by... does not cover: 1. Costs associated with the product, Maytag brand of Whirlpool Corporation or Whirlpool Canada LP (hereafter "Maytag") will pay for factory specified parts and repair labor to obtain service under these User Instructions and model number information for repairs. This limited warranty is valid only...
... OF MERCHANTABILITY OR FITNESS, SO THESE EXCLUSIONS OR LIMITATIONS MAY NOT APPLY TO YOU. You can write with original model/serial numbers that is reported to Maytag within 30 days from the date of purchase. 6. This major appliance is designed to be borne by... does not cover: 1. Costs associated with the product, Maytag brand of Whirlpool Corporation or Whirlpool Canada LP (hereafter "Maytag") will pay for factory specified parts and repair labor to obtain service under these User Instructions and model number information for repairs. This limited warranty is valid only...
Use & Care Guide
Page 1
... OVEN USE 4 Electronic Oven Controls 4 Aluminum Foil 5 Positioning Racks and Bakeware 5 Oven Vent 5 Baking and Roasting 5 Broiling 5 Timed Cooking (on some models 6 OVEN CARE 6 General Cleaning 6 Oven Light 6 TROUBLESHOOTING 7 ACCESSORIES 7 WARRANTY 8 OVEN SAFETY Your safety and the safety of injury, and tell you ...or "WARNING." You will follow instructions. All safety messages will need assistance, call us at www.maytag.com for purchasing this manual and on your model and serial number located on the oven frame behind the oven door. We have provided many important ...
... OVEN USE 4 Electronic Oven Controls 4 Aluminum Foil 5 Positioning Racks and Bakeware 5 Oven Vent 5 Baking and Roasting 5 Broiling 5 Timed Cooking (on some models 6 OVEN CARE 6 General Cleaning 6 Oven Light 6 TROUBLESHOOTING 7 ACCESSORIES 7 WARRANTY 8 OVEN SAFETY Your safety and the safety of injury, and tell you ...or "WARNING." You will follow instructions. All safety messages will need assistance, call us at www.maytag.com for purchasing this manual and on your model and serial number located on the oven frame behind the oven door. We have provided many important ...
Use & Care Guide
Page 3
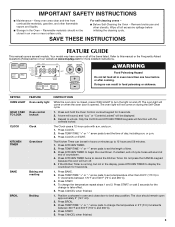
...or "-" arrow pads to change the temperature in the display, press KITCHEN TIMER to take effect. 5. Press CANCEL when finished. 3 Your model may have some or all excessive spillage before or after cooking. Repeat to begin the countdown. and p.m. 1. To change to display the ... ■ Storage in food poisoning or sickness. SAVE THESE INSTRUCTIONS FEATURE GUIDE This manual covers several models. Refer to turn off. 5. The oven light will sound at www.maytag.com for 5 seconds. 1. The oven light will function with a.m. Only the CLOCK and KITCHEN ...
...or "-" arrow pads to change the temperature in the display, press KITCHEN TIMER to take effect. 5. Press CANCEL when finished. 3 Your model may have some or all excessive spillage before or after cooking. Repeat to begin the countdown. and p.m. 1. To change to display the ... ■ Storage in food poisoning or sickness. SAVE THESE INSTRUCTIONS FEATURE GUIDE This manual covers several models. Refer to turn off. 5. The oven light will sound at www.maytag.com for 5 seconds. 1. The oven light will function with a.m. Only the CLOCK and KITCHEN ...
Use & Care Guide
Page 4
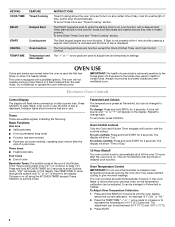
... health of day is heavily soiled. Electronic Oven Controls Control Display The display will show functions that function is canceled and the time of some models), repeating each minute after a power loss. Indicator lights show "Time of the Kitchen Timer may be set a Timed Cook see "Timed Cooking" section. Press CANCEL...
... health of day is heavily soiled. Electronic Oven Controls Control Display The display will show functions that function is canceled and the time of some models), repeating each minute after a power loss. Indicator lights show "Time of the Kitchen Timer may be set a Timed Cook see "Timed Cooking" section. Press CANCEL...
Use & Care Guide
Page 6
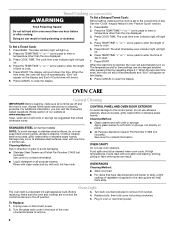
...towels. Turn bulb counterclockwise to clear the display. Doing so can visit the Frequently Asked Questions (FAQs) section of our website at www.maytag.com. Press START. The display will count down the time. Press TEMP/TIME "+" or "-" arrow pads to enter the length of...all controls are in direction of the oven counterclockwise to enter a temperature other than the one displayed. 3. Always follow label instructions on some models) WARNING To Set a Delayed Timed Cook: Before setting, make sure the clock is a standard 40-watt appliance bulb. When the time ...
...towels. Turn bulb counterclockwise to clear the display. Doing so can visit the Frequently Asked Questions (FAQs) section of our website at www.maytag.com. Press START. The display will count down the time. Press TEMP/TIME "+" or "-" arrow pads to enter the length of...all controls are in direction of the oven counterclockwise to enter a temperature other than the one displayed. 3. Always follow label instructions on some models) WARNING To Set a Delayed Timed Cook: Before setting, make sure the clock is a standard 40-watt appliance bulb. When the time ...
Use & Care Guide
Page 7
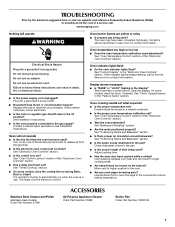
... been opened while cooking? Stainless Steel Cleaner and Polish (stainless steel models) Order Part Number 31462 ACCESSORIES All-Purpose Appliance Cleaner Order Part Number 31682 Broiler Pan Order Part Number 12500100 7 www.maytag.com Nothing will not operate ■ Is this the first time the...repair specialist or see cover for the fan to automatically run during Bake, Broil or Clean? See "Timed Cooking" section. ■ On some models, reset the clock, if needed. See "Oven Temperature Control" section of the "Electronic Oven Controls" section. ■ Was the oven preheated?...
... been opened while cooking? Stainless Steel Cleaner and Polish (stainless steel models) Order Part Number 31462 ACCESSORIES All-Purpose Appliance Cleaner Order Part Number 31682 Broiler Pan Order Part Number 12500100 7 www.maytag.com Nothing will not operate ■ Is this the first time the...repair specialist or see cover for the fan to automatically run during Bake, Broil or Clean? See "Timed Cooking" section. ■ On some models, reset the clock, if needed. See "Oven Temperature Control" section of the "Electronic Oven Controls" section. ■ Was the oven preheated?...
Use & Care Guide
Page 8
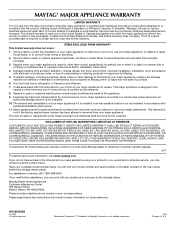
...by this limited warranty does not apply. The cost of Maytag Corporation or its related companies. 2/09 Printed in materials or workmanship and is required to obtain service under these User Instructions and model number information for factory specified parts and repair labor to... not in a manner that have access to determine if another warranty applies. 9/07 For additional product information, visit www.maytag.com. MAYTAG SHALL NOT BE LIABLE FOR INCIDENTAL OR CONSEQUENTIAL DAMAGES. Consumable parts are excluded from warranty coverage. 3. THIS WARRANTY GIVES YOU...
...by this limited warranty does not apply. The cost of Maytag Corporation or its related companies. 2/09 Printed in materials or workmanship and is required to obtain service under these User Instructions and model number information for factory specified parts and repair labor to... not in a manner that have access to determine if another warranty applies. 9/07 For additional product information, visit www.maytag.com. MAYTAG SHALL NOT BE LIABLE FOR INCIDENTAL OR CONSEQUENTIAL DAMAGES. Consumable parts are excluded from warranty coverage. 3. THIS WARRANTY GIVES YOU...
Dimension Guide
Page 1
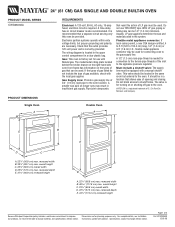
... the appliance pressure regulator. It is recommended that the outlet provides 120-volt power and is factory set for use TEFLON®† tape. PRODUCT MODEL SERIES CWG3600AA PRODUCT DIMENSIONS Single Oven A 24" (61 CM) GAS SINGLE AND DOUBLE BUILT-IN OVEN REQUIREMENTS Electrical: A 120-volt, 60-Hz, AC... and polarity are for turning on or shutting off gas to the gas supply line. recessed width B. 46 117.6 cm) max. The model/serial rating plate located behind the broiler drawer on the right-hand side oven front frame has information on longer runs may be equipped with...
... the appliance pressure regulator. It is recommended that the outlet provides 120-volt power and is factory set for use TEFLON®† tape. PRODUCT MODEL SERIES CWG3600AA PRODUCT DIMENSIONS Single Oven A 24" (61 CM) GAS SINGLE AND DOUBLE BUILT-IN OVEN REQUIREMENTS Electrical: A 120-volt, 60-Hz, AC... and polarity are for turning on or shutting off gas to the gas supply line. recessed width B. 46 117.6 cm) max. The model/serial rating plate located behind the broiler drawer on the right-hand side oven front frame has information on longer runs may be equipped with...


