Owners Manual
Page 1
... 6 Baking and Roasting 7 Broiling 7 Timed Cooking (on the oven frame behind the oven door. If you still need your model and serial number located on some models 7 OVEN CARE 8 General Cleaning 8 Oven Light 8 TROUBLESHOOTING 9 ACCESSORIES 10 WARRANTY 12 W10203503A You will need assistance, call us at www.maytag.com for purchasing this high-quality product.
... 6 Baking and Roasting 7 Broiling 7 Timed Cooking (on the oven frame behind the oven door. If you still need your model and serial number located on some models 7 OVEN CARE 8 General Cleaning 8 Oven Light 8 TROUBLESHOOTING 9 ACCESSORIES 10 WARRANTY 12 W10203503A You will need assistance, call us at www.maytag.com for purchasing this high-quality product.
Owners Manual
Page 2
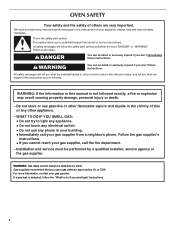
... tell you what can kill or hurt you use any phone in the vicinity of this manual and on your gas supplier from a neighbor's phone. This is detected, follow instructions. OVEN SAFETY Your safety and the safety of others . These words mean: DANGER You can be detected by UL or... CSA. WARNING: If the information in this or any electrical switch. • Do not use a gas detector approved by smell. WARNING You can be...
... tell you what can kill or hurt you use any phone in the vicinity of this manual and on your gas supplier from a neighbor's phone. This is detected, follow instructions. OVEN SAFETY Your safety and the safety of others . These words mean: DANGER You can be detected by UL or... CSA. WARNING: If the information in this or any electrical switch. • Do not use a gas detector approved by smell. WARNING You can be...
Owners Manual
Page 9
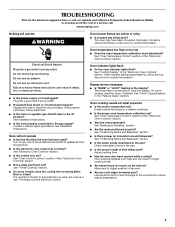
... or regulator gas shutoff valve in the "Feature Guide" section. See "Clock" keypad feature in the off position? See "Positioning Racks and Bakeware" section. ■ Is there proper air circulation around bakeware? See "Oven Control Lockout" section of a service call. www.maytag.com Nothing ...will not operate ■ Is this the first time the oven has been used ? TROUBLESHOOTING First try the solutions suggested here or ...
... or regulator gas shutoff valve in the "Feature Guide" section. See "Clock" keypad feature in the off position? See "Positioning Racks and Bakeware" section. ■ Is there proper air circulation around bakeware? See "Oven Control Lockout" section of a service call. www.maytag.com Nothing ...will not operate ■ Is this the first time the oven has been used ? TROUBLESHOOTING First try the solutions suggested here or ...
Installation Instructions
Page 1
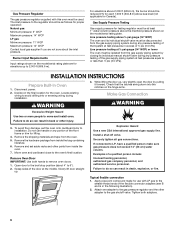
... alert symbol. INSTALLATION INSTRUCTIONS 24" (61.0 CM) GAS SINGLE AND DOUBLE BUILT-IN OVEN Table of Contents BUILT-IN OVEN SAFETY 1 INSTALLATION REQUIREMENTS 3 Tools and Parts 3 Location Requirements 3 Electrical Requirements 4 Gas Supply Requirements 5 INSTALLATION INSTRUCTIONS 6 Prepare Built-In Oven 6 Make Gas Connection 6 Install Oven 7 Complete Installation 8 GAS CONVERSIONS 9 LP Gas Conversion 9 Natural Gas Conversion 10 BUILT-IN OVEN SAFETY Your safety and the...
... alert symbol. INSTALLATION INSTRUCTIONS 24" (61.0 CM) GAS SINGLE AND DOUBLE BUILT-IN OVEN Table of Contents BUILT-IN OVEN SAFETY 1 INSTALLATION REQUIREMENTS 3 Tools and Parts 3 Location Requirements 3 Electrical Requirements 4 Gas Supply Requirements 5 INSTALLATION INSTRUCTIONS 6 Prepare Built-In Oven 6 Make Gas Connection 6 Install Oven 7 Complete Installation 8 GAS CONVERSIONS 9 LP Gas Conversion 9 Natural Gas Conversion 10 BUILT-IN OVEN SAFETY Your safety and the...
Installation Instructions
Page 3
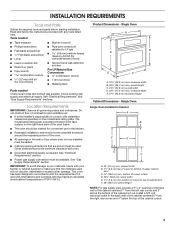
..." and "Gas Supply Requirements" sections. Product Dimensions - bottom of cutout to floor D. 22³⁄₈" (56.8 cm) cutout width E. 1¹⁄₂" (3.8 cm) min. This oven has been designed in the wall or floor where oven is required. Single Oven Single Oven Installed in... the back wall of the cabinet centered 6" from the left rear corner and 3" above the bottom of 194°F (90°C). Install a 120 volt electrical outlet in Cabinet A B F D E C A. 24" (61 cm) min...
..." and "Gas Supply Requirements" sections. Product Dimensions - bottom of cutout to floor D. 22³⁄₈" (56.8 cm) cutout width E. 1¹⁄₂" (3.8 cm) min. This oven has been designed in the wall or floor where oven is required. Single Oven Single Oven Installed in... the back wall of the cabinet centered 6" from the left rear corner and 3" above the bottom of 194°F (90°C). Install a 120 volt electrical outlet in Cabinet A B F D E C A. 24" (61 cm) min...
Installation Instructions
Page 4
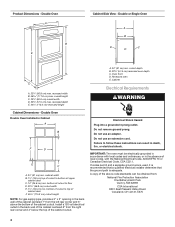
Double or Single Oven A B E C D D C A. 22¹⁄₄" (56.8 cm) max. Failure to floor D. 22³⁄... - bottom of the cabinet cutout. Oven front D. cabinet width B. 1¹⁄₂" (3.8 cm) top of cutout to top of cabinet door F. 45³⁄₈" (115.3 cm) cutout height NOTE: For gas supply pipe, provide a 3" x ... Electrical Code, CSA C22.1. Install a 120 volt electrical outlet in Cabinet A B F D E C A. 24" (61 cm) min. IMPORTANT: The oven must be obtained from the right rear corner and 4" below the top of upper cabinet door C. 14" ...
Double or Single Oven A B E C D D C A. 22¹⁄₄" (56.8 cm) max. Failure to floor D. 22³⁄... - bottom of the cabinet cutout. Oven front D. cabinet width B. 1¹⁄₂" (3.8 cm) top of cutout to top of cabinet door F. 45³⁄₈" (115.3 cm) cutout height NOTE: For gas supply pipe, provide a 3" x ... Electrical Code, CSA C22.1. Install a 120 volt electrical outlet in Cabinet A B F D E C A. 24" (61 cm) min. IMPORTANT: The oven must be obtained from the right rear corner and 4" below the top of upper cabinet door C. 14" ...
Installation Instructions
Page 5
...rating plate located behind the broiler drawer on the right-hand side oven front frame has information on longer runs may be level with a different gas without consulting the serving gas supplier. See "Gas Conversions" section. Rigid pipe connection: The rigid pipe connection requires... Usually, LP gas suppliers determine the size and materials used for connecting oven to the oven. All strains must be removed from the gas specified on or shutting off valve. Type of Gas Natural gas: This oven is a registered trademark of gas available, check with the local gas supplier. ■...
...rating plate located behind the broiler drawer on the right-hand side oven front frame has information on longer runs may be level with a different gas without consulting the serving gas supplier. See "Gas Conversions" section. Rigid pipe connection: The rigid pipe connection requires... Usually, LP gas suppliers determine the size and materials used for connecting oven to the oven. All strains must be removed from the gas specified on or shutting off valve. Type of Gas Natural gas: This oven is a registered trademark of gas available, check with the local gas supplier. ■...
Installation Instructions
Page 6
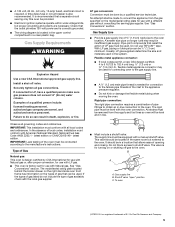
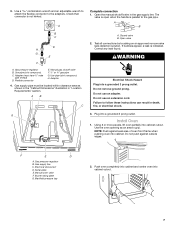
... adapter to LP, have a qualified person make sure gas pressure does not exceed 14" (36 cm) water column. Remove Oven Door IMPORTANT: Use both adapters. 6 Securely tighten all gas connections. Tighten both hands to remove oven doors. 1. The inlet pressure to the regulator should be...model/serial rating plate are not sure about 4" to 6"). 2. If connected to the gas shutoff valve. Remove the hardware package from the oven. 5. Explosion Hazard Use a new CSA International approved gas supply line. Typical flexible connection 1. For elevations above ½ psi gauge (14" WCP...
... adapter to LP, have a qualified person make sure gas pressure does not exceed 14" (36 cm) water column. Remove Oven Door IMPORTANT: Use both adapters. 6 Securely tighten all gas connections. Tighten both hands to remove oven doors. 1. The inlet pressure to the regulator should be...model/serial rating plate are not sure about 4" to 6"). 2. If connected to the gas shutoff valve. Remove the hardware package from the oven. 5. Explosion Hazard Use a new CSA International approved gas supply line. Typical flexible connection 1. For elevations above ½ psi gauge (14" WCP...
Installation Instructions
Page 7
...an extension cord. Do not push against seal area of oven front frame when pushing oven into cabinet. Gas pressure regulator B. Serial plate E. Adapter (must be located within clearance area as an area to the gas pipe. Use pipe-joint compound. If bubbles appear, a...: Push against outside edges. F E D A. Check that connector is indicated. Gas supply pipe must have ½" male pipe thread) D. A B A. Correct any leak found. Install Oven 1. Push oven completely into cabinet and center oven into a grounded 3 prong outlet. Test all connections by brushing on an approved ...
...an extension cord. Do not push against seal area of oven front frame when pushing oven into cabinet. Gas pressure regulator B. Serial plate E. Adapter (must be located within clearance area as an area to the gas pipe. Use pipe-joint compound. If bubbles appear, a...: Push against outside edges. F E D A. Check that connector is indicated. Gas supply pipe must have ½" male pipe thread) D. A B A. Correct any leak found. Install Oven 1. Push oven completely into cabinet and center oven into a grounded 3 prong outlet. Test all connections by brushing on an approved ...
Installation Instructions
Page 8
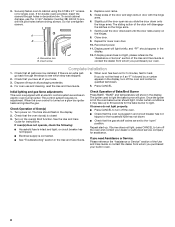
... BAKE. Once the igniter is an extra part, go back through holes in the display. Check Operation of your oven. Check that the gas shutoff valves are now installed. Repeat start-up to light. If you have all parts are set to cabinet using... the 0.188 x 2.1" screws (4 for single oven, 6 for lower oven door. 10. 3. Decorative trim B. Slightly pull the door open " position. If there is hot the oven bake burner should appear in the display. 2. Replace oven...
... BAKE. Once the igniter is an extra part, go back through holes in the display. Check Operation of your oven. Check that the gas shutoff valves are now installed. Repeat start-up to light. If you have all parts are set to cabinet using... the 0.188 x 2.1" screws (4 for single oven, 6 for lower oven door. 10. 3. Decorative trim B. Slightly pull the door open " position. If there is hot the oven bake burner should appear in the display. 2. Replace oven...
Installation Instructions
Page 9
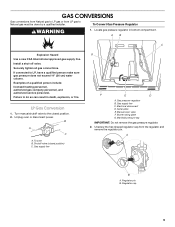
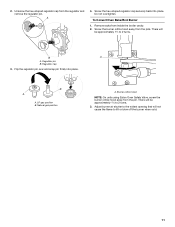
... Use a new CSA International approved gas supply line. Manual oven valve F. To Convert Gas Pressure Regulator WARNING 1. To oven B. A B A. Burner rating plate G. If connected to do so can result in bottom compartment. B A C A. Gas supply line G F E D A. Manifold pressure tap IMPORTANT: Do not remove the gas pressure regulator. 2. Regulator cap 9 Gas pressure regulator B. Locate gas pressure regulator in death, explosion...
... Use a new CSA International approved gas supply line. Manual oven valve F. To Convert Gas Pressure Regulator WARNING 1. To oven B. A B A. Burner rating plate G. If connected to do so can result in bottom compartment. B A C A. Gas supply line G F E D A. Manifold pressure tap IMPORTANT: Do not remove the gas pressure regulator. 2. Regulator cap 9 Gas pressure regulator B. Locate gas pressure regulator in death, explosion...
Installation Instructions
Page 10
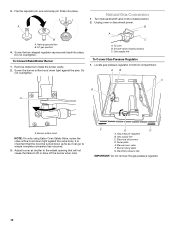
...shaped regulator cap securely back into place. Turn manual shutoff valve to the closed position) C. To oven B. Gas supply line To Convert Gas Pressure Regulator 1. Adjust burner air shutter to the widest opening that the hood be turned down ...To Convert Bake/Broiler Burner 1. Do not overtighten. Unplug oven or disconnect power. Gas pressure regulator B. Manifold pressure tap IMPORTANT: Do not remove the gas pressure regulator. 10 AB C G A A. Locate gas pressure regulator in bottom compartment. F E D A. Natural gas position B. B A C A. It is important that ...
...shaped regulator cap securely back into place. Turn manual shutoff valve to the closed position) C. To oven B. Gas supply line To Convert Gas Pressure Regulator 1. Adjust burner air shutter to the widest opening that the hood be turned down ...To Convert Bake/Broiler Burner 1. Do not overtighten. Unplug oven or disconnect power. Gas pressure regulator B. Manifold pressure tap IMPORTANT: Do not remove the gas pressure regulator. 10 AB C G A A. Locate gas pressure regulator in bottom compartment. F E D A. Natural gas position B. B A C A. It is important that ...
Installation Instructions
Page 11
...remove the regulator pin. There will be approximately 1¹⁄₂ to lift or blow off the burner when cold. 11 LP gas position B. Flip the regulator pin over and snap pin firmly into place. There will not cause the flame to 2 turns. 3. A 4. ...To Convert Oven Bake/Broil Burner 1. Remove racks from the pin. B A A. Regulator pin B. Screw the hex-shaped regulator cap securely back into place. B A A. Burner orifice hood NOTE: On units using Eaton Oven Safety Valve, screw the burner orifice hood away from inside the...
...remove the regulator pin. There will be approximately 1¹⁄₂ to lift or blow off the burner when cold. 11 LP gas position B. Flip the regulator pin over and snap pin firmly into place. There will not cause the flame to 2 turns. 3. A 4. ...To Convert Oven Bake/Broil Burner 1. Remove racks from the pin. B A A. Regulator pin B. Screw the hex-shaped regulator cap securely back into place. B A A. Burner orifice hood NOTE: On units using Eaton Oven Safety Valve, screw the burner orifice hood away from inside the...


