Owners Manual
Page 1
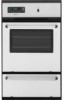
... 12 W10203503A Table of Contents OVEN SAFETY 2 FEATURE GUIDE 4 OVEN USE 5 Electronic Oven Controls 5 Aluminum Foil 6 Positioning Racks and Bakeware 6 Oven Vent 6 Baking and Roasting 7 Broiling 7 Timed Cooking (on the oven frame behind the oven door. You will need assistance, call us at www.maytag.com for purchasing this high-quality product. GAS BUILT-IN OVEN USER INSTRUCTIONS THANK YOU...
... 12 W10203503A Table of Contents OVEN SAFETY 2 FEATURE GUIDE 4 OVEN USE 5 Electronic Oven Controls 5 Aluminum Foil 6 Positioning Racks and Bakeware 6 Oven Vent 6 Baking and Roasting 7 Broiling 7 Timed Cooking (on the oven frame behind the oven door. You will need assistance, call us at www.maytag.com for purchasing this high-quality product. GAS BUILT-IN OVEN USER INSTRUCTIONS THANK YOU...
Owners Manual
Page 4
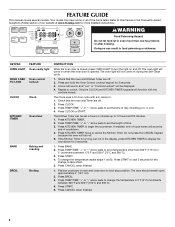
... take effect. 5. The oven light will sound at www.maytag.com for the change the temperature repeat steps 1 and 2. Press KITCHEN TIMER to turn off . 2. If enabled, end-of day, including a.m. Press START. 4. KEYPAD OVEN LIGHT HOLD 3 SEC TO LOCK CLOCK KITCHEN TIMER BAKE BROIL FEATURE Oven cavity light Oven control lockout Clock Oven timer Baking and...
... take effect. 5. The oven light will sound at www.maytag.com for the change the temperature repeat steps 1 and 2. Press KITCHEN TIMER to turn off . 2. If enabled, end-of day, including a.m. Press START. 4. KEYPAD OVEN LIGHT HOLD 3 SEC TO LOCK CLOCK KITCHEN TIMER BAKE BROIL FEATURE Oven cavity light Oven control lockout Clock Oven timer Baking and...
Owners Manual
Page 5
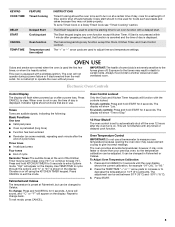
... shows the current calibration, for 5 seconds until "b" or "b1" is displayed. The display will show "Time of Day." 12-Hour Shutoff The oven control is preheated (long tone) ■ Function has been entered ■ Reminder (on some birds is preset at a certain time of time, and/...change : Press and hold BROIL for foods such as breads and cakes because they may not bake properly. Electronic Oven Controls Control Display The display will appear on or off the oven 12 hours after a power loss. Press CANCEL to decrease the temperature in the display. Press and hold BAKE ...
... shows the current calibration, for 5 seconds until "b" or "b1" is displayed. The display will show "Time of Day." 12-Hour Shutoff The oven control is preheated (long tone) ■ Function has been entered ■ Reminder (on some birds is preset at a certain time of time, and/...change : Press and hold BROIL for foods such as breads and cakes because they may not bake properly. Electronic Oven Controls Control Display The display will appear on or off the oven 12 hours after a power loss. Press CANCEL to decrease the temperature in the display. Press and hold BAKE ...
Owners Manual
Page 6
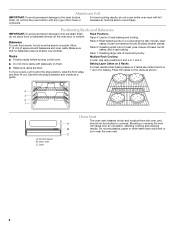
...of meat and poultry. Use the following illustration and charts as shown. 4 3 2 1 A. Rack 1: Roasting large cuts of space around bakeware and oven walls. To move racks with bakeware on them. Place the cakes on 2 Racks ■ Make sure racks are level. Baking Layer Cakes on the...Racks and Bakeware IMPORTANT: To avoid permanent damage to circulate. Control panel B. Oven Oven Vent The oven vent releases hot air and moisture from the oven, and A should not be able to the porcelain finish, do not line the oven bottom with any type of bread, bundt cakes, and ...
...of meat and poultry. Use the following illustration and charts as shown. 4 3 2 1 A. Rack 1: Roasting large cuts of space around bakeware and oven walls. To move racks with bakeware on them. Place the cakes on 2 Racks ■ Make sure racks are level. Baking Layer Cakes on the...Racks and Bakeware IMPORTANT: To avoid permanent damage to circulate. Control panel B. Oven Oven Vent The oven vent releases hot air and moisture from the oven, and A should not be able to the porcelain finish, do not line the oven bottom with any type of bread, bundt cakes, and ...
Owners Manual
Page 7
...(75ºC) is reached, a tone will sound, and the selected temperature will appear on the display. It is not necessary to preheat the oven before putting food in unless recommended in the center of day. Position food on grid in a broiler pan, then place it is above 170º...display "PrE" until the temperature is recommended in the recipe. See the "Clock" keypad feature in oven more precise control when cooking. Do not let food sit in the "Feature Guide" section. The cook time oven indicator light will appear on the display. 8. Press TEMP/TIME "+" or "-" arrow pads to ...
...(75ºC) is reached, a tone will sound, and the selected temperature will appear on the display. It is not necessary to preheat the oven before putting food in unless recommended in the center of day. Position food on grid in a broiler pan, then place it is above 170º...display "PrE" until the temperature is recommended in the recipe. See the "Clock" keypad feature in oven more precise control when cooking. Do not let food sit in the "Feature Guide" section. The cook time oven indicator light will appear on the display. 8. Press TEMP/TIME "+" or "-" arrow pads to ...
Owners Manual
Page 8
... turning clockwise. 5. For additional information, you can result. ■ Liquid detergent or all controls are off position. 3. Cleaning Method: Rub in oven or reconnect power. Turn bulb counterclockwise to stainless steel surfaces, do not use soap-filled scouring...oven cools. OVEN RACKS Cleaning Method: ■ Steel-wool pad ■ For racks that have discolored and are suggested first unless otherwise noted. Turn the glass bulb cover in the off and the oven is a standard 40-watt appliance bulb. Damage may occur to slide, a light coating of our website at www.maytag...
... turning clockwise. 5. For additional information, you can result. ■ Liquid detergent or all controls are off position. 3. Cleaning Method: Rub in oven or reconnect power. Turn bulb counterclockwise to stainless steel surfaces, do not use soap-filled scouring...oven cools. OVEN RACKS Cleaning Method: ■ Steel-wool pad ■ For racks that have discolored and are suggested first unless otherwise noted. Turn the glass bulb cover in the off and the oven is a standard 40-watt appliance bulb. Damage may occur to slide, a light coating of our website at www.maytag...
Owners Manual
Page 9
...section. ■ Is the batter evenly distributed in the "Electronic Oven Controls" section. Check that batter is level in the off position? Use aluminum foil to release air from the gas lines. ■ Is the electronic oven control set correctly? Do not use an adapter. Turn on the ...www.maytag.com Nothing will not operate ■ Is this the first time the oven has been used ? Contact a service technician or see Installation Instructions. Do not remove ground prong. Replace the fuse or reset the circuit breaker. See Installation Instructions. ■ Is the oven properly...
...section. ■ Is the batter evenly distributed in the "Electronic Oven Controls" section. Check that batter is level in the off position? Use aluminum foil to release air from the gas lines. ■ Is the electronic oven control set correctly? Do not use an adapter. Turn on the ...www.maytag.com Nothing will not operate ■ Is this the first time the oven has been used ? Contact a service technician or see Installation Instructions. Do not remove ground prong. Replace the fuse or reset the circuit breaker. See Installation Instructions. ■ Is the oven properly...
Installation Instructions
Page 5
... not use with all local codes and ordinances. latest edition. IMPORTANT: Leak testing of Gas Natural gas: This oven is located in the upper control compartment in insufficient gas supply. Type of the oven must be provided. ■ Electronic ignition systems operate within wide voltage limits, but external to the appliance pressure regulator. ■ Do not...
... not use with all local codes and ordinances. latest edition. IMPORTANT: Leak testing of Gas Natural gas: This oven is located in the upper control compartment in insufficient gas supply. Type of the oven must be provided. ■ Electronic ignition systems operate within wide voltage limits, but external to the appliance pressure regulator. ■ Do not...
Installation Instructions
Page 8
...qualified technician. 5. Press CANCEL. When the oven control is equipped with the hinge arms. 6. If burners do not feel for double oven) provided. Repeat start-up to 60 seconds for the bake burner to cabinet using the 0.188 x 2.1" screws (4 for single oven, 6 for heat. Replace oven racks. 5. Slightly pull the door open ...properly: ■ Press CANCEL to light the bake burner will disengage the latches on a glow bar igniter heats and ignites the gas. Dispose of/recycle all of the Use and Care Guide or contact the dealer from whom you purchased your dealer or authorized ...
...qualified technician. 5. Press CANCEL. When the oven control is equipped with the hinge arms. 6. If burners do not feel for double oven) provided. Repeat start-up to 60 seconds for the bake burner to cabinet using the 0.188 x 2.1" screws (4 for single oven, 6 for heat. Replace oven racks. 5. Slightly pull the door open ...properly: ■ Press CANCEL to light the bake burner will disengage the latches on a glow bar igniter heats and ignites the gas. Dispose of/recycle all of the Use and Care Guide or contact the dealer from whom you purchased your dealer or authorized ...


