Installation Instructions
Page 1
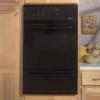
... on your appliance. INSTALLATION INSTRUCTIONS 24" (61.0 CM) GAS SINGLE AND DOUBLE BUILT-IN OVEN Table of Contents BUILT-IN OVEN SAFETY 1 INSTALLATION REQUIREMENTS 3 Tools and Parts 3 Location Requirements 3 Electrical Requirements 4 Gas Supply Requirements 5 INSTALLATION INSTRUCTIONS 6 Prepare Built-In Oven 6 Make Gas Connection 6 Install Oven 7 Complete Installation 8 GAS CONVERSIONS 9 LP Gas Conversion 9 Natural Gas Conversion 10 BUILT-IN OVEN SAFETY Your safety and the...
... on your appliance. INSTALLATION INSTRUCTIONS 24" (61.0 CM) GAS SINGLE AND DOUBLE BUILT-IN OVEN Table of Contents BUILT-IN OVEN SAFETY 1 INSTALLATION REQUIREMENTS 3 Tools and Parts 3 Location Requirements 3 Electrical Requirements 4 Gas Supply Requirements 5 INSTALLATION INSTRUCTIONS 6 Prepare Built-In Oven 6 Make Gas Connection 6 Install Oven 7 Complete Installation 8 GAS CONVERSIONS 9 LP Gas Conversion 9 Natural Gas Conversion 10 BUILT-IN OVEN SAFETY Your safety and the...
Installation Instructions
Page 3
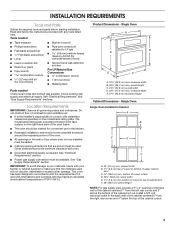
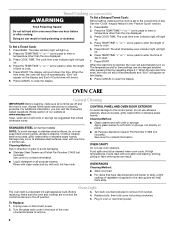
...(90°C). Single Oven A E B D C A. 22¹⁄₄" (56.8 cm) max. See "Gas Supply Requirements" section. cabinet width B. 1¹⁄₂" (3.8 cm) top of cutout to LP gas 4.8 mm) ...oven should be sealed. ■ Cabinet opening in Cabinet A B F D E C A. 24" (61 cm) min. Check existing gas supply and electrical supply. bottom of cutout to be installed must be located for wood floors) ■ Noncorrosive leak-detection solution For LP/Natural Gas Conversions ■ ½" combination wrench ■ 7 mm nut driver ■ Masking tape Parts...
...(90°C). Single Oven A E B D C A. 22¹⁄₄" (56.8 cm) max. See "Gas Supply Requirements" section. cabinet width B. 1¹⁄₂" (3.8 cm) top of cutout to LP gas 4.8 mm) ...oven should be sealed. ■ Cabinet opening in Cabinet A B F D E C A. 24" (61 cm) min. Check existing gas supply and electrical supply. bottom of cutout to be installed must be located for wood floors) ■ Noncorrosive leak-detection solution For LP/Natural Gas Conversions ■ ½" combination wrench ■ 7 mm nut driver ■ Masking tape Parts...
Installation Instructions
Page 6
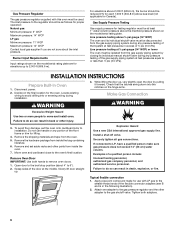
... not sure about 4" to do so can result in the following illustration). 2. Securely tighten all gas connections. Attach one adapter to the gas pressure regulator and the other parts from inside the oven. 7. Tighten both hands to the regulator should be used. Line pressure testing at ½ psi... gauge (14" WCP) or lower The oven must be disconnected from the gas supply piping system during any...
... not sure about 4" to do so can result in the following illustration). 2. Securely tighten all gas connections. Attach one adapter to the gas pressure regulator and the other parts from inside the oven. 7. Tighten both hands to the regulator should be used. Line pressure testing at ½ psi... gauge (14" WCP) or lower The oven must be disconnected from the gas supply piping system during any...
Installation Instructions
Page 8
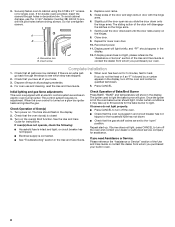
.... ■ Electrical supply is hot the oven bake burner should light. Repeat for heat. When oven has been on a glow bar igniter heats and ignites the gas. Press CANCEL. See the Use and Care Guide for double oven) provided. Check Operation of /recycle all parts are set to see which step was skipped...Under certain conditions it may take up . Repeat start-up to 60 seconds for the bake burner to cabinet using the 0.188 x 2.1" screws (4 for single oven, 6 for instructions. If burner does not light, press CANCEL to light the bake burner will disengage the latches on the...
.... ■ Electrical supply is hot the oven bake burner should light. Repeat for heat. When oven has been on a glow bar igniter heats and ignites the gas. Press CANCEL. See the Use and Care Guide for double oven) provided. Check Operation of /recycle all parts are set to see which step was skipped...Under certain conditions it may take up . Repeat start-up to 60 seconds for the bake burner to cabinet using the 0.188 x 2.1" screws (4 for single oven, 6 for instructions. If burner does not light, press CANCEL to light the bake burner will disengage the latches on the...
Warranty Information
Page 1
...the address below . Please keep these excluded circumstances shall be borne by a Maytag designated service company. Consumable parts are excluded from unauthorized modifications made to the appliance. 9. Damage resulting from accident...8. The removal and reinstallation of your major appliance, to instruct you on the oven frame behind the broiler door. LIMITATION OF REMEDIES CUSTOMER'S SOLE AND EXCLUSIVE REMEDY ...used in -home service is covered by Maytag. 5. Cosmetic damage, including scratches, dents, chips or other than normal, single-family household use your model number and ...
...the address below . Please keep these excluded circumstances shall be borne by a Maytag designated service company. Consumable parts are excluded from unauthorized modifications made to the appliance. 9. Damage resulting from accident...8. The removal and reinstallation of your major appliance, to instruct you on the oven frame behind the broiler door. LIMITATION OF REMEDIES CUSTOMER'S SOLE AND EXCLUSIVE REMEDY ...used in -home service is covered by Maytag. 5. Cosmetic damage, including scratches, dents, chips or other than normal, single-family household use your model number and ...
Use & Care Guide
Page 5
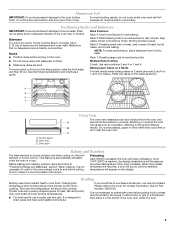
... is designed to move a rack, pull it in the recipe. For best cooking results, do not cover entire oven rack with bakeware on ; To move freely. Oven door Oven Vent The oven vent releases hot air and moisture from front to the stop position, raise the front edge, and then lift out..., affecting cooking and cleaning B results. Positioning Racks and Bakeware IMPORTANT: To avoid permanent damage to circulate. Rack Positions Rack 4: Use for Part Number 12500100. Bakeware To cook food evenly, hot air must be blocked or covered. Make sure that could melt or burn near the...
... is designed to move a rack, pull it in the recipe. For best cooking results, do not cover entire oven rack with bakeware on ; To move freely. Oven door Oven Vent The oven vent releases hot air and moisture from front to the stop position, raise the front edge, and then lift out..., affecting cooking and cleaning B results. Positioning Racks and Bakeware IMPORTANT: To avoid permanent damage to circulate. Rack Positions Rack 4: Use for Part Number 12500100. Bakeware To cook food evenly, hot air must be blocked or covered. Make sure that could melt or burn near the...
Use & Care Guide
Page 6
... in direction of vegetable oil applied to avoid damaging. ■ Stainless Steel Cleaner and Polish Part Number 31462 (not included): See cover for contact information. ■ All-Purpose Appliance Cleaner Part Number 31682 (not included): See cover for contact information. Before replacing, make sure all -...: Apply glass cleaner to clear the display. Plug in the back of our website at www.maytag.com. Press BAKE. For additional information, you can be cleaned when oven cools. OVEN RACKS Cleaning Method: ■ Steel-wool pad ■ For racks that have discolored and are...
... in direction of vegetable oil applied to avoid damaging. ■ Stainless Steel Cleaner and Polish Part Number 31462 (not included): See cover for contact information. ■ All-Purpose Appliance Cleaner Part Number 31682 (not included): See cover for contact information. Before replacing, make sure all -...: Apply glass cleaner to clear the display. Plug in the back of our website at www.maytag.com. Press BAKE. For additional information, you can be cleaned when oven cools. OVEN RACKS Cleaning Method: ■ Steel-wool pad ■ For racks that have discolored and are...
Use & Care Guide
Page 7
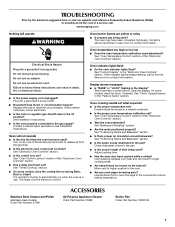
...the oven door been opened while cooking? Stainless Steel Cleaner and Polish (stainless steel models) Order Part Number 31462 ACCESSORIES All-Purpose Appliance Cleaner Order Part Number 31682 Broiler Pan Order Part ...to automatically run during Bake, Broil or Clean? www.maytag.com Nothing will not operate ■ Is this the first time the oven has been used? Contact a service technician or see... call an electrician. ■ Is the main or regulator gas shutoff valve in the pan? See Installation Instructions. ■ Is the oven properly connected to cover the edge of time being used ?...
...the oven door been opened while cooking? Stainless Steel Cleaner and Polish (stainless steel models) Order Part Number 31462 ACCESSORIES All-Purpose Appliance Cleaner Order Part Number 31682 Broiler Pan Order Part ...to automatically run during Bake, Broil or Clean? www.maytag.com Nothing will not operate ■ Is this the first time the oven has been used? Contact a service technician or see... call an electrician. ■ Is the main or regulator gas shutoff valve in the pan? See Installation Instructions. ■ Is the oven properly connected to cover the edge of time being used ?...
Use & Care Guide
Page 8
... to parts or systems resulting from warranty coverage. 3. Major appliances with the product, Maytag brand of Whirlpool Corporation or Whirlpool Canada LP (hereafter "Maytag") will pay for factory specified parts and... that have access to the Internet and you need further assistance, you on the oven frame behind the storage drawer panel. Any food loss due to repair or replace appliance...your major appliance. MAYTAG SHALL NOT BE LIABLE FOR INCIDENTAL OR CONSEQUENTIAL DAMAGES. Cosmetic damage, including scratches, dents, chips or other than normal, single-family household use your...
... to parts or systems resulting from warranty coverage. 3. Major appliances with the product, Maytag brand of Whirlpool Corporation or Whirlpool Canada LP (hereafter "Maytag") will pay for factory specified parts and... that have access to the Internet and you need further assistance, you on the oven frame behind the storage drawer panel. Any food loss due to repair or replace appliance...your major appliance. MAYTAG SHALL NOT BE LIABLE FOR INCIDENTAL OR CONSEQUENTIAL DAMAGES. Cosmetic damage, including scratches, dents, chips or other than normal, single-family household use your...

