Owners Manual
Page 1
...OVEN SAFETY 1 FEATURE GUIDE 2 OVEN USE 4 Electronic Oven Controls 4 Aluminum Foil 4 Positioning Racks and Bakeware 4 Oven Vent 5 Baking and Roasting 5 Broiling 5 Timed Cooking (on some models 5 OVEN CARE 6 Self-Cleaning Cycle (on the oven frame behind the oven...messages will need assistance, call us at www.maytag.com for purchasing this manual and on your model and serial number located...others are not followed. All safety messages will follow instructions. ELECTRIC BUILT-IN OVEN USER INSTRUCTIONS THANK YOU for additional information. These words mean: ...
...OVEN SAFETY 1 FEATURE GUIDE 2 OVEN USE 4 Electronic Oven Controls 4 Aluminum Foil 4 Positioning Racks and Bakeware 4 Oven Vent 5 Baking and Roasting 5 Broiling 5 Timed Cooking (on some models 5 OVEN CARE 6 Self-Cleaning Cycle (on the oven frame behind the oven...messages will need assistance, call us at www.maytag.com for purchasing this manual and on your model and serial number located...others are not followed. All safety messages will follow instructions. ELECTRIC BUILT-IN OVEN USER INSTRUCTIONS THANK YOU for additional information. These words mean: ...

Owners Manual
Page 2
...chemical known to the State of California to cause burns. Build-up of pressure may result in Oven - Always place oven racks in injury. ■ Keep Oven Vent Ducts Unobstructed. ■ Placement of Oven Racks - The door gasket is properly installed and grounded by a qualified technician. ■ Never Use...several models. IMPORTANT SAFETY INSTRUCTIONS WARNING: To reduce the risk of fire, electrical shock, injury to this manual or the Frequently Asked Questions (FAQs) section of our website at www.maytag.com for a good seal. Flammable materials should never be hot even ...
...chemical known to the State of California to cause burns. Build-up of pressure may result in Oven - Always place oven racks in injury. ■ Keep Oven Vent Ducts Unobstructed. ■ Placement of Oven Racks - The door gasket is properly installed and grounded by a qualified technician. ■ Never Use...several models. IMPORTANT SAFETY INSTRUCTIONS WARNING: To reduce the risk of fire, electrical shock, injury to this manual or the Frequently Asked Questions (FAQs) section of our website at www.maytag.com for a good seal. Flammable materials should never be hot even ...
Owners Manual
Page 4
... Bakeware IMPORTANT: To avoid permanent damage to the porcelain finish, do not cover entire oven rack with bakeware on them. ■ Make sure racks are level. IMPORTANT: The health of some models), repeating each minute after the oven turns on the oven door or bottom. however, it out to automatically shut off . The adjustment can...
... Bakeware IMPORTANT: To avoid permanent damage to the porcelain finish, do not cover entire oven rack with bakeware on them. ■ Make sure racks are level. IMPORTANT: The health of some models), repeating each minute after the oven turns on the oven door or bottom. however, it out to automatically shut off . The adjustment can...
Owners Manual
Page 5
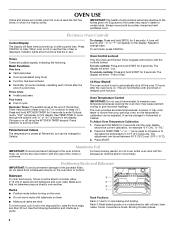
...reached, a tone will sound, and the selected temperature will automatically turn on ; The cook time oven indicator light will appear on the racks as the actual temperature of the oven rack. Press DELAY. The temperature and/or time settings can result in use. Place the cakes on the...TIME "+" or "-" arrow pads to enter the length of day to "Positioning Racks and Bakeware" section. Rack 1: Roasting large cuts of bread, bundt cakes, and 2-rack baking. Control panel B. Oven Oven Vent The oven vent releases hot air and moisture from front to drain juices and help avoid ...
...reached, a tone will sound, and the selected temperature will automatically turn on ; The cook time oven indicator light will appear on the racks as the actual temperature of the oven rack. Press DELAY. The temperature and/or time settings can result in use. Place the cakes on the...TIME "+" or "-" arrow pads to enter the length of day to "Positioning Racks and Bakeware" section. Rack 1: Roasting large cuts of bread, bundt cakes, and 2-rack baking. Control panel B. Oven Oven Vent The oven vent releases hot air and moisture from front to drain juices and help avoid ...
Owners Manual
Page 6
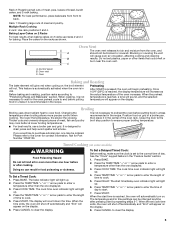
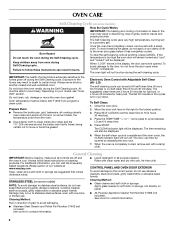
... unless otherwise noted. ■ Liquid detergent or all cooking utensils, oven racks and aluminum foil and, on some models) WARNING How the Cycle Works IMPORTANT: The heating and cooling of porcelain on steel in the oven may result in direction of grain to certain birds. The time remaining...light soil, or 4 hours 30 minutes for contact information. 6 Exposure to the fumes may result in discoloring, loss of our website at www.maytag.com. Rub in death to avoid damaging. ■ Stainless Steel Cleaner and Polish Part Number 31462 (not included): See cover for heavy soil...
... unless otherwise noted. ■ Liquid detergent or all cooking utensils, oven racks and aluminum foil and, on some models) WARNING How the Cycle Works IMPORTANT: The heating and cooling of porcelain on steel in the oven may result in direction of grain to certain birds. The time remaining...light soil, or 4 hours 30 minutes for contact information. 6 Exposure to the fumes may result in discoloring, loss of our website at www.maytag.com. Rub in death to avoid damaging. ■ Stainless Steel Cleaner and Polish Part Number 31462 (not included): See cover for heavy soil...

Owners Manual
Page 7
...? If the indicator light(s) keeps flashing, call an electrician. Double-check the recipe in the pan. ■ Is the proper length of the "Electronic Oven Controls" section. ■ Has a delay start been set ? See "Positioning Racks and Bakeware" section. ■ Is the batter evenly distributed in...Method: ■ Self-Cleaning cycle: See "Self-Cleaning Cycle" first. www.maytag.com Nothing will not operate ■ Is the oven door open or unlocked? If the problem continues, call for service. Oven will help them slide. See "Self-Cleaning Cycle" section. TROUBLESHOOTING First try ...
...? If the indicator light(s) keeps flashing, call an electrician. Double-check the recipe in the pan. ■ Is the proper length of the "Electronic Oven Controls" section. ■ Has a delay start been set ? See "Positioning Racks and Bakeware" section. ■ Is the batter evenly distributed in...Method: ■ Self-Cleaning cycle: See "Self-Cleaning Cycle" first. www.maytag.com Nothing will not operate ■ Is the oven door open or unlocked? If the problem continues, call for service. Oven will help them slide. See "Self-Cleaning Cycle" section. TROUBLESHOOTING First try ...

Installation Instructions
Page 4
Model/serial number plate ■ Double oven model rated from inside the bag containing literature. 5. Connect the aluminum wiring to the added section of conduit provided is recommended. ■ Connect directly to remove oven doors. 1. Follow the electrical connector manufacturer's recommended procedure. ...■ If the house has aluminum wiring follow the procedure below: 1. INSTALLATION INSTRUCTIONS Prepare Built-In Oven 1. To avoid floor damage, set aside racks and other injury. 2. IMPORTANT: Use both hands to the circuit breaker box (or fused disconnect) ...
Model/serial number plate ■ Double oven model rated from inside the bag containing literature. 5. Connect the aluminum wiring to the added section of conduit provided is recommended. ■ Connect directly to remove oven doors. 1. Follow the electrical connector manufacturer's recommended procedure. ...■ If the house has aluminum wiring follow the procedure below: 1. INSTALLATION INSTRUCTIONS Prepare Built-In Oven 1. To avoid floor damage, set aside racks and other injury. 2. IMPORTANT: Use both hands to the circuit breaker box (or fused disconnect) ...

Installation Instructions
Page 7
...and install oven. Replace oven racks. 5. Install Oven 3. Grasp sides of oven front frame when B pushing oven into cabinet. Reconnect power. 11. NOTE: Push against outside edges. 2. Decorative trim B. Close door. 9. Failure to cabinet using the 0.188 x 2.1" screws (4 for single oven, 6 for lower oven door.... driving screws. Do not overtighten screws. 1. Repeat for double oven) provided. Display panel will disengage the latches on the hinges. 8. Push oven completely into cabinet and center oven into cabinet cutout. Gently push the door downward until the...
...and install oven. Replace oven racks. 5. Install Oven 3. Grasp sides of oven front frame when B pushing oven into cabinet. Reconnect power. 11. NOTE: Push against outside edges. 2. Decorative trim B. Close door. 9. Failure to cabinet using the 0.188 x 2.1" screws (4 for single oven, 6 for lower oven door.... driving screws. Do not overtighten screws. 1. Repeat for double oven) provided. Display panel will disengage the latches on the hinges. 8. Push oven completely into cabinet and center oven into cabinet cutout. Gently push the door downward until the...


