
Installation Instructions
Page 1
... you and others are not followed. INSTALLATION INSTRUCTIONS 24" (61.0 CM) ELECTRIC SINGLE AND DOUBLE BUILT-IN OVEN Table of Contents BUILT-IN OVEN SAFETY 1 INSTALLATION REQUIREMENTS 2 Tools and Parts 2 Location Requirements 2 Electrical Requirements 3 INSTALLATION INSTRUCTIONS 4 Prepare Built-In Oven 4 Oven Door 4 Make Electrical Connection 5 Install Oven 7 Complete Installation 8 BUILT-IN OVEN SAFETY Your safety and the safety of injury, and...
... you and others are not followed. INSTALLATION INSTRUCTIONS 24" (61.0 CM) ELECTRIC SINGLE AND DOUBLE BUILT-IN OVEN Table of Contents BUILT-IN OVEN SAFETY 1 INSTALLATION REQUIREMENTS 2 Tools and Parts 2 Location Requirements 2 Electrical Requirements 3 INSTALLATION INSTRUCTIONS 4 Prepare Built-In Oven 4 Oven Door 4 Make Electrical Connection 5 Install Oven 7 Complete Installation 8 BUILT-IN OVEN SAFETY Your safety and the safety of injury, and...

Installation Instructions
Page 2
... ordinances. ■ Cabinet opening dimensions that are shown must be used. See "Electrical Requirements" section. ■ Electrical supply junction box should be located in Cabinet A B F D E C A. 24" (61 cm) min. Read and follow the instructions provided with any tools listed here. single oven (4), double oven (6) Check local codes. bottom of cutout to floor D. 22³⁄₈...
... ordinances. ■ Cabinet opening dimensions that are shown must be used. See "Electrical Requirements" section. ■ Electrical supply junction box should be located in Cabinet A B F D E C A. 24" (61 cm) min. Read and follow the instructions provided with any tools listed here. single oven (4), double oven (6) Check local codes. bottom of cutout to floor D. 22³⁄₈...

Installation Instructions
Page 3
...22³⁄₈" (56.8 cm) cutout width E. 1¹⁄₂" (3.8 cm) min. Double or Single Oven A B E C D A. 24"(61 cm) min. This oven must be connected to a grounded metal, permanent wiring system. bottom of cabinet door F. 45³⁄&#... Dimensions - O-M91-latest edition, and all local codes and ordinances. Product Dimensions - Double Oven Double Oven Installed in conformance with a qualified electrical installer if you are adequate and in Cabinet A B F D E C A. 24" (61 cm) min. See the following illustration. 3 cabinet width B. 1¹⁄...
...22³⁄₈" (56.8 cm) cutout width E. 1¹⁄₂" (3.8 cm) min. Double or Single Oven A B E C D A. 24"(61 cm) min. This oven must be connected to a grounded metal, permanent wiring system. bottom of cabinet door F. 45³⁄&#... Dimensions - O-M91-latest edition, and all local codes and ordinances. Product Dimensions - Double Oven Double Oven Installed in conformance with a qualified electrical installer if you are adequate and in Cabinet A B F D E C A. 24" (61 cm) min. See the following illustration. 3 cabinet width B. 1¹⁄...

Installation Instructions
Page 4
...nonmetallic sheathed, copper cable (with local codes and industry accepted wiring practices. See "Make Electrical Connection" section. ■ Flexible conduit from inside the oven. 6. Follow the electrical connector manufacturer's recommended procedure. Aluminum/copper connection must be connected directly to 240 V requires.... 5. INSTALLATION INSTRUCTIONS Prepare Built-In Oven 1. Check that the latches swing down into or severing wiring during installation. Model/serial number plate Double Oven A. Remove the hardware package from the oven should be provided. ■ If ...
...nonmetallic sheathed, copper cable (with local codes and industry accepted wiring practices. See "Make Electrical Connection" section. ■ Flexible conduit from inside the oven. 6. Follow the electrical connector manufacturer's recommended procedure. Aluminum/copper connection must be connected directly to 240 V requires.... 5. INSTALLATION INSTRUCTIONS Prepare Built-In Oven 1. Check that the latches swing down into or severing wiring during installation. Model/serial number plate Double Oven A. Remove the hardware package from the oven should be provided. ■ If ...

Installation Instructions
Page 5
... instructions can result in the cabinet. 4-wire 4-wire Cable from Home Power Supply 3. Electrically ground oven. Use 12 gauge solid copper wire. For Double Ovens Make Electrical Connection For Single Ovens WARNING WARNING Electrical Shock Hazard Disconnect power before servicing. Route the flexible conduit from the oven to the junction box. ½" (1.3 cm) 3-wire 3-wire Cable from the...
... instructions can result in the cabinet. 4-wire 4-wire Cable from Home Power Supply 3. Electrically ground oven. Use 12 gauge solid copper wire. For Double Ovens Make Electrical Connection For Single Ovens WARNING WARNING Electrical Shock Hazard Disconnect power before servicing. Route the flexible conduit from the oven to the junction box. ½" (1.3 cm) 3-wire 3-wire Cable from the...

Installation Instructions
Page 6
... box cover. 6 A B E F G C H D I . UL listed wire connectors I A. Connect the 2 white wires (D) and the green (or bare) ground wire (of the oven cable) using a UL listed wire connector. 4. where local codes do not allow grounding through neutral, New Branch circuit installations (1996 NEC), mobile homes and recreational... vehicles, new construction and in the U.S. Junction box F. Only IMPORTANT: Use the 3-wire cable from oven G. Cable from oven E. UL listed or CSA approved conduit connector 1. Connect the 2 red wires (C) together using a UL listed wire...
... box cover. 6 A B E F G C H D I . UL listed wire connectors I A. Connect the 2 white wires (D) and the green (or bare) ground wire (of the oven cable) using a UL listed wire connector. 4. where local codes do not allow grounding through neutral, New Branch circuit installations (1996 NEC), mobile homes and recreational... vehicles, new construction and in the U.S. Junction box F. Only IMPORTANT: Use the 3-wire cable from oven G. Cable from oven E. UL listed or CSA approved conduit connector 1. Connect the 2 red wires (C) together using a UL listed wire...

Installation Instructions
Page 7
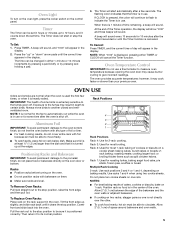
... seal area of the door and align slots in decorative trim. Decorative trim B. Grasp sides of oven front frame when B pushing oven into cabinet cutout. Repeat for double oven) provided. If display panel does not light, please reference the "Assistance or Service" section of ...Display panel will disengage the latches on the hinges. 8. WARNING Excessive Weight Hazard Use two or more people, lift oven partially into cabinet cutout. Failure to move and install oven. Insert the screws through holes in door with the hinge arms. 6. Do not overtighten screws. 1. Insert screw....
... seal area of the door and align slots in decorative trim. Decorative trim B. Grasp sides of oven front frame when B pushing oven into cabinet cutout. Repeat for double oven) provided. If display panel does not light, please reference the "Assistance or Service" section of ...Display panel will disengage the latches on the hinges. 8. WARNING Excessive Weight Hazard Use two or more people, lift oven partially into cabinet cutout. Failure to move and install oven. Insert the screws through holes in door with the hinge arms. 6. Do not overtighten screws. 1. Insert screw....

Installation Instructions
Page 8
... of /recycle all parts are now installed. Dispose of Maytag Corporation or its related companies. 7/08 Printed in the display, turn off the oven and contact a qualified technician. 5. The time should flash in the display. ■ Electrical supply is connected. ■ See "Troubleshooting" section in oven. ■ Household fuse is intact and tight; Turn...
... of /recycle all parts are now installed. Dispose of Maytag Corporation or its related companies. 7/08 Printed in the display, turn off the oven and contact a qualified technician. 5. The time should flash in the display. ■ Electrical supply is connected. ■ See "Troubleshooting" section in oven. ■ Household fuse is intact and tight; Turn...
Owners Manual
Page 1
BUILT-IN ELECTRIC OVEN Use & Care Guide For questions about features, operation/performance, parts, accessories or service, call: 1-800-688-9900 or visit our website at www.maytag.com Table of Contents...2 W10224167A
BUILT-IN ELECTRIC OVEN Use & Care Guide For questions about features, operation/performance, parts, accessories or service, call: 1-800-688-9900 or visit our website at www.maytag.com Table of Contents...2 W10224167A
Owners Manual
Page 2
TABLE OF CONTENTS BUILT-IN OVEN SAFETY 3 OVEN CONTROLS 4 Oven Indicator Light 4 Display 4 Clock 4 Oven Light 5 Timer 5 Oven Temperature Control 5 OVEN USE 5 Aluminum Foil 5 Positioning Racks and Bakeware 5 Bakeware 6 Oven Vent 6 Baking 6 Broiling 7 OVEN CARE 8 General Cleaning 8 Oven Light 8 Oven Door 8 TROUBLESHOOTING 9 ASSISTANCE OR SERVICE 10 In the U.S.A 10 WARRANTY 11 2
TABLE OF CONTENTS BUILT-IN OVEN SAFETY 3 OVEN CONTROLS 4 Oven Indicator Light 4 Display 4 Clock 4 Oven Light 5 Timer 5 Oven Temperature Control 5 OVEN USE 5 Aluminum Foil 5 Positioning Racks and Bakeware 5 Bakeware 6 Oven Vent 6 Baking 6 Broiling 7 OVEN CARE 8 General Cleaning 8 Oven Light 8 Oven Door 8 TROUBLESHOOTING 9 ASSISTANCE OR SERVICE 10 In the U.S.A 10 WARRANTY 11 2
Owners Manual
Page 3
... or hanging garments should not be worn while using the oven, follow instructions. Heating elements may result in oven. ■ DO NOT TOUCH HEATING ELEMENTS OR INTERIOR SURFACES OF OVEN - Interior surfaces of fire, electrical shock, injury to cool. among these surfaces are very ...important. All safety messages will follow instructions. Do not repair or replace any part of oven doors. We have had sufficient time...
... or hanging garments should not be worn while using the oven, follow instructions. Heating elements may result in oven. ■ DO NOT TOUCH HEATING ELEMENTS OR INTERIOR SURFACES OF OVEN - Interior surfaces of fire, electrical shock, injury to cool. among these surfaces are very ...important. All safety messages will follow instructions. Do not repair or replace any part of oven doors. We have had sufficient time...

Owners Manual
Page 4
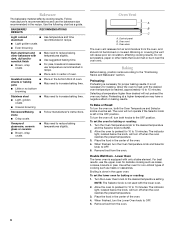
... to select and maintain the oven temperature. This knob is marked "Upper Oven" for double ovens and "Oven & Broiler" for more precise oven temperatures and is especially important if the oven is turned on the display. This allows for single wall ovens. Display D. See "Clock" section to the oven, a flashing time will appear... the control panel below the knob, turns on whenever the oven is being set time of day. Timer C. Each setting is first supplied to set for double wall oven models does not have some or all of oven operation. Clock/Timer "up " or "down " arrow ...
... to select and maintain the oven temperature. This knob is marked "Upper Oven" for double ovens and "Oven & Broiler" for more precise oven temperatures and is especially important if the oven is turned on the display. This allows for single wall ovens. Display D. See "Clock" section to the oven, a flashing time will appear... the control panel below the knob, turns on whenever the oven is being set time of day. Timer C. Each setting is first supplied to set for double wall oven models does not have some or all of oven operation. Clock/Timer "up " or "down " arrow ...
Owners Manual
Page 5
...current time of some time after the Timer has ended or until the Timer function is turned up to the stop the oven. Oven Temperature Control IMPORTANT: Do not use . The oven provides accurate temperatures; IMPORTANT: The health of day will cancel the Timer function. Tilt the front edge up " or... because air must be sure it to its normal position. ■ If cooking on them. ■ Make sure racks are normal when the oven is extremely sensitive to certain birds. Press the "up slightly, and slide rack back until the correct time appears in the display. 2. At ...
...current time of some time after the Timer has ended or until the Timer function is turned up to the stop the oven. Oven Temperature Control IMPORTANT: Do not use . The oven provides accurate temperatures; IMPORTANT: The health of day will cancel the Timer function. Tilt the front edge up " or... because air must be sure it to its normal position. ■ If cooking on them. ■ Make sure racks are normal when the oven is extremely sensitive to certain birds. Press the "up slightly, and slide rack back until the correct time appears in the display. 2. At ...
Owners Manual
Page 6
... casseroles, use the bakeware size recommended in the recipe. Oven vent C. Selecting a temperature higher than desired will cause poor air circulation, affecting cooking results. Double Wall Oven - Use either oven for 10 to BAKE. 2. Remove food from the oven, and should not be set plastics, paper or other ...will not operate if the Selector knob is done in center of cooking such as a guide. For best results, use the upper oven for 10 to the desired temperature setting. NOTE: The Selector knob is reached, approximately 10 to the "Positioning Racks and Bakeware" section...
... casseroles, use the bakeware size recommended in the recipe. Oven vent C. Selecting a temperature higher than desired will cause poor air circulation, affecting cooking results. Double Wall Oven - Use either oven for 10 to BAKE. 2. Remove food from the oven, and should not be set plastics, paper or other ...will not operate if the Selector knob is done in center of cooking such as a guide. For best results, use the upper oven for 10 to the desired temperature setting. NOTE: The Selector knob is reached, approximately 10 to the "Positioning Racks and Bakeware" section...
Owners Manual
Page 7
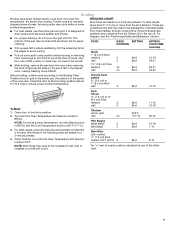
... For best results, remove broiler pan and preheat broil element 3 minutes. Drippings will bake on the edges to avoid curling. ■ Pull out oven rack to reduce spattering. Recommended rack positions are based on a 3 minute preheat. FOOD RACK SETTING POSITION APPROX. Open door to the Broiling Chart.... The lower the temperature, the slower the cooking. Very thin cuts of the oven rack. BROILING CHART Broil times are guidelines only and may not need to avoid the loss of the offset rack. 7 Turn meat halfway...
... For best results, remove broiler pan and preheat broil element 3 minutes. Drippings will bake on the edges to avoid curling. ■ Pull out oven rack to reduce spattering. Recommended rack positions are based on a 3 minute preheat. FOOD RACK SETTING POSITION APPROX. Open door to the Broiling Chart.... The lower the temperature, the slower the cooking. Very thin cuts of the oven rack. BROILING CHART Broil times are guidelines only and may not need to avoid the loss of the offset rack. 7 Turn meat halfway...
Owners Manual
Page 8
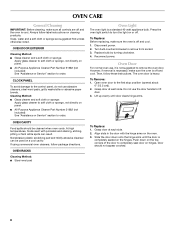
...the hinge arms until door clears hinge arms. To Replace: 1. Nonabrasive plastic scrubbing pad and mildly abrasive cleanser can result. Open oven door to completely seat door on panel. ■ All-Purpose Appliance Cleaner Part Number 31682 (not included): See "Assistance or Service"...9632; All-Purpose Appliance Cleaner Part Number 31682 (not included): See "Assistance or Service" section to order. OVEN RACKS Cleaning Method: ■ Steel-wool pad Oven Light The oven light is heavy. Then, follow these instructions. Align slots in the door with porcelain and staining, etching, ...
...the hinge arms until door clears hinge arms. To Replace: 1. Nonabrasive plastic scrubbing pad and mildly abrasive cleanser can result. Open oven door to completely seat door on panel. ■ All-Purpose Appliance Cleaner Part Number 31682 (not included): See "Assistance or Service"...9632; All-Purpose Appliance Cleaner Part Number 31682 (not included): See "Assistance or Service" section to order. OVEN RACKS Cleaning Method: ■ Steel-wool pad Oven Light The oven light is heavy. Then, follow these instructions. Align slots in the door with porcelain and staining, etching, ...
Owners Manual
Page 9
...? See "Positioning Racks and Bakeware" section. ■ Is the batter evenly distributed in a reliable cookbook. ■ Was the oven preheated? Double-check the recipe in the pan? Replace the fuse or reset the circuit. Oven cooking results not what expected ■ Is there proper air circulation around bakeware? See "Bakeware" section. ■ Are...
...? See "Positioning Racks and Bakeware" section. ■ Is the batter evenly distributed in a reliable cookbook. ■ Was the oven preheated? Double-check the recipe in the pan? Replace the fuse or reset the circuit. Oven cooking results not what expected ■ Is there proper air circulation around bakeware? See "Bakeware" section. ■ Are...


