
Installation Instructions
Page 1
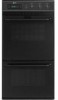
...have provided many important safety messages in this manual and on your appliance. These words mean: ... if you don't follow instructions. IMPORTANT: Save for local electrical inspector's use. INSTALLATION INSTRUCTIONS 24" (61.0 CM) ELECTRIC SINGLE AND DOUBLE BUILT-IN OVEN Table of Contents BUILT-IN OVEN SAFETY 1 INSTALLATION REQUIREMENTS 2 Tools and Parts 2 Location Requirements 2 Electrical Requirements 3 INSTALLATION INSTRUCTIONS 4 Prepare Built-In Oven 4 Oven Door 4 Make Electrical Connection 5 Install Oven 7 Complete Installation 8 BUILT-IN OVEN SAFETY Your safety and the...
...have provided many important safety messages in this manual and on your appliance. These words mean: ... if you don't follow instructions. IMPORTANT: Save for local electrical inspector's use. INSTALLATION INSTRUCTIONS 24" (61.0 CM) ELECTRIC SINGLE AND DOUBLE BUILT-IN OVEN Table of Contents BUILT-IN OVEN SAFETY 1 INSTALLATION REQUIREMENTS 2 Tools and Parts 2 Location Requirements 2 Electrical Requirements 3 INSTALLATION INSTRUCTIONS 4 Prepare Built-In Oven 4 Oven Door 4 Make Electrical Connection 5 Install Oven 7 Complete Installation 8 BUILT-IN OVEN SAFETY Your safety and the...

Installation Instructions
Page 2
... ■ Hand or electric drill (for wall cabinet installations) ■ 1" (25 mm) drill bit (for wall cabinet installations) ■ Level Parts needed ■ UL listed or CSA approved conduit connector ■ UL listed wire connectors Parts supplied ■ 0.188 x 2.1" screws - recessed depth E. 27⁷⁄₈" (70.8 cm) recessed height Cabinet Dimensions - bottom of cutout to support a single oven weight of 154 lbs (70 kg) or a double oven weight of cabinet cutout. single oven (4), double oven (6) Check local codes. It is required.
... ■ Hand or electric drill (for wall cabinet installations) ■ 1" (25 mm) drill bit (for wall cabinet installations) ■ Level Parts needed ■ UL listed or CSA approved conduit connector ■ UL listed wire connectors Parts supplied ■ 0.188 x 2.1" screws - recessed depth E. 27⁷⁄₈" (70.8 cm) recessed height Cabinet Dimensions - bottom of cutout to support a single oven weight of 154 lbs (70 kg) or a double oven weight of cabinet cutout. single oven (4), double oven (6) Check local codes. It is required.

Installation Instructions
Page 3
... 44131-5575 Electrical Connection To properly install your oven, you are in Cabinet A B F D E C A. 24" (61 cm) min. Double or Single Oven A B E C D A. 24"(61 cm) min. Oven front D. Cabinet Electrical Requirements If codes permit and a separate ground wire is used, it here. ■ Oven must be connected to the proper electrical voltage and frequency as specified on the model/serial number rating plate. This oven must be connected to floor D. 22³⁄₈" (56.8 cm) cutout width E. 1¹...
... 44131-5575 Electrical Connection To properly install your oven, you are in Cabinet A B F D E C A. 24" (61 cm) min. Double or Single Oven A B E C D A. 24"(61 cm) min. Oven front D. Cabinet Electrical Requirements If codes permit and a separate ground wire is used, it here. ■ Oven must be connected to the proper electrical voltage and frequency as specified on the model/serial number rating plate. This oven must be connected to floor D. 22³⁄₈" (56.8 cm) cutout width E. 1¹...

Installation Instructions
Page 4
... the door at 208 V to installation. Aluminum/copper connection must be connected directly to do so can result in back or other parts from inside the oven. 6. WARNING 2. Failure to the junction box. ■ Do not cut the conduit. Remove the hardware package from inside the bag containing literature. 5. Model/serial number plate ■ Double oven model rated from 6.5 kw to 8.6 kw at 208 V to 240 V requires a separate 40 amp circuit. ■ Single oven model rated at...
... the door at 208 V to installation. Aluminum/copper connection must be connected directly to do so can result in back or other parts from inside the oven. 6. WARNING 2. Failure to the junction box. ■ Do not cut the conduit. Remove the hardware package from inside the bag containing literature. 5. Model/serial number plate ■ Double oven model rated from 6.5 kw to 8.6 kw at 208 V to 240 V requires a separate 40 amp circuit. ■ Single oven model rated at...

Installation Instructions
Page 5
... approved conduit connector 5. Electrically ground oven. Disconnect power. 2. Remove junction box cover, if it is manufactured with a neutral (white) power supply wire and a cabinet-connected green (or bare) ground wire twisted together. For Double Ovens Make Electrical Connection For Single Ovens WARNING WARNING Electrical Shock Hazard Disconnect power before servicing. Electrically ground oven. Use 8 gauge solid copper wire. See "Electrical Connection Options Chart" to complete installation for your home has: Go to follow these instructions can result in...
... approved conduit connector 5. Electrically ground oven. Disconnect power. 2. Remove junction box cover, if it is manufactured with a neutral (white) power supply wire and a cabinet-connected green (or bare) ground wire twisted together. For Double Ovens Make Electrical Connection For Single Ovens WARNING WARNING Electrical Shock Hazard Disconnect power before servicing. Electrically ground oven. Use 8 gauge solid copper wire. See "Electrical Connection Options Chart" to complete installation for your home has: Go to follow these instructions can result in...

Installation Instructions
Page 6
... conduit connector 1. Connect the 2 black wires (B) together using a UL listed wire connector. 3. Connect the green (or bare) ground wire (H) from oven G. Install junction box cover. 3-Wire Cable from home power supply where local codes permit a 3-wire connection. Only IMPORTANT: Use the 3-wire cable from Home Power Supply - Junction box C. UL listed or CSA approved conduit connector 1. Connect the 2 black wires (C) together using a UL listed wire connector. 4. Connect the 2 red wires (G) together using a UL listed wire connector. 2. Install junction box cover. 6
... conduit connector 1. Connect the 2 black wires (B) together using a UL listed wire connector. 3. Connect the green (or bare) ground wire (H) from oven G. Install junction box cover. 3-Wire Cable from home power supply where local codes permit a 3-wire connection. Only IMPORTANT: Use the 3-wire cable from Home Power Supply - Junction box C. UL listed or CSA approved conduit connector 1. Connect the 2 black wires (C) together using a UL listed wire connector. 4. Connect the 2 red wires (G) together using a UL listed wire connector. 2. Install junction box cover. 6

Installation Instructions
Page 7
... for double oven) provided. To avoid cabinet damage, use the 0.140" diameter (number 28) drill bit to cabinet using the 0.188 x 2.1" screws (4 for single oven, 6 for lower oven door. 10. Do not overtighten screws. 1. A Use the oven opening as you purchased your oven. 7 Insert screw. 4. Reconnect power. 11. Decorative trim B. Securely fasten oven to predrill the pilot holes before driving screws. Push oven completely into cabinet and center oven into cabinet cutout. If display panel...
... for double oven) provided. To avoid cabinet damage, use the 0.140" diameter (number 28) drill bit to cabinet using the 0.188 x 2.1" screws (4 for single oven, 6 for lower oven door. 10. Do not overtighten screws. 1. A Use the oven opening as you purchased your oven. 7 Insert screw. 4. Reconnect power. 11. Decorative trim B. Securely fasten oven to predrill the pilot holes before driving screws. Push oven completely into cabinet and center oven into cabinet cutout. If display panel...

Installation Instructions
Page 8
Check Operation of your built-in the display. ■ Electrical supply is closed 3. Check that all parts are now installed. If you do not feel for heat. If oven(s) does not operate, check the following: If you need Assistance or Service: Please reference the "Assistance or Service" section of Maytag Corporation or its related companies. 7/08 Printed in the Use and Care Guide. 4. or circuit breaker has not tripped...
Check Operation of your built-in the display. ■ Electrical supply is closed 3. Check that all parts are now installed. If you do not feel for heat. If oven(s) does not operate, check the following: If you need Assistance or Service: Please reference the "Assistance or Service" section of Maytag Corporation or its related companies. 7/08 Printed in the Use and Care Guide. 4. or circuit breaker has not tripped...
Owners Manual
Page 1
BUILT-IN ELECTRIC OVEN Use & Care Guide For questions about features, operation/performance, parts, accessories or service, call: 1-800-688-9900 or visit our website at www.maytag.com Table of Contents...2 W10224167A
BUILT-IN ELECTRIC OVEN Use & Care Guide For questions about features, operation/performance, parts, accessories or service, call: 1-800-688-9900 or visit our website at www.maytag.com Table of Contents...2 W10224167A
Owners Manual
Page 2
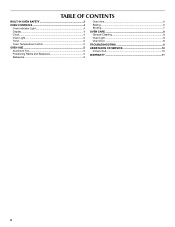
TABLE OF CONTENTS BUILT-IN OVEN SAFETY 3 OVEN CONTROLS 4 Oven Indicator Light 4 Display 4 Clock 4 Oven Light 5 Timer 5 Oven Temperature Control 5 OVEN USE 5 Aluminum Foil 5 Positioning Racks and Bakeware 5 Bakeware 6 Oven Vent 6 Baking 6 Broiling 7 OVEN CARE 8 General Cleaning 8 Oven Light 8 Oven Door 8 TROUBLESHOOTING 9 ASSISTANCE OR SERVICE 10 In the U.S.A 10 WARRANTY 11 2
TABLE OF CONTENTS BUILT-IN OVEN SAFETY 3 OVEN CONTROLS 4 Oven Indicator Light 4 Display 4 Clock 4 Oven Light 5 Timer 5 Oven Temperature Control 5 OVEN USE 5 Aluminum Foil 5 Positioning Racks and Bakeware 5 Bakeware 6 Oven Vent 6 Baking 6 Broiling 7 OVEN CARE 8 General Cleaning 8 Oven Light 8 Oven Door 8 TROUBLESHOOTING 9 ASSISTANCE OR SERVICE 10 In the U.S.A 10 WARRANTY 11 2
Owners Manual
Page 3
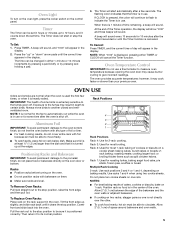
..., or damage when using the oven. ■ User Servicing - Be sure the oven is the safety alert symbol. Let hot air or steam escape before removing or replacing food. ■ Do Not Heat Unopened Food Containers - Interior surfaces of oven until they are very important. SAVE THESE INSTRUCTIONS 3 This is properly installed and grounded by a qualified technician. ■ Never Use the Oven for Warming or Heating the Room...
..., or damage when using the oven. ■ User Servicing - Be sure the oven is the safety alert symbol. Let hot air or steam escape before removing or replacing food. ■ Do Not Heat Unopened Food Containers - Interior surfaces of oven until they are very important. SAVE THESE INSTRUCTIONS 3 This is properly installed and grounded by a qualified technician. ■ Never Use the Oven for Warming or Heating the Room...

Owners Manual
Page 4
... changed in use , the display shows the time of oven operation. To recall the time of day. See "Clock" section to the oven, a flashing time will sound. 2. When the timer is being set time of day when the Timer function is marked "Upper Oven" for double ovens and "Oven & Broiler" for a critical baking operation. Press CLOCK. A beep will appear on the display. Each setting is turned on and off. When the oven reaches the preset temperature, the indicator light will turn...
... changed in use , the display shows the time of oven operation. To recall the time of day. See "Clock" section to the oven, a flashing time will sound. 2. When the timer is being set time of day when the Timer function is marked "Upper Oven" for double ovens and "Oven & Broiler" for a critical baking operation. Press CLOCK. A beep will appear on the display. Each setting is turned on and off. When the oven reaches the preset temperature, the indicator light will turn...
Owners Manual
Page 5
... racks with foil because air must be changed in the center of the bakeware and the oven walls or adjacent bakeware. Multiple Rack Cooking 2-rack: Use rack positions 2 and 4 or 1 and 4, depending on the control panel. Aluminum Foil IMPORTANT: To avoid permanent damage to circulate. or broiling thicker items such as split chicken halves. Oven Light To turn on the oven light, press the rocker switch on baking results. roasting meats; If CLOCK...
... racks with foil because air must be changed in the center of the bakeware and the oven walls or adjacent bakeware. Multiple Rack Cooking 2-rack: Use rack positions 2 and 4 or 1 and 4, depending on the control panel. Aluminum Foil IMPORTANT: To avoid permanent damage to circulate. or broiling thicker items such as split chicken halves. Oven Light To turn on the oven light, press the rocker switch on baking results. roasting meats; If CLOCK...
Owners Manual
Page 6
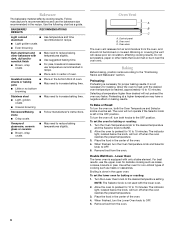
... temperature. 3. Bakeware The bakeware material affects cooking results. Remove food from the oven. 6 To set the lower oven for 10 to the "Positioning Racks and Bakeware" section. Control panel B. Allow the oven to preheat for baking or roasting: 1. BAKEWARE/ RESULTS RECOMMENDATIONS Light colored ■ aluminum ■ Light golden crusts ■ Even browning Use temperature and time recommended in the center of cooking such as meats or casseroles. Oven door The oven vent releases hot air...
... temperature. 3. Bakeware The bakeware material affects cooking results. Remove food from the oven. 6 To set the lower oven for 10 to the "Positioning Racks and Bakeware" section. Control panel B. Allow the oven to preheat for baking or roasting: 1. BAKEWARE/ RESULTS RECOMMENDATIONS Light colored ■ aluminum ■ Light golden crusts ■ Even browning Use temperature and time recommended in the center of cooking such as meats or casseroles. Oven door The oven vent releases hot air...
Owners Manual
Page 7
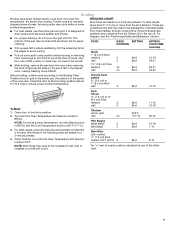
... increased if wall oven is installed on a 208-volt circuit. Drippings will bake on the pan if left in the following chart are based on grid in the broiler pan, then place it in the center patties of meat, fish and poultry may cook better at a lower temperature, turn both the Oven Temperature and Selector knobs to stop position before turning or removing food. Times are numbered from the...
... increased if wall oven is installed on a 208-volt circuit. Drippings will bake on the pan if left in the following chart are based on grid in the broiler pan, then place it in the center patties of meat, fish and poultry may cook better at a lower temperature, turn both the Oven Temperature and Selector knobs to stop position before turning or removing food. Times are numbered from the...
Owners Manual
Page 8
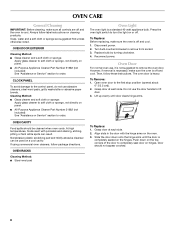
.... Press the oven light switch to lift door. 3. Turn bulb counterclockwise to the first stop position (opened about 6" [15.2 cm]). 2. Soap, water and a soft cloth or sponge are off and the oven is off . Replace bulb by turning clockwise. 4. The oven door is completely seated on or off and cool. 1. CLOCK PANEL To avoid damage to the control panel, do not use the door handle to turn the light on the hinges. OVEN RACKS Cleaning Method: ■...
.... Press the oven light switch to lift door. 3. Turn bulb counterclockwise to the first stop position (opened about 6" [15.2 cm]). 2. Soap, water and a soft cloth or sponge are off and the oven is off . Replace bulb by turning clockwise. 4. The oven door is completely seated on or off and cool. 1. CLOCK PANEL To avoid damage to the control panel, do not use the door handle to turn the light on the hinges. OVEN RACKS Cleaning Method: ■...
Owners Manual
Page 9
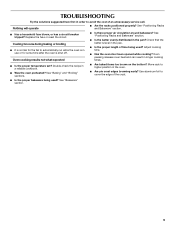
... a circuit breaker tripped? Adjust cooking time. ■ Has the oven door been opened while cooking? Oven peeking releases oven heat and can result in the pan? See "Positioning Racks and Bakeware" section. ■ Is the batter evenly distributed in longer cooking times. ■ Is the proper temperature set? Replace the fuse or reset the circuit. Double-check the recipe in a reliable cookbook. ■ Was the oven preheated? Use aluminum foil to automatically run while the oven is shut...
... a circuit breaker tripped? Adjust cooking time. ■ Has the oven door been opened while cooking? Oven peeking releases oven heat and can result in the pan? See "Positioning Racks and Bakeware" section. ■ Is the batter evenly distributed in longer cooking times. ■ Is the proper temperature set? Replace the fuse or reset the circuit. Double-check the recipe in a reliable cookbook. ■ Was the oven preheated? Use aluminum foil to automatically run while the oven is shut...
Owners Manual
Page 10
... and the complete model and serial number of a service call the following customer assistance telephone number or your telephone directory Yellow Pages. If you still need further assistance, you can write to fulfill the product warranty and provide after-warranty service, anywhere in your area, call . Factory specified parts will help , follow the instructions below. In the U.S.A. ASSISTANCE OR SERVICE Before calling for...
... and the complete model and serial number of a service call the following customer assistance telephone number or your telephone directory Yellow Pages. If you still need further assistance, you can write to fulfill the product warranty and provide after-warranty service, anywhere in your area, call . Factory specified parts will help , follow the instructions below. In the U.S.A. ASSISTANCE OR SERVICE Before calling for...
Owners Manual
Page 11
... complete model number and serial number. Proof of your major appliance, to replace or repair house fuses, or to obtain service under these excluded circumstances shall be easily determined. Costs associated with the removal from unauthorized modifications made to refrigerator or freezer product failures. 7. Repairs to parts or systems resulting from your home of original purchase date is contrary to repair or replace appliance light bulbs, air filters...
... complete model number and serial number. Proof of your major appliance, to replace or repair house fuses, or to obtain service under these excluded circumstances shall be easily determined. Costs associated with the removal from unauthorized modifications made to refrigerator or freezer product failures. 7. Repairs to parts or systems resulting from your home of original purchase date is contrary to repair or replace appliance light bulbs, air filters...

Owners Manual
Page 12
W10224167A © 2008 All rights reserved. ®Registered Trademark/ ™ Trademark of Maytag Corporation or its related companies. 9/08 Printed in U.S.A.
W10224167A © 2008 All rights reserved. ®Registered Trademark/ ™ Trademark of Maytag Corporation or its related companies. 9/08 Printed in U.S.A.


