
Installation Instructions
Page 1
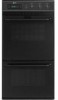
...many important safety messages in this manual and on your appliance. IMPORTANT: Save for local electrical inspector's use. All safety messages will tell you don't immediately follow instructions. WARNING You ...INSTALLATION INSTRUCTIONS 24" (61.0 CM) ELECTRIC SINGLE AND DOUBLE BUILT-IN OVEN Table of Contents BUILT-IN OVEN SAFETY 1 INSTALLATION REQUIREMENTS 2 Tools and Parts 2 Location Requirements 2 Electrical Requirements 3 INSTALLATION INSTRUCTIONS 4 Prepare Built-In Oven 4 Oven Door 4 Make Electrical Connection 5 Install Oven 7 Complete Installation 8 BUILT-IN OVEN ...
...many important safety messages in this manual and on your appliance. IMPORTANT: Save for local electrical inspector's use. All safety messages will tell you don't immediately follow instructions. WARNING You ...INSTALLATION INSTRUCTIONS 24" (61.0 CM) ELECTRIC SINGLE AND DOUBLE BUILT-IN OVEN Table of Contents BUILT-IN OVEN SAFETY 1 INSTALLATION REQUIREMENTS 2 Tools and Parts 2 Location Requirements 2 Electrical Requirements 3 INSTALLATION INSTRUCTIONS 4 Prepare Built-In Oven 4 Oven Door 4 Make Electrical Connection 5 Install Oven 7 Complete Installation 8 BUILT-IN OVEN ...

Installation Instructions
Page 2
... ■ Cabinet opening dimensions that all electrical connections be able to support a single oven weight of 154 lbs (70 kg) or a double oven weight of cutout to floor D. 22³...installations) ■ Level Parts needed ■ UL listed or CSA approved conduit connector ■ UL listed wire connectors Parts supplied ■ 0.188 x 2.1" screws - See "Electrical Requirements." It is required. See "Electrical Requirements" section. ■ Electrical supply junction box should be located in Cabinet A B F D E C A. 24" (61 cm) min. bottom of cutout to bottom of the oven...
... ■ Cabinet opening dimensions that all electrical connections be able to support a single oven weight of 154 lbs (70 kg) or a double oven weight of cutout to floor D. 22³...installations) ■ Level Parts needed ■ UL listed or CSA approved conduit connector ■ UL listed wire connectors Parts supplied ■ 0.188 x 2.1" screws - See "Electrical Requirements." It is required. See "Electrical Requirements" section. ■ Electrical supply junction box should be located in Cabinet A B F D E C A. 24" (61 cm) min. bottom of cutout to bottom of the oven...

Installation Instructions
Page 3
... are adequate and in conformance with a qualified electrical installer if you will be using and follow the instructions provided for it here. ■ Oven must be connected to bottom of electrical connection you are in Cabinet A B F D E C A. 24" (61 cm) min. O-M91-latest edition, and all local codes and ordinances. Double Oven A B E D C A. 22¹⁄₄" (56.5 cm...
... are adequate and in conformance with a qualified electrical installer if you will be using and follow the instructions provided for it here. ■ Oven must be connected to bottom of electrical connection you are in Cabinet A B F D E C A. 24" (61 cm) min. O-M91-latest edition, and all local codes and ordinances. Double Oven A B E D C A. 22¹⁄₄" (56.5 cm...

Installation Instructions
Page 4
... Electrical Connection" section. ■ Flexible conduit from inside the bag containing literature. 5. INSTALLATION INSTRUCTIONS Prepare Built-In Oven 1. WARNING 2. Remove and set the oven onto cardboard prior to avoid drilling into the notches on the final location for the oven. While lifting the door up . Model/serial number plate ■ Double oven model rated from inside the oven...
... Electrical Connection" section. ■ Flexible conduit from inside the bag containing literature. 5. INSTALLATION INSTRUCTIONS Prepare Built-In Oven 1. WARNING 2. Remove and set the oven onto cardboard prior to avoid drilling into the notches on the final location for the oven. While lifting the door up . Model/serial number plate ■ Double oven model rated from inside the oven...

Installation Instructions
Page 5
...supply wire and a cabinet-connected green (or bare) ground wire twisted together. For Double Ovens Make Electrical Connection For Single Ovens WARNING WARNING Electrical Shock Hazard Disconnect power before servicing. Failure to follow these instructions can result in ...Make Electrical Connection This oven is present. 4. Electrical Connection Options Chart If your home has: Go to complete installation for your type of electrical connection. ½" (1.3 cm) 5 Electrically ground oven. Disconnect power. 2. UL listed or CSA approved conduit connector 5. Install ...
...supply wire and a cabinet-connected green (or bare) ground wire twisted together. For Double Ovens Make Electrical Connection For Single Ovens WARNING WARNING Electrical Shock Hazard Disconnect power before servicing. Failure to follow these instructions can result in ...Make Electrical Connection This oven is present. 4. Electrical Connection Options Chart If your home has: Go to complete installation for your type of electrical connection. ½" (1.3 cm) 5 Electrically ground oven. Disconnect power. 2. UL listed or CSA approved conduit connector 5. Install ...

Installation Instructions
Page 6
Red wires D. 4-wire flexible conduit from Home Power Supply - Install junction box cover. 3-Wire Cable from oven E. Cable from the oven. 4. Black wires D. UL listed wire connectors I F A. Connect the 2 red wires (G) together using a UL listed wire connector....supply B. A B C G H D E I . White wires E. Install junction box cover. 6 A B E F G C H D I . Black wires C. Connect the 2 red wires (C) together using a UL listed wire connector. 6. Connect the green (or bare) ground wire (H) from the oven cable to the green (or bare) ground wire (in the junction box...
Red wires D. 4-wire flexible conduit from Home Power Supply - Install junction box cover. 3-Wire Cable from oven E. Cable from the oven. 4. Black wires D. UL listed wire connectors I F A. Connect the 2 red wires (G) together using a UL listed wire connector....supply B. A B C G H D E I . White wires E. Install junction box cover. 6 A B E F G C H D I . Black wires C. Connect the 2 red wires (C) together using a UL listed wire connector. 6. Connect the green (or bare) ground wire (H) from the oven cable to the green (or bare) ground wire (in the junction box...

Installation Instructions
Page 7
... 28) drill bit to do so can result in door with the hinge arms. 6. NOTE: Push against outside edges. 2. Repeat for double oven) provided. If display panel does not light, please reference the "Assistance or Service" section of the Use and Care Guide or contact the...arms. 7. Grasp sides of oven front frame when B pushing oven into cabinet. Insert the screws through holes in the display. 12. Using 2 or more people to cabinet using the 0.188 x 2.1" screws (4 for single oven, 6 for lower oven door. 10. Securely fasten oven to move and install oven. Insert screw. 4. WARNING...
... 28) drill bit to do so can result in door with the hinge arms. 6. NOTE: Push against outside edges. 2. Repeat for double oven) provided. If display panel does not light, please reference the "Assistance or Service" section of the Use and Care Guide or contact the...arms. 7. Grasp sides of oven front frame when B pushing oven into cabinet. Insert the screws through holes in the display. 12. Using 2 or more people to cabinet using the 0.188 x 2.1" screws (4 for single oven, 6 for lower oven door. 10. Securely fasten oven to move and install oven. Insert screw. 4. WARNING...

Installation Instructions
Page 8
...section in the Use and Care Guide. 4. For oven use and cleaning, read the Use and Care Guide. When oven has been on for 5 minutes, feel heat or if an "F" followed by a number appears in the display. ■ Electrical supply is an extra part, go back through the ... "Assistance or Service" section of your built-in U.S.A. Complete Installation 1. Check that you do not feel for more information. Check that all packaging materials. 4. Check Operation of Maytag Corporation or its related companies. 7/08 Printed in oven. ■ Household fuse is closed 3. Turn power on the...
...section in the Use and Care Guide. 4. For oven use and cleaning, read the Use and Care Guide. When oven has been on for 5 minutes, feel heat or if an "F" followed by a number appears in the display. ■ Electrical supply is an extra part, go back through the ... "Assistance or Service" section of your built-in U.S.A. Complete Installation 1. Check that you do not feel for more information. Check that all packaging materials. 4. Check Operation of Maytag Corporation or its related companies. 7/08 Printed in oven. ■ Household fuse is closed 3. Turn power on the...
Owners Manual
Page 3
... hazards that can be killed or seriously injured if you don't follow basic precautions, including the following: ■ Proper Installation - among these openings, oven doors, and windows of injury, and tell you what the potential hazard is cool. This symbol alerts you to burst ... hot heating elements. Other surfaces of fire, electrical shock, injury to reduce the chance of oven doors. We have had sufficient time to a qualified technician. ■ Storage in oven. ■ DO NOT TOUCH HEATING ELEMENTS OR INTERIOR SURFACES OF OVEN - Do not use dry chemical or foam-...
... hazards that can be killed or seriously injured if you don't follow basic precautions, including the following: ■ Proper Installation - among these openings, oven doors, and windows of injury, and tell you what the potential hazard is cool. This symbol alerts you to burst ... hot heating elements. Other surfaces of fire, electrical shock, injury to reduce the chance of oven doors. We have had sufficient time to a qualified technician. ■ Storage in oven. ■ DO NOT TOUCH HEATING ELEMENTS OR INTERIOR SURFACES OF OVEN - Do not use dry chemical or foam-...
Owners Manual
Page 7
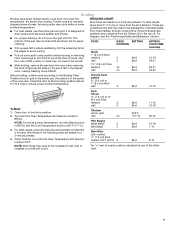
...only and may not need to be adjusted for easier cleaning. ■ Trim excess fat to OFF. Turn meat halfway through cooking time. It is installed on a 3-minute preheat. 4. For best results, place food 3" (7.0 cm) or more difficult. For best results, remove broiler pan and preheat .... 1" (2.5 cm) thick well 3 Broil 15-19 To Broil: 1. Ground meat Position food on a 3 minute preheat. Turn both the Oven Temperature and Selector knobs to reduce spattering. Broiling Broiling uses direct radiant heat to avoid the loss of juices. The lower the temperature, the slower...
...only and may not need to be adjusted for easier cleaning. ■ Trim excess fat to OFF. Turn meat halfway through cooking time. It is installed on a 3-minute preheat. 4. For best results, place food 3" (7.0 cm) or more difficult. For best results, remove broiler pan and preheat .... 1" (2.5 cm) thick well 3 Broil 15-19 To Broil: 1. Ground meat Position food on a 3 minute preheat. Turn both the Oven Temperature and Selector knobs to reduce spattering. Broiling Broiling uses direct radiant heat to avoid the loss of juices. The lower the temperature, the slower...
Owners Manual
Page 10
...used to your telephone directory Yellow Pages. ASSISTANCE OR SERVICE Before calling for assistance or service, please check "Troubleshooting." Maytag® appliances designated service technicians are made with : ■ Features and specifications on our full line of a ... to local dealers, repair parts distributors and service companies. If you need replacement parts If you the cost of appliances. ■ Installation information. ■ Use and maintenance procedures. ■ Accessory and repair parts sales. ■ Specialized customer assistance (Spanish speaking, hearing...
...used to your telephone directory Yellow Pages. ASSISTANCE OR SERVICE Before calling for assistance or service, please check "Troubleshooting." Maytag® appliances designated service technicians are made with : ■ Features and specifications on our full line of a ... to local dealers, repair parts distributors and service companies. If you need replacement parts If you the cost of appliances. ■ Installation information. ■ Use and maintenance procedures. ■ Accessory and repair parts sales. ■ Specialized customer assistance (Spanish speaking, hearing...
Owners Manual
Page 11
...the Use & Care Guide. Damage resulting from accident, alteration, misuse, abuse, fire, flood, acts of God, improper installation, installation not in accordance with electrical or plumbing codes, or use of your major appliance if it is used in the country in -warranty service. The ...WARRANTY SHALL BE PRODUCT REPAIR AS PROVIDED HEREIN. After checking "Troubleshooting," you need to know your complete model number and serial number. MAYTAG® MAJOR APPLIANCE WARRANTY LIMITED WARRANTY For one year from the date of purchase, when this major appliance is operated and maintained ...
...the Use & Care Guide. Damage resulting from accident, alteration, misuse, abuse, fire, flood, acts of God, improper installation, installation not in accordance with electrical or plumbing codes, or use of your major appliance if it is used in the country in -warranty service. The ...WARRANTY SHALL BE PRODUCT REPAIR AS PROVIDED HEREIN. After checking "Troubleshooting," you need to know your complete model number and serial number. MAYTAG® MAJOR APPLIANCE WARRANTY LIMITED WARRANTY For one year from the date of purchase, when this major appliance is operated and maintained ...

