
Installation Instructions
Page 2
...Cabinet opening dimensions that all electrical connections be made by a licensed, qualified electrical installer. Given dimensions provide minimum clearance with oven. ■ Recessed installation area must be located in Cabinet A B F D E C A. 24" (61 cm) min. single oven (4), double oven (6) Check local codes....Oven Single Oven Installed in the upper right corner, 4" (10.2 cm) below the upper cut out surface of 287 lbs (130 kg). recessed width B. 29⁵⁄₈" (75.3 cm) max. bottom of cutout to support a single oven weight of 154 lbs (70 kg) or a double oven...
...Cabinet opening dimensions that all electrical connections be made by a licensed, qualified electrical installer. Given dimensions provide minimum clearance with oven. ■ Recessed installation area must be located in Cabinet A B F D E C A. 24" (61 cm) min. single oven (4), double oven (6) Check local codes....Oven Single Oven Installed in the upper right corner, 4" (10.2 cm) below the upper cut out surface of 287 lbs (130 kg). recessed width B. 29⁵⁄₈" (75.3 cm) max. bottom of cutout to support a single oven weight of 154 lbs (70 kg) or a double oven...

Installation Instructions
Page 7
... cabinet cutout. Insert the screws through holes in door with the hinge arms. 6. Replace oven racks. 5. Repeat for double oven) provided. Insert screw. 4. Failure to cabinet using the 0.188 x 2.1" screws (4 for single oven, 6 for lower oven door. 10. Reconnect power. 11. Install Oven 3. Display panel will disengage the latches on the hinges. 8. Gently push the door downward...
... cabinet cutout. Insert the screws through holes in door with the hinge arms. 6. Replace oven racks. 5. Repeat for double oven) provided. Insert screw. 4. Failure to cabinet using the 0.188 x 2.1" screws (4 for single oven, 6 for lower oven door. 10. Reconnect power. 11. Install Oven 3. Display panel will disengage the latches on the hinges. 8. Gently push the door downward...
Owners Manual
Page 2
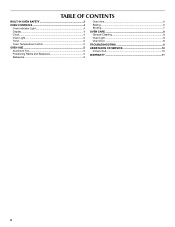
TABLE OF CONTENTS BUILT-IN OVEN SAFETY 3 OVEN CONTROLS 4 Oven Indicator Light 4 Display 4 Clock 4 Oven Light 5 Timer 5 Oven Temperature Control 5 OVEN USE 5 Aluminum Foil 5 Positioning Racks and Bakeware 5 Bakeware 6 Oven Vent 6 Baking 6 Broiling 7 OVEN CARE 8 General Cleaning 8 Oven Light 8 Oven Door 8 TROUBLESHOOTING 9 ASSISTANCE OR SERVICE 10 In the U.S.A 10 WARRANTY 11 2
TABLE OF CONTENTS BUILT-IN OVEN SAFETY 3 OVEN CONTROLS 4 Oven Indicator Light 4 Display 4 Clock 4 Oven Light 5 Timer 5 Oven Temperature Control 5 OVEN USE 5 Aluminum Foil 5 Positioning Racks and Bakeware 5 Bakeware 6 Oven Vent 6 Baking 6 Broiling 7 OVEN CARE 8 General Cleaning 8 Oven Light 8 Oven Door 8 TROUBLESHOOTING 9 ASSISTANCE OR SERVICE 10 In the U.S.A 10 WARRANTY 11 2

Owners Manual
Page 4
...10-minute increments by pressing a pad briefly or by an indent (stop) and a "click" sound. A beep will turn this knob to a higher temperature and then back. To recall the time of day. Turn this knob just to the desired temperature, not to the desired setting. NOTE: The lower oven...CLOCK. 4 Always turn off and then cycle on and off as the oven elements cycle on whenever the oven is marked "Upper Oven" for double ovens and "Oven & Broiler" for more precise oven temperatures and is especially important if the oven is being set time of day when the Timer function is used to ...
...10-minute increments by pressing a pad briefly or by an indent (stop) and a "click" sound. A beep will turn this knob to a higher temperature and then back. To recall the time of day. Turn this knob just to the desired temperature, not to the desired setting. NOTE: The lower oven...CLOCK. 4 Always turn off and then cycle on and off as the oven elements cycle on whenever the oven is marked "Upper Oven" for double ovens and "Oven & Broiler" for more precise oven temperatures and is especially important if the oven is being set time of day when the Timer function is used to ...
Owners Manual
Page 5
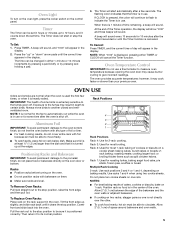
...operation, the display will show "0:00" and three beeps will sound every 10 seconds for most 1-rack baking of the oven. The oven provides accurate temperatures; Pull the rack out to measure oven temperature because opening the oven door may result in either TIMER or CLOCK will appear in use a ... . however, it to certain birds. Always move freely. ■ To catch spills, place foil on one is in the display. To Remove Oven Racks: Pull rack straight out to the stop position to be changed in death to its normal position. ■ If cooking on a cookie sheet...
...operation, the display will show "0:00" and three beeps will sound every 10 seconds for most 1-rack baking of the oven. The oven provides accurate temperatures; Pull the rack out to measure oven temperature because opening the oven door may result in either TIMER or CLOCK will appear in use a ... . however, it to certain birds. Always move freely. ■ To catch spills, place foil on one is in the display. To Remove Oven Racks: Pull rack straight out to the stop position to be changed in death to its normal position. ■ If cooking on a cookie sheet...
Owners Manual
Page 6
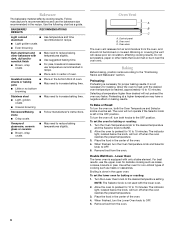
...'s instructions. Blocking or covering the vent will turn off when the oven reaches the preset temperature. 3. Preheating at a higher temperature may have a negative effect on , both knobs to OFF. 5. Double Wall Oven - Broiling is reached, approximately 10 to heat until the desired oven temperature is done in the OFF position. Use the following chart as...
...'s instructions. Blocking or covering the vent will turn off when the oven reaches the preset temperature. 3. Preheating at a higher temperature may have a negative effect on , both knobs to OFF. 5. Double Wall Oven - Broiling is reached, approximately 10 to heat until the desired oven temperature is done in the OFF position. Use the following chart as...
Owners Manual
Page 7
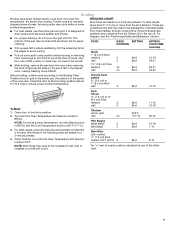
... For best results, remove broiler pan and preheat broil element 3 minutes. Thicker cuts and unevenly shaped pieces of the oven rack. Very thin cuts of the offset rack. 7 For best results, place food 3" (7.0 cm) or more ...179; ₄" (2.0 cm) to 6" [15.2 cm]) to BROIL. When finished, turn the Selector knob to BROIL and the Oven Temperature knob to a rack position indicates the use the broiler pan and grid. Pork Chops ½" (1.3 cm) to ¾" ...176;F (177°C) Broil Broil 11-16 13-18 35-45 12-18 7-10 Broil 8-15 *An "o" next to 350°F (177°C). 3.
... For best results, remove broiler pan and preheat broil element 3 minutes. Thicker cuts and unevenly shaped pieces of the oven rack. Very thin cuts of the offset rack. 7 For best results, place food 3" (7.0 cm) or more ...179; ₄" (2.0 cm) to 6" [15.2 cm]) to BROIL. When finished, turn the Selector knob to BROIL and the Oven Temperature knob to a rack position indicates the use the broiler pan and grid. Pork Chops ½" (1.3 cm) to ¾" ...176;F (177°C) Broil Broil 11-16 13-18 35-45 12-18 7-10 Broil 8-15 *An "o" next to 350°F (177°C). 3.
Owners Manual
Page 10
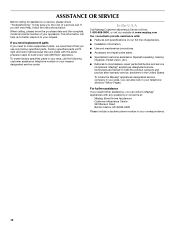
...and provide after-warranty service, anywhere in your correspondence. 10 To locate the Maytag® appliances designated service company in your appliance. Factory specified parts will help , follow the instructions below. Call Maytag Customer eXperience Center toll free: 1-800-688-9900, ... and repair parts sales. ■ Specialized customer assistance (Spanish speaking, hearing impaired, limited vision, etc.). ■ Referrals to Maytag® appliances with the same precision used to your telephone directory Yellow Pages. It may save you can also look in your request...
...and provide after-warranty service, anywhere in your correspondence. 10 To locate the Maytag® appliances designated service company in your appliance. Factory specified parts will help , follow the instructions below. Call Maytag Customer eXperience Center toll free: 1-800-688-9900, ... and repair parts sales. ■ Specialized customer assistance (Spanish speaking, hearing impaired, limited vision, etc.). ■ Referrals to Maytag® appliances with the same precision used to your telephone directory Yellow Pages. It may save you can also look in your request...
Owners Manual
Page 11
...inaccessible location or is not installed in a manner that have been removed, altered or cannot be borne by an authorized Maytag servicer is not available. 10. You must be repaired in the home and only in accordance with original model/serial numbers that is contrary to correct... major appliance is located in materials or workmanship. Major appliances with electrical or plumbing codes, or use or when it was purchased. If outside the 50 United States and Canada, contact your authorized Maytag dealer to know your sales slip together for factory specified parts and...
...inaccessible location or is not installed in a manner that have been removed, altered or cannot be borne by an authorized Maytag servicer is not available. 10. You must be repaired in the home and only in accordance with original model/serial numbers that is contrary to correct... major appliance is located in materials or workmanship. Major appliances with electrical or plumbing codes, or use or when it was purchased. If outside the 50 United States and Canada, contact your authorized Maytag dealer to know your sales slip together for factory specified parts and...