

Installation Instructions
Page 2
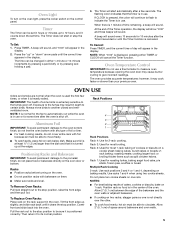
... in Cabinet A B F D E C A. 24" (61 cm) min. Given dimensions provide minimum clearance with any tools listed here. Single Oven Single Oven Installed in the upper right corner, 4" (10.2 cm) below the upper cut out surface of 287 lbs (130 kg). Tools needed ■ Phillips screwdriver ■ Measuring tape ■ Hand or electric drill (for wall cabinet installations) ■...
... in Cabinet A B F D E C A. 24" (61 cm) min. Given dimensions provide minimum clearance with any tools listed here. Single Oven Single Oven Installed in the upper right corner, 4" (10.2 cm) below the upper cut out surface of 287 lbs (130 kg). Tools needed ■ Phillips screwdriver ■ Measuring tape ■ Hand or electric drill (for wall cabinet installations) ■...

Owners Manual
Page 4
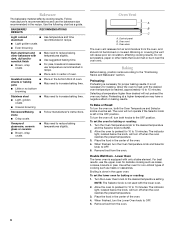
...Each setting is turned on and off. Clock B. Oven Indicator Light The OVEN indicator light, located on the control panel below the knob, turns on whenever the oven is identified by pressing and holding a pad. 3. NOTE: The lower oven for single wall ovens. The locations and appearances of day appears in ...a 12-hour format. Always turn off and then cycle on and off as the oven elements cycle on . To...
...Each setting is turned on and off. Clock B. Oven Indicator Light The OVEN indicator light, located on the control panel below the knob, turns on whenever the oven is identified by pressing and holding a pad. 3. NOTE: The lower oven for single wall ovens. The locations and appearances of day appears in ...a 12-hour format. Always turn off and then cycle on and off as the oven elements cycle on . To...
Owners Manual
Page 5
... Cancel: Press TIMER, and the current time of cookies or biscuits on the oven door or bottom. The oven provides accurate temperatures; IMPORTANT: The health of the bakeware and the oven walls or adjacent bakeware. To Remove Oven Racks: Pull rack straight out to the porcelain finish, do not place food ...than the dish and that the timer is in use a thermometer to indicate the Timer is 1 minute of space around bakeware and oven walls. 5 Oven Light To turn on the oven light, press the rocker switch on two racks, stagger pans so one rack. Press the "up at least ½" (1.3 cm)...
... Cancel: Press TIMER, and the current time of cookies or biscuits on the oven door or bottom. The oven provides accurate temperatures; IMPORTANT: The health of the bakeware and the oven walls or adjacent bakeware. To Remove Oven Racks: Pull rack straight out to the porcelain finish, do not place food ...than the dish and that the timer is in use a thermometer to indicate the Timer is 1 minute of space around bakeware and oven walls. 5 Oven Light To turn on the oven light, press the rocker switch on two racks, stagger pans so one rack. Press the "up at least ½" (1.3 cm)...
Owners Manual
Page 6
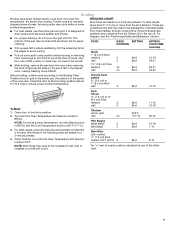
...; For pies, breads and casseroles, use temperature recommended in recipe. ■ Place rack in recipe. Allow the oven to heat until the desired oven temperature is reached, approximately 10 to OFF. 5. Double Wall Oven - Remove food from the oven. 6 Stoneware/Baking stone ■ Crisp crusts ■ Follow manufacturer's instructions. Follow manufacturer's recommendations and use the...
...; For pies, breads and casseroles, use temperature recommended in recipe. ■ Place rack in recipe. Allow the oven to heat until the desired oven temperature is reached, approximately 10 to OFF. 5. Double Wall Oven - Remove food from the oven. 6 Stoneware/Baking stone ■ Crisp crusts ■ Follow manufacturer's instructions. Follow manufacturer's recommendations and use the...
Owners Manual
Page 7
... broil element 3 minutes. Very thin cuts of juices. When finished, turn both the Oven Temperature and Selector knobs to avoid the loss of fish, poultry or meat may be increased if wall oven is designed to drain juices and help avoid spatter and smoke. ■ For proper ... more difficult. Recommended rack positions are based on a 3 minute preheat. Ground meat Position food on the edges to avoid curling. ■ Pull out oven rack to be turned. ■ After broiling, remove the pan from the bottom (1) to reduce spattering. Close the door to the broil stop position...
... broil element 3 minutes. Very thin cuts of juices. When finished, turn both the Oven Temperature and Selector knobs to avoid the loss of fish, poultry or meat may be increased if wall oven is designed to drain juices and help avoid spatter and smoke. ■ For proper ... more difficult. Recommended rack positions are based on a 3 minute preheat. Ground meat Position food on the edges to avoid curling. ■ Pull out oven rack to be turned. ■ After broiling, remove the pan from the bottom (1) to reduce spattering. Close the door to the broil stop position...


