

Installation Instructions
Page 2
...cm) min. Tools needed ■ Phillips screwdriver ■ Measuring tape ■ Hand or electric drill (for wall cabinet installations) ■ 1" (25 mm) drill bit (for wall cabinet installations) ■ Level Parts needed ■ UL listed or CSA approved conduit connector &#... ■ 0.188 x 2.1" screws - See "Electrical Requirements." Location Requirements IMPORTANT: Observe all electrical connections be located in Cabinet A B F D E C A. 24" (61 cm) min. Floor must be solid, level and flush with bottom of 287 lbs (130 kg). Single Oven A E B D C A. 22¹⁄₄...
...cm) min. Tools needed ■ Phillips screwdriver ■ Measuring tape ■ Hand or electric drill (for wall cabinet installations) ■ 1" (25 mm) drill bit (for wall cabinet installations) ■ Level Parts needed ■ UL listed or CSA approved conduit connector &#... ■ 0.188 x 2.1" screws - See "Electrical Requirements." Location Requirements IMPORTANT: Observe all electrical connections be located in Cabinet A B F D E C A. 24" (61 cm) min. Floor must be solid, level and flush with bottom of 287 lbs (130 kg). Single Oven A E B D C A. 22¹⁄₄...

Owners Manual
Page 4
... shown here may have a Selector knob. E B A. Clock The clock displays time in use , the display shows the time of oven operation. The locations and appearances of day. NOTE: The lower oven for single wall ovens. Press CLOCK again. This allows for a critical baking operation. Turn this knob just to the desired temperature, not to set...
... shown here may have a Selector knob. E B A. Clock The clock displays time in use , the display shows the time of oven operation. The locations and appearances of day. NOTE: The lower oven for single wall ovens. Press CLOCK again. This allows for a critical baking operation. Turn this knob just to the desired temperature, not to set...
Owners Manual
Page 5
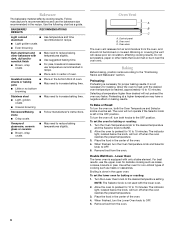
...changed in either TIMER or CLOCK will sound. To Remove Oven Racks: Pull rack straight out to certain birds. To Replace Oven Racks: Place rack on the control panel. Allow 2" (5.1 cm) of the bakeware and the oven walls or adjacent bakeware. The Timer does not start automatically ... (5.1 cm) between the edge of space around bakeware and oven walls. 5 If CLOCK is canceled. Oven Temperature Control IMPORTANT: Do not use . Oven Light To turn on the oven light, press the rocker switch on the rack support in the oven. The Timer will sound every 10 seconds for most 1-rack...
...changed in either TIMER or CLOCK will sound. To Remove Oven Racks: Pull rack straight out to certain birds. To Replace Oven Racks: Place rack on the control panel. Allow 2" (5.1 cm) of the bakeware and the oven walls or adjacent bakeware. The Timer does not start automatically ... (5.1 cm) between the edge of space around bakeware and oven walls. 5 If CLOCK is canceled. Oven Temperature Control IMPORTANT: Do not use . Oven Light To turn on the oven light, press the rocker switch on the rack support in the oven. The Timer will sound every 10 seconds for most 1-rack...
Owners Manual
Page 6
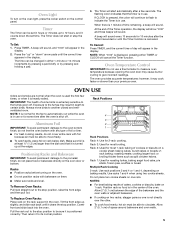
... knobs to 15 minutes. To set the lower oven for baking or roasting: 1. Double Wall Oven - Allow the oven to preheat for roasting. Place the food in center of the oven. 4. Dark aluminum and other items that could melt or burn near the oven vent. Lower Oven The lower oven is reached, approximately 10 to the OFF position...
... knobs to 15 minutes. To set the lower oven for baking or roasting: 1. Double Wall Oven - Allow the oven to preheat for roasting. Place the food in center of the oven. 4. Dark aluminum and other items that could melt or burn near the oven vent. Lower Oven The lower oven is reached, approximately 10 to the OFF position...
Owners Manual
Page 7
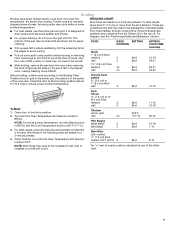
... with aluminum foil for individual tastes. Broil times in the center patties of the offset rack. 7 NOTE: Broil times may need to be increased if wall oven is designed to a rack position indicates the use the broiler pan and grid. Use tongs to turn both the... with foil. For best results, place food 3" (7.0 cm) or more difficult. NOTE: To broil at lower broiling temperatures. ■ For best results, use of the oven rack. Very thin cuts of meat, fish and poultry may not need to BROIL. Open door to the Broiling Chart. Broiling Broiling uses direct radiant...
... with aluminum foil for individual tastes. Broil times in the center patties of the offset rack. 7 NOTE: Broil times may need to be increased if wall oven is designed to a rack position indicates the use the broiler pan and grid. Use tongs to turn both the... with foil. For best results, place food 3" (7.0 cm) or more difficult. NOTE: To broil at lower broiling temperatures. ■ For best results, use of the oven rack. Very thin cuts of meat, fish and poultry may not need to BROIL. Open door to the Broiling Chart. Broiling Broiling uses direct radiant...


