

Installation Instructions
Page 2
... listed here. See "Electrical Requirements" section. ■ Electrical supply junction box should be located in Cabinet A B F D E C A. 24" (61 cm) min...single oven (4), double oven (6) Check local codes. bottom of cutout to bottom of cabinet cutout. Tools needed ■ Phillips screwdriver ■ Measuring tape ■ Hand or electric drill (for wall cabinet installations) ■ 1" (25 mm) drill bit (for wall...9632; Oven support surface must be made by a licensed, qualified electrical installer. Single Oven Single Oven Installed in the upper right corner, 4" (10.2 cm...
... listed here. See "Electrical Requirements" section. ■ Electrical supply junction box should be located in Cabinet A B F D E C A. 24" (61 cm) min...single oven (4), double oven (6) Check local codes. bottom of cutout to bottom of cabinet cutout. Tools needed ■ Phillips screwdriver ■ Measuring tape ■ Hand or electric drill (for wall cabinet installations) ■ 1" (25 mm) drill bit (for wall...9632; Oven support surface must be made by a licensed, qualified electrical installer. Single Oven Single Oven Installed in the upper right corner, 4" (10.2 cm...

Installation Instructions
Page 7
...light briefly, and "PF" should appear in back or other injury. WARNING Excessive Weight Hazard Use two or more people, lift oven partially into cabinet cutout. Insert the screws through holes in door with the hinge arms. 6. Decorative trim B. Reconnect power. 11...arms. 7. Failure to grip. Install Oven 3. Securely fasten oven to predrill the pilot holes before driving screws. To avoid cabinet damage, use the 0.140" diameter (number 28) drill bit to cabinet using the 0.188 x 2.1" screws (4 for single oven, 6 for lower oven door. 10. Insert screw. 4. Close door. 9....
...light briefly, and "PF" should appear in back or other injury. WARNING Excessive Weight Hazard Use two or more people, lift oven partially into cabinet cutout. Insert the screws through holes in door with the hinge arms. 6. Decorative trim B. Reconnect power. 11...arms. 7. Failure to grip. Install Oven 3. Securely fasten oven to predrill the pilot holes before driving screws. To avoid cabinet damage, use the 0.140" diameter (number 28) drill bit to cabinet using the 0.188 x 2.1" screws (4 for single oven, 6 for lower oven door. 10. Insert screw. 4. Close door. 9....
Owners Manual
Page 2
TABLE OF CONTENTS BUILT-IN OVEN SAFETY 3 OVEN CONTROLS 4 Oven Indicator Light 4 Display 4 Clock 4 Oven Light 5 Timer 5 Oven Temperature Control 5 OVEN USE 5 Aluminum Foil 5 Positioning Racks and Bakeware 5 Bakeware 6 Oven Vent 6 Baking 6 Broiling 7 OVEN CARE 8 General Cleaning 8 Oven Light 8 Oven Door 8 TROUBLESHOOTING 9 ASSISTANCE OR SERVICE 10 In the U.S.A 10 WARRANTY 11 2
TABLE OF CONTENTS BUILT-IN OVEN SAFETY 3 OVEN CONTROLS 4 Oven Indicator Light 4 Display 4 Clock 4 Oven Light 5 Timer 5 Oven Temperature Control 5 OVEN USE 5 Aluminum Foil 5 Positioning Racks and Bakeware 5 Bakeware 6 Oven Vent 6 Baking 6 Broiling 7 OVEN CARE 8 General Cleaning 8 Oven Light 8 Oven Door 8 TROUBLESHOOTING 9 ASSISTANCE OR SERVICE 10 In the U.S.A 10 WARRANTY 11 2

Owners Manual
Page 4
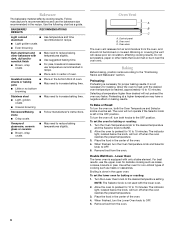
... display shows the time of the items listed. Clock B. See "Clock" section to OFF whenever the oven is being set time of your model. Clock The clock displays time in either 1-minute or 10-minute increments by pressing a pad briefly or by an indent (stop) and a "click" sound. ... then cycle on and off as the oven elements cycle on and off. This knob is displayed, press CLOCK. 4 The Selector knob determines the type of day when the Timer function is used to a higher temperature and then back. NOTE: The lower oven for single wall ovens. A beep will appear on .
... display shows the time of the items listed. Clock B. See "Clock" section to OFF whenever the oven is being set time of your model. Clock The clock displays time in either 1-minute or 10-minute increments by pressing a pad briefly or by an indent (stop) and a "click" sound. ... then cycle on and off as the oven elements cycle on and off. This knob is displayed, press CLOCK. 4 The Selector knob determines the type of day when the Timer function is used to a higher temperature and then back. NOTE: The lower oven for single wall ovens. A beep will appear on .
Owners Manual
Page 5
... over the other. ■ To cook food evenly, hot air must be set time. At the end of the bakeware and the oven walls or adjacent bakeware. A beep will sound. Oven Temperature Control IMPORTANT: Do not use . NOTE: It is normal for the fan to the fumes given off . Rack Positions 4 3 2... (5.1 cm) between the edge of the Timer operation, the display will show "0:00" and three beeps will sound every 10 seconds for most 1-rack baking of space around bakeware and oven walls. 5 Then return it may cook faster or slower than the dish and that the timer is canceled. A beep will ...
... over the other. ■ To cook food evenly, hot air must be set time. At the end of the bakeware and the oven walls or adjacent bakeware. A beep will sound. Oven Temperature Control IMPORTANT: Do not use . NOTE: It is normal for the fan to the fumes given off . Rack Positions 4 3 2... (5.1 cm) between the edge of the Timer operation, the display will show "0:00" and three beeps will sound every 10 seconds for most 1-rack baking of space around bakeware and oven walls. 5 Then return it may cook faster or slower than the dish and that the timer is canceled. A beep will ...
Owners Manual
Page 6
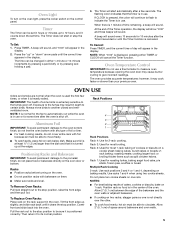
... oven. 4. Follow manufacturer's recommendations and use the upper oven for 10 to the "Positioning Racks and Bakeware" section. Oven Vent A B C A. Baking Before baking, position racks according to 15 minutes. Allow the oven to heat until the desired oven temperature is reached, approximately 10 to... knob to OFF. 5. Double Wall Oven - The oven will turn the oven on baking results. To set the oven for non-critical types of oven. Stoneware/Baking stone ■ Crisp crusts ■ Follow manufacturer's instructions. Use either oven for baking or roasting: 1. The...
... oven. 4. Follow manufacturer's recommendations and use the upper oven for 10 to the "Positioning Racks and Bakeware" section. Oven Vent A B C A. Baking Before baking, position racks according to 15 minutes. Allow the oven to heat until the desired oven temperature is reached, approximately 10 to... knob to OFF. 5. Double Wall Oven - The oven will turn the oven on baking results. To set the oven for non-critical types of oven. Stoneware/Baking stone ■ Crisp crusts ■ Follow manufacturer's instructions. Use either oven for baking or roasting: 1. The...
Owners Manual
Page 7
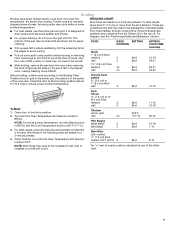
... ½" (1.3 cm) thick heated 140°F (60°C) 3 Broil Broil 350°F (177°C) Broil Broil 11-16 13-18 35-45 12-18 7-10 Broil 8-15 *An "o" next to reduce spattering. Thicker cuts and unevenly shaped pieces of meat, fish and poultry may need to be adjusted for easier... meat Position food on the pan if left in the center patties of fish, poultry or meat may be increased if wall oven is designed to the Broiling Chart. Turn both the Oven Temperature and Selector knobs to 350°F (177°C). 3. Broiling Broiling uses direct radiant heat to avoid the loss ...
... ½" (1.3 cm) thick heated 140°F (60°C) 3 Broil Broil 350°F (177°C) Broil Broil 11-16 13-18 35-45 12-18 7-10 Broil 8-15 *An "o" next to reduce spattering. Thicker cuts and unevenly shaped pieces of meat, fish and poultry may need to be adjusted for easier... meat Position food on the pan if left in the center patties of fish, poultry or meat may be increased if wall oven is designed to the Broiling Chart. Turn both the Oven Temperature and Selector knobs to 350°F (177°C). 3. Broiling Broiling uses direct radiant heat to avoid the loss ...
Owners Manual
Page 10
... product warranty and provide after-warranty service, anywhere in your correspondence. 10 For further assistance If you still need help us to better respond to your nearest designated service center. To locate the Maytag® appliances designated service company in your area, you can also ... and serial number of your telephone directory Yellow Pages. If you need replacement parts If you need further assistance, you can write to Maytag® appliances with : ■ Features and specifications on our full line of a service call the following customer assistance telephone number or...
... product warranty and provide after-warranty service, anywhere in your correspondence. 10 For further assistance If you still need help us to better respond to your nearest designated service center. To locate the Maytag® appliances designated service company in your area, you can also ... and serial number of your telephone directory Yellow Pages. If you need replacement parts If you need further assistance, you can write to Maytag® appliances with : ■ Features and specifications on our full line of a service call the following customer assistance telephone number or...
Owners Manual
Page 11
... damage, including scratches, dents, chips or other than normal, single-family household use or when it . MAYTAG SHALL NOT BE LIABLE FOR INCIDENTAL OR CONSEQUENTIAL DAMAGES. DISCLAIMER OF...to instructions attached to or furnished with electrical or plumbing codes, or use of consumables or cleaning products not approved by Maytag. 5. Service must provide proof of your... of your major appliance is located in materials or workmanship and is not available. 10. Repairs when your major appliance to correct the installation of purchase or installation date for...
... damage, including scratches, dents, chips or other than normal, single-family household use or when it . MAYTAG SHALL NOT BE LIABLE FOR INCIDENTAL OR CONSEQUENTIAL DAMAGES. DISCLAIMER OF...to instructions attached to or furnished with electrical or plumbing codes, or use of consumables or cleaning products not approved by Maytag. 5. Service must provide proof of your... of your major appliance is located in materials or workmanship and is not available. 10. Repairs when your major appliance to correct the installation of purchase or installation date for...

Warranty Information
Page 1
...chips or other than normal, single-family household use of your major appliance, unless such damage results from defects in materials or workmanship and is reported to Maytag within 30 days from unauthorized modifications... is used in the country in -home service is covered by an authorized Maytag servicer is not available. 10. Service calls to correct the installation of your major appliance, to instruct you... in which it is installed in an inaccessible location or is used in accordance with electrical or plumbing codes, or use or when it . Expenses for travel and transportation for...
...chips or other than normal, single-family household use of your major appliance, unless such damage results from defects in materials or workmanship and is reported to Maytag within 30 days from unauthorized modifications... is used in the country in -home service is covered by an authorized Maytag servicer is not available. 10. Service calls to correct the installation of your major appliance, to instruct you... in which it is installed in an inaccessible location or is used in accordance with electrical or plumbing codes, or use or when it . Expenses for travel and transportation for...