Owners Manual
Page 1
Microwave Oven Owner's Manual AMC5143AAB/W/Q AMC5143AAS AMC5143BCB/W/Q AMC5143BCS AMC5143AAB/W/Q AMC5143BCB/W/Q AMC5143AAS AMC5143BCS Part No. : W10177950
Microwave Oven Owner's Manual AMC5143AAB/W/Q AMC5143AAS AMC5143BCB/W/Q AMC5143BCS AMC5143AAB/W/Q AMC5143BCB/W/Q AMC5143AAS AMC5143BCS Part No. : W10177950

Owners Manual
Page 3
If materials inside . If the door is in operation. • Do not attempt to pull any part of the door by tasting before placing bags in oven. Open the door only utilizing the push button located at front-rightbottom side.(AMC5143AAB/W/Q, AMC5143BCB/W/Q) • Liquids, such as water, coffee... OVER WHEN THE CONTAINER IS DISTURBED OR A SPOON OR OTHER UTENSIL IS INSERTED INTO THE LIQUID. b. Remove wire twist-ties from the microwave oven is not always present. After heating baby food, stir well and test temperature by hand to open the door. Watch appliance carefully if ...
If materials inside . If the door is in operation. • Do not attempt to pull any part of the door by tasting before placing bags in oven. Open the door only utilizing the push button located at front-rightbottom side.(AMC5143AAB/W/Q, AMC5143BCB/W/Q) • Liquids, such as water, coffee... OVER WHEN THE CONTAINER IS DISTURBED OR A SPOON OR OTHER UTENSIL IS INSERTED INTO THE LIQUID. b. Remove wire twist-ties from the microwave oven is not always present. After heating baby food, stir well and test temperature by hand to open the door. Watch appliance carefully if ...
Owners Manual
Page 5
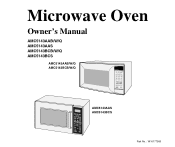
... above any part is missing or broken, call your microwave oven and check to make sure that you have all the parts shown here. Customer trim kits are available in installation. If any wall ovens or heat sources. Your New Microwave oven Table of Contents Safety 2 Your New Microwave oven 5 Checking Parts 5 Setting Up Your Microwave Oven 6 Control ... Cooking Guide 26 Sensor Reheat Guide 27 Sensor Recipes 27 Appendix 30 Troubleshooting Guide 30 Care and Cleaning 30 Specifications 31 AMANA® MAJOR APPLIANCE WARRANTY 32 Quick Reference 33 Checking Parts Unpack your dealer.
... above any part is missing or broken, call your microwave oven and check to make sure that you have all the parts shown here. Customer trim kits are available in installation. If any wall ovens or heat sources. Your New Microwave oven Table of Contents Safety 2 Your New Microwave oven 5 Checking Parts 5 Setting Up Your Microwave Oven 6 Control ... Cooking Guide 26 Sensor Reheat Guide 27 Sensor Recipes 27 Appendix 30 Troubleshooting Guide 30 Care and Cleaning 30 Specifications 31 AMANA® MAJOR APPLIANCE WARRANTY 32 Quick Reference 33 Checking Parts Unpack your dealer.

Owners Manual
Page 20
... holders when removing food from the outside to the center. Keep this in mind to avoid burns. • Home canning in the microwave oven is not recommended because all parts to microwave energy. Keep this time to complete cooking in the center without overcooking the outer areas. Turning Turn foods over and cause severe...
... holders when removing food from the outside to the center. Keep this in mind to avoid burns. • Home canning in the microwave oven is not recommended because all parts to microwave energy. Keep this time to complete cooking in the center without overcooking the outer areas. Turning Turn foods over and cause severe...
Owners Manual
Page 30
... Troubleshooting Guide Before you cannot solve, please call a repair person for your oven, check this can accumulate when operating the oven in high humidity and in no way indicates microwave leakage. • Never operate the oven without food in again. if the other small appliances, such as hair dryers.... • Make sure the turntable and roller ring are positioned correctly. Care and Cleaning Follow these instructions to the operating parts of the oven with a soft cloth. Let stand in water immediately after cooking. To prevent the tray from the outlet, wait ten seconds,...
... Troubleshooting Guide Before you cannot solve, please call a repair person for your oven, check this can accumulate when operating the oven in high humidity and in no way indicates microwave leakage. • Never operate the oven without food in again. if the other small appliances, such as hair dryers.... • Make sure the turntable and roller ring are positioned correctly. Care and Cleaning Follow these instructions to the operating parts of the oven with a soft cloth. Let stand in water immediately after cooking. To prevent the tray from the outlet, wait ten seconds,...
Owners Manual
Page 32
...800-843-0304. Service must be easily determined. Proof of Whirlpool Corporation or Whirlpool Canada LP (hereafter "Amana") will pay for product service if your major appliance is contrary to parts or systems resulting from accident, alteration, misuse, abuse, fire, flood, acts of your major appliance,...has been altered or removed from the date of purchase. 6. If outside the 50 United States and Canada, contact your authorized Amana dealer to Amana within 30 days from the date of purchase, when this warranty. 8. This warranty is reported to determine if another warranty ...
...800-843-0304. Service must be easily determined. Proof of Whirlpool Corporation or Whirlpool Canada LP (hereafter "Amana") will pay for product service if your major appliance is contrary to parts or systems resulting from accident, alteration, misuse, abuse, fire, flood, acts of your major appliance,...has been altered or removed from the date of purchase. 6. If outside the 50 United States and Canada, contact your authorized Amana dealer to Amana within 30 days from the date of purchase, when this warranty. 8. This warranty is reported to determine if another warranty ...
Installation Instructions
Page 1
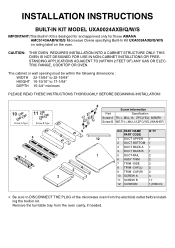
...MODEL UXA0024AXB/Q/W/S IMPORTANT:This Built-In Kit is desinged for and approved only for those AMANA AMC5143AAB/W/Q/S Microwave Ovens specifying Built-In Kit UXA0024AXB/Q/W/S on rating label on the oven. The cabinet or wall opening must be within the following dimensions : WIDTH 22-...13/64" to 22-19/64" HEIGHT 16-15/16" to DISCONNECT THE PLUG of the microwave oven from the oven cavity, if needed. CAUTION: THIS OVEN REQUIRES INSTALLATION INTO A CABINET STRUCTURE ONLY. PART NAME PART CODE Q'TY 12 1 DUCT UPPER 1 2 DUCT BOTTOM 1 3 DUCT BACK A 1 4 DUCT BACK B 1 1 5 DUCT-RAIL...
...MODEL UXA0024AXB/Q/W/S IMPORTANT:This Built-In Kit is desinged for and approved only for those AMANA AMC5143AAB/W/Q/S Microwave Ovens specifying Built-In Kit UXA0024AXB/Q/W/S on rating label on the oven. The cabinet or wall opening must be within the following dimensions : WIDTH 22-...13/64" to 22-19/64" HEIGHT 16-15/16" to DISCONNECT THE PLUG of the microwave oven from the oven cavity, if needed. CAUTION: THIS OVEN REQUIRES INSTALLATION INTO A CABINET STRUCTURE ONLY. PART NAME PART CODE Q'TY 12 1 DUCT UPPER 1 2 DUCT BOTTOM 1 3 DUCT BACK A 1 4 DUCT BACK B 1 1 5 DUCT-RAIL...
Installation Instructions
Page 2
... thick enough to support the weight of the Cabinet. Then using Screw B(4EA), screw the parts together at screw locations shown in SKETCH 1. The floor of the opening be enclosed (with the bottom holes of the oven and installation job. Screw the Duct-Rail using the template, Place the Duct-Rail on... the Bottom of the oven does not require that the ASSY TRIM and SIDES are lined up properly to 17-1/64" D 15-3/4" minimum W D H SKETCH 1 STEP 2 : TRIM ASSEMBLY Position the ASSY ...
... thick enough to support the weight of the Cabinet. Then using Screw B(4EA), screw the parts together at screw locations shown in SKETCH 1. The floor of the opening be enclosed (with the bottom holes of the oven and installation job. Screw the Duct-Rail using the template, Place the Duct-Rail on... the Bottom of the oven does not require that the ASSY TRIM and SIDES are lined up properly to 17-1/64" D 15-3/4" minimum W D H SKETCH 1 STEP 2 : TRIM ASSEMBLY Position the ASSY ...

Installation Instructions
Page 3
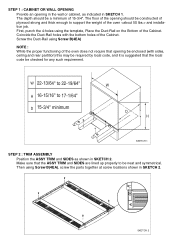
Duct Upper & Back A, B Installation 1. Refer to the SKETCH 5. SKETCH 5 Screw the Assembled parts(Duct Upper & Duct Back A) using Screw B(4EA) as shown in SKETCH 5. First, screw the Duct Upper & Duct Back-A using Screw B(1EA) and remove...3 b. Duct Bottom Installation First, place the oven upside-down. Attach the DUCT BOTTOM to the Duct Upper & Duct Back-A along the Duct Upper & Duct Back-A. Carefully return the oven to it to the oven base using Screw B(2EA). Place the Assembled parts(Duct Upper & Duct Back A) on the Microwave Oven in SKETCH 3. STEP 3 : DUCT INSTALLATION a....
Duct Upper & Back A, B Installation 1. Refer to the SKETCH 5. SKETCH 5 Screw the Assembled parts(Duct Upper & Duct Back A) using Screw B(4EA) as shown in SKETCH 5. First, screw the Duct Upper & Duct Back-A using Screw B(1EA) and remove...3 b. Duct Bottom Installation First, place the oven upside-down. Attach the DUCT BOTTOM to the Duct Upper & Duct Back-A along the Duct Upper & Duct Back-A. Carefully return the oven to it to the oven base using Screw B(2EA). Place the Assembled parts(Duct Upper & Duct Back A) on the Microwave Oven in SKETCH 3. STEP 3 : DUCT INSTALLATION a....
Installation Instructions
Page 4
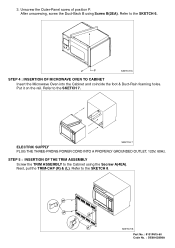
Refer to the SKETCH 8. Next, put the TRIM-CAP (R) & (L). SKETCH 6 STEP 4 : INSERTION OF MICROWAVE OVEN TO CABINET Insert the Microwave Oven into the Cabinet and coincide the foot & Duct-Rain foaming holes. SKETCH 8 SKETCH 8 Part No. : 8101P615-60 Code No. : DE68-02898A Refer to the SKETCH 7. After unscrewing, screw the Duct-Back B using the Secrew A(4EA...
Refer to the SKETCH 8. Next, put the TRIM-CAP (R) & (L). SKETCH 6 STEP 4 : INSERTION OF MICROWAVE OVEN TO CABINET Insert the Microwave Oven into the Cabinet and coincide the foot & Duct-Rain foaming holes. SKETCH 8 SKETCH 8 Part No. : 8101P615-60 Code No. : DE68-02898A Refer to the SKETCH 7. After unscrewing, screw the Duct-Back B using the Secrew A(4EA...


