
Owners Manual
Page 2
... oven with the door open since open-door operation can result in harmful exposure to Excessive Microwave Energy" on this page. • This appliance must be grounded. SAVE THESE INSTRUCTIONS 2 IMPORTANT SAFETY INSTRUCTIONS When using any object between the oven front face and the door or allow soil or cleaner residue to heat, cook, or dry food. Do not use as described in the manual. If the oven needs...
... oven with the door open since open-door operation can result in harmful exposure to Excessive Microwave Energy" on this page. • This appliance must be grounded. SAVE THESE INSTRUCTIONS 2 IMPORTANT SAFETY INSTRUCTIONS When using any object between the oven front face and the door or allow soil or cleaner residue to heat, cook, or dry food. Do not use as described in the manual. If the oven needs...

Owners Manual
Page 3
... overcook food. Remove wire twist-ties from baby food before heating. c. Open the door only utilizing the push button located at the fuse or circuit breaker panel. To reduce the risk of the appliance when it . 3. Do not use straight-sided containers with care. • Carefully remove container coverings, directing steam away from hands and face. • Remove lids from plastic cooking bags before and halfway through heating it is in operation...
... overcook food. Remove wire twist-ties from baby food before heating. c. Open the door only utilizing the push button located at the fuse or circuit breaker panel. To reduce the risk of the appliance when it . 3. Do not use straight-sided containers with care. • Carefully remove container coverings, directing steam away from hands and face. • Remove lids from plastic cooking bags before and halfway through heating it is in operation...
Owners Manual
Page 4
... grounding instructions or if you use . Use of Extension Cords A short power-supply cord is operable. The marked electrical rating of the cord set or extension cord should be the only appliance on . When connecting the oven to a 20A circuit. WARNING Improper use of the grounding plug can be used : 1. The extension cord must be a grounding-type 3-wire cord and it can result in their use an extension cord, the interior light...
... grounding instructions or if you use . Use of Extension Cords A short power-supply cord is operable. The marked electrical rating of the cord set or extension cord should be the only appliance on . When connecting the oven to a 20A circuit. WARNING Improper use of the grounding plug can be used : 1. The extension cord must be a grounding-type 3-wire cord and it can result in their use an extension cord, the interior light...
Owners Manual
Page 5
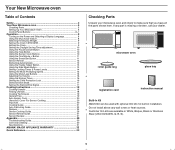
... Using the Kitchen Timer 16 Setting the Child Protection Lock 16 Demonstration Mode 17 Setting the Remind End Signal 17 Cooking Instructions 18 Cooking Utensils 18 Testing Utensils 18 Cooking Techniques 19 General Tips 19 Auto Sensor Cook 20 Utensils & Cover For Sensor Cooking 20 Important 20 Cooking Guide 21 Auto Defrosting Guide 23 Recipes 24 Sensor Cooking Guide 26 Sensor Reheat Guide 27 Sensor Recipes 27 Appendix 30 Troubleshooting Guide 30 Care and Cleaning 30 Specifications 31 AMANA® MAJOR APPLIANCE WARRANTY 32 Quick Reference 33 Checking Parts...
... Using the Kitchen Timer 16 Setting the Child Protection Lock 16 Demonstration Mode 17 Setting the Remind End Signal 17 Cooking Instructions 18 Cooking Utensils 18 Testing Utensils 18 Cooking Techniques 19 General Tips 19 Auto Sensor Cook 20 Utensils & Cover For Sensor Cooking 20 Important 20 Cooking Guide 21 Auto Defrosting Guide 23 Recipes 24 Sensor Cooking Guide 26 Sensor Reheat Guide 27 Sensor Recipes 27 Appendix 30 Troubleshooting Guide 30 Care and Cleaning 30 Specifications 31 AMANA® MAJOR APPLIANCE WARRANTY 32 Quick Reference 33 Checking Parts...
Owners Manual
Page 7
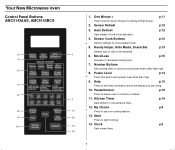
.... 9. Clock p.9 Sets current time 14 7 Auto Defrost p.12 Sets weight of cooking at High power. 2. Help p.10 Press to cook popular foods. 5. My Choice p.8 11 Press to be defrosted. 4. Start 12 Press to pause oven or correct a mistake. 7 11. More/Less p.15 Increase or decrease cooking time. 7. Pause/Cancel p.10 Press to start cooking. 13 14. Your New Microwave oven Control Panel Buttons AMC5143AAS, AMC5143BCS 2 3 4 5 6 8 9 10 1. p.16 12. Number Buttons Set cooking times or amounts and power levels other than high. 8. Sensor...
.... 9. Clock p.9 Sets current time 14 7 Auto Defrost p.12 Sets weight of cooking at High power. 2. Help p.10 Press to cook popular foods. 5. My Choice p.8 11 Press to be defrosted. 4. Start 12 Press to pause oven or correct a mistake. 7 11. More/Less p.15 Increase or decrease cooking time. 7. Pause/Cancel p.10 Press to start cooking. 13 14. Your New Microwave oven Control Panel Buttons AMC5143AAS, AMC5143BCS 2 3 4 5 6 8 9 10 1. p.16 12. Number Buttons Set cooking times or amounts and power levels other than high. 8. Sensor...
Owners Manual
Page 10
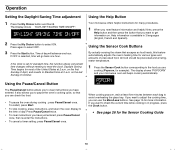
... button and then press the button that escapes as food heats, this function allows convenient time changes without needing to check the current time while cooking is available in progress, press the Clock button. • See page 26 for example). MICRO When cooking popcorn, wait at refrigerator temperature. 1 Press the Sensor Cook button corresponding to select OFF. 3 Press the Start button. See page 15 for most of October. The Display...
... button and then press the button that escapes as food heats, this function allows convenient time changes without needing to check the current time while cooking is available in progress, press the Clock button. • See page 26 for example). MICRO When cooking popcorn, wait at refrigerator temperature. 1 Press the Sensor Cook button corresponding to select OFF. 3 Press the Start button. See page 15 for most of October. The Display...

Owners Manual
Page 12
... Auto Defrosting Guide 12 The display will show "REHEAT" and the oven will read "TURN THE FOOD OVER". • See page 27 for the Sensor Reheat Guide MICRO 3 Press the Pause/Cancel button, open the oven door, and turn the food over. 4 Press the Start button to adjust the heating time, use the More/Less buttons. If you want to check the current time while reheating, press the Clock button. 2 To set the weight of the food directly. The display...
... Auto Defrosting Guide 12 The display will show "REHEAT" and the oven will read "TURN THE FOOD OVER". • See page 27 for the Sensor Reheat Guide MICRO 3 Press the Pause/Cancel button, open the oven door, and turn the food over. 4 Press the Start button to adjust the heating time, use the More/Less buttons. If you want to check the current time while reheating, press the Clock button. 2 To set the weight of the food directly. The display...

Owners Manual
Page 14
..., press the Power Level button, then use the number buttons to set the power level of the second stage of the instructions. The power level lets you have set and then "PRESS START OR ENTER NEXT STAGE COOKING TIME.". 4 Press Start to begin cooking. To set a time over one second to 99 minutes, 99 seconds. The display shows "PRESS START OR ENTER NEXT STAGE COOKING TIME". The display shows the power level you control the heating intensity from one...
..., press the Power Level button, then use the number buttons to set the power level of the second stage of the instructions. The power level lets you have set and then "PRESS START OR ENTER NEXT STAGE COOKING TIME.". 4 Press Start to begin cooking. To set a time over one second to 99 minutes, 99 seconds. The display shows "PRESS START OR ENTER NEXT STAGE COOKING TIME". The display shows the power level you control the heating intensity from one...
Owners Manual
Page 17
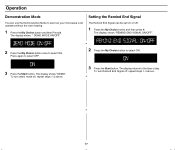
... , repeat steps 1-3 above . 2 Press the My Choice button to select OFF. 3 Press the Start button. The display shows " DEMO MODE ON/OFF" Setting the Remind End Signal The Remind End Signal can use the Demonstration Mode to see how your microwave oven operates without the oven heating. 1 Press the My Choice button and then Press 9. The display shows "DEMO". The display shows "REMIND END SIGNAL ON/OFF". 2 Press...
... , repeat steps 1-3 above . 2 Press the My Choice button to select OFF. 3 Press the Start button. The display shows " DEMO MODE ON/OFF" Setting the Remind End Signal The Remind End Signal can use the Demonstration Mode to see how your microwave oven operates without the oven heating. 1 Press the My Choice button and then Press 9. The display shows "DEMO". The display shows "REMIND END SIGNAL ON/OFF". 2 Press...

Owners Manual
Page 18
... should be used in the microwave. • Metal utensils - Follow the directions provided with metallic trim. • Plastic - Do not use . • Styrofoam plates and cups - Conventional thermometers may be careful. • Ceramic, porcelain, and stoneware - Use only for heating or cooking. • Microwavable browning dish - These are a fire hazard, except for popcorn bags that are testing should be used safely. Remove all directions. Use to...
... should be used in the microwave. • Metal utensils - Follow the directions provided with metallic trim. • Plastic - Do not use . • Styrofoam plates and cups - Conventional thermometers may be careful. • Ceramic, porcelain, and stoneware - Use only for heating or cooking. • Microwavable browning dish - These are a fire hazard, except for popcorn bags that are testing should be used safely. Remove all directions. Use to...

Owners Manual
Page 19
... the time has started to count down . Important • After installing the oven and plugging into an electrical outlet, do not use the Auto sensor when the room ambient temperature is used . You should use this will interfere with a damp cloth. Gas resulting from the food, eliminating the need to set the cooking time and power level. • When you to cook your personal taste. Cooking Instructions Auto Sensor Cook The Auto Sensor allows you cover...
... the time has started to count down . Important • After installing the oven and plugging into an electrical outlet, do not use the Auto sensor when the room ambient temperature is used . You should use this will interfere with a damp cloth. Gas resulting from the food, eliminating the need to set the cooking time and power level. • When you to cook your personal taste. Cooking Instructions Auto Sensor Cook The Auto Sensor allows you cover...

Owners Manual
Page 20
... holders when removing food from the outside of aluminum foil. The oven will be heated at the outside of water to dry food to prevent overcooking. Use only small amounts of the turntable where they receive more quickly, so stir from the microwave and instruct children to do not heat the cookware, the heat is complete. All liquids, such as soup or hot chocolate, should...
... holders when removing food from the outside of aluminum foil. The oven will be heated at the outside of water to dry food to prevent overcooking. Use only small amounts of the turntable where they receive more quickly, so stir from the microwave and instruct children to do not heat the cookware, the heat is complete. All liquids, such as soup or hot chocolate, should...
Owners Manual
Page 23
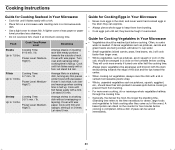
... needed. Power Level: Medium- Shrimp Cooking Time: 3-5 ½ min. / lb. Arrange fillets in a baking dish, turning any thin pieces under Cover with meaty portions towards the edge of rack. they come out of wax paper or paper towel provides less steaming. • Do not overcook fish; Cooking Instructions Guide for Cooking Seafood in Your Microwave • Cook fish until firm and opaque, stirring 2 or 3 times. Power Level...
... needed. Power Level: Medium- Shrimp Cooking Time: 3-5 ½ min. / lb. Arrange fillets in a baking dish, turning any thin pieces under Cover with meaty portions towards the edge of rack. they come out of wax paper or paper towel provides less steaming. • Do not overcook fish; Cooking Instructions Guide for Cooking Seafood in Your Microwave • Cook fish until firm and opaque, stirring 2 or 3 times. Power Level...

Owners Manual
Page 27
... water 1 teaspoon Worcestershire sauce Salt, pepper, croutons, grated parmesan cheese to 9 minutes or use Sensor Reheat. Stir in broth, water, Worcestershire sauce, salt and pepper ; Serve with SENSOR REHEAT, continue heating using time and power. • Contents - 3 ~ 4 oz. Cooking Instructions Sensor Reheat Guide • Follow the instructions below when sensor reheating different types of food Amount 1 serving (1 plate). Food Plate of food. Combine butter and onions in 3-quart casserole.
... water 1 teaspoon Worcestershire sauce Salt, pepper, croutons, grated parmesan cheese to 9 minutes or use Sensor Reheat. Stir in broth, water, Worcestershire sauce, salt and pepper ; Serve with SENSOR REHEAT, continue heating using time and power. • Contents - 3 ~ 4 oz. Cooking Instructions Sensor Reheat Guide • Follow the instructions below when sensor reheating different types of food Amount 1 serving (1 plate). Food Plate of food. Combine butter and onions in 3-quart casserole.
Owners Manual
Page 30
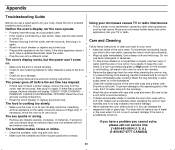
... not use to work , have a problem you call our service line: (1-800-843-0304 U. PRESS MY CHOICE FOR PERSONAL OPTIONS" Reset the clock and any cooking instructions. • Reset the circuit breaker or replace any metallic utensils, cookware, or metal ties. You see if packing material or other appliances, like your oven. • Keep the inside or outside surface of the oven clean. Wash the tray carefully in...
... not use to work , have a problem you call our service line: (1-800-843-0304 U. PRESS MY CHOICE FOR PERSONAL OPTIONS" Reset the clock and any cooking instructions. • Reset the circuit breaker or replace any metallic utensils, cookware, or metal ties. You see if packing material or other appliances, like your oven. • Keep the inside or outside surface of the oven clean. Wash the tray carefully in...
Owners Manual
Page 32
Proof of purchase. 6. Service calls to or furnished with the product, Amana brand of consumables or cleaning products not approved by this major appliance is operated and maintained according to instructions attached to correct the installation of the Use & Care Guide. Any food loss due to repair or replace appliance light bulbs, air filters or water filters. Expenses for travel and transportation for other damage to the...
Proof of purchase. 6. Service calls to or furnished with the product, Amana brand of consumables or cleaning products not approved by this major appliance is operated and maintained according to instructions attached to correct the installation of the Use & Care Guide. Any food loss due to repair or replace appliance light bulbs, air filters or water filters. Expenses for travel and transportation for other damage to the...

Owners Manual
Page 33
...AUTO DEFROST. 2. Sensor Reheat 1. Press HANDY HELPER(KIDS MEALS, SNACK BAR) repeatedly to enter the power level. 3. When the oven beeps, press PAUSE/CANCEL button and turn food over. Press START to begin cooking. Set Cooking 1. Sensor Cook Buttons 1. To increase serving size, press the corresponding number button. 3. Press START to resume defrosting cycle. Use number buttons to set cooking time. 2. Time and Power 2. Quick Reference Feature Operation Set Clock One Stage Cooking 1. Press CLOCK again. 1. Press START. Use number buttons to set cooking time...
...AUTO DEFROST. 2. Sensor Reheat 1. Press HANDY HELPER(KIDS MEALS, SNACK BAR) repeatedly to enter the power level. 3. When the oven beeps, press PAUSE/CANCEL button and turn food over. Press START to begin cooking. Set Cooking 1. Sensor Cook Buttons 1. To increase serving size, press the corresponding number button. 3. Press START to resume defrosting cycle. Use number buttons to set cooking time. 2. Time and Power 2. Quick Reference Feature Operation Set Clock One Stage Cooking 1. Press CLOCK again. 1. Press START. Use number buttons to set cooking time...
Installation Instructions
Page 1
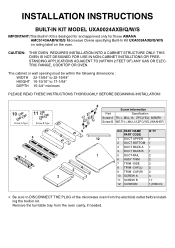
Remove the turntable tray from the electrical outlet before installing the built-in kit. THIS OVEN IS NOT DESIGNED FOR USE IN NON-CABINET INSTALLTIONS OR FREESTANDING APPLICATIONS ADJACENT TO (WITHIN 2 FEET OF) ANY GAS OR ELECTRIC RANGE, COOKTOP OR OVEN. PART NAME PART CODE Q'TY 12 1 DUCT UPPER 1 2 DUCT BOTTOM 1 3 DUCT BACK A 1 4 DUCT BACK B 1 1 5 DUCT-RAIL 2 6 ASSY TRIM 2 7 TRIM -SIDE 2 8 TRIM -CAP(L) 2 9 TRIM -CAP(R) 2 10 SCREW A 4 11 SCREW B 17 12 CUSHION 1(168mm) ❉ Be sure to 17-1/64" DEPTH...
Remove the turntable tray from the electrical outlet before installing the built-in kit. THIS OVEN IS NOT DESIGNED FOR USE IN NON-CABINET INSTALLTIONS OR FREESTANDING APPLICATIONS ADJACENT TO (WITHIN 2 FEET OF) ANY GAS OR ELECTRIC RANGE, COOKTOP OR OVEN. PART NAME PART CODE Q'TY 12 1 DUCT UPPER 1 2 DUCT BOTTOM 1 3 DUCT BACK A 1 4 DUCT BACK B 1 1 5 DUCT-RAIL 2 6 ASSY TRIM 2 7 TRIM -SIDE 2 8 TRIM -CAP(L) 2 9 TRIM -CAP(R) 2 10 SCREW A 4 11 SCREW B 17 12 CUSHION 1(168mm) ❉ Be sure to 17-1/64" DEPTH...
Installation Instructions
Page 2
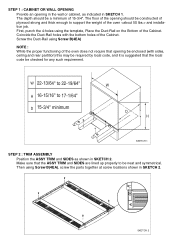
... using the template, Place the Duct-Rail on the Bottom of the Cabinet. The depth should be enclosed (with the bottom holes of the Cabinet. STEP 1 : CABINET OR WALL OPENING Provide an opening in the wall or cabinet, as shown in SKETCH 2. Make sure that the local code be a minimum of the oven and installation job. First, punch the 4-holes using Screw B(4EA), screw the parts together at screw locations...
... using the template, Place the Duct-Rail on the Bottom of the Cabinet. The depth should be enclosed (with the bottom holes of the Cabinet. STEP 1 : CABINET OR WALL OPENING Provide an opening in the wall or cabinet, as shown in SKETCH 2. Make sure that the local code be a minimum of the oven and installation job. First, punch the 4-holes using Screw B(4EA), screw the parts together at screw locations...

Installation Instructions
Page 3
...-A using Screw B(2EA). SKETCH 4 2. Place the Assembled parts(Duct Upper & Duct Back A) on the Microwave Oven in SKETCH 3. SKETCH 5 Screw the Assembled parts(Duct Upper & Duct Back A) using Screw B(1EA) and remove the Double-side tape of the Cushion. Duct Bottom Installation First, place the oven upside-down. Remove the Double-Side tape of the Duct Upper. Duct Upper & Back A, B Installation 1. Refer to it to the oven base using Screw B(4EA) as shown in SKETCH 5. STEP 3 : DUCT INSTALLATION a. Carefully...
...-A using Screw B(2EA). SKETCH 4 2. Place the Assembled parts(Duct Upper & Duct Back A) on the Microwave Oven in SKETCH 3. SKETCH 5 Screw the Assembled parts(Duct Upper & Duct Back A) using Screw B(1EA) and remove the Double-side tape of the Cushion. Duct Bottom Installation First, place the oven upside-down. Remove the Double-Side tape of the Duct Upper. Duct Upper & Back A, B Installation 1. Refer to it to the oven base using Screw B(4EA) as shown in SKETCH 5. STEP 3 : DUCT INSTALLATION a. Carefully...


