Product Information Sheet
Page 2
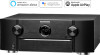
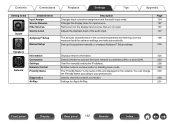
... on /off) in W Standby Consumption in W Maximum Dimensions Antenna Horizontal: W x D x H Antenna Vertical: W x D x H w/o Antenna: W x D x H Weight UPC NA SR6014/U1B 699927231750 5+1 / • 2 / 2 1 11.2) 2 (Independent) • • / Assignable Assignable Assignable Port Hole Advanced • 3 9 11 110 W 150 W 220 W Black... DTS:X, and the DTS:X logo are registered trademarks or trademarks of such marks by Marantz without notice. GUI ISF Certification GUI Languages Setup Assistant Smart Select Firmware Update by Network / USB Variable Cross Over Optimized Bass Redirection ...
... on /off) in W Standby Consumption in W Maximum Dimensions Antenna Horizontal: W x D x H Antenna Vertical: W x D x H w/o Antenna: W x D x H Weight UPC NA SR6014/U1B 699927231750 5+1 / • 2 / 2 1 11.2) 2 (Independent) • • / Assignable Assignable Assignable Port Hole Advanced • 3 9 11 110 W 150 W 220 W Black... DTS:X, and the DTS:X logo are registered trademarks or trademarks of such marks by Marantz without notice. GUI ISF Certification GUI Languages Setup Assistant Smart Select Firmware Update by Network / USB Variable Cross Over Optimized Bass Redirection ...
Owners Manual
Page 5
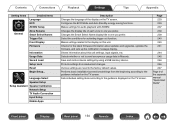
...operations Audio Center Level Adjust Subwoofer Level Adjust Surround Parameter M-DAX Audio Delay Volume Audyssey® Graphic EQ Video Picture Adjust HDMI Setup Output Settings On Screen Display 4K Signal Format TV Format Inputs Input Assign Source Rename Hide Sources Source Level Playback Settings Tips ... 174 Crossovers 222 175 Bass 223 178 Front Speaker 224 180 Network 225 180 Information 225 182 Connection 225 187 Wi-Fi Setup 226 191 Settings 228 192 Network Control 229 193 Friendly Name 230 194 Diagnostics 230 194 AirPlay 231 197 197 197 Front...
...operations Audio Center Level Adjust Subwoofer Level Adjust Surround Parameter M-DAX Audio Delay Volume Audyssey® Graphic EQ Video Picture Adjust HDMI Setup Output Settings On Screen Display 4K Signal Format TV Format Inputs Input Assign Source Rename Hide Sources Source Level Playback Settings Tips ... 174 Crossovers 222 175 Bass 223 178 Front Speaker 224 180 Network 225 180 Information 225 182 Connection 225 187 Wi-Fi Setup 226 191 Settings 228 192 Network Control 229 193 Friendly Name 230 194 Diagnostics 230 194 AirPlay 231 197 197 197 Front...
Owners Manual
Page 6
... Tips Appendix HEOS Account You have not signed in You have already signed in General Language ECO ZONE2 Setup Zone Rename Smart Select Names Trigger Out Front Display Firmware Information Usage Data Save & Load Setup Lock Reset Limiting the operating zone with the remote control 232 Tips 232 232 Tips 250 233...
... Tips Appendix HEOS Account You have not signed in You have already signed in General Language ECO ZONE2 Setup Zone Rename Smart Select Names Trigger Out Front Display Firmware Information Usage Data Save & Load Setup Lock Reset Limiting the operating zone with the remote control 232 Tips 232 232 Tips 250 233...
Owners Manual
Page 15
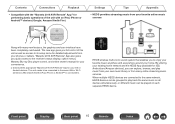
...play music from your own music library or from your favorite online music sources .. z Download the appropriate "Marantz 2016 AVR Remote" App for your iOS or Android devices. "Marantz 2016 AVR Remote" App also gives you to . HEOS wireless multi-room sound system that the iPad, ... unit needs to be grouped to the receiver's status display, option menus, Marantz Blu-ray Disc player control, and online owner's manual for your convenience. Contents Connections Playback 0 Compatible with the "Marantz 2016 AVR Remote" Appz for performing basic operations of this unit as well as...
...play music from your own music library or from your favorite online music sources .. z Download the appropriate "Marantz 2016 AVR Remote" App for your iOS or Android devices. "Marantz 2016 AVR Remote" App also gives you to . HEOS wireless multi-room sound system that the iPad, ... unit needs to be grouped to the receiver's status display, option menus, Marantz Blu-ray Disc player control, and online owner's manual for your convenience. Contents Connections Playback 0 Compatible with the "Marantz 2016 AVR Remote" Appz for performing basic operations of this unit as well as...
Owners Manual
Page 16
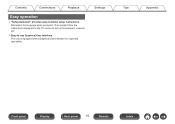
Contents Connections Playback Easy operation 0 "Setup Assistant" provides easy-to-follow the instructions displayed on the TV screen to set up the speakers, network, etc. 0 Easy to use Graphical User Interface This unit is equipped with a Graphical User Interface for improved operability. Then simply follow setup instructions First select the language when prompted. Settings Tips Appendix Front panel Display Rear panel 16 Remote Index
Contents Connections Playback Easy operation 0 "Setup Assistant" provides easy-to-follow the instructions displayed on the TV screen to set up the speakers, network, etc. 0 Easy to use Graphical User Interface This unit is equipped with a Graphical User Interface for improved operability. Then simply follow setup instructions First select the language when prompted. Settings Tips Appendix Front panel Display Rear panel 16 Remote Index
Owners Manual
Page 20
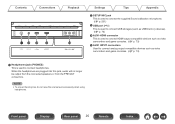
... 0 To prevent hearing loss, do not raise the volume level excessively when using headphones. Contents Connections Q1 Q2 Q3 Q4 Playback Q5 Settings Tips Appendix L SETUP MIC jack This is used to connect the supplied Sound calibration microphone. (v p. 201) M USB port (T) This is used to connect USB storages (such as USB...
... 0 To prevent hearing loss, do not raise the volume level excessively when using headphones. Contents Connections Q1 Q2 Q3 Q4 Playback Q5 Settings Tips Appendix L SETUP MIC jack This is used to connect the supplied Sound calibration microphone. (v p. 201) M USB port (T) This is used to connect USB storages (such as USB...

Owners Manual
Page 29
...) 0 "Adjusting the volume (ZONE2)" (v p. 160) P OPTION button This displays the option menu on the TV screen. (v p. 165) Front panel Display Rear panel 29 Remote Index R SETUP button This displays the menu on the TV screen.
...) 0 "Adjusting the volume (ZONE2)" (v p. 160) P OPTION button This displays the option menu on the TV screen. (v p. 165) Front panel Display Rear panel 29 Remote Index R SETUP button This displays the menu on the TV screen.
Owners Manual
Page 30
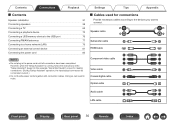
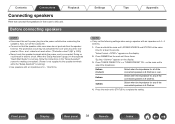
... result in the power cord until all connections have been completed. Settings Tips Appendix o Cables used for making connections. (During "Setup Assistant" operation, the input/output connectors do not conduct current.) 0 Do not bundle power cords together with connection cables. Contents ... a USB memory device to the USB port Connecting FM/AM antennas Connecting to connect. However, when the "Setup Assistant" is running, follow the instructions in the "Setup Assistant" (page 9 in the separate "Quick Start Guide") screen for connections Provide necessary cables according to the...
... result in the power cord until all connections have been completed. Settings Tips Appendix o Cables used for making connections. (During "Setup Assistant" operation, the input/output connectors do not conduct current.) 0 Do not bundle power cords together with connection cables. Contents ... a USB memory device to the USB port Connecting FM/AM antennas Connecting to connect. However, when the "Setup Assistant" is running, follow the instructions in the "Setup Assistant" (page 9 in the separate "Quick Start Guide") screen for connections Provide necessary cables according to the...
Owners Manual
Page 38
...core wires do not protrude from the power outlet before connecting the speakers. Doing so could result in the "Setup Assistant" screen for any of the connected speakers is connected. When the "Setup Assistant" (page 9 in the separate "Quick Start Guide") is 4 Ω/ohms. 4. Press TUNER ... is 8 Ω/ohms or over. 6ohms: Select when the impedance for making connections. (Power is not supplied to the speaker terminals while the "Setup Assistant" is running.) 0 Use speakers with an impedance of 4 - 16 Ω/ohms. Settings Tips Appendix NOTE 0 Carry out the following settings ...
...core wires do not protrude from the power outlet before connecting the speakers. Doing so could result in the "Setup Assistant" screen for any of the connected speakers is connected. When the "Setup Assistant" (page 9 in the separate "Quick Start Guide") is 4 Ω/ohms. 4. Press TUNER ... is 8 Ω/ohms or over. 6ohms: Select when the impedance for making connections. (Power is not supplied to the speaker terminals while the "Setup Assistant" is running.) 0 Use speakers with an impedance of 4 - 16 Ω/ohms. Settings Tips Appendix NOTE 0 Carry out the following settings ...
Owners Manual
Page 80
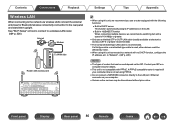
See "Wi-Fi Setup" on how to connect to the LAN port / Ethernet connector on your ISP or a computer shop for Bluetooth/wireless connectivity connection to a network with no ...
See "Wi-Fi Setup" on how to connect to the LAN port / Ethernet connector on your ISP or a computer shop for Bluetooth/wireless connectivity connection to a network with no ...
Owners Manual
Page 146
NOTE 0 If the "HDMI Control" or "Smart Menu" settings have been changed, always reset the power to "Off". (v p. 186) Settings Tips Appendix Front panel Display Rear panel 146 Remote Index o Smart Select Calls up the "Smart Select" items registered to this case, set "Smart Menu" to connected devices after the change. 0 The Smart Menu function may not work properly depending on the specifications of this unit. In this unit. Contents Connections Playback o Setup Menu Displays a setup menu for configuring the settings of your TV.
NOTE 0 If the "HDMI Control" or "Smart Menu" settings have been changed, always reset the power to "Off". (v p. 186) Settings Tips Appendix Front panel Display Rear panel 146 Remote Index o Smart Select Calls up the "Smart Select" items registered to this case, set "Smart Menu" to connected devices after the change. 0 The Smart Menu function may not work properly depending on the specifications of this unit. In this unit. Contents Connections Playback o Setup Menu Displays a setup menu for configuring the settings of your TV.
Owners Manual
Page 161
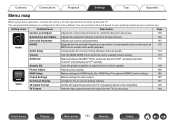
Audio M-DAX Expands the low and high frequency components of each speaker. 178 Picture Adjust Adjusts picture quality. 180 HDMI Setup Makes settings for HDMI Audio Out, HDMI Pass Through and HDMI Control settings. 182 Output Settings Makes settings for video output. 187 On Screen Display ...
Audio M-DAX Expands the low and high frequency components of each speaker. 178 Picture Adjust Adjusts picture quality. 180 HDMI Setup Makes settings for HDMI Audio Out, HDMI Pass Through and HDMI Control settings. 182 Output Settings Makes settings for video output. 187 On Screen Display ...
Owners Manual
Page 162
... is the name of this unit displayed on the network. Sets up the speakers manually or changes Audyssey® Setup settings. Contents Connections Playback Settings Tips Appendix Setting items Inputs Detailed items Input Assign Source Rename Hide Sources Source Level Audyssey®...; Setup Manual Setup ... Removes from the display input sources that are made automatically. Page 194 197 197 197 198 209 Displays network information...
... is the name of this unit displayed on the network. Sets up the speakers manually or changes Audyssey® Setup settings. Contents Connections Playback Settings Tips Appendix Setting items Inputs Detailed items Input Assign Source Rename Hide Sources Source Level Audyssey®...; Setup Manual Setup ... Removes from the display input sources that are made automatically. Page 194 197 197 197 198 209 Displays network information...
Owners Manual
Page 164
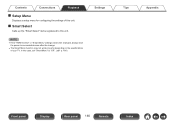
...title of each zone to one you prefer. Sets individual setting items according to Marantz. Language Select Speaker Setup Setup Assistant Speaker Calibration Network Setup TV Audio Connection Input Setup Mobile Apps Description Changes the language of the separate manual "Quick Start Guide" Front...the display on the TV screen. Contents Connections Playback Settings Tips Appendix Setting items General Detailed items Language ECO ZONE2 Setup Zone Rename Smart Select Names Trigger Out Front Display Firmware .. Various settings are reset to the guidance indicated on ...
...title of each zone to one you prefer. Sets individual setting items according to Marantz. Language Select Speaker Setup Setup Assistant Speaker Calibration Network Setup TV Audio Connection Input Setup Mobile Apps Description Changes the language of the separate manual "Quick Start Guide" Front...the display on the TV screen. Contents Connections Playback Settings Tips Appendix Setting items General Detailed items Language ECO ZONE2 Setup Zone Rename Smart Select Names Trigger Out Front Display Firmware .. Various settings are reset to the guidance indicated on ...
Owners Manual
Page 165
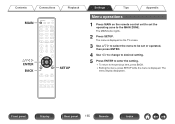
... menu is displayed. Front panel Display Rear panel 165 Remote Index The menu display disappears. . Contents Connections Playback MAIN uio p ENTER BACK SETUP Settings Tips Appendix Menu operations 1 Press MAIN on the TV screen. 3 Use ui p to select the menu to be set or operated, then press ENTER. 4 ...Use o p to change to desired setting. 5 Press ENTER to enter the setting. 0 To return to the previous item, press BACK. 0 Exiting the menu, press SETUP while the menu is displayed on the remote control unit to set the operating zone to the MAIN ZONE.
... menu is displayed. Front panel Display Rear panel 165 Remote Index The menu display disappears. . Contents Connections Playback MAIN uio p ENTER BACK SETUP Settings Tips Appendix Menu operations 1 Press MAIN on the TV screen. 3 Use ui p to select the menu to be set or operated, then press ENTER. 4 ...Use o p to change to desired setting. 5 Press ENTER to enter the setting. 0 To return to the previous item, press BACK. 0 Exiting the menu, press SETUP while the menu is displayed on the remote control unit to set the operating zone to the MAIN ZONE.
Owners Manual
Page 175
...IMAX DTS", "Dynamic EQ", "Dynamic Volume" and "Audyssey LFC™" settings cannot be configured. 0 This cannot be selected after Audyssey® Setup has been performed. These can be set when the input mode is closer to the speakers. Do not use "MultEQ® XT32". 0 When ... optimized for both time and frequency characteristics of compensation curves. Selects the reference setting, but bypasses MultEQ® XT32 on Audyssey® Setup measurement results. o MultEQ® XT32 MultEQ® XT32 compensates for small rooms where your listening position is set to "7.1CH IN"....
...IMAX DTS", "Dynamic EQ", "Dynamic Volume" and "Audyssey LFC™" settings cannot be configured. 0 This cannot be selected after Audyssey® Setup has been performed. These can be set when the input mode is closer to the speakers. Do not use "MultEQ® XT32". 0 When ... optimized for both time and frequency characteristics of compensation curves. Selects the reference setting, but bypasses MultEQ® XT32 on Audyssey® Setup measurement results. o MultEQ® XT32 MultEQ® XT32 compensates for small rooms where your listening position is set to "7.1CH IN"....
Owners Manual
Page 177
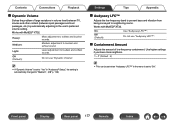
... volume setting. On: Off (Default): Use "Audyssey LFC™". Works with MultEQ® XT32. o Containment Amount Adjusts the amount of large variations in "Audyssey® Setup", the setting is set to "Yes" in volume level between TV, movies and other content (between quiet passages and loud passages, etc.) by automatically adjusting...
... volume setting. On: Off (Default): Use "Audyssey LFC™". Works with MultEQ® XT32. o Containment Amount Adjusts the amount of large variations in "Audyssey® Setup", the setting is set to "Yes" in volume level between TV, movies and other content (between quiet passages and loud passages, etc.) by automatically adjusting...
Owners Manual
Page 179
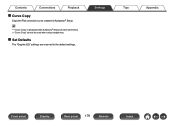
Settings Tips Appendix Front panel Display Rear panel 179 Remote Index o Set Defaults The "Graphic EQ" settings are returned to the default settings. Contents Connections Playback o Curve Copy Copy the Flat correction curve created in Audyssey® Setup. 0 "Curve Copy" is displayed after Audyssey® Setup has been performed. 0 "Curve Copy" cannot be used when using headphones.
Settings Tips Appendix Front panel Display Rear panel 179 Remote Index o Set Defaults The "Graphic EQ" settings are returned to the default settings. Contents Connections Playback o Curve Copy Copy the Flat correction curve created in Audyssey® Setup. 0 "Curve Copy" is displayed after Audyssey® Setup has been performed. 0 "Curve Copy" cannot be used when using headphones.
Owners Manual
Page 182
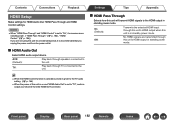
... the HDMI output in standby power mode. AVR (Default): TV: Play back through TV connected to the unit. Contents Connections Playback Settings Tips Appendix HDMI Setup Make settings for an extended period, it is in standby power mode. No HDMI signals are not using this unit is recommended that you unplug...
... the HDMI output in standby power mode. AVR (Default): TV: Play back through TV connected to the unit. Contents Connections Playback Settings Tips Appendix HDMI Setup Make settings for an extended period, it is in standby power mode. No HDMI signals are not using this unit is recommended that you unplug...
Owners Manual
Page 198
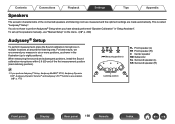
... The acoustic characteristics of the first measurement position (main listening position). For best results, we recommend you perform Audyssey® Setup, Audyssey MultEQ® XT32, Audyssey Dynamic EQ®, Audyssey Dynamic Volume® and Audyssey LFC™ functions are made automatically.... Front panel Display Rear panel 198 Remote Index To set up to perform Audyssey® Setup when you have already performed "Speaker Calibration" in multiple locations all around the listening area. FL SW C FR ( :Measuring ...
... The acoustic characteristics of the first measurement position (main listening position). For best results, we recommend you perform Audyssey® Setup, Audyssey MultEQ® XT32, Audyssey Dynamic EQ®, Audyssey Dynamic Volume® and Audyssey LFC™ functions are made automatically.... Front panel Display Rear panel 198 Remote Index To set up to perform Audyssey® Setup when you have already performed "Speaker Calibration" in multiple locations all around the listening area. FL SW C FR ( :Measuring ...


