
User Guide
Page 5
... play 29 Using repeat play 30 Bookmarking a place in a disc (LAST MEMORY 31 Memorizing disc settings (CONDITION MEMORY 32 Using setup menu shortcuts (FUNCTION MEMORY 33 Displaying disc information 34 6 Playing MP3s Playing MP3s 35 Searching for folders and tracks 36 Using random play 36... 36 Displaying MP3 information 36 Using the MP3 Navigator 37 Making a program list of MP3 tracks 38 7 DVD Setup Menu Using the Setup menu 39 Setup Menu Mode 39 OSD Settings 40 Audio settings 40 Video settings 47 Language settings 52 General settings 55 8 Additional Information Handling ...
... play 29 Using repeat play 30 Bookmarking a place in a disc (LAST MEMORY 31 Memorizing disc settings (CONDITION MEMORY 32 Using setup menu shortcuts (FUNCTION MEMORY 33 Displaying disc information 34 6 Playing MP3s Playing MP3s 35 Searching for folders and tracks 36 Using random play 36... 36 Displaying MP3 information 36 Using the MP3 Navigator 37 Making a program list of MP3 tracks 38 7 DVD Setup Menu Using the Setup menu 39 Setup Menu Mode 39 OSD Settings 40 Audio settings 40 Video settings 47 Language settings 52 General settings 55 8 Additional Information Handling ...
User Guide
Page 14
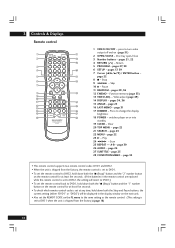
...2 % ^ 3 4 & 5 * 6 ( 7 8 ) 9 0 - _ = + ~ ! ¡ @ ™ # £ 1 VIDEO ON/OFF - Return 5 PROGRAM - pages 29, 36 12 F.MEMO - Clear 20 TOP MENU - A-B - pages 17, 39 7 Cursor (2/3/5/∞) / ENTER button - Skip 10 8 - Press to the same setting as the remote control. (This setting is shipped from the factory....) • To set the remote control back to DVD1, hold down both the "7 (Stop)" button and the "1" number button on the FL menu to change the display brightness 18 POWER - pages 21, 22 4 RETURN ( ) - pages 27, 38 6 SETUP - page 31 17 DIMMER ...
...2 % ^ 3 4 & 5 * 6 ( 7 8 ) 9 0 - _ = + ~ ! ¡ @ ™ # £ 1 VIDEO ON/OFF - Return 5 PROGRAM - pages 29, 36 12 F.MEMO - Clear 20 TOP MENU - A-B - pages 17, 39 7 Cursor (2/3/5/∞) / ENTER button - Skip 10 8 - Press to the same setting as the remote control. (This setting is shipped from the factory....) • To set the remote control back to DVD1, hold down both the "7 (Stop)" button and the "1" number button on the FL menu to change the display brightness 18 POWER - pages 21, 22 4 RETURN ( ) - pages 27, 38 6 SETUP - page 31 17 DIMMER ...
User Guide
Page 16
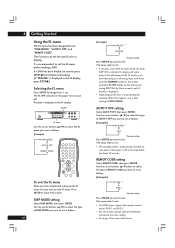
... on the remote control or FL OFF button on the disc, it after turning off . FL menu is playing. Use the cursor buttons (5/∞) down to select the type of DISP MODE you want... (Example) ON 30 MIN * OFF * Factory setting Press ENTER you want exit the FL menu. It is recommended to set . When this happens, use it may not operate normally. REMOT CODE... * Factory setting Press ENTER you want to the same setting. • See page 14 for more information. The menu select is set "DISP MODE", "AUTO P OFF" and "REMOT CODE". Use the cursor buttons (5/∞) to ...
... on the remote control or FL OFF button on the disc, it after turning off . FL menu is playing. Use the cursor buttons (5/∞) down to select the type of DISP MODE you want... (Example) ON 30 MIN * OFF * Factory setting Press ENTER you want exit the FL menu. It is recommended to set . When this happens, use it may not operate normally. REMOT CODE... * Factory setting Press ENTER you want to the same setting. • See page 14 for more information. The menu select is set "DISP MODE", "AUTO P OFF" and "REMOT CODE". Use the cursor buttons (5/∞) to ...
User Guide
Page 17
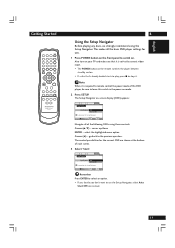
... here instead. 17 English Getting Started 4 Using the Setup Navigator Before playing any discs, we strongly recommend using these controls: Cursor (5/∞) - select the highlighted menu option Cursor (2) - This makes all of each screen. 3 Select 'Start'. The Setup Navigator on mode. 2 Press SETUP. Audio1 A2 Video1 V2 Language General Setup Navigator...
... here instead. 17 English Getting Started 4 Using the Setup Navigator Before playing any discs, we strongly recommend using these controls: Cursor (5/∞) - select the highlighted menu option Cursor (2) - This makes all of each screen. 3 Select 'Start'. The Setup Navigator on mode. 2 Press SETUP. Audio1 A2 Video1 V2 Language General Setup Navigator...

User Guide
Page 18
... speaker is compatible with Dolby Digital Move ENTER Select SETUP Exit • All options (except Not Connected) assume PCM compatibility. 4 Getting Started 4 Choose an OSD menu language.
... speaker is compatible with Dolby Digital Move ENTER Select SETUP Exit • All options (except Not Connected) assume PCM compatibility. 4 Getting Started 4 Choose an OSD menu language.

User Guide
Page 19
... to do this step, depending on when you use the Setup Navigator again at any 96kHz audio will be changed using the appropriate menu option-chapter 7 explains all menu options in step 8. • Selecting Don't Know has the same effect as selecting No: any time, it is a more on page 61 for... General Setup Navigator Amp Connection No 96kHz PCM Audio Yes Don't Know Digital jack not compatible with 96kHz audio. This is available from the General menu. If you selected Not Connected in detail. 19
... to do this step, depending on when you use the Setup Navigator again at any 96kHz audio will be changed using the appropriate menu option-chapter 7 explains all menu options in step 8. • Selecting Don't Know has the same effect as selecting No: any time, it is a more on page 61 for... General Setup Navigator Amp Connection No 96kHz PCM Audio Yes Don't Know Digital jack not compatible with 96kHz audio. This is available from the General menu. If you selected Not Connected in detail. 19
User Guide
Page 20
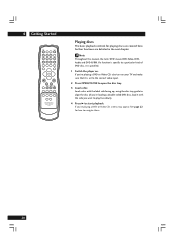
... OPEN/CLOSE to start playback. See page 22 for playing discs are detailed in the next chapter. If you 're playing a DVD or Video CD, a menu may appear. Further functions are covered here. Load a disc with the label side facing up, using the disc tray guide to align the disc (if...
... OPEN/CLOSE to start playback. See page 22 for playing discs are detailed in the next chapter. If you 're playing a DVD or Video CD, a menu may appear. Further functions are covered here. Load a disc with the label side facing up, using the disc tray guide to align the disc (if...
User Guide
Page 22
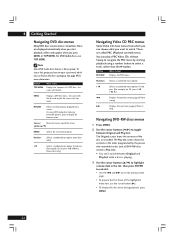
...discs contain menus. Note Some DVD-Audio discs feature a 'bonus group'. Coursor Moves the cursor around the screen. (2/3/5/∞) ENTER Selects the current menu option. The Play List screen shows the contents in the list, then press ENTER to select it. • Use the 4 and ¢ ...see the previous/next page. • To preview the first frame of the disc as the 'top menu'. These are displayed automatically when you press MENU or TOP MENU. Numbers Selects a numbered menu option (some DVD-Audio discs featuring browsable pictures, press to select a track, rather than the 3 button...
...discs contain menus. Note Some DVD-Audio discs feature a 'bonus group'. Coursor Moves the cursor around the screen. (2/3/5/∞) ENTER Selects the current menu option. The Play List screen shows the contents in the list, then press ENTER to select it. • Use the 4 and ¢ ...see the previous/next page. • To preview the first frame of the disc as the 'top menu'. These are displayed automatically when you press MENU or TOP MENU. Numbers Selects a numbered menu option (some DVD-Audio discs featuring browsable pictures, press to select a track, rather than the 3 button...
User Guide
Page 23
...pictures only) • Time search (DVD-Video and Video CD only) • Frame & Time search (DVD-Video only) (The Frame Search option in the Video1 menu must be appear in exact order when stepping through the frames in forward or reverse mode. 23 For 45 minutes into the disc, press 4, 5, 0, 0. 3 ...point on the disc, it 's stopped. Depending on a disc using frame advance, forward step or reverse step. Note The Frame Search option in the Video menu must be On to use this) (page 47) • Off 2 Enter the title/chapter/group/track number or time (minutes & seconds). If you want...
...pictures only) • Time search (DVD-Video and Video CD only) • Frame & Time search (DVD-Video only) (The Frame Search option in the Video1 menu must be appear in exact order when stepping through the frames in forward or reverse mode. 23 For 45 minutes into the disc, press 4, 5, 0, 0. 3 ...point on the disc, it 's stopped. Depending on a disc using frame advance, forward step or reverse step. Note The Frame Search option in the Video menu must be On to use this) (page 47) • Off 2 Enter the title/chapter/group/track number or time (minutes & seconds). If you want...
User Guide
Page 24
When viewing a DVD, if the paused picture shakes, select the [Field] setting in the Setup screen Video menu [Still Picture] setting as a still frame, played back at slow speeds and even advanced frame by frame. Video CDs can be viewed in the forward ...
When viewing a DVD, if the paused picture shakes, select the [Field] setting in the Setup screen Video menu [Still Picture] setting as a still frame, played back at slow speeds and even advanced frame by frame. Video CDs can be viewed in the forward ...
User Guide
Page 25
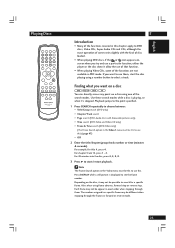
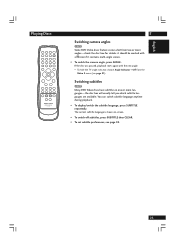
... scenes. • To switch the camera angle, press ANGLE. English Playing Discs 5 Switching camera angles Some DVD Video discs feature scenes shot from the Video 2 menu (see page 53. 25
... scenes. • To switch the camera angle, press ANGLE. English Playing Discs 5 Switching camera angles Some DVD Video discs feature scenes shot from the Video 2 menu (see page 53. 25

User Guide
Page 33
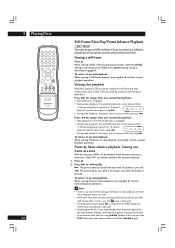
...MEMO. Function Memory On Screen Display Digital Out 2 Select the item you want to the shortcut menu. English Playing Discs 5 Using setup menu shortcuts (FUNCTION MEMORY) You can access the setting straight from the shortcut menu. In this case, the mark or ' i This item cannot be registered in the function... memory' is marked FM. (Some items in the normal way. 4 Press SETUP to 5 setup menu items that you selected. Rather than navigate through the whole setup menu each time you want to alter a setting, you want using the cursor buttons (2/3/5/∞) and press ENTER. ...
...MEMO. Function Memory On Screen Display Digital Out 2 Select the item you want to the shortcut menu. English Playing Discs 5 Using setup menu shortcuts (FUNCTION MEMORY) You can access the setting straight from the shortcut menu. In this case, the mark or ' i This item cannot be registered in the function... memory' is marked FM. (Some items in the normal way. 4 Press SETUP to 5 setup menu items that you selected. Rather than navigate through the whole setup menu each time you want to alter a setting, you want using the cursor buttons (2/3/5/∞) and press ENTER. ...

User Guide
Page 37
...FOLDER~2 3.FOLDER~3 4.FOLDER~4 5.FOLDER~5 6.FOLDER~6 MP3 Navigator Track 1~4 1.TRACK1~1 2.TRACK2~2 3.TRACK3~3 4.TRACK4~4 CLEAR Del PGM ENTER Play MENU Exit 6 Navigate using the following controls: Cursor buttons (2/3) - To move rapidly up or down a long list of folders and tracks. Add ...FOLDER~1 2.FOLDER~2 3.FOLDER~3 4.FOLDER~4 5.FOLDER~5 6.FOLDER~6 MP3 Navigator Track 1.TRACK1~1 2.TRACK2~2 3.TRACK3~3 4.TRACK4~4 ENTER Play MENU Exit Total number of Folder • On the right side is playing, the currently playing folder and track numbers are automatically skipped and...
...FOLDER~2 3.FOLDER~3 4.FOLDER~4 5.FOLDER~5 6.FOLDER~6 MP3 Navigator Track 1~4 1.TRACK1~1 2.TRACK2~2 3.TRACK3~3 4.TRACK4~4 CLEAR Del PGM ENTER Play MENU Exit 6 Navigate using the following controls: Cursor buttons (2/3) - To move rapidly up or down a long list of folders and tracks. Add ...FOLDER~1 2.FOLDER~2 3.FOLDER~3 4.FOLDER~4 5.FOLDER~5 6.FOLDER~6 MP3 Navigator Track 1.TRACK1~1 2.TRACK2~2 3.TRACK3~3 4.TRACK4~4 ENTER Play MENU Exit Total number of Folder • On the right side is playing, the currently playing folder and track numbers are automatically skipped and...

User Guide
Page 39
...on-screen display illustrations on the remote to all the player's settings. Switch to those available in Expert Audio1 A2 Video1 V2 Language General Setup Menu Mode - Sections below marked with a colored box. In some screens you can press RETURN to all the player's settings. orange for DVD...- Stop the disc, then change the setting. The color of the screen. The controls for DVD only; English DVD Setup Menu 7 Using the Setup menu The Setup menu gives you access to leave the screen without making any changes. yellow for DVD-Audio and Super Audio CD/CD; Press SETUP...
...on-screen display illustrations on the remote to all the player's settings. Switch to those available in Expert Audio1 A2 Video1 V2 Language General Setup Menu Mode - Sections below marked with a colored box. In some screens you can press RETURN to all the player's settings. orange for DVD...- Stop the disc, then change the setting. The color of the screen. The controls for DVD only; English DVD Setup Menu 7 Using the Setup menu The Setup menu gives you access to leave the screen without making any changes. yellow for DVD-Audio and Super Audio CD/CD; Press SETUP...
User Guide
Page 40
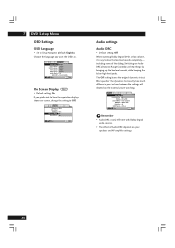
... on your speakers and AV amplifier settings. 40 Audio1 A2 Video1 V2 Language General Audio DRC Off Dolby Digital Out On DTS Out - 7 DVD Setup Menu OSD Settings OSD Language • Set in . Selected Subtitle Move SETUP Exit On Screen Display • Default setting: On If you want the OSDs in...
... on your speakers and AV amplifier settings. 40 Audio1 A2 Video1 V2 Language General Audio DRC Off Dolby Digital Out On DTS Out - 7 DVD Setup Menu OSD Settings OSD Language • Set in . Selected Subtitle Move SETUP Exit On Screen Display • Default setting: On If you want the OSDs in...
User Guide
Page 41
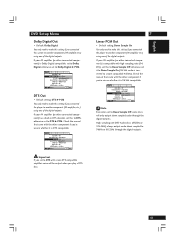
... SETUP Exit Note Even when set it is converted to a more compatible 48 kHz). MPEG 3 PCM Digital Out - MPEG 3 PCM Digital Out - English DVD Setup Menu Dolby Digital Out • Default: Dolby Digital You only need to make this setting if you connected this system to another component (AV amplifier, etc...
... SETUP Exit Note Even when set it is converted to a more compatible 48 kHz). MPEG 3 PCM Digital Out - MPEG 3 PCM Digital Out - English DVD Setup Menu Dolby Digital Out • Default: Dolby Digital You only need to make this setting if you connected this system to another component (AV amplifier, etc...
User Guide
Page 42
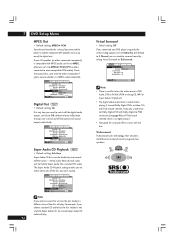
7 DVD Setup Menu MPEG Out • Default setting: MPEG 3 PCM You only need to switch off the optical and coaxial outputs individually. If your AV amplifier (or other ...
7 DVD Setup Menu MPEG Out • Default setting: MPEG 3 PCM You only need to switch off the optical and coaxial outputs individually. If your AV amplifier (or other ...
User Guide
Page 43
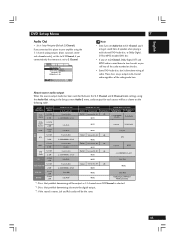
... mode settings using the 5.1 channel analog outputs (front, surround, center and subwoofer outs), set this to 5.1 Channel; English DVD Setup Menu Audio Out • Set in the Setup screen Audio 2 menu, audio output for each source will be as 5.1channel even if 2 Channel is selected. *2: Discs that prohibit downmixing also mute the...
... mode settings using the 5.1 channel analog outputs (front, surround, center and subwoofer outs), set this to 5.1 Channel; English DVD Setup Menu Audio Out • Set in the Setup screen Audio 2 menu, audio output for each source will be as 5.1channel even if 2 Channel is selected. *2: Discs that prohibit downmixing also mute the...

User Guide
Page 44
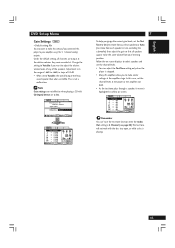
... highlighted in yellow. RS - 10.0 ft. Fix CD Digital Direct - Large RS - A1 Audio2 Video1 V2 Language General Speaker Setting Distance L/R - 10.0 ft. 7 DVD Setup Menu Speaker Setting • Set in Setup Navigator (default: Center: Large | Sub: On | Surround: Large | Distance: all 10 feet (3.0m)) You only need to make this...
... highlighted in yellow. RS - 10.0 ft. Fix CD Digital Direct - Large RS - A1 Audio2 Video1 V2 Language General Speaker Setting Distance L/R - 10.0 ft. 7 DVD Setup Menu Speaker Setting • Set in Setup Navigator (default: Center: Large | Sub: On | Surround: Large | Distance: all 10 feet (3.0m)) You only need to make this...
User Guide
Page 45
.... • When set to Variable, the overall output level may want to adjust the relative volume levels of any of the speakers. English DVD Setup Menu Gain Settings • Default setting: Fix You may sound quieter than when set to Fix. Under the default setting, all speakers appear to be the...
.... • When set to Variable, the overall output level may want to adjust the relative volume levels of any of the speakers. English DVD Setup Menu Gain Settings • Default setting: Fix You may sound quieter than when set to Fix. Under the default setting, all speakers appear to be the...