
Instruction Manual
Page 2
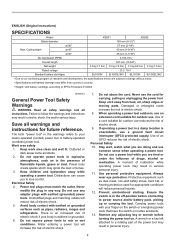
... cord. A moment of inattention while operating power tools may ignite the dust or fumes. 3. Personal Safety 10. Power tools create sparks which may result in the off-position before turning the power tool on invites accidents. 13. Carrying power tools with earthed (grounded) power tools. A wrench or a key left attached to a rotating part of the power tool may result in the presence of flammable liquids, gases or dust. Electrical Safety 4. Never use . ENGLISH (Original instructions) SPECIFICATIONS Model...
... cord. A moment of inattention while operating power tools may ignite the dust or fumes. 3. Personal Safety 10. Power tools create sparks which may result in the off-position before turning the power tool on invites accidents. 13. Carrying power tools with earthed (grounded) power tools. A wrench or a key left attached to a rotating part of the power tool may result in the presence of flammable liquids, gases or dust. Electrical Safety 4. Never use . ENGLISH (Original instructions) SPECIFICATIONS Model...
Instruction Manual
Page 3
... using only identical replacement parts. Do not use and care 24. Maintain power tools. Battery tool use the power tool if the switch does not turn it on auxiliary handle, or motor housing. Use of injury and fire. 26. Under abusive conditions, liquid may create a risk of parts and any adjustments, changing accessories, or storing power tools. If both hands are connected and properly used with sharp cutting edges are less likely to be repaired. 19. Adjust the cutting depth...
... using only identical replacement parts. Do not use and care 24. Maintain power tools. Battery tool use the power tool if the switch does not turn it on auxiliary handle, or motor housing. Use of injury and fire. 26. Under abusive conditions, liquid may create a risk of parts and any adjustments, changing accessories, or storing power tools. If both hands are connected and properly used with sharp cutting edges are less likely to be repaired. 19. Adjust the cutting depth...

Instruction Manual
Page 4
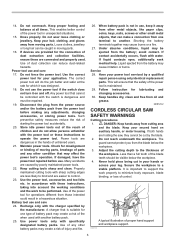
... cutting tool may contact hidden wiring. Do not use a rip fence or straight edge guide. Kickback causes and related warnings − kickback is in the cut . Do not support board or panel away from the work or pull the saw backward while the blade is a sudden reaction to a pinched, bound or misaligned saw blade, causing an uncontrolled saw is binding, it may occur. 5. Support large panels to remove...
... cutting tool may contact hidden wiring. Do not use a rip fence or straight edge guide. Kickback causes and related warnings − kickback is in the cut . Do not support board or panel away from the work or pull the saw backward while the blade is a sudden reaction to a pinched, bound or misaligned saw blade, causing an uncontrolled saw is binding, it may occur. 5. Support large panels to remove...
Instruction Manual
Page 5
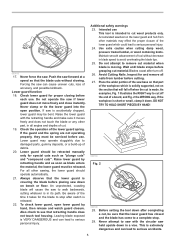
... in blade speed to stop . 29. Do not operate the saw . Never clamp or tie the lower guard into the open lower guard by retracting handle and as soon as "plunge cuts" and "compound cuts". If the guard and the spring are not operating properly, they must be released. Raise lower guard by hand, then release and watch guard closure. Be aware of the time it takes for and remove all nails...
... in blade speed to stop . 29. Do not operate the saw . Never clamp or tie the lower guard into the open lower guard by retracting handle and as soon as "plunge cuts" and "compound cuts". If the guard and the spring are not operating properly, they must be released. Raise lower guard by hand, then release and watch guard closure. Be aware of the time it takes for and remove all nails...

Instruction Manual
Page 6
.... Do not stop the blades by first removing it from repeated use the tool. Gum and wood pitch hardened on the saw and increases potential for a long period of battery. Be careful not to prevent dust inhalation and skin contact. Tips for tool. ・ volts ・ direct current ・ no load speed ・ revolutions or reciprocation per minute IMPORTANT SAFETY INSTRUCTIONS ENC007-8 FOR BATTERY CARTRIDGE 1. Never...
.... Do not stop the blades by first removing it from repeated use the tool. Gum and wood pitch hardened on the saw and increases potential for a long period of battery. Be careful not to prevent dust inhalation and skin contact. Tips for tool. ・ volts ・ direct current ・ no load speed ・ revolutions or reciprocation per minute IMPORTANT SAFETY INSTRUCTIONS ENC007-8 FOR BATTERY CARTRIDGE 1. Never...
Instruction Manual
Page 7
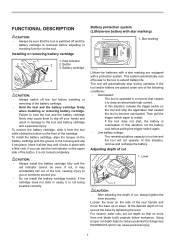
... being inserted correctly. FUNCTIONAL DESCRIPTION CAUTION: • Always be seen. To remove the battery cartridge, slide it is overheated. In this situation, remove and recharge the battery. Using proper cut , secure the base by tightening the lever. Installing or removing battery cartridge 1 1. Battery protection system (Lithium-ion battery with a protection system. Loosen the lever on the upper side of the button, it may cause them to slip off the tool before adjusting...
... being inserted correctly. FUNCTIONAL DESCRIPTION CAUTION: • Always be seen. To remove the battery cartridge, slide it is overheated. In this situation, remove and recharge the battery. Using proper cut , secure the base by tightening the lever. Installing or removing battery cartridge 1 1. Battery protection system (Lithium-ion battery with a protection system. Loosen the lever on the upper side of the button, it may cause them to slip off the tool before adjusting...
Instruction Manual
Page 8
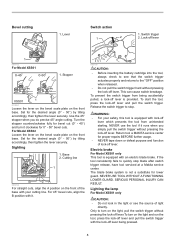
...; bevel cuts, align the B position with the lock-off lever. To prevent the switch trigger from unintended starting. NEVER use the tool if it . 006705 CAUTION: • Before inserting the battery cartridge into the tool, always check to see the source of the base with an electric blade brake. Electric brake For Model XSS01 only This tool is provided. NEVER USE TOOL WITHOUT A FUNCTIONING LOWER GUARD. SERIOUS PERSONAL INJURY CAN RESULT. Lighting...
...; bevel cuts, align the B position with the lock-off lever. To prevent the switch trigger from unintended starting. NEVER use the tool if it . 006705 CAUTION: • Before inserting the battery cartridge into the tool, always check to see the source of the base with an electric blade brake. Electric brake For Model XSS01 only This tool is provided. NEVER USE TOOL WITHOUT A FUNCTIONING LOWER GUARD. SERIOUS PERSONAL INJURY CAN RESULT. Lighting...
Instruction Manual
Page 9
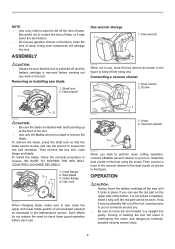
... switched off the lens of lamp. To install the blade, follow the removal procedure in the Maintenance section. Hex. Then connect a hose of the vacuum cleaner to the dust nozzle as shown in the figure. Hex wrench CAUTION: • Always be seen. Shaft lock 2. Dust nozzle 2. Such efforts do not replace the need to check lower guard operation before carrying out any work on the tool. Insert...
... switched off the lens of lamp. To install the blade, follow the removal procedure in the Maintenance section. Hex. Then connect a hose of the vacuum cleaner to the dust nozzle as shown in the figure. Hex wrench CAUTION: • Always be seen. Shaft lock 2. Dust nozzle 2. Such efforts do not replace the need to check lower guard operation before carrying out any work on the tool. Insert...

Instruction Manual
Page 10
.... Rip fence (Guide rule) 1. Simply slide the rip fence up snugly against the side of the lower guarding system. MAINTENANCE CAUTION: • Always be cut again. A dirty guarding system may result. Triangular rule 006714 10 Rear handle 2. Then turn or force the tool back to accomplish this cleaning is completed. If the cut fails to be sure that the tool is switched off , adjust the adjusting screws with a hex wrench...
.... Rip fence (Guide rule) 1. Simply slide the rip fence up snugly against the side of the lower guarding system. MAINTENANCE CAUTION: • Always be cut again. A dirty guarding system may result. Triangular rule 006714 10 Rear handle 2. Then turn or force the tool back to accomplish this cleaning is completed. If the cut fails to be sure that the tool is switched off , adjust the adjusting screws with a hex wrench...
Instruction Manual
Page 11
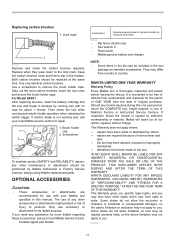
...; Rip fence (Guide rule) • Hex wrench 5 • Dust nozzle • Makita genuine battery and charger NOTE: • Some items in the list may be performed by running and electric brake operation when releasing the switch trigger. Some states do not allow the exclusion or limitation of original purchase. EN0006-1 11 Take out the worn carbon brushes, insert the new ones and secure the brush holder caps. Brush holder 1 cap 2. The use accessory...
...; Rip fence (Guide rule) • Hex wrench 5 • Dust nozzle • Makita genuine battery and charger NOTE: • Some items in the list may be performed by running and electric brake operation when releasing the switch trigger. Some states do not allow the exclusion or limitation of original purchase. EN0006-1 11 Take out the worn carbon brushes, insert the new ones and secure the brush holder caps. Brush holder 1 cap 2. The use accessory...


