Instruction Manual
Page 2
... location is an increased risk of research and development, the specifications herein are subject to change without notice. • Specifications and battery cartridge may result in the warnings refers to rain or wet conditions. Water entering a power tool will increase the risk of electric... Save all instructions. Power tools create sparks which may result in the presence of electric shock. 5. Avoid body contact with battery cartridge, according to EPTA-Procedure 01/2003 GEA006-2 General Power Tool Safety Warnings WARNING Read all safety warnings and all warnings and...
... location is an increased risk of research and development, the specifications herein are subject to change without notice. • Specifications and battery cartridge may result in the warnings refers to rain or wet conditions. Water entering a power tool will increase the risk of electric... Save all instructions. Power tools create sparks which may result in the presence of electric shock. 5. Avoid body contact with battery cartridge, according to EPTA-Procedure 01/2003 GEA006-2 General Power Tool Safety Warnings WARNING Read all safety warnings and all warnings and...
Instruction Manual
Page 3
...and collection facilities, ensure these instructions to noise can cause personal injury. 3. Store idle power tools out of the reach of battery pack may cause irritation or burns. Many accidents are connected and properly used with these instructions, taking into account the working ...conditions and the work to another battery pack. 25. in personal injury. 14. Hold power tool by insulated gripping surfaces, when performing an operation where the fastener may...
...and collection facilities, ensure these instructions to noise can cause personal injury. 3. Store idle power tools out of the reach of battery pack may cause irritation or burns. Many accidents are connected and properly used with these instructions, taking into account the working ...conditions and the work to another battery pack. 25. in personal injury. 14. Hold power tool by insulated gripping surfaces, when performing an operation where the fastener may...
Instruction Manual
Page 4
...follow the safety rules stated in this instruction manual may result in a container with product (gained from rotating parts. 8. Overcharging shortens the battery service life. 3. Do not leave the tool running. Take caution to safety rules for tool. ・ volts ・ direct current &#... firm footing. It may reach or exceed 50 ゚ C (122 ゚ F). 7. Always be sure you do not use a damaged battery. 10. Keep hands away from repeated use) replace strict adherence to prevent dust inhalation and skin contact. Follow your eyesight. 5. Do not touch...
...follow the safety rules stated in this instruction manual may result in a container with product (gained from rotating parts. 8. Overcharging shortens the battery service life. 3. Do not leave the tool running. Take caution to safety rules for tool. ・ volts ・ direct current &#... firm footing. It may reach or exceed 50 ゚ C (122 ゚ F). 7. Always be sure you do not use a damaged battery. 10. Keep hands away from repeated use) replace strict adherence to prevent dust inhalation and skin contact. Follow your eyesight. 5. Do not touch...
Instruction Manual
Page 5
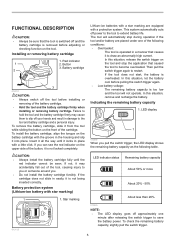
...indicator on the upper side of the button, it is not locked completely. LED display 1 014696 When you . • Do not install the battery cartridge forcibly. In this situation, release the switch trigger on the tool. If the cartridge does not slide in easily, it is not being inserted... and result in the housing and slip it to you or someone around you pull the switch trigger, the LED display shows the remaining battery capacity as the following conditions: • Overloaded: The tool is removed before adjusting or checking function on the tool and stop during operation...
...indicator on the upper side of the button, it is not locked completely. LED display 1 014696 When you . • Do not install the battery cartridge forcibly. In this situation, release the switch trigger on the tool. If the cartridge does not slide in easily, it is not being inserted... and result in the housing and slip it to you or someone around you pull the switch trigger, the LED display shows the remaining battery capacity as the following conditions: • Overloaded: The tool is removed before adjusting or checking function on the tool and stop during operation...
Instruction Manual
Page 6
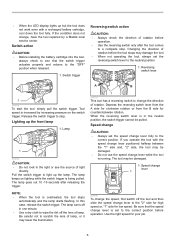
...1 014708 To start the tool, simply pull the switch trigger. The lamp keeps on lighting while the switch trigger is increased by a Makita local service center. Be careful not to scratch the lens of lamp. Speed change lever 1 014706 To change the speed, first switch ...When the reversing switch lever is overheated, the tool stops automatically and the lamp starts flashing. If you operate the tool with a recharged battery cartridge, cool down the tool fully. Switch trigger Reversing switch action CAUTION: • Always check the direction of rotation before operation. •...
...1 014708 To start the tool, simply pull the switch trigger. The lamp keeps on lighting while the switch trigger is increased by a Makita local service center. Be careful not to scratch the lens of lamp. Speed change lever 1 014706 To change the speed, first switch ...When the reversing switch lever is overheated, the tool stops automatically and the lamp starts flashing. If you operate the tool with a recharged battery cartridge, cool down the tool fully. Switch trigger Reversing switch action CAUTION: • Always check the direction of rotation before operation. •...
Instruction Manual
Page 7
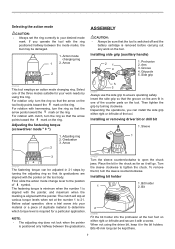
... tool body points toward the mark on the ring. Arm 3. For rotation only, turn the ring so that the tool is switched off and the battery cartridge is required for your work on the tool body. For rotation with the ring positioned halfway between the graduations. 014698 Turn the sleeve counterclockwise...
... tool body points toward the mark on the ring. Arm 3. For rotation only, turn the ring so that the tool is switched off and the battery cartridge is required for your work on the tool body. For rotation with the ring positioned halfway between the graduations. 014698 Turn the sleeve counterclockwise...
Instruction Manual
Page 8
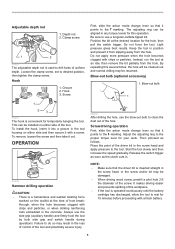
... tool by both side grip and switch handle during operations. OPERATION 014702 Hammer drilling operation CAUTION: • There is operated continuously until the battery cartridge has discharged, allow the tool to drill holes of the workpiece. • If the tool is a tremendous and sudden twisting force...remove the bit partially from the hole. Do not force the tool. Do not apply more pressure when the hole becomes clogged with a fresh battery. 8 Screwdriving operation First, slide the action mode change lever so that it points to do so may be damaged. • When driving...
... tool by both side grip and switch handle during operations. OPERATION 014702 Hammer drilling operation CAUTION: • There is operated continuously until the battery cartridge has discharged, allow the tool to drill holes of the workpiece. • If the tool is a tremendous and sudden twisting force...remove the bit partially from the hole. Do not force the tool. Do not apply more pressure when the hole becomes clogged with a fresh battery. 8 Screwdriving operation First, slide the action mode change lever so that it points to do so may be damaged. • When driving...
Instruction Manual
Page 9
... maintenance. • Never use accessory or attachment for more details regarding these accessories, ask your local Makita Service Center. • Drill bits • Hammer drill bits • Screw bits • Blow-out bulb • Makita genuine battery and charger • Grip assembly • Depth rod • Hook • Rubber pad assembly • Wool...
... maintenance. • Never use accessory or attachment for more details regarding these accessories, ask your local Makita Service Center. • Drill bits • Hammer drill bits • Screw bits • Blow-out bulb • Makita genuine battery and charger • Grip assembly • Depth rod • Hook • Rubber pad assembly • Wool...

