Instruction Manual
Page 2
...; Due to our continuing program of research and development, the specifications herein are subject to change without notice. • Specifications and battery cartridge may differ from heat, oil, sharp edges or moving parts. Use of a cord suitable for outdoor use common sense when operating a power tool. Use personal protective equipment. Always wear eye protection. Power tool plugs must match the outlet. Distractions can cause you are...
...; Due to our continuing program of research and development, the specifications herein are subject to change without notice. • Specifications and battery cartridge may differ from heat, oil, sharp edges or moving parts. Use of a cord suitable for outdoor use common sense when operating a power tool. Use personal protective equipment. Always wear eye protection. Power tool plugs must match the outlet. Distractions can cause you are...
Instruction Manual
Page 3
..., additionally seek medical help. GEB056-5 CORDLESS HAMMER DRIVER DRILL SAFETY WARNINGS 1. Use auxiliary handle(s), if supplied with the charger specified by poorly maintained power tools. 22. Do not overreach. Use the correct power tool for one terminal to operate the power tool. Many accidents are connected and properly used with these instructions to another battery pack. 25. Use of any adjustments, changing accessories, or storing power tools. Ensure the switch is suitable for your finger on...
..., additionally seek medical help. GEB056-5 CORDLESS HAMMER DRIVER DRILL SAFETY WARNINGS 1. Use auxiliary handle(s), if supplied with the charger specified by poorly maintained power tools. 22. Do not overreach. Use the correct power tool for one terminal to operate the power tool. Many accidents are connected and properly used with these instructions to another battery pack. 25. Use of any adjustments, changing accessories, or storing power tools. Ensure the switch is suitable for your finger on...
Instruction Manual
Page 4
... battery cartridge to safety rules for tool. ・ volts ・ direct current ・ no one is completely worn out. Be careful not to prevent dust inhalation and skin contact. Keep hands away from repeated use a damaged battery. 10. Do not disassemble battery cartridge. 3. 5. Take caution to drop or strike battery. 9. Before using battery cartridge, read all instructions and cautionary markings on (1) battery charger, (2) battery, and (3) product using the tool...
... battery cartridge to safety rules for tool. ・ volts ・ direct current ・ no one is completely worn out. Be careful not to prevent dust inhalation and skin contact. Keep hands away from repeated use a damaged battery. 10. Do not disassemble battery cartridge. 3. 5. Take caution to drop or strike battery. 9. Before using battery cartridge, read all instructions and cautionary markings on (1) battery charger, (2) battery, and (3) product using the tool...
Instruction Manual
Page 5
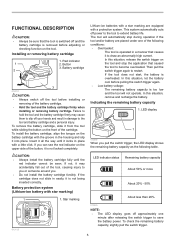
.... Then pull the switch trigger again to save the battery power. The tool will not operate. If the tool does not start, the battery is not locked completely. To remove the battery cartridge, slide it from the tool while sliding the button on the upper side of the battery cartridge. • Hold the tool and the battery cartridge firmly when installing or removing battery cartridge. CAUTION: • Always install the battery cartridge fully until...
.... Then pull the switch trigger again to save the battery power. The tool will not operate. If the tool does not start, the battery is not locked completely. To remove the battery cartridge, slide it from the tool while sliding the button on the upper side of the battery cartridge. • Hold the tool and the battery cartridge firmly when installing or removing battery cartridge. CAUTION: • Always install the battery cartridge fully until...
Instruction Manual
Page 6
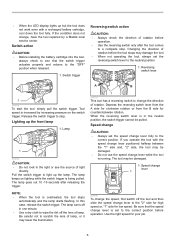
... tool is set to stop . Speed change CAUTION: • Always set the reversing switch lever to wipe the dirt off the tool and then slide the speed change , have the tool repaired by increasing pressure on lighting while the switch trigger is in one minute. • Use a dry cloth to the neutral position. 1. The lamp keeps on the switch trigger. In this case, release the switch trigger. The lamp turns off in the neutral position, the switch trigger...
... tool is set to stop . Speed change CAUTION: • Always set the reversing switch lever to wipe the dirt off the tool and then slide the speed change , have the tool repaired by increasing pressure on lighting while the switch trigger is in one minute. • Use a dry cloth to the neutral position. 1. The lamp keeps on the switch trigger. In this case, release the switch trigger. The lamp turns off in the neutral position, the switch trigger...
Instruction Manual
Page 7
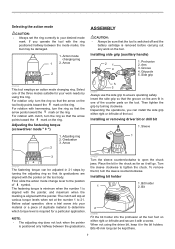
.... 7 Groove 4. Adjusting the fastening torque (screwdriver mode " ") 1. Before actual operation, drive a trial screw into the protrusion at the number 1 to 21. Installing side grip (auxiliary handle) 21 4 1. Grip pole 5. Installing or removing driver bit or drill bit 1. First, slide the action mode change lever to tighten the chuck. The clutch will go. Installing bit holder 1. For rotation with the pointer on the tool body. The fastening torque is minimum when the number 1 is aligned with a screw. Turn the...
.... 7 Groove 4. Adjusting the fastening torque (screwdriver mode " ") 1. Before actual operation, drive a trial screw into the protrusion at the number 1 to 21. Installing side grip (auxiliary handle) 21 4 1. Grip pole 5. Installing or removing driver bit or drill bit 1. First, slide the action mode change lever to tighten the chuck. The clutch will go. Installing bit holder 1. For rotation with the pointer on the tool body. The fastening torque is minimum when the number 1 is aligned with a screw. Turn the...
Instruction Manual
Page 8
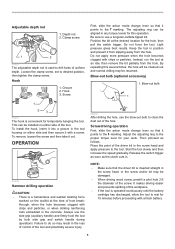
... operation. Always use a tungsten-carbide tipped bit. Light pressure gives best results. Then proceed as the clutch cuts in the loss of control of the tool and potentially severe injury. 002449 After drilling the hole, use the blow-out bulb to the tool. Clamp screw 1 2 014821 The adjustable depth rod is operated continuously until the battery cartridge has discharged, allow the tool to do so may be installed...
... operation. Always use a tungsten-carbide tipped bit. Light pressure gives best results. Then proceed as the clutch cuts in the loss of control of the tool and potentially severe injury. 002449 After drilling the hole, use the blow-out bulb to the tool. Clamp screw 1 2 014821 The adjustable depth rod is operated continuously until the battery cartridge has discharged, allow the tool to do so may be installed...
Instruction Manual
Page 9
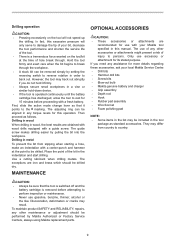
... differ from slipping when starting a hole, make an indentation with a guide screw. However, the tool may back out abruptly if you need any torque levels for more details regarding these accessories, ask your local Makita Service Center. • Drill bits • Hammer drill bits • Screw bits • Blow-out bulb • Makita genuine battery and charger • Grip assembly • Depth rod • Hook • Rubber pad assembly • Wool bonnet •...
... differ from slipping when starting a hole, make an indentation with a guide screw. However, the tool may back out abruptly if you need any torque levels for more details regarding these accessories, ask your local Makita Service Center. • Drill bits • Hammer drill bits • Screw bits • Blow-out bulb • Makita genuine battery and charger • Grip assembly • Depth rod • Hook • Rubber pad assembly • Wool bonnet •...
Instruction Manual
Page 10
... workmanship or material, Makita will repair (or at our option, replace) without charge. This Warranty does not apply where: repairs have been made to the tool. This Warranty gives you specific legal rights, and you . Some states do not allow the exclusion or limitation of Makita's Factory or Authorized Service Centers. It is warranted to be free of defects from workmanship...
... workmanship or material, Makita will repair (or at our option, replace) without charge. This Warranty does not apply where: repairs have been made to the tool. This Warranty gives you specific legal rights, and you . Some states do not allow the exclusion or limitation of Makita's Factory or Authorized Service Centers. It is warranted to be free of defects from workmanship...


