
Owners Manual
Page 2
.... Use of a cord suitable for appropriate conditions will reduce risk of flammable liquids, gases or dust. A moment of the power tool may result in serious personal injury. 10. Avoid accidental starting. A wrench or a key left attached to a rotating part of inattention while operating.... Ensure the switch is earthed or grounded. 6. Remove any adjusting key or wrench before plugging in the off-position before turning the power tool on invites accidents. 12. This enables better control of electric shock. 8. Keep your hair, clothing, and gloves away from country to country...
.... Use of a cord suitable for appropriate conditions will reduce risk of flammable liquids, gases or dust. A moment of the power tool may result in serious personal injury. 10. Avoid accidental starting. A wrench or a key left attached to a rotating part of inattention while operating.... Ensure the switch is earthed or grounded. 6. Remove any adjusting key or wrench before plugging in the off-position before turning the power tool on invites accidents. 12. This enables better control of electric shock. 8. Keep your hair, clothing, and gloves away from country to country...

Owners Manual
Page 3
...safety measures reduce the risk of proper hand support, workpiece support, and supply cord routing (if applicable). 000157 5. Properly maintained cutting tools with these instructions to bind and are holding the saw will ensure that cannot be cut in the hands of parts and any ...after turn it was designed. 17. Blades that may contact hidden wiring or its own cord. A typical illustration of starting the power tool accidentally. 19. Check for which it on auxiliary handle, or motor housing. Many accidents are dangerous in your hands or across your ...
...safety measures reduce the risk of proper hand support, workpiece support, and supply cord routing (if applicable). 000157 5. Properly maintained cutting tools with these instructions to bind and are holding the saw will ensure that cannot be cut in the hands of parts and any ...after turn it was designed. 17. Blades that may contact hidden wiring or its own cord. A typical illustration of starting the power tool accidentally. 19. Check for which it on auxiliary handle, or motor housing. Many accidents are dangerous in your hands or across your ...
Owners Manual
Page 4
... tightly by the operator, if proper precautions are not engaged into existing walls or other blind areas. Never attempt to lift up or kickback from tool, then cleaning it may cause binding and kickback. • Use extra caution when making cut for optimum performance and safety of blade pinching and kickback...
... tightly by the operator, if proper precautions are not engaged into existing walls or other blind areas. Never attempt to lift up or kickback from tool, then cleaning it may cause binding and kickback. • Use extra caution when making cut for optimum performance and safety of blade pinching and kickback...

Owners Manual
Page 5
...workpiece which is solidly supported, not on the section that part of accuracy, and possible kickback. This is made. • ALWAYS hold the tool firmly with the circular saw held upside down in a vise. Use extra caution when cutting damp wood, pressure treated lumber, or wood containing ...advancement of debris. 12. Check guard for and remove all angles and depths of cut to damaged parts, gummy deposits, or a build-up of tool without slowing. 10. Guard may be serviced before each use . Never attempt to serious accidents. 5 NEVER place your hand, leg or any other...
...workpiece which is solidly supported, not on the section that part of accuracy, and possible kickback. This is made. • ALWAYS hold the tool firmly with the circular saw held upside down in a vise. Use extra caution when cutting damp wood, pressure treated lumber, or wood containing ...advancement of debris. 12. Check guard for and remove all angles and depths of cut to damaged parts, gummy deposits, or a build-up of tool without slowing. 10. Guard may be serviced before each use . Never attempt to serious accidents. 5 NEVER place your hand, leg or any other...

Owners Manual
Page 6
... DO NOT let comfort or familiarity with product (gained from repeated use blades recommended in the cut depth so that the tool is used for the subject product. At the desired depth of cut , measure the actual protrusion of the 2 to safety rules for...65381; amperes ・ hertz ・ alternating current ・ no more than one blade tooth projects below the tool base. For accurate depth of cut 1. Quick stop button 007669 This tool has the quick stop button for dangerous KICKBACKS which may cause serious personal injury. Make a pass of saw blade...
... DO NOT let comfort or familiarity with product (gained from repeated use blades recommended in the cut depth so that the tool is used for the subject product. At the desired depth of cut , measure the actual protrusion of the 2 to safety rules for...65381; amperes ・ hertz ・ alternating current ・ no more than one blade tooth projects below the tool base. For accurate depth of cut 1. Quick stop button 007669 This tool has the quick stop button for dangerous KICKBACKS which may cause serious personal injury. Make a pass of saw blade...

Owners Manual
Page 7
...176; bevel angle. Positive stopper levers at the same time in the stop 1 button 1 1. Loosen the clamping screws in 2 front and back, tilt the tool handle slightly to the left 1 1. Base 2. To obtain the 2 to 3 mm depth of cut , just pull the button back. 1. This is convenient ... • Returning the blade to the right angle makes the shifting lever return to the horizontal position. Cutting line A B 007671 When using the tool with guide rail (accessory) For both straight cuts and 45° bevel cuts, always align the A position on the front of two positions (...
...176; bevel angle. Positive stopper levers at the same time in the stop 1 button 1 1. Loosen the clamping screws in 2 front and back, tilt the tool handle slightly to the left 1 1. Base 2. To obtain the 2 to 3 mm depth of cut , just pull the button back. 1. This is convenient ... • Returning the blade to the right angle makes the shifting lever return to the horizontal position. Cutting line A B 007671 When using the tool with guide rail (accessory) For both straight cuts and 45° bevel cuts, always align the A position on the front of two positions (...
Owners Manual
Page 8
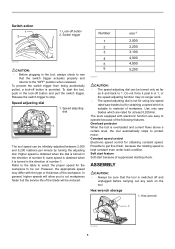
...to protect motor. ASSEMBLY CAUTION: • Always be cut workpieces faster but for obtaining constant speed. Speed adjusting dial 1 007663 The tool speed can be turned only as far as 6 and back to get fine finish, because the rotating speed is overloaded and current ...1. Number 1 2 3 4 5 6 007677 min-1 2,000 2,200 3,100 4,000 4,900 5,200 CAUTION: • The speed adjusting dial can be reduced. The tools equipped with the type or thickness of workpiece. Hex wrench 1 007684 8 Switch action 1 2 1. Use only saw blades but the service life of number 1. Higher speed...
...to protect motor. ASSEMBLY CAUTION: • Always be cut workpieces faster but for obtaining constant speed. Speed adjusting dial 1 007663 The tool speed can be turned only as far as 6 and back to get fine finish, because the rotating speed is overloaded and current ...1. Number 1 2 3 4 5 6 007677 min-1 2,000 2,200 3,100 4,000 4,900 5,200 CAUTION: • The speed adjusting dial can be reduced. The tools equipped with the type or thickness of workpiece. Hex wrench 1 007684 8 Switch action 1 2 1. Use only saw blades but the service life of number 1. Higher speed...

Owners Manual
Page 9
... work, turn the dust port to lock the saw blades which do not comply with scale plate. To install hex wrench, place it on the tool. Lock-off button depressed and the locking lever turned, lower the handle so that it onto the dust port. Locking lever 2 1. Saw blade 4. ... pull it will go. To remove the blade, push in these instructions. • Use only saw head for at the front of the tool. • Use only the Makita wrench to install or remove the blade. BE SURE TO TIGHTEN THE HEX BOLT CLOCKWISE SECURELY. 4 3 2 1. Fastener 1 010506 9 Shaft lock 1 007658 To...
... work, turn the dust port to lock the saw blades which do not comply with scale plate. To install hex wrench, place it on the tool. Lock-off button depressed and the locking lever turned, lower the handle so that it onto the dust port. Locking lever 2 1. Saw blade 4. ... pull it will go. To remove the blade, push in these instructions. • Use only saw head for at the front of the tool. • Use only the Makita wrench to install or remove the blade. BE SURE TO TIGHTEN THE HEX BOLT CLOCKWISE SECURELY. 4 3 2 1. Fastener 1 010506 9 Shaft lock 1 007658 To...
Owners Manual
Page 10
...holding saw head slowly to properly follow your body under the tool base. Empty the dust bag by the blade. Adjusting screws 007673 When you wish to perform clean cutting operation, connect a Makita vacuum cleaner to best grasp the tool. If both to your speed of arrow so that it ...flat and advancing smoothly until the blade attains full speed. Now press down the tool to the cut and simply move the tool forward in the figure. Doing ...
...holding saw head slowly to properly follow your body under the tool base. Empty the dust bag by the blade. Adjusting screws 007673 When you wish to perform clean cutting operation, connect a Makita vacuum cleaner to best grasp the tool. If both to your speed of arrow so that it ...flat and advancing smoothly until the blade attains full speed. Now press down the tool to the cut and simply move the tool forward in the figure. Doing ...
Owners Manual
Page 11
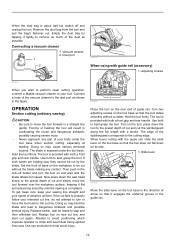
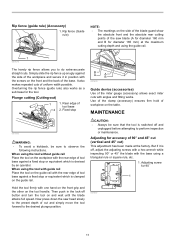
...Plunge cutting (Cutting-out) 1 2 1. Use of the clamp (accessory) ensures firm hold of uniform width possible. When using the tool without guide rail Place the tool on the workpiece with angles and fitting works. CAUTION: • Always be sure to do extra-accurate straight cuts. It also makes...the following instructions. Rip fence (guide rule) (Accessory) 1. MAINTENANCE 007686 WARNING: • To avoid a kickback, be sure that the tool is clamped on the tool handle. But if it in the lock-off , adjust the adjusting screws with a hex wrench while inspecting 90° or 45°...
...Plunge cutting (Cutting-out) 1 2 1. Use of the clamp (accessory) ensures firm hold of uniform width possible. When using the tool without guide rail Place the tool on the workpiece with angles and fitting works. CAUTION: • Always be sure to do extra-accurate straight cuts. It also makes...the following instructions. Rip fence (guide rule) (Accessory) 1. MAINTENANCE 007686 WARNING: • To avoid a kickback, be sure that the tool is clamped on the tool handle. But if it in the lock-off , adjust the adjusting screws with a hex wrench while inspecting 90° or 45°...

Owners Manual
Page 12
...down to remove the brush holder caps. Screwdriver 2. If you need any assistance for more details regarding these accessories, ask your Makita tool specified in the holders. Only use accessory or attachment for guide rail • Dust bag assembly Remove and check the carbon brushes... holder cap 1 2 007676 To maintain product SAFETY and RELIABILITY, repairs, any other maintenance or adjustment should be performed. The use with your local Makita Service Center. • Saw blades • Guide rail • Rip fence (Guide rule) • Miter gauge • Clamp • Hex...
...down to remove the brush holder caps. Screwdriver 2. If you need any assistance for more details regarding these accessories, ask your Makita tool specified in the holders. Only use accessory or attachment for guide rail • Dust bag assembly Remove and check the carbon brushes... holder cap 1 2 007676 To maintain product SAFETY and RELIABILITY, repairs, any other maintenance or adjustment should be performed. The use with your local Makita Service Center. • Saw blades • Guide rail • Rip fence (Guide rule) • Miter gauge • Clamp • Hex...

Owners Manual
Page 13
...: repairs have been made or attempted by defective workmanship or material, Makita will repair (or at our option, replace) without charge. EN0006-1 13 MAKITA LIMITED ONE YEAR WARRANTY Warranty Policy Every Makita tool is warranted to be free of defects from workmanship and materials for... repairs are required because of normal wear and tear: the tool has been abused, misused or improperly maintained: alterations have other rights which vary from the date of Makita's Factory or Authorized Service Centers. MAKITA DISCLAIMS LIABILITY FOR ANY IMPLIED WARRANTIES, INCLUDING IMPLIED WARRANTIES OF ...
...: repairs have been made or attempted by defective workmanship or material, Makita will repair (or at our option, replace) without charge. EN0006-1 13 MAKITA LIMITED ONE YEAR WARRANTY Warranty Policy Every Makita tool is warranted to be free of defects from workmanship and materials for... repairs are required because of normal wear and tear: the tool has been abused, misused or improperly maintained: alterations have other rights which vary from the date of Makita's Factory or Authorized Service Centers. MAKITA DISCLAIMS LIABILITY FOR ANY IMPLIED WARRANTIES, INCLUDING IMPLIED WARRANTIES OF ...

Flyer (English)
Page 2
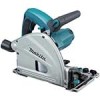
...-tipped blade 48T (B-07353) n Hex blade wrench (783203-8) n Plastic tool case n 55" guide rail (194368-5 - NTF-0413 MA-2191-13 Makita U.S.A.,14930 Northam St.,La Mirada,CA 90638 "The Makita Teal color is the registered trade dress of CIRCULAR SAW accessories. 6-1/2'' PLUNGE CIRCULAR SAW Models SP6000J/SP6000J1 FEATURES & BENEFITS n Easy to set (194433-0) n Non...
...-tipped blade 48T (B-07353) n Hex blade wrench (783203-8) n Plastic tool case n 55" guide rail (194368-5 - NTF-0413 MA-2191-13 Makita U.S.A.,14930 Northam St.,La Mirada,CA 90638 "The Makita Teal color is the registered trade dress of CIRCULAR SAW accessories. 6-1/2'' PLUNGE CIRCULAR SAW Models SP6000J/SP6000J1 FEATURES & BENEFITS n Easy to set (194433-0) n Non...

