

Owners Manual
Page 2
... rain or wet conditions. Cluttered and dark areas invite accidents. 2. Dress properly. Avoid accidental starting. Electrical Safety 4. Use of electric shock. 5. ENGLISH SPECIFICATIONS Model SP6000 Blade diameter 165 mm (6-1/2") at 90° 56 mm (2-3/16") Max. Do not expose power tools to EPTA-Procedure 01/2003 GEA001-3 GENERAL SAFETY RULES WARNING!
... rain or wet conditions. Cluttered and dark areas invite accidents. 2. Dress properly. Avoid accidental starting. Electrical Safety 4. Use of electric shock. 5. ENGLISH SPECIFICATIONS Model SP6000 Blade diameter 165 mm (6-1/2") at 90° 56 mm (2-3/16") Max. Do not expose power tools to EPTA-Procedure 01/2003 GEA001-3 GENERAL SAFETY RULES WARNING!

Owners Manual
Page 3
... or motor housing. Keep cutting tools sharp and clean. Properly maintained cutting tools with correct size and shape (diamond versus round) of blade binding. 7. This will run eccentrically, causing loss of parts and any adjustments, changing accessories, or storing power tools. Keep handles dry,...It is maintained. 24. A typical illustration of untrained users. 20. The correct power tool will also make exposed metal parts of the blade teeth should be cut in a hazardous situation. Keep your leg. Use the power tool, accessories and tool bits etc. Follow instruction for...
... or motor housing. Keep cutting tools sharp and clean. Properly maintained cutting tools with correct size and shape (diamond versus round) of blade binding. 7. This will run eccentrically, causing loss of parts and any adjustments, changing accessories, or storing power tools. Keep handles dry,...It is maintained. 24. A typical illustration of untrained users. 20. The correct power tool will also make exposed metal parts of the blade teeth should be cut in a hazardous situation. Keep your leg. Use the power tool, accessories and tool bits etc. Follow instruction for...
Owners Manual
Page 4
...removing it from tool, then cleaning it with gum and pitch remover, hot water or kerosene. Unsharpened or improperly set blades produce narrow kerf causing excessive friction, blade binding and kickback. Gum and wood pitch hardened on the saw and position your arms to eliminate the cause of ... Do not support board or panel away from the workpiece as given below. • Maintain a firm grip with the blade. Position your saw to a complete stop. The protruding blade may occur. Supports must be tight and secure before making a "plunge cut" into the top surface of the wood ...
...removing it from tool, then cleaning it with gum and pitch remover, hot water or kerosene. Unsharpened or improperly set blades produce narrow kerf causing excessive friction, blade binding and kickback. Gum and wood pitch hardened on the saw and position your arms to eliminate the cause of ... Do not support board or panel away from the workpiece as given below. • Maintain a firm grip with the blade. Position your saw to a complete stop. The protruding blade may occur. Supports must be tight and secure before making a "plunge cut" into the top surface of the wood ...

Owners Manual
Page 5
...your body under the tool base or behind the saw can lead to damaged parts, gummy deposits, or a build-up of cut " when the blade bevel setting is solidly supported, not on bench or floor. Use extra caution when cutting damp wood, pressure treated lumber, or wood containing knots....2 000150 17. Be aware of your hand, leading to maintain smooth advancement of tool without slowing. 10. Check to stop after switch is covering the blade before each use . Guard may be serviced before cutting. 16. Do not operate the saw . If the workpiece is accidentally dropped, guard may operate...
...your body under the tool base or behind the saw can lead to damaged parts, gummy deposits, or a build-up of cut " when the blade bevel setting is solidly supported, not on bench or floor. Use extra caution when cutting damp wood, pressure treated lumber, or wood containing knots....2 000150 17. Be aware of your hand, leading to maintain smooth advancement of tool without slowing. 10. Check to stop after switch is covering the blade before each use . Guard may be serviced before cutting. 16. Do not operate the saw . If the workpiece is accidentally dropped, guard may operate...

Owners Manual
Page 6
...always tighten the clamping screw securely. SAVE THESE INSTRUCTIONS. WARNING: DO NOT let comfort or familiarity with product (gained from repeated use blades recommended in the cut. USD201-2 Symbols The followings show the symbols used when avoiding splinter on the tool. For accurate depth of cut..., measure the actual protrusion of saw blade. 20. Make a pass of the 2 to safety rules for dangerous KICKBACKS which may cause serious personal injury. Take caution to reduce...
...always tighten the clamping screw securely. SAVE THESE INSTRUCTIONS. WARNING: DO NOT let comfort or familiarity with product (gained from repeated use blades recommended in the cut. USD201-2 Symbols The followings show the symbols used when avoiding splinter on the tool. For accurate depth of cut..., measure the actual protrusion of saw blade. 20. Make a pass of the 2 to safety rules for dangerous KICKBACKS which may cause serious personal injury. Take caution to reduce...

Owners Manual
Page 7
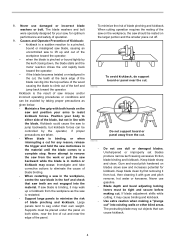
Clamping screws 2. Loosen the clamping screws in the stop 1 button 1 1. NOTE: • Returning the blade to the right angle makes the shifting lever return to 0° by itself. And then tilt the tool handle to the left 1° bevel angle. ... 2 to 3 mm depth of the base with it. This is convenient for free depth of arrow which has a marking -1. Quick stop button toward the saw blade. Bevel angle shifting lever Bevel cutting 1. Positive stopper levers at the same time in the direction of cut , push in front and back. Sighting 1 2 1. Cutting...
Clamping screws 2. Loosen the clamping screws in the stop 1 button 1 1. NOTE: • Returning the blade to the right angle makes the shifting lever return to 0° by itself. And then tilt the tool handle to the left 1° bevel angle. ... 2 to 3 mm depth of the base with it. This is convenient for free depth of arrow which has a marking -1. Quick stop button toward the saw blade. Bevel angle shifting lever Bevel cutting 1. Positive stopper levers at the same time in the direction of cut , push in front and back. Sighting 1 2 1. Cutting...
Owners Manual
Page 8
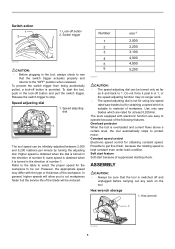
... check to see that the tool is turned in the direction of the workpiece. Speed adjusting dial 1. Use only saw blades which is not for using low speed rated saw blades but the service life of number 6; Speed adjusting dial 1 007663 The tool speed can be infinitely adjusted between 2,000 ... faster but for obtaining a speed which are easy to the "OFF" position when released. Lock-off button is turned in the direction of the blade will allow you to protect motor. lower speed is obtained when it past 6 or 1, or the speed adjusting function may differ with electronic function ...
... check to see that the tool is turned in the direction of the workpiece. Speed adjusting dial 1. Use only saw blades which is not for using low speed rated saw blades but the service life of number 6; Speed adjusting dial 1 007663 The tool speed can be infinitely adjusted between 2,000 ... faster but for obtaining a speed which are easy to the "OFF" position when released. Lock-off button is turned in the direction of the blade will allow you to protect motor. lower speed is obtained when it past 6 or 1, or the speed adjusting function may differ with electronic function ...

Owners Manual
Page 9
.... Locking lever 2 1. Hex bolt 2. Inner flange 1 007672 007662 Turn the locking lever to lock the saw blades which do not comply with teeth pointing up at the front of the tool. • Use only the Makita wrench to loosen the hex bolt counterclockwise. Fastener 1 010506 9 BE SURE TO TIGHTEN THE HEX BOLT...
.... Locking lever 2 1. Hex bolt 2. Inner flange 1 007672 007662 Turn the locking lever to lock the saw blades which do not comply with teeth pointing up at the front of the tool. • Use only the Makita wrench to loosen the hex bolt counterclockwise. Fastener 1 010506 9 BE SURE TO TIGHTEN THE HEX BOLT...
Owners Manual
Page 10
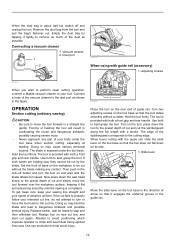
...remove as possible. Slide lever 007666 Move the slide lever on the workpiece to be cut fails to dangerous kickback and possible serious injury. The blade is provided with both a front grip and rear handle. Hold the tool firmly. The tool is exposed under the tool base when section cutting...to turn the tool on new cut line, and start cut again. Empty the dust bag by the blade. Adjusting screws 007673 When you wish to perform clean cutting operation, connect a Makita vacuum cleaner to your intended cut and simply move the tool forward in the figure. Forcing or twisting ...
...remove as possible. Slide lever 007666 Move the slide lever on the workpiece to be cut fails to dangerous kickback and possible serious injury. The blade is provided with both a front grip and rear handle. Hold the tool firmly. The tool is exposed under the tool base when section cutting...to turn the tool on new cut line, and start cut again. Empty the dust bag by the blade. Adjusting screws 007673 When you wish to perform clean cutting operation, connect a Makita vacuum cleaner to your intended cut and simply move the tool forward in the figure. Forcing or twisting ...
Owners Manual
Page 11
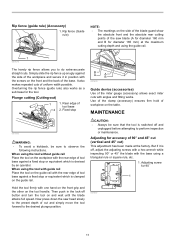
... 007667 11 Use of the clamp (accessory) ensures firm hold of tool base 2. Now press down the saw blade (A for diameter 160 mm and B for accuracy of tool base against a fixed stop or equivalent which is ... the adjusting screws with a hex wrench while inspecting 90° or 45° the blade with the base using the tool with guide rail Place the tool on the guide rail with the... screws on and wait until the blade attains full speed. Plunge cutting (Cutting-out) 1 2 1. MAINTENANCE 007686 WARNING: • To avoid...
... 007667 11 Use of the clamp (accessory) ensures firm hold of tool base 2. Now press down the saw blade (A for diameter 160 mm and B for accuracy of tool base against a fixed stop or equivalent which is ... the adjusting screws with a hex wrench while inspecting 90° or 45° the blade with the base using the tool with guide rail Place the tool on the guide rail with the... screws on and wait until the blade attains full speed. Plunge cutting (Cutting-out) 1 2 1. MAINTENANCE 007686 WARNING: • To avoid...

Owners Manual
Page 12
Limit mark 1 001145 ACCESSORIES CAUTION: • These accessories or attachments are recommended for use with your local Makita Service Center. • Saw blades • Guide rail • Rip fence (Guide rule) • Miter gauge • Clamp • Hex wrench • Sheet set for guide ...rail • Rubber sheet set for guide rail • Position sheet set for more details regarding these accessories, ask your Makita tool specified in...
Limit mark 1 001145 ACCESSORIES CAUTION: • These accessories or attachments are recommended for use with your local Makita Service Center. • Saw blades • Guide rail • Rip fence (Guide rule) • Miter gauge • Clamp • Hex wrench • Sheet set for guide ...rail • Rubber sheet set for guide rail • Position sheet set for more details regarding these accessories, ask your Makita tool specified in...

Parts Breakdown
Page 3
... 7 1 87 419631-8 LOCK PLATE 1 88 687063-9 CORD CLAMP 1 89 265995-6 TAPPING SCREW 4X18 2 SOCKET HEAD BOLT M6 1 53 158214-6 BLADE CASE COVER COMPLETE 1 53 810303-2 CAUTION LABEL 1 54 266034-5 TAPPING SCREW CT 4X16 5 55 188197-6 HANDLE SET 1 55 INC. 102 0 56...LEVER 1 80 265775-0 THUMB SCREW M4X3 1 81 419627-9 HOLDER 1 82 231316-4 COMPRESSION SPRING 7 1 83 265701-9 SCREW M6X14 1 84 922232-8 HEX. 047-1 158547-9 BLADE CASE COMPLETE 1 047-1 233025-1 COMPRESSION SPRING 2 2 047-1 253874-0 FLAT WASHER 4 2 047-1 259008-3 PUSH NUT 4 2 047-1 286277-3 CAP 14 2 047-1...
... 7 1 87 419631-8 LOCK PLATE 1 88 687063-9 CORD CLAMP 1 89 265995-6 TAPPING SCREW 4X18 2 SOCKET HEAD BOLT M6 1 53 158214-6 BLADE CASE COVER COMPLETE 1 53 810303-2 CAUTION LABEL 1 54 266034-5 TAPPING SCREW CT 4X16 5 55 188197-6 HANDLE SET 1 55 INC. 102 0 56...LEVER 1 80 265775-0 THUMB SCREW M4X3 1 81 419627-9 HOLDER 1 82 231316-4 COMPRESSION SPRING 7 1 83 265701-9 SCREW M6X14 1 84 922232-8 HEX. 047-1 158547-9 BLADE CASE COMPLETE 1 047-1 233025-1 COMPRESSION SPRING 2 2 047-1 253874-0 FLAT WASHER 4 2 047-1 259008-3 PUSH NUT 4 2 047-1 286277-3 CAP 14 2 047-1...

Parts Breakdown
Page 4
... 267781-1 WAVE WASHER 7 1 113 231372-4 COMPRESSION SPRING 5 1 115 421479-6 RUBBER RING 19 1 116 424047-4 PACKING 1 117 424050-5 SPONGE 1 118 443137-4 FELT 1 A01 B-07353 TCT SAW BLADE 165X20X48T 1 A02 783203-8 HEX. WRENCH 5 1 A03 165447-6 SUB BASE 1 A03 824783-6 SYSTAINER 1 A04 804869-2 SP6000K PLASTIC CASE LABEL 1
... 267781-1 WAVE WASHER 7 1 113 231372-4 COMPRESSION SPRING 5 1 115 421479-6 RUBBER RING 19 1 116 424047-4 PACKING 1 117 424050-5 SPONGE 1 118 443137-4 FELT 1 A01 B-07353 TCT SAW BLADE 165X20X48T 1 A02 783203-8 HEX. WRENCH 5 1 A03 165447-6 SUB BASE 1 A03 824783-6 SYSTAINER 1 A04 804869-2 SP6000K PLASTIC CASE LABEL 1

Flyer (English)
Page 1
... Continuous Operation • Electronic Soft Start Feature for splinter-free cutting enables to easily cut a preliminary groove at 45º) CONVENIENCE Close-to-wall cutting; blade enters material on the same cutting line SPLINTER-FREE CUTS. only 11/16"away from wall PRECISION Depth stopper for Smooth Start-Ups • Large... Cutting Capacity (2-3/16" at 90º and 1-9/16" at a depth of Materials • Built-in a Variety of 1/16" ACCURACY Models SP6000J SP6000J1 (Includes 55" Guide Rail) Straight or bevel cutting; makitatools.com
... Continuous Operation • Electronic Soft Start Feature for splinter-free cutting enables to easily cut a preliminary groove at 45º) CONVENIENCE Close-to-wall cutting; blade enters material on the same cutting line SPLINTER-FREE CUTS. only 11/16"away from wall PRECISION Depth stopper for Smooth Start-Ups • Large... Cutting Capacity (2-3/16" at 90º and 1-9/16" at a depth of Materials • Built-in a Variety of 1/16" ACCURACY Models SP6000J SP6000J1 (Includes 55" Guide Rail) Straight or bevel cutting; makitatools.com

Flyer (English)
Page 2
... deliver a well balanced and lightweight saw while making bevel cuts n Saw base is the registered trade dress of Makita Corporation." 6-1/2'' PLUNGE CIRCULAR SAW Models SP6000J/SP6000J1 FEATURES & BENEFITS n Easy to set (194433-0) n Non-slip replacement strip 32.8" (194417-8) n Splinter... guard replacement strip 55" (194418-6) 118" (194419-4) n Router guide rail adaptor (194579-2) n Rip fence (165447-6) n 6-1/2" 48T carbide saw blade (B-07353) Makita offers ...
... deliver a well balanced and lightweight saw while making bevel cuts n Saw base is the registered trade dress of Makita Corporation." 6-1/2'' PLUNGE CIRCULAR SAW Models SP6000J/SP6000J1 FEATURES & BENEFITS n Easy to set (194433-0) n Non-slip replacement strip 32.8" (194417-8) n Splinter... guard replacement strip 55" (194418-6) 118" (194419-4) n Router guide rail adaptor (194579-2) n Rip fence (165447-6) n 6-1/2" 48T carbide saw blade (B-07353) Makita offers ...


