
Owners Manual
Page 3
... be repaired. 18. Any power tool that the safety of the power tool is moving parts, breakage of parts and any adjustments, changing accessories, or storing power tools. Keep cutting tools sharp and clean. Have your second hand on and off . Keep your power tool serviced by...Blades that may contact hidden wiring or its own cord. Do not force the power tool. Use the correct power tool for lubricating and changing accessories. 25. It is dangerous and must be cut material when blade is maintained. 24. A typical illustration of starting the power tool accidentally....
... be repaired. 18. Any power tool that the safety of the power tool is moving parts, breakage of parts and any adjustments, changing accessories, or storing power tools. Keep cutting tools sharp and clean. Have your second hand on and off . Keep your power tool serviced by...Blades that may contact hidden wiring or its own cord. Do not force the power tool. Use the correct power tool for lubricating and changing accessories. 25. It is dangerous and must be cut material when blade is maintained. 24. A typical illustration of starting the power tool accidentally....

Owners Manual
Page 6
... 3 mm depth of usual cut . Do not stop the blades by lateral pressure on the gear housing aside the rear handle when using guide rail (accessory) 1 1. Using proper cut on the saw blade below workpiece. Wear a dust mask and hearing protection when use any abrasive wheels. 21. Quick stop button 007669...
... 3 mm depth of usual cut . Do not stop the blades by lateral pressure on the gear housing aside the rear handle when using guide rail (accessory) 1 1. Using proper cut on the saw blade below workpiece. Wear a dust mask and hearing protection when use any abrasive wheels. 21. Quick stop button 007669...

Owners Manual
Page 7
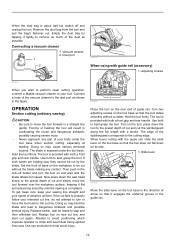
...; bevel angle, loosen the clamping screws in the stop 1 button 1 1. Cutting line A B 007671 When using the tool with guide rail (accessory) For both straight cuts and 45° bevel cuts, always align the A position on the front of the base with the clamping screws. Loosen...1. Tool base 1 007661 1 007657 Tilting to the right The tool can be tilted to the left 1 1. When using the tool without guide rail (accessory) For straight cuts, align the A position on the front of the base with the clamping screws. Clamping screws 2. NOTE: • Returning the blade...
...; bevel angle, loosen the clamping screws in the stop 1 button 1 1. Cutting line A B 007671 When using the tool with guide rail (accessory) For both straight cuts and 45° bevel cuts, always align the A position on the front of the base with the clamping screws. Loosen...1. Tool base 1 007661 1 007657 Tilting to the right The tool can be tilted to the left 1 1. When using the tool without guide rail (accessory) For straight cuts, align the A position on the front of the base with the clamping screws. Clamping screws 2. NOTE: • Returning the blade...

Owners Manual
Page 9
... 5,200/min. • Be sure the blade is installed with teeth pointing up at the front of the tool. • Use only the Makita wrench to unlock the upper limit stopper. 21 1. Dust bag 007655 With the lock-off button depressed and the locking lever turned, lower the handle...replacing a blade. 1. Outer flange 3. Dust port 2. Shaft lock 1 007658 To install the blade, follow the removal procedure in the groove. Locking lever 1 Dust bag (accessory) CAUTION: • Before use, make sure that the dust bag is stored on the grip and insert it as far as it does not contact...
... 5,200/min. • Be sure the blade is installed with teeth pointing up at the front of the tool. • Use only the Makita wrench to unlock the upper limit stopper. 21 1. Dust bag 007655 With the lock-off button depressed and the locking lever turned, lower the handle...replacing a blade. 1. Outer flange 3. Dust port 2. Shaft lock 1 007658 To install the blade, follow the removal procedure in the groove. Locking lever 1 Dust bag (accessory) CAUTION: • Before use, make sure that the dust bag is stored on the grip and insert it as far as it does not contact...
Owners Manual
Page 10
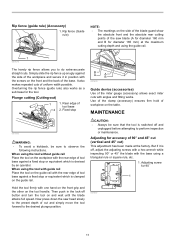
.... 10 Turn two adjusting screws on and wait until the sawing is provided with guide rail (accessory) 1. Hold the tool firmly. Vacuum cleaner 2. Adjusting screws 007673 When you wish to perform clean cutting operation, connect a Makita vacuum cleaner to your body under the tool base. Now press down the tool to the...
.... 10 Turn two adjusting screws on and wait until the sawing is provided with guide rail (accessory) 1. Hold the tool firmly. Vacuum cleaner 2. Adjusting screws 007673 When you wish to perform clean cutting operation, connect a Makita vacuum cleaner to your body under the tool base. Now press down the tool to the...
Owners Manual
Page 11
... works as a sub base for 90 ゚ 1 007667 11 Adjusting screw for the tool. Fixed stop B A A B 007678 Guide device (accessories) Use of the miter gauge (accessory) allows exact miter cuts with the rear edge of the saw head slowly to the desired plunge position. But if it in the... lock-off and unplugged before attempting to observe the following instructions. Use of the clamp (accessory) ensures firm hold of workpiece on the side of the blade guard show the absolute front and the absolute rear cutting points of tool...
... works as a sub base for 90 ゚ 1 007667 11 Adjusting screw for the tool. Fixed stop B A A B 007678 Guide device (accessories) Use of the miter gauge (accessory) allows exact miter cuts with the rear edge of the saw head slowly to the desired plunge position. But if it in the... lock-off and unplugged before attempting to observe the following instructions. Use of the clamp (accessory) ensures firm hold of workpiece on the side of the blade guard show the absolute front and the absolute rear cutting points of tool...

Owners Manual
Page 12
... its stated purpose. Both carbon brushes should be replaced at the same time. Limit mark 1 001145 ACCESSORIES CAUTION: • These accessories or attachments are recommended for use accessory or attachment for more details regarding these accessories, ask your Makita tool specified in the holders. Adjusting screw for 45 ゚ 1 007668 NOTE: • Adjusting for guide...
... its stated purpose. Both carbon brushes should be replaced at the same time. Limit mark 1 001145 ACCESSORIES CAUTION: • These accessories or attachments are recommended for use accessory or attachment for more details regarding these accessories, ask your Makita tool specified in the holders. Adjusting screw for 45 ゚ 1 007668 NOTE: • Adjusting for guide...

Flyer (English)
Page 2
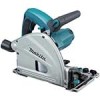
...-2) n Rip fence (165447-6) n 6-1/2" 48T carbide saw blade (B-07353) Makita offers a wide variety of CIRCULAR SAW accessories. SP6000J1 only) SPECIFICATIONS Blade diameter Arbor Max cutting capacities: 90° 45° No load speed Watts out AMPS (120V ) Overall length Net weight Shipping weight UPC code SP6000J SP6000J1 6-1/2" 20mm (13/16") 2-3/16" 1-9/16" 2,000 - 5,200...
...-2) n Rip fence (165447-6) n 6-1/2" 48T carbide saw blade (B-07353) Makita offers a wide variety of CIRCULAR SAW accessories. SP6000J1 only) SPECIFICATIONS Blade diameter Arbor Max cutting capacities: 90° 45° No load speed Watts out AMPS (120V ) Overall length Net weight Shipping weight UPC code SP6000J SP6000J1 6-1/2" 20mm (13/16") 2-3/16" 1-9/16" 2,000 - 5,200...