Owners Manual
Page 3
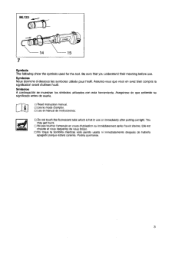
... out light. Sfmbolos A continuacion se muestran 10s simbolos utilizados con esta herramienta.Asegurese de que entiende su significado antes de usarla. 0 Read instruction manual. 0Lire le mode d'emploi. 0 Lea el manual de instrucciones I 'outil. ON0 toque la bombilla mientras este siendo usada ni inmediatamente despues de haberla apagado porque estara caliente. Symboles Nous...
... out light. Sfmbolos A continuacion se muestran 10s simbolos utilizados con esta herramienta.Asegurese de que entiende su significado antes de usarla. 0 Read instruction manual. 0Lire le mode d'emploi. 0 Lea el manual de instrucciones I 'outil. ON0 toque la bombilla mientras este siendo usada ni inmediatamente despues de haberla apagado porque estara caliente. Symboles Nous...
Owners Manual
Page 4
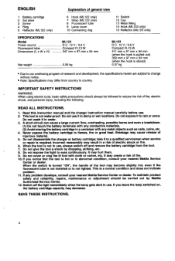
...be followed to a qualified servicemanwhen service or repair is not in use, always switch off the light immedlatelywhen the lamp gets dark in a risk of electric shock or fire. 6. Read this instruction manual and the charger instruction manual carefully before use it to reduce... general view 1 Battery cartridge 2 Set plate 3 Screw 4 Ring 5 Reflector (ML122 only) 6 Hook (ML122 only) 7 Strap (ML122 only) 8 Fluorescent tube 9 Lamp cover 10 Connecting ring 11 Switch 12 Cap 13 Metal fitting 14 Hook (ML123 only) 15 Reflector (ML123 only) SPECIFICATIONS Model ML122 Power source D.C. 12 V ...
...be followed to a qualified servicemanwhen service or repair is not in use, always switch off the light immedlatelywhen the lamp gets dark in a risk of electric shock or fire. 6. Read this instruction manual and the charger instruction manual carefully before use it to reduce... general view 1 Battery cartridge 2 Set plate 3 Screw 4 Ring 5 Reflector (ML122 only) 6 Hook (ML122 only) 7 Strap (ML122 only) 8 Fluorescent tube 9 Lamp cover 10 Connecting ring 11 Switch 12 Cap 13 Metal fitting 14 Hook (ML123 only) 15 Reflector (ML123 only) SPECIFICATIONS Model ML122 Power source D.C. 12 V ...
Owners Manual
Page 5
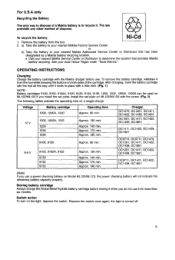
... sides of a Makita battery is turned off 5 OPERATING INSTRUCTIONS Charging Charge the battery cartridge with a little click. (Fig. 1) NOTE: Battery cartridges 9100, 9102, 9102A, 9120, 9122, 9133, 9135, 1200, 1202, 1200A, 1202A can be used on Model ML122/ML123. Approx. 130 ... charge the Nickel Metal Hydridebatterycartridge beforestoring it for more than six months. Call your nearest Makita Authorized Service Center or Distributor that provides Makita battery recycling. Install the set plate. Switch action To turn on a single charge. To remove the battery cartridge, ...
... sides of a Makita battery is turned off 5 OPERATING INSTRUCTIONS Charging Charge the battery cartridge with a little click. (Fig. 1) NOTE: Battery cartridges 9100, 9102, 9102A, 9120, 9122, 9133, 9135, 1200, 1202, 1200A, 1202A can be used on Model ML122/ML123. Approx. 130 ... charge the Nickel Metal Hydridebatterycartridge beforestoring it for more than six months. Call your nearest Makita Authorized Service Center or Distributor that provides Makita battery recycling. Install the set plate. Switch action To turn on a single charge. To remove the battery cartridge, ...
Owners Manual
Page 6
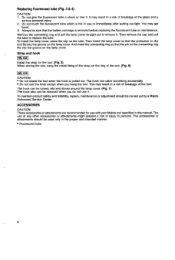
... tube to remove it. To install the lamp cover, place the cap on the lamp cover. Strap and hook Install the strap on the tool....when you do not use it . To maintainproduct safety and reliability, repairs, maintenanceor adjustmentshould be used only in a risk of breakage of injury ...manual.The use or immediately after putting out light. Then insert the lamp cover so that the protrusion on the tool fits into the groove on the tube. The hook can be removed when you hang the tool. The accessories or attachments should be carriedout by a Makita Authorized Service Center. Replacing...
... tube to remove it. To install the lamp cover, place the cap on the lamp cover. Strap and hook Install the strap on the tool....when you do not use it . To maintainproduct safety and reliability, repairs, maintenanceor adjustmentshould be used only in a risk of breakage of injury ...manual.The use or immediately after putting out light. Then insert the lamp cover so that the protrusion on the tool fits into the groove on the tube. The hook can be removed when you hang the tool. The accessories or attachments should be carriedout by a Makita Authorized Service Center. Replacing...
Parts Breakdown
Page 2
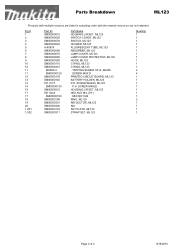
... SM00000030 SM00000040 A-90978 SM00000060 SM00000070 SM00000080 SM00000300 SM00000110 SM00000315 265868-3 SM00000120 SM00000130 SM00000140 911137-7 SM00000150 SM00000010 931102-0 SM00000180 SM00000190 SM00000301 SM00000320 SM00000170 SM00000311 Part Name HOUSING L/R SET, ML123 SWITCH COVER, ML123 SWITCH, ML123 HOLDER, ML123 FLUORESCENT TUBE, ML123 ABSORBER, ML123 LAMP COVER, ML123 LAMP COVER PROTECTOR, ML123 HOOK, ML123 C RING, ML123 C RING, ML143 TAPPING SCREW 3X12, ML900 SCREW M3X12 PRINTED CIRCUIT BOARD...
... SM00000030 SM00000040 A-90978 SM00000060 SM00000070 SM00000080 SM00000300 SM00000110 SM00000315 265868-3 SM00000120 SM00000130 SM00000140 911137-7 SM00000150 SM00000010 931102-0 SM00000180 SM00000190 SM00000301 SM00000320 SM00000170 SM00000311 Part Name HOUSING L/R SET, ML123 SWITCH COVER, ML123 SWITCH, ML123 HOLDER, ML123 FLUORESCENT TUBE, ML123 ABSORBER, ML123 LAMP COVER, ML123 LAMP COVER PROTECTOR, ML123 HOOK, ML123 C RING, ML123 C RING, ML143 TAPPING SCREW 3X12, ML900 SCREW M3X12 PRINTED CIRCUIT BOARD...