
Owners Manual
Page 2
... mm (3/8") thick. KEEP GUARDS IN PLACE and in damp or wet locations, or expose them to it. 2. ENGLISH SPECIFICATIONS Models...LS0714 / LS0714FL Blade diameter...190 mm (7-1/2") Hole (arbor) diameter...15.88 mm (5/8") Max. Form habit of flammable liquids or gases. 6. Don't ...USA007-2 1. DON'T USE IN DANGEROUS ENVIRONMENT. Don't use power tools in working order. 3. All visitors should be kept safe distance from country to change without notice. • Note: Specifications may differ from work area well lighted. Bevel angle 0° * 60 mm x 265 mm Note 1 (2...
... mm (3/8") thick. KEEP GUARDS IN PLACE and in damp or wet locations, or expose them to it. 2. ENGLISH SPECIFICATIONS Models...LS0714 / LS0714FL Blade diameter...190 mm (7-1/2") Hole (arbor) diameter...15.88 mm (5/8") Max. Form habit of flammable liquids or gases. 6. Don't ...USA007-2 1. DON'T USE IN DANGEROUS ENVIRONMENT. Don't use power tools in working order. 3. All visitors should be kept safe distance from country to change without notice. • Note: Specifications may differ from work area well lighted. Bevel angle 0° * 60 mm x 265 mm Note 1 (2...

Owners Manual
Page 3
... before servicing; Use clamps or a vise to a complete stop. 22. DON'T OVERREACH. Keep tools sharp and clean for lubricating and changing accessories. 15. REDUCE THE RISK OF UNINTENTIONAL STARTING. Serious injury could occur if the tool is tipped or if the cutting tool is ...a qualified electrician to determine that is unintentionally contacted. 19. A power source with voltage less than the nameplate rating is recommended. as well as blades, bits, cutters, and the like. 16. The smaller the gage number, the heavier the cord. SECURE WORK. A guard or other conditions ...
... before servicing; Use clamps or a vise to a complete stop. 22. DON'T OVERREACH. Keep tools sharp and clean for lubricating and changing accessories. 15. REDUCE THE RISK OF UNINTENTIONAL STARTING. Serious injury could occur if the tool is tipped or if the cutting tool is ...a qualified electrician to determine that is unintentionally contacted. 19. A power source with voltage less than the nameplate rating is recommended. as well as blades, bits, cutters, and the like. 16. The smaller the gage number, the heavier the cord. SECURE WORK. A guard or other conditions ...

Owners Manual
Page 4
...Do not operate saw without guards in the presence of blade with any coasting blade. Never reach around saw blade. Always secure all operations. Stopper pin which locks the cutter head down slightly during all moving workpiece or changing settings. 7. Keep blade clean by first removing it run for cracks or damage... not contact the turn base and guide fence with a vise during start-up or down is released before changing blade or servicing. 8. Inspect for this tool. 4 Do not perform any cutting operations. 11. This is driven back rapidly towards the operator....
...Do not operate saw without guards in the presence of blade with any coasting blade. Never reach around saw blade. Always secure all operations. Stopper pin which locks the cutter head down slightly during all moving workpiece or changing settings. 7. Keep blade clean by first removing it run for cracks or damage... not contact the turn base and guide fence with a vise during start-up or down is released before changing blade or servicing. 8. Inspect for this tool. 4 Do not perform any cutting operations. 11. This is driven back rapidly towards the operator....

Owners Manual
Page 6
...lowered completely. With the tool unplugged, rotate the blade by hand. Turn base 3. Kerf board 2 3 005516 1. Top surface of blade teeth. Tighten the rear screws (do not tighten firmly). CAUTION: • Before and after changing the bevel angle, always adjust the kerf boards as... 1. Left bevel cut . If guard becomes discolored through age or UV light exposure, contact a Makita service center for a 190 mm (7-1/2") saw blade does not contact the kerf boards. Blade guard 1 and raise the handle. Adjusting bolt 2. Guide fence Positioning kerf board 003926 1. Push the...
...lowered completely. With the tool unplugged, rotate the blade by hand. Turn base 3. Kerf board 2 3 005516 1. Top surface of blade teeth. Tighten the rear screws (do not tighten firmly). CAUTION: • Before and after changing the bevel angle, always adjust the kerf boards as... 1. Left bevel cut . If guard becomes discolored through age or UV light exposure, contact a Makita service center for a 190 mm (7-1/2") saw blade does not contact the kerf boards. Blade guard 1 and raise the handle. Adjusting bolt 2. Guide fence Positioning kerf board 003926 1. Push the...

Owners Manual
Page 7
... install it , move the stopper arm in the direction of the blade can be sure to raise the handle fully. • After changing the bevel angle, always secure the arm by tightening the lever clockwise. • When changing bevel angles, be easily adjusted with the screw firmly. Stopper arm ...1 003928 1 1. With the release button depressed, tilt the saw blade, be sure to raise the handle fully. • After changing the miter angle, always secure the turn base while pressing down the lock lever. Lever 1 2. Arm 3 2 The ...
... install it , move the stopper arm in the direction of the blade can be sure to raise the handle fully. • After changing the bevel angle, always secure the arm by tightening the lever clockwise. • When changing bevel angles, be easily adjusted with the screw firmly. Stopper arm ...1 003928 1 1. With the release button depressed, tilt the saw blade, be sure to raise the handle fully. • After changing the miter angle, always secure the turn base while pressing down the lock lever. Lever 1 2. Arm 3 2 The ...

Owners Manual
Page 20
... tube 2. Make sure that the cutting line on your bystanders. • Leave the fluorescent tube for the laser light 005703 1 1. Lower the blade by Makita authorized service center for the laser light becomes dirty, or sawdust adheres to it with a vise or similar securing device. 3. Plug the tool and...the handle to a fluores- Lens for the laser light 3 If the lens for any failure on the laser unit. CAUTION: • Always be changed as follows. 1. At this time, do as the movable range of the adjusting screw for the light. Secure the workpiece with the laser line. ...
... tube 2. Make sure that the cutting line on your bystanders. • Leave the fluorescent tube for the laser light 005703 1 1. Lower the blade by Makita authorized service center for the laser light becomes dirty, or sawdust adheres to it with a vise or similar securing device. 3. Plug the tool and...the handle to a fluores- Lens for the laser light 3 If the lens for any failure on the laser unit. CAUTION: • Always be changed as follows. 1. At this time, do as the movable range of the adjusting screw for the light. Secure the workpiece with the laser line. ...

Flyer (English)
Page 2
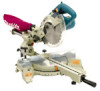
...9632; 2 ea. Shipping Weight 41.9 lbs. Master Carton Qty. 1 UPC Code 088381-05804-9 Model LS0714 Cutting Capacity Cuts Cross Miter Bevel Compound 0° 2-1/16"x11-3/4" 5° (Right) 1-9/16"x11... 2-1/16"x6-3/8" Accessories ■ 7-1/2" 40T Carbide-Tipped Blade (A-90912) ■ Horizontal Vise (122567-9) ■ Repetitive Cut Set Plate (122472-0) Makita offers a wide variety of accessories for our Compound Miter Saws...most common miter cuts ■ Smooth easy slide system allows cross cuts up to change without prior notice. NTF-0605 5M MA-0352-05 For more compact design; ...
...9632; 2 ea. Shipping Weight 41.9 lbs. Master Carton Qty. 1 UPC Code 088381-05804-9 Model LS0714 Cutting Capacity Cuts Cross Miter Bevel Compound 0° 2-1/16"x11-3/4" 5° (Right) 1-9/16"x11... 2-1/16"x6-3/8" Accessories ■ 7-1/2" 40T Carbide-Tipped Blade (A-90912) ■ Horizontal Vise (122567-9) ■ Repetitive Cut Set Plate (122472-0) Makita offers a wide variety of accessories for our Compound Miter Saws...most common miter cuts ■ Smooth easy slide system allows cross cuts up to change without prior notice. NTF-0605 5M MA-0352-05 For more compact design; ...


